
Categorías populares
¿Buscas un hilo?



























Comentarios / Preguntas (164)
 Danuta escribió:
Kończy się schemat M2. Jak robić dalej schemat M3 ? Obciąć nitkę i zacząć M3 czy przęjść oczkami ścisłymi do M3 ? Jak w schemacie M3 przerabiać początek rzędów aby były skosy ?
29.07.2024 - 21:25DROPS Design respondió:
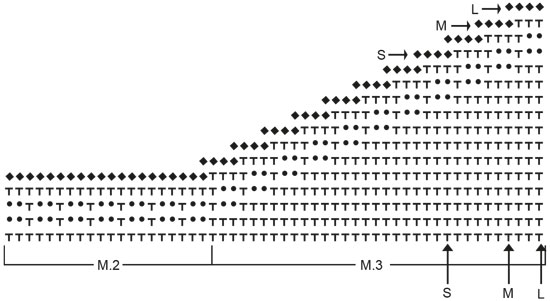
Witaj Danusiu, należy przejść oczkami ścisłymi do schematu M3. Tak samo będziesz robić w kolejnych rzędach, co utworzy skosy. Pozdrawiamy!
02.08.2024 - 08:27
 Marie Josephe Scherer escribió:
Avez vous l'explication en français? Je vous remercie par avance. Marie Jo
08.06.2024 - 08:38DROPS Design respondió:
Bonjour Mme Scherer, tous nos modèles sont disponibles en français, pour changer de langue, cliquez simplement sur le menu déroulant à côté de l'imprimante; vous trouverez ainsi les explications en français (ici pour celui-ci.) Bon crochet!
10.06.2024 - 07:54
 Leonoor escribió:
Heyy ik heb nog een vraagje, bij de nek als je het aan het haken bent en je moet minderen moet je dan het touw afknippen en aan de andere kant door haken? Of moet je het door 2 splitsen en het na afloop er los op naaien? Groetjes Leonoor!
30.05.2024 - 16:22DROPS Design respondió:
Dag Leonoor,
Je kunt inderdaad eerst de ene helft van de hals haken en dan de andere helft.
30.05.2024 - 19:04
Leonoor escribió:
What do you do at the sides of the bodypiece? Like everytime you turn your work at pattern 1, cause I can't find it in the pattern and in the photo I can't see it clear enough.
27.05.2024 - 18:05DROPS Design respondió:
Dear Leonoor, as for what to do at the edge, when turning the piece please see the pattern, that says: "Crochet tip: To turn piece work as follows: 2 ch replace 1 tr and 1 ch replaces 1 dc.", so after turning if you start a row with trebles (UK terms) start the row with three chain stitch, when doing dc (UK term), start the row with 2 chain stitch. Happy Crafting!
27.05.2024 - 19:45
 Kristina escribió:
Hej kan man få mönstret på svenska, jag har köpt mönstren men det är på Norska?
19.05.2024 - 13:28
Åsa escribió:
Jag förstår inte hur jag gör trianglarna. Virkar jag en triangel åt gången? Tack för otroligt fina mönster.
01.04.2024 - 09:06DROPS Design respondió:
Hej Åsa, forstår ikke rigtig hvilke triangler du mener... alle former er tegnet ind i diagrammerne :)
05.04.2024 - 12:20
 Bente Sundsdal escribió:
Hei, ang. M.1: hvordan kan man starte og avslutte en rad med en luftmaske, d går rett og slett ikke.. eller skal man trekke disse luftmaskene ut med hempene til slutt… veldig fin topp men jeg forstår ingenting av start og avslutning på M1. Håper på en oppklaring for jeg har lyst å hekle denne :)
10.02.2024 - 10:16DROPS Design respondió:
Hej Bente, jo, du har 2 luftmasker imellem hver st på hele 2. række i M.1
22.02.2024 - 11:00
 Kathy Dean escribió:
Thank you for taking the time to reply. Forgive my long winded question. After deciding "never to give up", I worked the pattern from the picture of the top instead of the chart. Not sure why this chart got me confused. Nevertheless, I thank you for these beautiful patterns that are freely available. A challenge is always good. Wishing you everything of the best.
31.10.2023 - 12:53
 Kathy Dean escribió:
Dear Drops team. Does 17 on chart M1 represent 17 rounds? I count only 16? Should there be 5 rounds (with filet blocks to form bottom part of diamond and to the middle of the diamond shape ) and not 4? When I count the rows/rounds of the filet blocks in the picture of the top, I count five (that round has the 3 filet block repeat) middle /bottom half of diamond. Count the chart from (R) 5 - 8 (3 filet block rep) that is only 4? Please correct me if I'm wrong. Thank you
28.10.2023 - 07:20DROPS Design respondió:
Dear Mrs Dean, diagram M.1 should be 16 rows, the number has now been edited, thanks for noticing. Read every row from RS from the right towards the left and every row from WS from the left towards the right. Then sorry, I don't understand your question, could you try to reword? Thanks for your comprehension.
30.10.2023 - 15:50
Kathy Dean escribió:
Thanks for replying. Do you repeat the 24 stitches for each round for M 1? Our wool supplier does not offer such a service. Thank you
27.10.2023 - 14:11DROPS Design respondió:
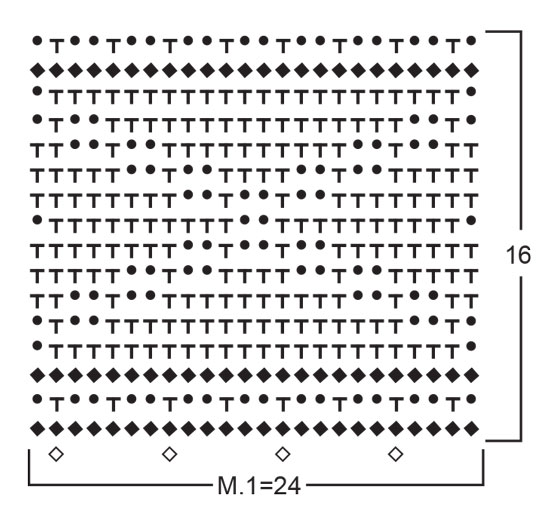
Dear Mrs Dean, when working M.1 you work in rows, not in the round, and repeat the 24 sts of diagram over the 168 sts (7 times in total in width). From RS read diagram from the right towards the left (starting on bottom corner on the right side) and from WS read diagram from the left towards the right. Happy knitting!
28.10.2023 - 08:37
|
|||||||||||||
Sidney |
|||||||||||||
 |
 |
||||||||||||
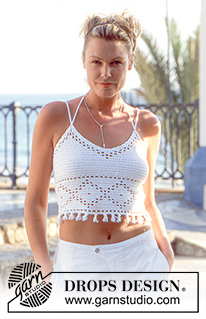
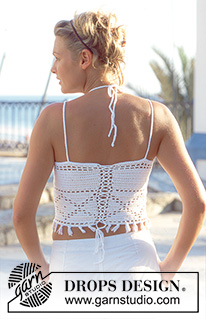
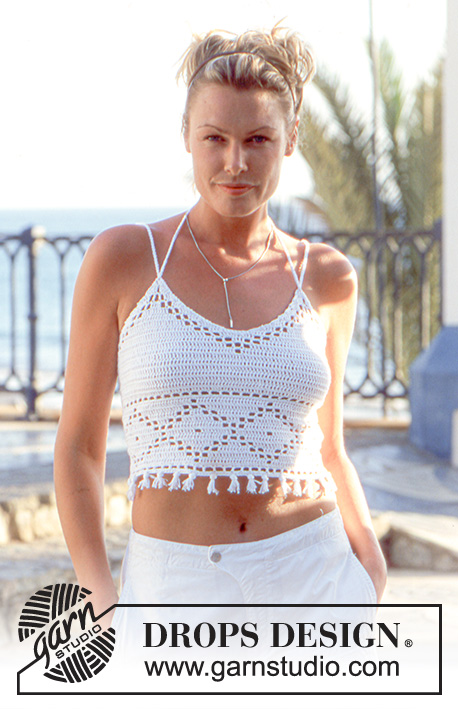
Top DROPS a ganchillo en Safran.
DROPS 69-1 |
|||||||||||||
|
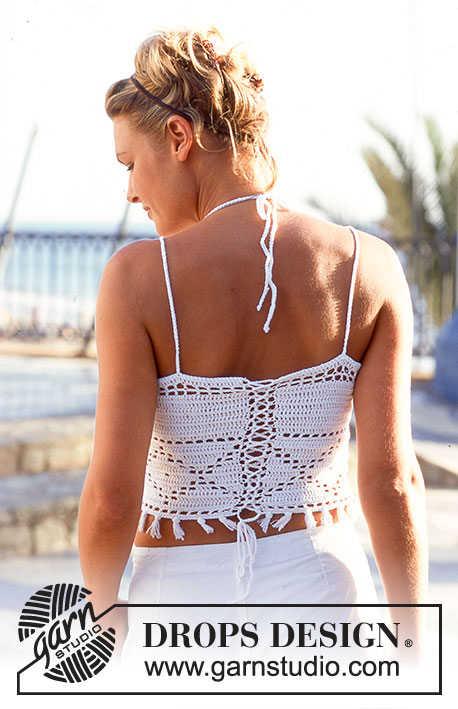
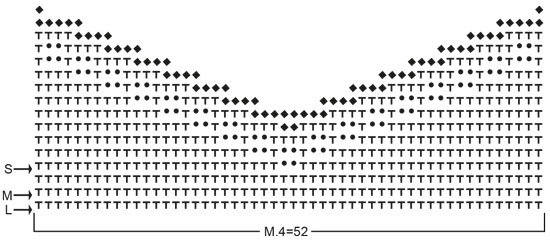
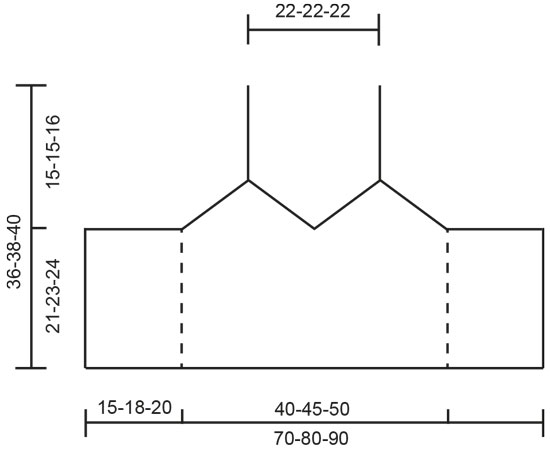
TENSIÓN DE LA MUESTRA : 24 p.a. x 12 filas del patrón con las ag de ganchillo del tamaño más pequeño = 10 x 10 cm PATRÓN: Ver los diagramas. Diagramas del Patrón 1 y el Patrón 2 = 1 repetición. Los diagramas del Patrón 3 y del Patrón 4 tienen flechas para cada talla. TIP PARA LA REALIZACIÓN DEL TRABAJO: Para girar en cada fila trabajar como sigue: sustituir 1 p.a. por 2 p.de cad y 1 p.b. por 1 p.de cad. -------------------------------------------------------- TOP: Trabajar 169-193-217 p.de cad con el ganchillo de tamaño más pequeño. Girar y trabajar el Patrón 1 - ver TIP PARA LA REALIZACIÓN DEL TRABAJO = 168-192-216 pts. Después del Patrón 1 continuar con p.a. sobre todos los pts, pero: Para las tallas S y M: aum 4 pts repartidos en la 1ª fila después del Patrón 1. Para la talla L: dism 2 pts repartidos en la 1ª fila después del Patrón 1. = 172-196-214 pts. Ahora hay un total de 22-24-25 filas trabajadas (incl el Patrón 1) y la labor mide aprox 18-20-21 cm Continuar como sigue: Trabajar el Patrón 2 - comenzar en el borde inferior del lado izquierdo del diagrama y trabajar hacia el lado derecho - sobre 36-42-48 pts, después el Patrón 3 que se comienza en el borde inferior del lado izquierdo del diagrama y se trabaja hacia el lado derecho - sobre 24-30-33 pts, posteriormente el Patrón 4 (52-52-52 pts), después el Patrón 3 - comenzar en el borde inferior del lado derecho del diagrama según la talla y trabajar hacia el lado izquierdo - sobre 24-30-33 pts, el Patrón 2, comenzar en el borde inferior del lado derecho del diagrama y trabajar hacia el lado izquierdo - sobre los últimos 36-42-48 pts. Continuar con el patrón de esta manera. Después de 5 filas el Patrón 2 está terminado - continuar con el Patrón 3 y el Patrón 4 hasta completar el diagrama. TERMINACIÓN: TIRANTES: comenzar a aprox 9 cm del borde superior en el lado derecho de la labor (= en la espalda). Hacer una cadeneta de aprox 90 cm de largo con doble hilo y la ag de ganchillo del tamaño más grande. Pasar por la punta superior del delantero. Repetir en el otro lado. El largo de la tira se ajusta cuando se ata en la espalda en la parte posterior del cuello. CIERRE: Trabajar ojales a lo largo de cada lado de la pieza (centro de la espalda). Comenzar en la parte superior y trabajar como sigue: * 1 p.b., 3 p.de cad., saltar 1 cm*, repetir de * a * hasta finalizar en la parte inferior. Hacer una cadeneta de aprox 150 cm de largo. Pasarla por los ojales - comenzar en la parte superior y cruzar hacia abajo, atar abajo. FLECOS: 1 fleco = 4 hilos de 8 cm de largo, doblar los hilos y pasar el bucle por la primera fila en el borde inferior, pasar los extremos de los hilos por el bucle - ver el Patrón 1. Trabajar 28-32-36 flecos. |
|||||||||||||
Explicaciones del diagrama |
|||||||||||||
|
|||||||||||||
 |
|||||||||||||
 |
|||||||||||||
 |
|||||||||||||
 |
|||||||||||||
¿Terminaste este patrón?Entonces, etiqueta tus fotos con #dropspattern o envíalas a la galería #dropsfan. ¿Necesitas ayuda con este patrón?Encontrarás 8 videos tutoriales, un espacio para comentarios/preguntas y más visitando la página del patrón en garnstudio.com © 1982-2026 DROPS Design A/S. Todos los derechos reservados. Este documento, incluyendo todas sus sub-secciones, está protegido por los derechos de autor (copyright). Lee más acerca de lo que puedes hacer con nuestros patrones en la parte de abajo de cada patrón de nuestro sitio. |
|||||||||||||






Con más de 40 años en el diseño de modelos de punto y de ganchillo, DROPS Design ofrece una de las más vastas colecciones de patrones gratuitos en el internet - traducidos en 17 idiomas. Al día de hoy, contamos con 333 catálogos y 12532 patrones - de los cuales 12026 están traducidos en español.
Nosotros trabajamos con mucho esmero para brindarte lo mejor que las labores de punto y ganchillo tienen para ofrecer,inspiración y consejos, así como hilos de magnífica calidad a precios increíbles! Te gustaría usar nuestros patrones para otro fin además del uso personal? Puedes leer acerca de lo que estás permitida a hacer en el texto de Copyright en la parte de abajo de todos nuestros patrones. Felices labores!
Escribe un comentario sobre DROPS 69-1
¡Nos encantaría saber qué piensas acerca de este patrón!
Si quieres escribir una pregunta referente al patrón, por favor asegúrate de elegir la categoría correcta en el formulario debajo, para acelerar el proceso de respuesta. Los campos obligatorios están marcados con un *.