
Categorías populares
¿Buscas un hilo?



























Comentarios / Preguntas (164)
 Christina escribió:
As soon as I posted my last comment/ question the answer appeared below my original question. It definitely wasnt there before cos I looked carefully. Anyway thank you.
28.09.2026 - 22:06
Christina escribió:
Please could someone answer my question from the 23/9 as it doesnt say which size hook to use for the loops. Is it a 3mm or a 5mm. Really this pattern is not at all clear.
28.09.2026 - 22:03DROPS Design respondió:
Hi Christina, We have answered your question and you should have been notified via e mail. If you look at the comments and answers at the bottom of the page, you will see our answer - you work the loops with a 5 mm hook. Regards, Drops Team.
29.09.2026 - 06:12
Christina escribió:
I'm about to crochet the loops but it doesnt say what size hook to use. Is it the 3mm or 5mm hook. I take it that I use a 5mm for the ties in chain stitch as I did for the ties at the neck/shoulder.
23.09.2026 - 22:45DROPS Design respondió:
Hi Christina, Yes, the loops are worked using crochet hook size 5 mm. Regards, Drops Team.
24.09.2026 - 07:29
Christina escribió:
Ok, thanks. I just did slip stitches at the beginning of M2 to get to M3 and also slip stitches at each beginning row of M3 to decrease and for each new shorter row.Your previous reply on 10/9 said to turn when I have done M3. But then when should I do M4? I went straight from M3 to crochet halfway across M4 to the central point and then turned and went crocheted back across M4 and M3. I couldnt see any other way to do it.
23.09.2026 - 22:41
Christina escribió:
Ok, I'll work dble crochet AGAIN along the top of M2 to get to the start of M3 but this will be row 6 of M2. Why doesnt it show this on the graph? But then you say to turn after M3. Dont I have to work M4 after M3 to get to the halfway point. None of this makes any sense to me!
13.09.2026 - 01:17DROPS Design respondió:
Dear Christina, we don't show it in the chart because you can simply cut the thread and rejoin it in M.3. Otherwise, you could also work slip stitches, to avoid cutting the thread but still stitches small enough that it won't look as if M.2 has a 6th row. The M.3 after this first M.2 is worked as before; however, there is an M.3 which is worked before M.2, at the end of the row, previously. For this M.3, instead of working slip stitches, you simply turn the piece and leave unworked the stitches in the final M.2 (as opposed to the initial M.2, which was explained above). Happy crochetting!
14.09.2026 - 00:06
Christina escribió:
Thanks for your reply but I still dont understand. Im at ghe end of row5 so if I work a double crochet in each M2 stitch now, then I will have two rows of double crochet instead of one as shown on the pattern. It clearly says in the instructions that M2 has only 5 rows. How do I get to the start of M3 without doing another M2 row? There's nothing to say in the instructions.
09.09.2026 - 22:18DROPS Design respondió:
Dear Christina, at the beginning of the row you work M.2 = 1 dc in each st to the beg of M.3, then when you have done M.3, just turn leaving the last stitches M.2 unworked at the end of the row and continue with M.3 as shown in the diagram. Happy crocheting!
10.09.2026 - 09:45
Christina escribió:
I dont want to break and rejoin the yarn as that's a bit messy but the pattern doesn't show to do any slip stitches to make my way from the end of M2 to the beginning of row 6 of M3.
08.09.2026 - 01:18
Christina escribió:
I dont want to break and rejoin the yarn as that's a bit messy but the pattern doesn't show to do any slip stitches to make my way from the end of M2 to the beginning of row 6 of M3.
07.09.2026 - 22:52
Christina escribió:
Sorry didnt mean to send it twice. I thought it hadnt been sent
07.09.2026 - 22:49
Christina escribió:
I'm at the end of row 5 of M2. How to I get to the beginning of row 6 of M3 and M4? Do I have to break off the yarn and retie each time or can I slip stitch until I get to the start of M3? Also what do I do when I reach the middle of M4? Do I turn and work back and forth over that half and then crochet the other half separately.
07.09.2026 - 22:44DROPS Design respondió:
Dear Christina, work 1 double crochet (UK crochet terminology - see 2nd symbol under diagram text) in each stitch in M.2 to M.3 - when you reach the middle of M.4 you will finish each part separately, without breaking yarn just work one side to the end then join yarn again to finish the 2nd side. Happy crocheting!
08.09.2026 - 09:24
|
|||||||||||||
Sidney |
|||||||||||||
 |
 |
||||||||||||
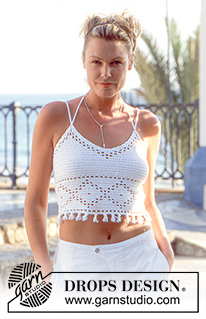
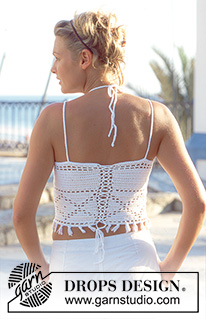
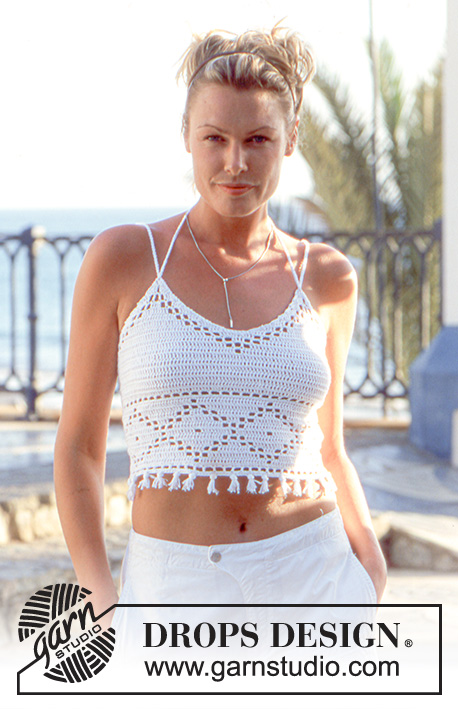
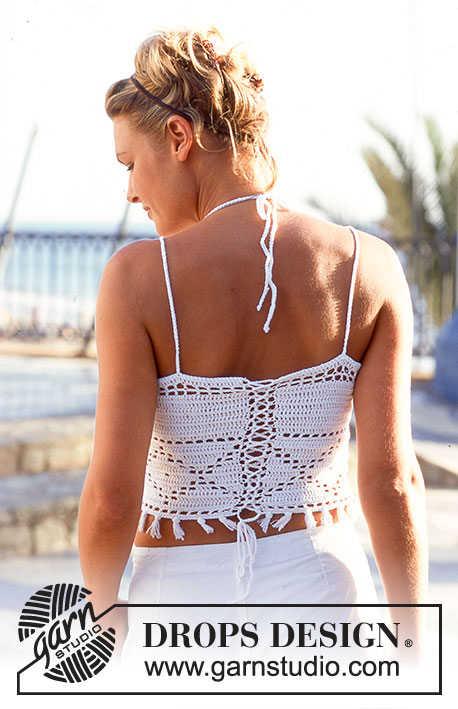
Top DROPS a ganchillo en Safran.
DROPS 69-1 |
|||||||||||||
|
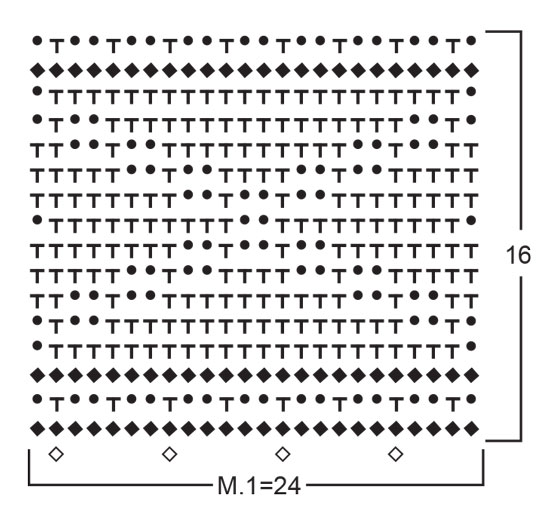
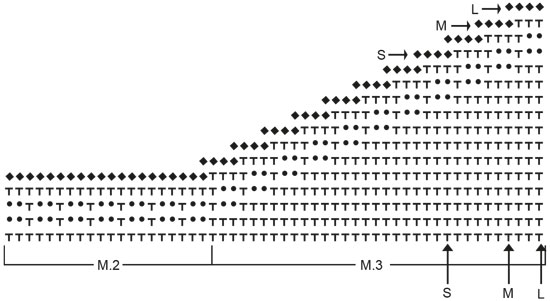
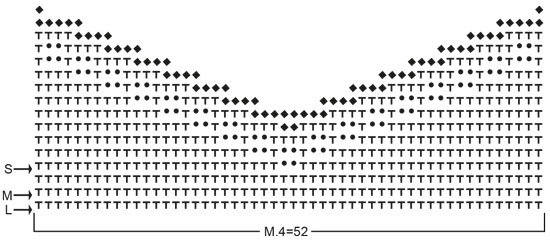
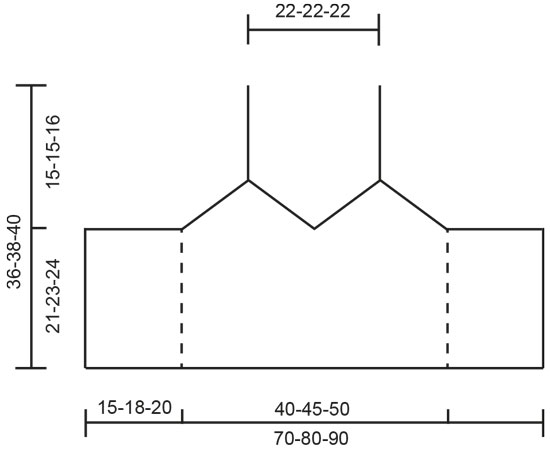
TENSIÓN DE LA MUESTRA : 24 p.a. x 12 filas del patrón con las ag de ganchillo del tamaño más pequeño = 10 x 10 cm PATRÓN: Ver los diagramas. Diagramas del Patrón 1 y el Patrón 2 = 1 repetición. Los diagramas del Patrón 3 y del Patrón 4 tienen flechas para cada talla. TIP PARA LA REALIZACIÓN DEL TRABAJO: Para girar en cada fila trabajar como sigue: sustituir 1 p.a. por 2 p.de cad y 1 p.b. por 1 p.de cad. -------------------------------------------------------- TOP: Trabajar 169-193-217 p.de cad con el ganchillo de tamaño más pequeño. Girar y trabajar el Patrón 1 - ver TIP PARA LA REALIZACIÓN DEL TRABAJO = 168-192-216 pts. Después del Patrón 1 continuar con p.a. sobre todos los pts, pero: Para las tallas S y M: aum 4 pts repartidos en la 1ª fila después del Patrón 1. Para la talla L: dism 2 pts repartidos en la 1ª fila después del Patrón 1. = 172-196-214 pts. Ahora hay un total de 22-24-25 filas trabajadas (incl el Patrón 1) y la labor mide aprox 18-20-21 cm Continuar como sigue: Trabajar el Patrón 2 - comenzar en el borde inferior del lado izquierdo del diagrama y trabajar hacia el lado derecho - sobre 36-42-48 pts, después el Patrón 3 que se comienza en el borde inferior del lado izquierdo del diagrama y se trabaja hacia el lado derecho - sobre 24-30-33 pts, posteriormente el Patrón 4 (52-52-52 pts), después el Patrón 3 - comenzar en el borde inferior del lado derecho del diagrama según la talla y trabajar hacia el lado izquierdo - sobre 24-30-33 pts, el Patrón 2, comenzar en el borde inferior del lado derecho del diagrama y trabajar hacia el lado izquierdo - sobre los últimos 36-42-48 pts. Continuar con el patrón de esta manera. Después de 5 filas el Patrón 2 está terminado - continuar con el Patrón 3 y el Patrón 4 hasta completar el diagrama. TERMINACIÓN: TIRANTES: comenzar a aprox 9 cm del borde superior en el lado derecho de la labor (= en la espalda). Hacer una cadeneta de aprox 90 cm de largo con doble hilo y la ag de ganchillo del tamaño más grande. Pasar por la punta superior del delantero. Repetir en el otro lado. El largo de la tira se ajusta cuando se ata en la espalda en la parte posterior del cuello. CIERRE: Trabajar ojales a lo largo de cada lado de la pieza (centro de la espalda). Comenzar en la parte superior y trabajar como sigue: * 1 p.b., 3 p.de cad., saltar 1 cm*, repetir de * a * hasta finalizar en la parte inferior. Hacer una cadeneta de aprox 150 cm de largo. Pasarla por los ojales - comenzar en la parte superior y cruzar hacia abajo, atar abajo. FLECOS: 1 fleco = 4 hilos de 8 cm de largo, doblar los hilos y pasar el bucle por la primera fila en el borde inferior, pasar los extremos de los hilos por el bucle - ver el Patrón 1. Trabajar 28-32-36 flecos. |
|||||||||||||
Explicaciones del diagrama |
|||||||||||||
|
|||||||||||||
 |
|||||||||||||
 |
|||||||||||||
 |
|||||||||||||
 |
|||||||||||||
¿Terminaste este patrón?Entonces, etiqueta tus fotos con #dropspattern o envíalas a la galería #dropsfan. ¿Necesitas ayuda con este patrón?Encontrarás 8 videos tutoriales, un espacio para comentarios/preguntas y más visitando la página del patrón en garnstudio.com © 1982-2026 DROPS Design A/S. Todos los derechos reservados. Este documento, incluyendo todas sus sub-secciones, está protegido por los derechos de autor (copyright). Lee más acerca de lo que puedes hacer con nuestros patrones en la parte de abajo de cada patrón de nuestro sitio. |
|||||||||||||






Con más de 40 años en el diseño de modelos de punto y de ganchillo, DROPS Design ofrece una de las más vastas colecciones de patrones gratuitos en el internet - traducidos en 17 idiomas. Al día de hoy, contamos con 333 catálogos y 12532 patrones - de los cuales 12026 están traducidos en español.
Nosotros trabajamos con mucho esmero para brindarte lo mejor que las labores de punto y ganchillo tienen para ofrecer,inspiración y consejos, así como hilos de magnífica calidad a precios increíbles! Te gustaría usar nuestros patrones para otro fin además del uso personal? Puedes leer acerca de lo que estás permitida a hacer en el texto de Copyright en la parte de abajo de todos nuestros patrones. Felices labores!
Escribe un comentario sobre DROPS 69-1
¡Nos encantaría saber qué piensas acerca de este patrón!
Si quieres escribir una pregunta referente al patrón, por favor asegúrate de elegir la categoría correcta en el formulario debajo, para acelerar el proceso de respuesta. Los campos obligatorios están marcados con un *.