
Categorías populares
¿Buscas un hilo?


Comentarios / Preguntas (107)
![]() Susanne Altenburg escribió:
Susanne Altenburg escribió:
Hallo hab mal eine Frage. Ich muss ja bei meiner Größe 74 lm für die Ärmel nehmen.aber die 12 luft maschen für die Verbindung zählen die dann später zu den 74 luftmachen ? Dann hätte ich ja wenn ich alles ein mal rum häkel dann ins gesamt 86 Stäbchen für die ärmel were es richtig? Gruß Frau Altenburg
22.02.2021 - 17:49DROPS Design respondió:
Liebe Frau Altenburg, ja so stimmt es, und dann bei der 1. Runde bei den Ärmeln häkeln Sie noch 2 Stäbchen dazu und zwar jet 1 Stäbchen um das Stäbchen der Stäbchen Reihe an der Stelle, wo die Luftmaschen unter den Arm gehäkelt werden (-= also beidseitig, vor den 12 und nach den 12) = 86 + 2 = 88 Stäbchen. Viel Spaß beim häkeln!
23.02.2021 - 09:34
![]() Cloudy escribió:
Cloudy escribió:
Hi there I’m up to the finishing touch on the sleeve edge. It says for size L to do the A2 diagram 11 times but then it says to do it once vertically. Can you please explain which it is.
16.12.2020 - 05:11DROPS Design respondió:
Dear Cloudy, you have 88 sts around sleeve edge and can repeat a total of 11 times the 8 stitches in A.2. After you have worked the 2 rows of A.2, diagram is finished (and has been worked one time in height = vertically). Edge is finished. Cut and fasten the yarn. Happy crocheting!
16.12.2020 - 07:10
![]() Erin escribió:
Erin escribió:
Hello! I am working on this in XXL and I am confused on the marker placement portion. I have (23+4+4+20+4+4+46+4+4+23+4+4=144) with each + being a marker, but I need 164 stitches? Any clarification provided would be much appreciated. Thank you!
15.10.2020 - 18:31DROPS Design respondió:
Dear Erin, it looks like you have forgotten 20 one time after the 46+4+4, ie: 23+4+4+20 +4+4+ 46 + 4+4+20+4+4+23=164. Happy crocheting!
16.10.2020 - 08:54
![]() Cloudy escribió:
Cloudy escribió:
The garment on the model looks fitted coming in at the waist and flaring out towards the hem. Another reader said hers looks like a dress and so does mine. Very disappointed in this pattern.
09.10.2020 - 03:16DROPS Design respondió:
Dear Cloudy, did you check and kept correct tension as explained in the pattern? remember to check your size with the measurement chart - read more about charts here. Happy crocheting!
09.10.2020 - 08:08
![]() Moira escribió:
Moira escribió:
One more thing that’s confusing. It says in A1 to work 1st-3rd rounds 40 times (XL) size and then 3rd round until work measures 33cm. It looks like the 1st round is only done once like a set up row, is that correct? If it is and the 3rd is repeated then why are there two instructions, to repeat 40 times and to repeat until work measures 33cm? One would assume that 1st and 3rd rounds are repeated 40 times just by the way it’s written.i must admit these patterns are not easy to work out.
08.10.2020 - 19:28DROPS Design respondió:
Dear Moira, you repeat 40 times A.1 in the round in size XL (= the row with the arrow 1 to the row with the 3. on the right side) - then after these 3 rows have been worked, you repeat row 3 until piece measures 33 cm, then work row/repeat 4. in A.1 until piece measures 45 cm. Happy crocheting!
09.10.2020 - 07:39
![]() Moira escribió:
Moira escribió:
Hi there, the A1 diagram does not make any sense in your explanation to a previous knitter. According to your abbreviations, the first row is a sc, then skip 2 and 4 ch, but the next sc is not in any particular dc from the previous row, it is in the middle of two dc. I don’t understand that. Then row 2 (which doesn’t say it’s row 2) starts off with a dc in the chain space. Can you please clarify as your diagram and abbreviations are very confusing.
08.10.2020 - 17:44DROPS Design respondió:
Dear Moira, you repeat the diagram in widht, ie (1 sc in next dc, 4 chains, skip 2 dc, 1 sc in next dc, 4 chains, skip 2 dc) and repeat from (to). Row 2 just starts wit 3 ch (see CROCHET INFO-1) ie crochet: 3 chains (= 1st dc), 3 dc+2ch+3dc in next ch-space, and repeat with 1 dc in next ch-space. If you like the first dc of 2nd row being in the middle of the first ch-space, you can crochet some sl st in the first ch-space. Happy crocheting!
09.10.2020 - 07:27
![]() Johanna escribió:
Johanna escribió:
Erg mooi patroon! Ik heb een vraag over de markeerders. Ik ben nu bij de toer gekomen waar ik aan elke kant van de markeerders moet meerderen, maar wat moet ik met de markeerders doen wanneer ik naar de volgende toer ga? Moet ik ze laten zitten en dan op dezelfde hoogte in de volgende goede kant weer meerderen, of neem ik ze steeds mee naar de volgende toer? ( het is de eerste keer dat ik een ronde pas haak...😅) Alvast bedankt!
29.09.2020 - 01:23DROPS Design respondió:
Dag Johanna,
Je kunt de markeerders inderdaad laten zitten en meenemen in de hoogte, zodat je weet waar je de volgende keer moet meerderen.
21.10.2020 - 12:20
![]() Debbie Zaayman escribió:
Debbie Zaayman escribió:
I have started with this pattern and have started the first four rows of the fan pattern. Can i please give you my email address and then you can forward me your email address. I want to send you a picture so you can see if looks right before i continue. Currently it looks like a dress and dont know if it is suppose to look like that.\r
24.08.2020 - 16:44
![]() Debbie Zaayman escribió:
Debbie Zaayman escribió:
Can you please clarify for me with regrds to the first fan patter row..... do i understand it correctly: A1 the first row, is it three trebles in one chain, two chains(skip 2 chains) three treble in next chain and one treble in next chain
16.08.2020 - 16:46DROPS Design respondió:
Dear Mrs Zaayman, start A.1 with 1 double crochet (= UK Engish), then 4 chains, skip 2 stitches, then repeat (1 dc in next st, 4 chains, skip 2 sts) around. on 2nd row work 3 ch (at the beg of round only to replace 1st treble), then crochet around next ch-space: 3 tr, 2 ch, 3 tr, and repeat (1 tr around next ch-space, 3tr +2 ch+3 tr around next ch-space). Happy crocheting!
17.08.2020 - 08:51
![]() Anna escribió:
Anna escribió:
Bei den Zunahmen vor und nach, bzw. dann nur noch vor dem Markier steht, dass diese in den Hinreihen gearbeitet werden. Ist hiermit tatsächlich nur jede zweite Reihe gemeint und die Rückreihen finden ohne Zunahmen statt?
20.07.2020 - 09:19DROPS Design respondió:
Liebe Anna, wenn Sie in jede Hinreihe zunehmen sollen, dann nehmen Sie in jeder 2. Reihe, dh nur bei den Hinreihen, bei den Rückreihen werden Sie nicht zunehmen. Viel Spaß beim häkeln!
20.07.2020 - 10:01
|
||||||||||||||||||||||||||||
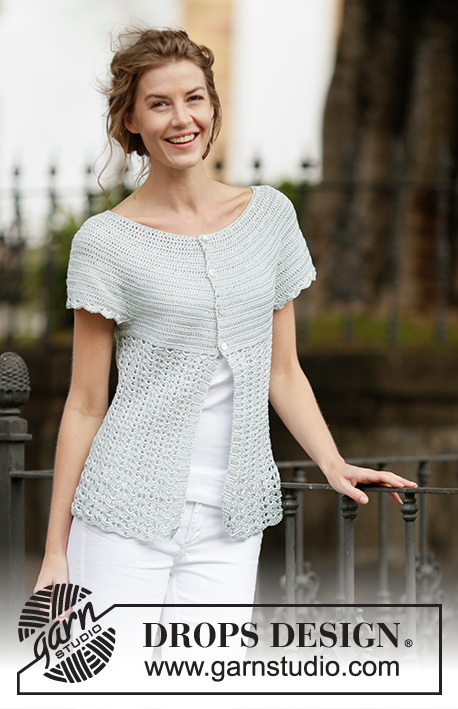
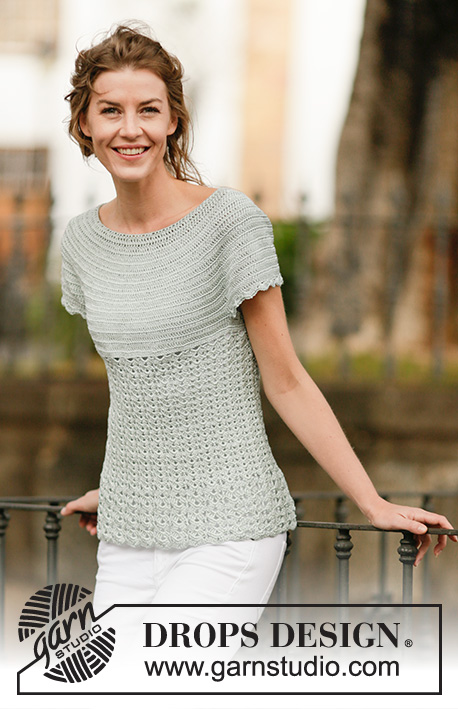
Lady Ascot#ladyascottop |
||||||||||||||||||||||||||||
 |
 |
|||||||||||||||||||||||||||
Top de ganchillo DROPS con patrón de abanicos y pechera redonda, trabajado de arriba para abajo, en “Cotton Viscose”. Talla: S – XXXL.
DROPS 162-26 |
||||||||||||||||||||||||||||
|
PATRÓN: Ver diagramas A.1-A.2. INFORMACIÓN-1 PARA LA ELABORACIÓN DEL TRABAJO: Sustituir el primer p.a. en cada hilera de p.a. con 3 cad, terminar la hilera con 1 p.bjs en la 3ª cad. INFORMACIÓN-2 PARA LA ELABORACIÓN DEL TRABAJO: Comenzar cada vta con 3 cad y terminar la vta con 1 p.bjs en la 3ª cad. TIP PARA AUMENTAR: Aumentar 1 p.a. trabajando 2 p.a. en 1 p.a. ----------------------------------------------------- TOP: Trabajado de arriba para abajo a partir del centro de la espalda. Montar 133-137-142-147-152-157 cad en ag de ganchillo tamaño 3.5 mm con Cotton Viscose y formar un anillo con 1 p.bjs en la primera cad. Trabajar la vta sig de la manera sig: 3 cad (= 1 p.a.), 1 p.a. en la primera cad del anillo de cad, * saltar 1 cad, 1 p.a. en cada una de las 5 cad sig *, repetir de *a* hasta que resten 0-4-3-2-1-0 cad, 1 p.a. en cada una de las últimas 0-4-3-2-1-0 cad = 112-116-120-124-128-132 p.a. Después trabajar la pieza de ida y vuelta. Unir cada hilera, al final de la hilera, con 1 p.bjs en la primera cad de la hilera – LEER INFORMACIÓN-1 PARA LA ELABORACIÓN DEL TRABAJO. Virar la pieza. Trabajar 1 hilera con 1 p.a. en cada p.a. y, AL MISMO TIEMPO, aumentar 28 p.a. distribuidos equitativamente (es decir, aumentar 1 p.a. después de aprox cada 4º p.a.) – LEER TIP PARA AUMENTAR = 140-144-148-152-156-160 p.a. Insertar 12 marcapuntos en la pieza de la manera sig: Trabajar 17-18-19-20-21-22 p.a. (= mitad pieza de la espalda) y, AL MISMO TIEMPO, aumentar 1-0-0-2-2-1 p.a. distribuidos equitativamente, insertar el primer marcapuntos, * trabajar 4 p.a., insertar el sig marcapuntos *, repetir de *a* 1 vez más, trabajar 20 p.a., insertar el sig marcapuntos, * trabajar 4 p.a., insertar el sig marcapuntos *, repetir de *a* 1 vez más, trabajar 34-36-38-40-42-44 p.a. (= pieza del frente) y, AL MISMO TIEMPO, aumentar 2-0-0-4-4-2 p.a. distribuidos equitativamente, insertar el sig marcapuntos, * trabajar 4 p.a., insertar el sig marcapuntos *, repetir de *a* 1 vez más, trabajar 20 p.a., insertar el sig marcapuntos, * trabajar 4 p.a., insertar el sig marcapuntos *, repetir de *a* 1 vez más, trabajar 17-18-19-20-21-22 p.a. (= mitad pieza de la espalda) y, AL MISMO TIEMPO, aumentar 1-0-0-2-2-1 p.a. distribuidos equitativamente = 144-144-148-160-164-164 p.a. RECORDARSE DE MANTENER LA MISMA TENSIÓN DE LA MUESTRA! En la hilera sig por el LD, aumentar de la manera sig: Aumentar 1 p.a. en cada lado de cada marcapuntos (= 24 p.a. aumentados), repetir los aumentos en cada hilera por el LD 1-4-5-7-8-10 veces en total, después aumentar antes de cada marcapuntos (= 12 p.a. aumentados), repetir los aumentos en cada hilera por el LD 9-6-6-4-4-3 veces en total = 276-312-340-376-404-440 p.a. La pieza mide aprox 18-18-20-20-22-23 cm. Trabajar la hilera sig de la manera sig: 36-43-48-54-59-66 p.a. (= mitad pieza de la espalda), trabajar 12 cad (insertar un marcapuntos en el centro de estos nuevos pts = bajo la manga), saltar 66-70-74-80-84-88 p.a. de la hilera anterior (= manga), trabajar 72-86-96-108-118-132 p.a. (= pieza del frente), trabajar 12 cad (insertar un marcapuntos en el centro de estos nuevos pts = bajo la manga), saltar 66-70-74-80-84-88 p.a. de la hilera anterior y trabajar 36-43-48-54-59-66 p.a. (= mitad pieza de la espalda) = 168-196-216-240-260-288 p.a./cad (= 84-98-108-120-130-144 p.a./cad en la pieza de la espalda y en la pieza del frente). Insertar 1 marcapuntos en la pieza. AHORA MEDIR LA PIEZA A PARTIR DE AQUÍ! Trabajar 1 hilera con 1 p.a. en cada p.a. y 1 p.a. en cada cad bajo la manga y, AL MISMO TIEMPO, aumentar 18-8-6-0-10-6 p.a. distribuidos equitativamente = 186-204-222-240-270-294 p.a. Trabajar 1 hilera con 1 p.a. en cada p.a. Ahora trabajar la pieza en redondo, sin virar. PATRÓN DE ABANICOS: Trabajar la 1ª-3ª vta de A.1 31-34-37-40-45-49 veces – LEER INFORMACIÓN-2 PARA LA ELABORACIÓN DEL TRABAJO. Después repetir la 3ª vta hasta que la pieza mida aprox 29-31-31-33-31-31 cm. Ahora trabajar la 4ª vta hasta que la pieza mida aprox 40-42-43-45-45-45 cm. Cortar y asegurar el hilo. ORILLA DE LA MANGA: Comenzar trabajando al centro bajo la manga de la manera sig: Trabajar 1 p.b. en la 6ª cad de las 12 cad trabajadas en la sisa, en el cuerpo. Trabajar 3 cad (= 1 p.a.). Después trabajar 1 p.a. en cada una de las 6 cad sig, trabajar 1 p.a. en la hilera de p.a. donde las cad para la manga fueron trabajadas, 1 p.a. en los 66-70-74-80-84-88 p.a. sig (= sobre la manga) y, AL MISMO TIEMPO, aumentar 0-4-0-2-6-2 p.a. distribuidos equitativamente, trabajar 1 p.a. en la hilera de p.a. donde las cad para la manga fueron trabajadas, trabajar 1 p.a. en cada una de las restantes 5 cad bajo la manga = 80-88-88-96-104-104 p.a. Después trabajar A.2 10-11-11-12-13-13 veces en total. Cortar y asegurar el hilo cuando A.2 ha sido trabajado 1 vez verticalmente. Trabajar la otra orilla de manga de la misma manera. |
||||||||||||||||||||||||||||
Explicaciones del diagrama |
||||||||||||||||||||||||||||
|
||||||||||||||||||||||||||||
 |
||||||||||||||||||||||||||||
 |
||||||||||||||||||||||||||||
¿Terminaste este patrón?Entonces, etiqueta tus fotos con #dropspattern #ladyascottop o envíalas a la galería #dropsfan. ¿Necesitas ayuda con este patrón?Encontrarás 13 videos tutoriales, un espacio para comentarios/preguntas y más visitando la página del patrón en garnstudio.com © 1982-2026 DROPS Design A/S. Todos los derechos reservados. Este documento, incluyendo todas sus sub-secciones, está protegido por los derechos de autor (copyright). Lee más acerca de lo que puedes hacer con nuestros patrones en la parte de abajo de cada patrón de nuestro sitio. |
||||||||||||||||||||||||||||


Con más de 40 años en el diseño de modelos de punto y de ganchillo, DROPS Design ofrece una de las más vastas colecciones de patrones gratuitos en el internet - traducidos en 17 idiomas. Al día de hoy, contamos con 324 catálogos y 12290 patrones - de los cuales 11684 están traducidos en español.
Nosotros trabajamos con mucho esmero para brindarte lo mejor que las labores de punto y ganchillo tienen para ofrecer,inspiración y consejos, así como hilos de magnífica calidad a precios increíbles! Te gustaría usar nuestros patrones para otro fin además del uso personal? Puedes leer acerca de lo que estás permitida a hacer en el texto de Copyright en la parte de abajo de todos nuestros patrones. Felices labores!
Escribe un comentario sobre DROPS 162-26
¡Nos encantaría saber qué piensas acerca de este patrón!
Si quieres escribir una pregunta referente al patrón, por favor asegúrate de elegir la categoría correcta en el formulario debajo, para acelerar el proceso de respuesta. Los campos obligatorios están marcados con un *.