
Categorías populares
¿Buscas un hilo?


Comentarios / Preguntas (12)
![]() Wilnellia Diep escribió:
Wilnellia Diep escribió:
I love all your patterns. Unfortunately I do not understand how to knit the neck warmer which seems to me easy at first. `could you give me every step until the end? I started by doing the top 2K2P First row 2nd row etc… when to increase … Thank you so much for your support
14.12.2024 - 21:41DROPS Design respondió:
Dear Wilnellia, you cast on stitches for the neck warmer. Then work 4 rounds in garter stitch. Continue in stocking stitch until piece measures 12 cm. Then you start slipping stitches to a thread: work and slip the first 4 stitches to one thread, work in stocking stitches until 4 stitches are left, work and slip the last 4 stitches to another thread. *Turn the piece, work and slip the new first 2 stitches to the thread on this side, work in stocking stitch until 2 stitches are left, work and slip the last 2 stitches to the thread on this side.* Repeat * to * until 1 stitch is left on the needle. Cut the yarn and place all stitches back on needle to continue working. Happy knitting!
15.12.2024 - 22:59
![]() Corina Avram escribió:
Corina Avram escribió:
Also, what should happen after the hat reaches 14-16cm? One should knit without increasing until 17-18 cm?
18.12.2023 - 13:11DROPS Design respondió:
Dear Mrs Avram, when piece measures 14 cm, increase one more time, then when piece measures 16 cm increase one last time (there are now 67-69 sts), then continue over these stitches until pieces measures 17-18 cm, then cast off. Happy knitting!
19.12.2023 - 07:31
![]() Corina Avram escribió:
Corina Avram escribió:
Hello, about the hat instructions: "When piece measures 9-10 cm, work in garter st over all sts AT THE SAME TIME on 1st row inc 4 sts evenly = 59-61 sts. Repeat inc when piece measures 14 and 16 cm = 67-69 sts on needle" Is the increase done on every row, RS and WS? My hat reached 69 stitches, but measures only 12 cm. Thanks :) Corina
18.12.2023 - 13:09DROPS Design respondió:
Dear Mrs Avram, increase on a row from right side (read how to increase evenly here); increase when hat measures 10 cm, then work until it measures 14 cm and increase evenly 4 sts, then work until it measures 16 cm and increase 4 sts evenly = there are 69 sts in total when piece measures 16 cm.. Cast off when it measures 18 cm. Happy knitting!
18.12.2023 - 16:21
![]() Diane Turcot escribió:
Diane Turcot escribió:
Pour le tour du cou, après que l'ouvrage mesure 12 cm, vous dites de le diviser, en deux? Donc 25 et 24 m. Pouvez-vous expliquer clairement la suite. Tricoter les mailles restantes? Combien, le reste des 25? Ensuite on tourne?Je ne comprends pas. SVP, aidez-moi, je veux le réussir. MERCI
26.10.2021 - 02:56DROPS Design respondió:
Bonjour Mme Turcot, vous divisez l'ouvrage pour le tricoter de ce moment en allers et retours (pas en rond) en jersey sur les aiguilles circulaires. Ce sont les rangs raccourcis. Regardez la video ICI. Pour la suite, suivez les explications. Bon tricot!
26.10.2021 - 17:21
![]() Helena escribió:
Helena escribió:
Sadly, I still don't understand the instructions for the neck warmer. Also, it always helps to state if the item is knitted top down or bottom up. It helps get a picture of the garment in the head. Hat in this pattern is great though - I knitted 4 of them. Pity about the neck warmer, unless you improve on the instructions.
22.11.2019 - 20:21DROPS Design respondió:
Dear Helena, the neck warmer is worked top down, first in the round, then with short rhows (leave first 4 sts then 2 sts unworked at the end of each row until the middle stitch remains on needle, then work in the round again for the last rounds. Happy knitting!
25.11.2019 - 08:11
![]() Helena escribió:
Helena escribió:
I have done countless knitting from your patterns and I really like everything you do. However, the instructios for this neck warmer are totally incomprehensible to me. I don't understand at all where to make a division and what stitches to put on a stitch holder and which ones to knit. Love the hat though.
05.10.2019 - 12:47DROPS Design respondió:
Dear Helena, work now in rows (short rows): work the first 4 sts and slip them on a thread, work to the end of the row, turn and work the first 4 sts and slip them on a thread, work to the end of the row (= 4 sts on each side are on a thread). Continue like this but slip the first 2 sts at the beg of each row -both from RS and from WS on a thread until 1 stitch remains (= middle stitch). Happy knitting!
07.10.2019 - 10:55
![]() Rosalba Di Salvio escribió:
Rosalba Di Salvio escribió:
Salve,io vorrei fare questo cappello per una taglia 58 cm e 60 cm vorrei farlo con i ferri circolari e il filato Big delight,perché preferisco lavorare in cerchio che con i ferri diritti e poi cucire alla fine,come devo fare? Grazie per l'aiuto
15.02.2019 - 21:05DROPS Design respondió:
Buongiorno Rosalba, per un aiuto così personalizzato può rivolgersi al suo rivenditore DROPS di fiducia. Buon lavoro!
17.02.2019 - 09:37
![]() Rosalba escribió:
Rosalba escribió:
Salve,io vorrei fare questo cappello per una taglia 58 cm e 60 cm vorrei farlo con i ferri circolari e il filato Big delight,perché preferisco lavorare in cerchio che con i ferri diritti e poi cucire alla fine,come devo fare? Grazie per l'aiuto
15.02.2019 - 18:47
![]() Isabelle escribió:
Isabelle escribió:
Que veut dire 1m lis au point mousse de chaque côté? Vous dite de continuée en jersey. Merci!
18.02.2018 - 20:27DROPS Design respondió:
Bonjour Isabelle, on continue en jersey mais la 1ère et la dernière maille va se tricoter à l'endroit tous les rangs (= mailles lisière pour la couture). Bon tricot!
19.02.2018 - 10:18
![]() Jacqueline Lhote escribió:
Jacqueline Lhote escribió:
Je ne comprends pas la division et le glissement des mailles pour le tour de cou
08.02.2015 - 18:51DROPS Design respondió:
Bonjour Mme Lhote, vous tricotez comme pour les rangs raccourcis en laissant non travaillées les mailles de chaque côté, puis reprenez toutes les mailles ensemble, en rond. Bon tricot!
08.02.2015 - 19:34
|
|
Eliana#elianaset |
|
|
|
|
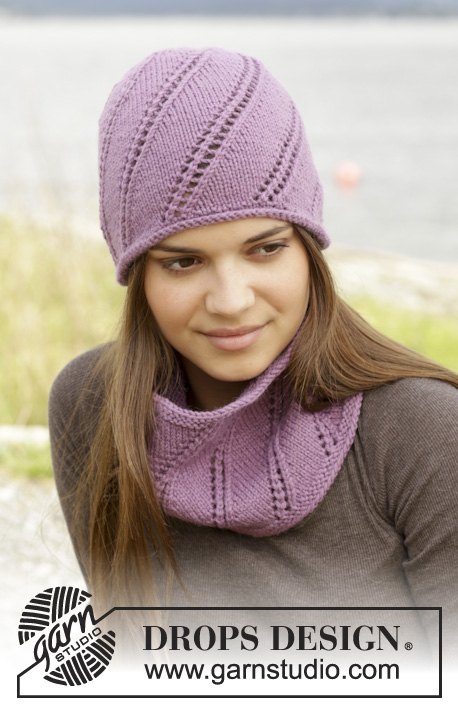
Gorro y cuello de punto DROPS en punto musgo y punto jersey en ”Andes”.
DROPS 156-40 |
|
|
PUNTO MUSGO (de ida y vta en ag): Trabajar todas las filas de derecho. 1 pliegue = 2 filas de derecho. PUNTO MUSGO (en redondo con ag circular): * 1 vta de derecho y 1 vta de revés*, repetir de * a *. 1 pliegue = 2 vtas. ---------------------------------------------------------------------------------------------------------------------------------------------- GORRO: Se trabaja de ida y vta en PT MUSGO - ver explicaciones arriba, de arriba abajo. Mont 9 pts con ag tamaño 8 mm con Andes. FILA 1 (y resto de filas por el LR): Trabajar todos los pts de derecho. FILA 2 (= LD): * 1 d., 1 HEB (lazada)*, repetir de * a * hasta que quede 1 pt , finalizar con 1 d. = 17 pts. Trabajar las HEBs de derecho retorcido en la sig fila (es decir tejer por detrás del pt ) para evitar que se formen agujeros. FILA 4 (= LD): * 2 d., 1 HEB*, repetir de * a * hasta que quede 1 pt, finalizar con 1 d. = 25 pts. FILA 6 (= LD): * 3 d., 1 HEB*, repetir de * a * hasta que quede 1 pt, finalizar con 1 d. = 33 pts. FILA 8 (= LD): * 4 d., 1 HEB*, repetir de * a * hasta que quede 1 pt, finalizar con 1 d. = 41 pts. FILA 10 (= LD): * 5 d., 1 HEB*, repetir de * a * hasta que quede 1 pt, finalizar con 1 d. = 49 pts. Fila 12 (= LD): Trabajar los pts de derecho, AL MISMO TIEMPO aum 6-8 pts repartidos (= aprox después de cada 8-6 pts) = 55-57 pts. RECUERDE MANTENER LA MISMA TENSIÓN DE LA MUESTRA! Insertar 1 marcapuntos en la labor. AHORA MEDIR LA LABOR DESDE AQUÍ! Trabajar en pt jersey con 1 pt orillo en pt musgo a cada lado de la labor. Cuando la labor mida 9-10 cm, trabajar en pt musgo sobre todos los pts, AL MISMO TIEMPO en la 1ª fila aum 4 pts repartidos = 59-61 pts. Repetir los aum cuando la labor mida 14 y 16 cm = 67-69 pts en la ag. Rematar cuando la labor mida 17-18 cm. TERMINACIÓN: Coser cogiendo la parte exterior del pt orillo. Fruncir la parte de arriba del gorro y asegurar. ---------------------------------------------------------------------------------------------------------------------------------------------- CUELLO: Se trabaja en redondo en ag circular. Mont 49 pts en ag circular tamaño 8 mm con Andes. Trabajar 2 pliegues en PT MUSGO - ver explicaciones arriba. Trabajar en pt jersey hasta que la labor mida 12 cm. RECUERDE MANTENER LA MISMA TENSIÓN DE LA MUESTRA! Ahora dividir la labor y trabajar de ida y vta en pt jersey como sigue: Trabajar los primeros 4 pts, desl estos pts a un gancho aux, trabajar los pts restantes, repetir en el otro lado de la labor. Ahora hay 4 pts en los ganchos aux a cada lado de la labor. Trabajar como sigue: * Trabajar los primeros 2 pts, desl estos pts a un gancho aux, trabajar los pts restantes*, repetir de * a * en cada fila. Es decir, desl 2 pts a un gancho aux a cada lado de la labor en estas 2 filas. Continuar de la misma manera hasta que quede 1 pt en la ag (= pt central). Cortar el hilo. Desl todos los pts de vta a la ag circular = 49 pts. Ahora trabajar en redondo en ag circular desde el centro de la parte posterior. Trabajar como sigue: * 1 r., 1 HEB*, repetir de * a * hasta el pt central (= 24 vcs), 1 r., * 1 HEB, 1 r.*, repetir de * a * la vta entera (= 24 vcs) = 97 pts. Trabajar 1 vta de derecho, trabajar las HEBs de derecho retorcido. Ahora trabajar 1 pliegue sobre todos los pts, AL MISMO TIEMPO en la 1ª vta aum trabajando una HEB después del primer pt, a cada lado del pt central (es decir 48 pts a cada lado) y 1 HEB antes del último pt de la vta = 101 pts en la ag. Rematar flojo |
|
¿Terminaste este patrón?Entonces, etiqueta tus fotos con #dropspattern #elianaset o envíalas a la galería #dropsfan. ¿Necesitas ayuda con este patrón?Encontrarás 23 videos tutoriales, un espacio para comentarios/preguntas y más visitando la página del patrón en garnstudio.com © 1982-2026 DROPS Design A/S. Todos los derechos reservados. Este documento, incluyendo todas sus sub-secciones, está protegido por los derechos de autor (copyright). Lee más acerca de lo que puedes hacer con nuestros patrones en la parte de abajo de cada patrón de nuestro sitio. |


Con más de 40 años en el diseño de modelos de punto y de ganchillo, DROPS Design ofrece una de las más vastas colecciones de patrones gratuitos en el internet - traducidos en 17 idiomas. Al día de hoy, contamos con 324 catálogos y 12290 patrones - de los cuales 11685 están traducidos en español.
Nosotros trabajamos con mucho esmero para brindarte lo mejor que las labores de punto y ganchillo tienen para ofrecer,inspiración y consejos, así como hilos de magnífica calidad a precios increíbles! Te gustaría usar nuestros patrones para otro fin además del uso personal? Puedes leer acerca de lo que estás permitida a hacer en el texto de Copyright en la parte de abajo de todos nuestros patrones. Felices labores!
Escribe un comentario sobre DROPS 156-40
¡Nos encantaría saber qué piensas acerca de este patrón!
Si quieres escribir una pregunta referente al patrón, por favor asegúrate de elegir la categoría correcta en el formulario debajo, para acelerar el proceso de respuesta. Los campos obligatorios están marcados con un *.