
Categorías populares
¿Buscas un hilo?


Comentarios / Preguntas (52)
![]() Irene Aho escribió:
Irene Aho escribió:
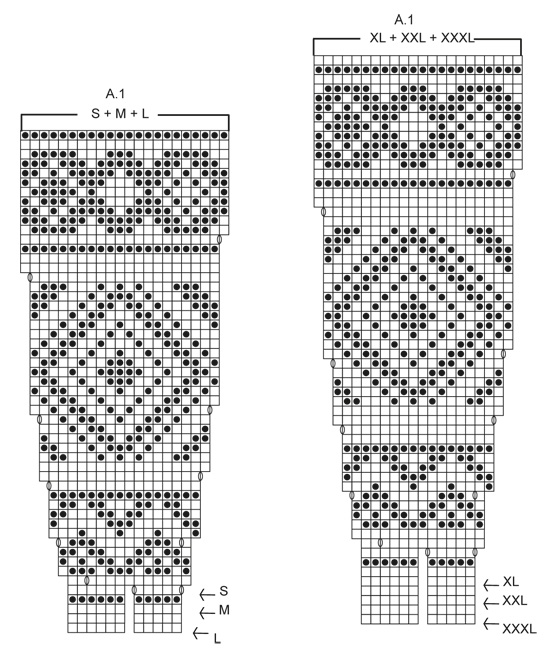
Ohjeessa lukee, että kun A1 on neulottu loppuun koossa M silmukoiden määrä on kasvanut 242. Lisäksi soikio tuntuu indikoivan lisäyskerrosta. Kuinka monta silmukkaa lisätään milläkin lisäyskerroksella? Kuviohan menee sekaisin mikäli lisään väärän määrän väärässä kohtaa. Useissa dropsin ohjeissa on tarkka ohje kuinka monta silmukkaa lisätään kullakin lisäykskirroksella, tästä ohjeesta ne puuttuvat.
04.07.2020 - 21:33
![]() Bonté escribió:
Bonté escribió:
Bonjour pkoi il manque une case dans le dessin du diagramme dans le début cela fait un trou je comprends pas
18.01.2020 - 08:37DROPS Design respondió:
Bonjour Mme Bonté, parce qu'aux premiers rangs du diagramme, on n'a pas encore augmenté 1 maille au milieu, et pour que le diagramme soit juste, on n'a pas dessiné la case, vous allez ainsi tricoter et répéter le diagramme sur le nombre de cases indiqué, dès que vous aurez fait les 2 premières augmentations, vous aurez la case manquante au milieu (= le jeté approximativement au milieu du diagramme). Bon tricot!
20.01.2020 - 08:24
![]() Nicol escribió:
Nicol escribió:
Hallo liebes Drops-Team, ich hätte eine generelle Frage bei der Anleitung: ich habe nun schön öfter festgestellt, dass in der Beschreibung steht (nachdem man das hohe Halsbündchen gestrickt hat), dass erst Maschen abgenommen werden sollen, die ein paar wenige Reihen später wieder aufgenommen werden, und irgendwie mag sich mir der Grund dafür nicht erschließen. Schon im Voraus lieben Dank fürs "aufklären". :)
28.10.2019 - 14:18DROPS Design respondió:
Liebe Nicol, beim Hals strickt man Bündchen/Rippenmuster mit kleineren Nadeln, dann muss man abnehmen bei der 1. Runde mit der grösseren Nadeln um den richtigen Umfang zu haben, dann strickt man hier verkürzten Reihen und dann wird es zugenommen, damit es die richtige Breite und die richtige Maschenanzahl für das Muster gibt. Viel Spaß beim stricken!
04.11.2019 - 12:59
![]() Caroline escribió:
Caroline escribió:
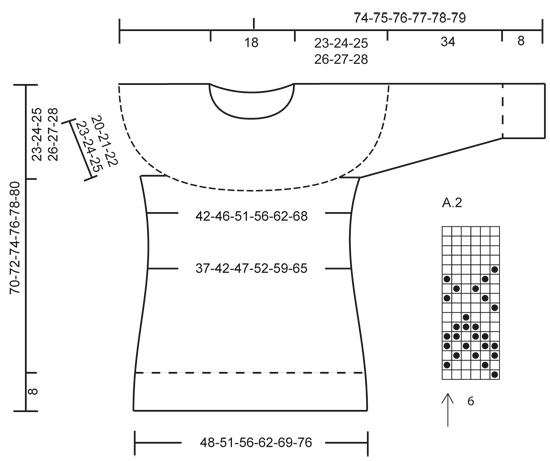
Dear Drops, Thank you very much for your quick reply about knitting the sleeve. Please could you tell me how to find the middle stitch on top of the sleeve as I'm not sure what this is. Best wishes Caroline
23.05.2019 - 09:31DROPS Design respondió:
Dear Caroline, the middle stitch on top of sleeve is the one in the middle of the round (start counting from beg of the round = mid under arm) - read more about how to center a diagram here. Happy knitting!
23.05.2019 - 09:57
![]() Caroline escribió:
Caroline escribió:
Hello drops, I've just started the sleeve using the M sizes, and I have 63 sts in accordance with your pattern. I now need to knit chart A2 which is a pattern of 6-stitch repeats. As 63 is not divisible by 6, I can't see how this will work without losing the pattern at some point under the sleeve, which will look a mess. Please could you give me some advice about what to do here. Best wishes Caroline
21.05.2019 - 08:56DROPS Design respondió:
Hi Caroline, Under the sleeve the pattern will not fit as you say and you will be decreasing as you go as well. So stop working A.2 wherever you are at the end of the round and start the next round where you began A.2 on the previous round - the most important thing is to get the stitch with the arrow (middle stitch in A.2) to match the middle stitch on top of sleeve. I hope this helps and happy knitting!
21.05.2019 - 09:52
![]() Anita Danell escribió:
Anita Danell escribió:
Hej! På mönstret är det precis i början (vid markeringarna S M L ) som ett sprund/ 2 ben de första varven. Vad ska jag göra där, hoppa över en maska? För det är väl ingen utökning eftersom det inte är markerat med ökningssymbolen? Vänliga hälsningar Anita Danell
22.02.2019 - 15:29DROPS Design respondió:
Hej, här ska du bara fortsätta till följande ruta i diagrammet. Senare ökas det maskor, så då fortsätter diagrammet som vanligt.
22.02.2019 - 16:26
![]() Marion escribió:
Marion escribió:
Skal jeg på 1. økning øke 1 maske etter hver 5. maske, og så etter hver 6. maske annenhver gang? Og på neste omgang øke etter hver 13. maske?
16.08.2018 - 11:57DROPS Design respondió:
Hei Marion Ja, det stemmer at du på 5 omgang øker helt på starten av omgangen, og så videre etter hver 5 og 6 maske annenhver gang. Det stemmer også at du på 6 omgang øker først etter 11 masker, og så etter 13 masker på resten av omgangen. Om du syntes det er vanskelig å holde oversikten kan du sette 1 merke mellom hver rapport av mønsteret så er det lettere å se hvor du er i arbeidet ditt. God fornøyelse.
23.08.2018 - 11:33
![]() Marion escribió:
Marion escribió:
Hei. Jeg kommer helt feil ut når jeg øker i mønsteret, men greier ikke å se hvor jeg gjør feil. Savner at det står hvor mange masker en skal ha på pinnen etter hver økning!
16.08.2018 - 11:42DROPS Design respondió:
Se svar på spørsmål over :)
23.08.2018 - 11:33
![]() Monica Ruud escribió:
Monica Ruud escribió:
Hei. Skal strikke Drops 156-12 aldri strikket ovenfra og ned og finner ikke noen video jeg kan se på. Kan du hjelpe meg så jeg garantert noe å lære etter. Vennlig hilsen Monica Ruud
02.08.2018 - 17:46DROPS Design respondió:
Hei Monica. Du skal strikke på samme måte som du ville strikket om du strikket nedenfra og opp, bare at du øker når du ville felt, og feller når du ville økt – Men dette står forklart i oppskriften, så det er bare å gjøre akkurat som det står: Du begynner altså med halskanten, når denne er ferdig strikkes det forhøyning i nakken (forkortede pinner) så strikkes bærestykke (mønster leses som vanlig fra nederste til øverst, fra høyre mot venstre), alle økinger er markert i diagrammet. Videre settes masker av til ermer, nye masker legges opp og bolen strikkes nedover. God fornøyelse.
17.08.2018 - 13:24
![]() Lousha escribió:
Lousha escribió:
According to the pattern I'm supposed to put the sleeve stitches on holders once A1 chart is fully worked. But according to the picture that is pretty much at the stomach... Certainly much lower than the armpit. So if I knit like this, I won't be able to lift my arms up. Is this a mistake in the pattern or just some strange design?
07.06.2018 - 19:31DROPS Design respondió:
Dear Lousha, you will divide sts for sleeves and body after A.1 has been worked (deep armholes - see measurements in chart: 23-28 cm)) and then work A.2 on body - make sure your tension in height is right (=22 rows stocking st = 10 cm). Happy knitting!
08.06.2018 - 08:17
|
||||||||||
Eir#eirsweater |
||||||||||
|
|
||||||||||
Jersey de punto DROPS con punto jacquard y canesú redondo, tejido de arriba abajo en "Nepal". Tala: S - XXXL.
DROPS 156-12 |
||||||||||
|
PATRÓN: Ver los diagramas A.1-A.2. Trabajar el patrón entero en pt jersey. Ver los diagramas para la talla correcta. TIP PARA TOMAR LAS MEDIDAS: Debido al peso de la lana, hacer todas las mediciones con la pieza suspendida, de lo contrario quedará muy larga cuando se use. TIP PARA LOS AUMENTOS: Aum 1 pt trabajando, levantando un pt de la fila anterior, trabajar este pt de derecho. TIP PARA LAS DISMINUCIONES: Dism como sigue después del marcapuntos (MP): desl 1 pt como de derecho, 1 d., pasar el pt desl por encima. Dism como sigue 2 pts antes del MP: 2 pjd. ---------------------------------------------------------------------------------------------------------------------------------------------- CANESÚ: Se trabaja de arriba abajo en redondo con ag circular. Mont 102-102-108-108-114-114 pts en ag circular tamaño 4 mm con verde grisáceo claro. Trabajar pt elástico: 1 d./ 2 r. sobre todos los pts. RECUERDE MANTENER LA MISMA TENSIÓN DE LA MUESTRA! Cuando la labor mida 14-14-15-15-16-16 cm, trabajar 1 vta de derecho, AL MISMO TIEMPO dism 26-22-24-20-22-18 pts repartidos = 76-80-84-88-92-96 pts. Cambiar a ag circular tamaño 5 mm. Ahora trabajar una elevación de ida y vta en el escote desde el centro de la espalda como sigue: Insertar 1 MP al inicio de la vta, 9-10-11-12-13-14 d., girar la labor y trabajar 18-20-22-24-26-28 r. Girar la labor, 27-29-31-33-35-37 d., girar la labor y 36-38-40-42-44-46 r. Girar la labor y 45-47-49-51-53-55 d., girar la labor y 54-56-58-60-62-64 r. Girar la labor y trabajar de derecho sobre todos los pts hasta el MP. Ahora trabajar en redondo. Trabajar 1 vta de derecho, AL MISMO TIEMPO aum 34-41-48-55-62-80 pts repartidos = 110-121-132-143-154-176 pts. Ahora trabajar y aum según A.1 - elegir el diagrama según la talla. El patrón comienza desde la flecha de cada talla del diagrama. Cuando se ha trabajado A.1 una vez en vertical, hay 220-242-264-286-308-352 pts en la ag. La labor mide aprox 23-24-25-26-27-28 cm - ver TIP PARA TOMAR LAS MEDIDAS. Trabajar 1 vta de derecho con verde grisáceo claro, AL MISMO TIEMPO aum 8-10-8-10-16-0 pts repartidos = 228-252-272-296-324-352 pts. Trabajar los primeros 32-36-40-44-49-54 pts (= mitad de la espalda), desl los sig 51-55-57-61-65-69 pts a un gancho aux para la manga, mont 8 pts nuevos bajo estos pts, trabajar los sig 63-71-79-87-97-107 pts (= delantero), desl los sig 51-55-57-61-65-69 pts a un gancho aux para la manga, mont 8 pts nuevos bajo estos pts, trabajar los 31-35-39-43-49-53 pts restantes = 142-158-174-190-210-230 pts. CUERPO: Trabajar 1 vta en pt jersey, AL MISMO TIEMPO aum 2-4-0-2-0-4 pts repartidos = 144-162-174-192-210-234 pts. Trabajar A.2 (= 6 pts), AL MISMO TIEMPO en la última fila dism 2-4-0-2-0-4 pts repartidos = 142-158-174-190-210-230 pts. Cuando se ha trabajado A.2 una vez en vertical, continuar con verde grisáceo claro. Insertar 6 MP en la labor como sigue: Trabajar 15-16-17-17-18-20 pts, insertar el 1er MP, trabajar 21-24-27-31-35-38 pts, insertar el 2º MP (marcar los lados), trabajar 21-24-27-31-35-38 pts, insertar el 3er MP, trabajar 29-31-33-33-35-39 pts, insertar el 4º MP, trabajar 21-24-27-31-35-38 pts, insertar el 5º MP, trabajar 21-24-27-31-35-38 pts, insertar el 6º MP, trabajar los 14-15-16-16-17-19 pts restantes. Mover los MPs hacia arriba según se avanza. Ahora dism como sigue: dism después del 3er y 6º MP y antes del 1er y 4º MP - LEER TIP PARA LAS DISMINUCIONES. Repetir las dism cada 1-1-1.5-1.5-3.5-3.5 cm un total de 4-4-4-3-2-2 vcs = 126-142-158-178-202-222 pts en la ag. LEER TODA LA SECCIÓN SIGUIENTE ANTES DE CONTINUAR! Cuando la labor mida 38-40-42-44-46-48 cm, aum después del 3er y 6º MP y antes del 4º y 1er MP - LEER TIP PARA LOS AUMENTOS. Repetir los aum cada 4½ cm un total de 5 vcs. AL MISMO TIEMPO cuando la labor mida 38-40-42-44-46-48 cm, aum 1 pt a cada lado del 2º y 5º MP (= en los lados). Repetir los aum en los lados cada 6-9-9-9-9-6 cm un total de 4-3-3-3-3-4 vcs. Después de haber completado todos los aum quedan 162-174-190-210-234-258 pts en la ag. Trabajar hasta que la labor mida 62-64-66-68-70-72 cm. Trabajar 1 vta de derecho, AL MISMO TIEMPO aum 42-45-50-66-78-90 pts repartidos = 204-219-240-276-312-348 pts. Cambiar a ag circular tamaño 4 mm y trabajar en pt elástico = 1 d./2 r. Cuando la labor mida 70-72-74-76-78-80 cm, rematar con derecho sobre derecho y revés sobre revés. MANGA: Desl los pts desde el gancho aux de vta a ag circular tamaño 5 mm (= 51-55-57-61-65-69 pts). Mont 8 pts nuevos bajo la manga = 59-63-65-69-73-77 pts. Insertar 1 MP en la labor. AHORA MEDIR LA LABOR DESDE AQUÍ! Trabajar A.2 - ATENCIÓN: Ajustar el patrón al centro de la labor, la flecha del diagrama marca el pt central en la parte superior de la manga. AL MISMO TIEMPO cuando la labor mida 4 cm desde el MP, comenzar las dism - recuerde el TIP PARA LAS DISMINUCIONES! Repetir las dism cada 2-1½-1½-1½-1½-1 cm un total de 8-10-11-10-12-14 vcs más = 41-41-41-47-47-47 pts restantes. Cuando la labor mida 34 cm, aum 4 pts repartidos = 45-45-45-51-51-51 pts. Cambiar a ag de doble punta tamaño 4 mm. Trabajar pt elástico = 1 d./2 r. Rematar con derecho sobre derecho y revés sobre revés cuando la labor mida 42 cm. Trabajar la otra manga de la misma manera. TERMINACIÓN: Coser las aberturas bajo las mangas. |
||||||||||
Explicaciones del diagrama |
||||||||||
|
||||||||||
 |
||||||||||
 |
||||||||||
¿Terminaste este patrón?Entonces, etiqueta tus fotos con #dropspattern #eirsweater o envíalas a la galería #dropsfan. ¿Necesitas ayuda con este patrón?Encontrarás 24 videos tutoriales, un espacio para comentarios/preguntas y más visitando la página del patrón en garnstudio.com © 1982-2026 DROPS Design A/S. Todos los derechos reservados. Este documento, incluyendo todas sus sub-secciones, está protegido por los derechos de autor (copyright). Lee más acerca de lo que puedes hacer con nuestros patrones en la parte de abajo de cada patrón de nuestro sitio. |
||||||||||


Con más de 40 años en el diseño de modelos de punto y de ganchillo, DROPS Design ofrece una de las más vastas colecciones de patrones gratuitos en el internet - traducidos en 17 idiomas. Al día de hoy, contamos con 324 catálogos y 12290 patrones - de los cuales 11685 están traducidos en español.
Nosotros trabajamos con mucho esmero para brindarte lo mejor que las labores de punto y ganchillo tienen para ofrecer,inspiración y consejos, así como hilos de magnífica calidad a precios increíbles! Te gustaría usar nuestros patrones para otro fin además del uso personal? Puedes leer acerca de lo que estás permitida a hacer en el texto de Copyright en la parte de abajo de todos nuestros patrones. Felices labores!
Escribe un comentario sobre DROPS 156-12
¡Nos encantaría saber qué piensas acerca de este patrón!
Si quieres escribir una pregunta referente al patrón, por favor asegúrate de elegir la categoría correcta en el formulario debajo, para acelerar el proceso de respuesta. Los campos obligatorios están marcados con un *.