
Categorías populares
¿Buscas un hilo?


Comentarios / Preguntas (195)
![]() Kari Kunkes escribió:
Kari Kunkes escribió:
Just a observation for those who crochet using American terms. The slip stitch in this pattern is actually a single crochet.
01.10.2019 - 14:49
![]() ASMA escribió:
ASMA escribió:
Je n'ai pas compris comment tricoter les manches est ce que je tricote sur les 31 ml puis sur le dos et je termine sur les 29ml je n'ai pas compris 2 fois A1 ou 2 fois A1 2
21.09.2019 - 20:30DROPS Design respondió:
Bonjour Asma, vous commencez par la 1ère manche sur les 31 ml (= 1 bride dans la 4ème ml à partir du crochet car les 3 premières ml = 1ère bride, et 1 bride dans les 4 ml suivantes = 6 brides), puis A.1, 2 x A.2, crochetez ensuite les mailles du dos: 1 ou 2 fois A.2 (cf taille), A.3, 4-11 brides, A.1, A.2, A.3, 4-11 brides, A.1, 1 ou 2 fois A.1, 1 x A.2 au-dessus des dernières m du dos et 1 x A.2 au-dessus des 8 premières ml des 29 ml, 1 x A.3 et vous terminez par la 2ème manche (et 1 bride dans chacune des 6 dernières des 29 ml). Bon crochet!
23.09.2019 - 09:11
![]() Miep Van Grieken escribió:
Miep Van Grieken escribió:
Bij de maten XXL en XXXL is het aantal opgezette lossen niet goed opgegeven. Bij beide maten moeten er met 12 lossen meer begonnen worden. Jammer dat dit niet goed uitgerekend is.
15.09.2019 - 00:13
![]() Miep Van Grieken escribió:
Miep Van Grieken escribió:
Bij de maten XXL en XXXL is het aantal opgezette lossen niet goed opgegeven. Bij beide maten moeten er met 12 lossen meer begonnen worden. Jammer dat dit niet goed uitgerekend is.
14.09.2019 - 23:55
![]() Virginie escribió:
Virginie escribió:
Bonjour, J'ai fini le dos et le devant côté droit de la veste en taille L. Je ne comprends pas comment crocheter le col châle. Le col se travaille-t-il uniquement sur le côté droit ou se continue t-il sur le dos et sur le côté gauche? A quel endroit se commence t-il? Et doit-on faire la même chose côté gauche? Merci pour votre réponse
08.08.2019 - 09:21DROPS Design respondió:
Bonjour Virginie, pour faire le col châle du devant droit, commencez sur l'endroit de l'ouvrage en crochetant les 27-27-29-30-32-32 premières brides comme indiqué, puis continuez en rangs raccourcis (les mailles des différentes hauteur vont former d'elles-mêmes l'arrondi du col châle) pendant 10 cm (côté épaule) soit jusqu'à la moitié de l'encolure dos environ. Vous ferez ensuite le col châle du devant gauche de la même façon (en crochetant les dernières mailles sur l'endroit cette fois - et le rang des ms se fera sur l'endroit au lieu de sur l'envers). Assemblez ensuite le dernier rang des 2 cols puis le côté du col le long de l'encolure dos. Bon crochet!
08.08.2019 - 10:09
![]() Barbara Nuttmann escribió:
Barbara Nuttmann escribió:
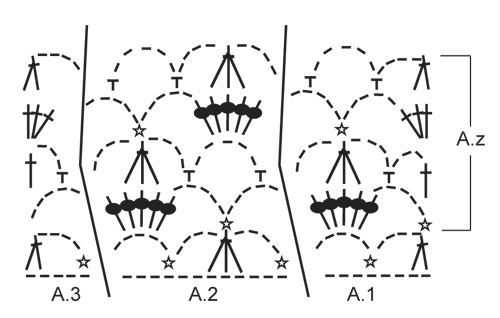
My question was ask above but not answered! I’m doing szL.. I got first row with 9dc..then first row A.z, when I get to 9dc the only way to make it balance is ch3 sk 1 stitch, 7dc, ch3, sk one stitch, slip stitch??? Then..what do I do when I get to this solid area on rows a.z 2,3,4???
15.07.2019 - 21:23DROPS Design respondió:
Dear Mrs Nuttmann, in size L you will have on row 1 in A.z: 3 ch, 7 dc, 3 ch (see NOTE in pattern) as you worked, then on next rows in A.z you will have again 9 dc - the 3 ch from row 1 replace the first and the last of the 9 dc. Happy crocheting!
16.07.2019 - 09:18
![]() Raffaella escribió:
Raffaella escribió:
Grazie
11.07.2019 - 13:58
![]() Raffaella escribió:
Raffaella escribió:
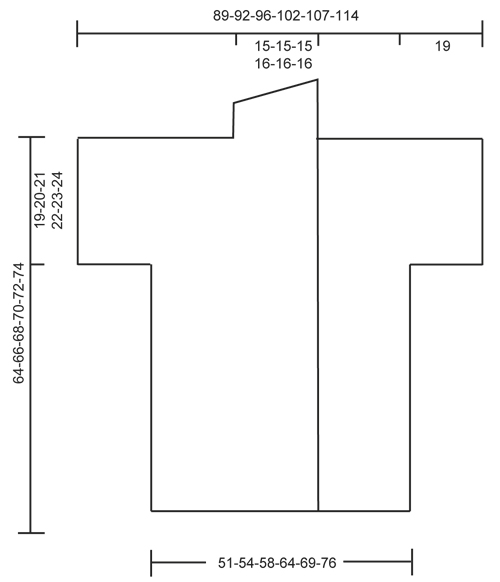
The numbers that are at the base and sideways are the numbers of chains according to the size?
11.07.2019 - 13:49DROPS Design respondió:
Dear Raffaella, each number refers to the size in the order of the size, ie for example you cast on 83 chains in size S -87 chains in size M, 93 chains in size L, 101 chains in size XL, 111 chains in size XXL and 121 chains in size XXXL. Happy crocheting!
11.07.2019 - 13:52
![]() Denise escribió:
Denise escribió:
Could I use Red Heart With Love 4 ply worsted weight to make this project? If so, would there need to be any adjustments to the pattern?
05.07.2019 - 17:55DROPS Design respondió:
Dear Denise, the DROPS patterns are written and made available free to support the DROPS yarns. I hope you will understand that we cannot help you with substitutions of yarns made by other companies. However, you should always make a swatch, check gauge and make necessary changes accordingly. Happy Crafting!
07.07.2019 - 17:18
![]() Dotty Maddock escribió:
Dotty Maddock escribió:
This sweater came out, in the end, beautifully. However, the instructions are misleading and incomplete. For example, the only way I knew about attaching the shawl collar was through reading questions and answers here. There are missing instructions to turn and chain (at the end of rows), and it is just very confusing. Not for inexperienced crocheters, and frustrating for even experienced ones. You've been warned.
09.04.2019 - 00:40DROPS Design respondió:
Dear Mrs Maddock, thanks for your comment, we are sorry to hear that, your comment has been forwarded to our design team. Happy crocheting!
09.04.2019 - 10:59
|
||||||||||||||||||||||
Shining Star#shiningstarcardigan |
||||||||||||||||||||||
 |
 |
|||||||||||||||||||||
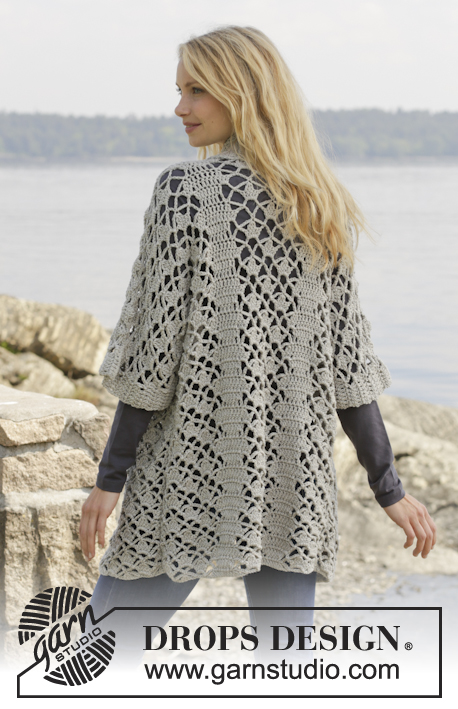
Chaqueta de ganchillo DROPS con patrón de calados y cuello chal en ”Merino Extra Fine”. Talla: S - XXXL.
DROPS 157-18 |
||||||||||||||||||||||
|
INFORMACIÓN PARA REALIZAR EL TRABAJO: Sustituir el primer p.a. del inicio de cada fila de p.a. por 3 p.de cad. PATRÓN: Ver los diagramas A.1-A.3. ---------------------------------------------------------------------------------------------------------------------------------------------- ESPALDA: Se trabaja de ida y vta. Trabajar 83-87-93-101-111-121 p.de cad. con ag de ganchillo tamaño 5 mm y con Merino Extra Fine. Ahora trabajar como sigue por el LD: Trabajar A.1 - ver explicaciones arriba, sobre los primeros 8 p.de cad. ATENCIÓN: Sustituir el 1er p.a. por 3 p.de cad. - ver INFORMACIÓN PARA REALIZAR EL TRABAJO arriba, A.2 sobre los sig 12-12-12-12-24-24 p.de cad., A.3 sobre los sig 5 p.de cad., 1 p.a. en cada uno de los sig 4-6-9-13-6-11 p.de cad., A.1, A.2, A.3, 1 p.a. en cada uno de los sig 4-6-9-13-6-11 p.de cad., A.1, A.2 sobre los sig 12-12-12-12-24-24 p.de cad. y A.3. Ahora repetir A.z en vertical hasta finalizar las medidas. ATENCIÓN: En la 1ª fila de A.z (= por el LR) trabajar como sigue: A.3, A.2 1-1-1-1-2-2 vcs en ancho, A.1, 3 p.de cad. (= 1 p.a.), 1 p.a. en cada uno de los sig 2-4-7-11-4-9 p.a., 3 p.de cad. (= 1 p.a.), A.3, A.2, A.1, 3 p.de cad.(= 1 p.a.), 1 p.a. en cada uno de los sig 2-4-7-11-4-9 p.a., 3 p.de cad. (= 1 p.a.), A.3, A.2 1-1-1-1-2-2 vcs en ancho y A.1. RECUERDE MANTENER LA MISMA TENSIÓN DE LA MUESTRA! Cuando la labor mida aprox 45-46-47-48-49-50 cm, ajustar para finalizar con la 2ª fila de A.z.- cortar el hilo. Ahora trabajar la manga como sigue: trabajar flojo 29 p.de cad, comenzar por el LR y continuar con A.3, A.2 y A.1 y p.a. sobre la espalda como antes, finalizar con 31 p.de cad flojos, girar la labor. Ahora trabajar la 1ª fila de A.1 - A.3 sobre los p.de cad por el LD, AL MISMO TIEMPO continuar con el patrón sobre la espalda como antes (es decir, trabajar la 4ª fila de A.z sobre estos pts) como sigue: Trabajar 1 p.a. en cada uno de los primeros 6 p.de cad, A.1 sobre los sig 8 p.de cad, A.2 2 vcs en el ancho (es decir, trabajar el último A.2 sobre los últimos 5 p.de cad, después trabajar el resto de A.2 sobre A.1), trabajar A.2 1-1-1-1-2-2 vcs en el ancho como antes, A.3, 1 p.a. en cada uno de los sig 4-6-9-13-6-11 p.a., A.1, A.2, A.3, 1 p.a. en cada uno de los sig 4-6-9-13-6-11 p.a., A.1, A.2 1-1-1-1-2-2 vcs en el ancho, ahora trabajar A.2 2 vcs en el ancho (es decir, trabajar el primer A.2 sobre A.3 y los sig 6 p.de cad), A.3 sobre los sig 5 p.de cad y 1 p.a. en cada uno de los últimos 6 p.de cad. Continuar con este patrón hasta que la labor mida aprox 62-64-66-68-70-72 cm - ajustar para finalizar después de la fila del LR. Después finalizar cada hombro/manga por separado como sigue: HOMBRO/MANGA DERECHA: Trabajar 6 p.a., A.1 una vez y A.2 3-3-3-3-4-4 vcs, A.3, 1 p.a. en cada uno de los sig 4-6-9-13-6-11 p.a. Girar y trabajar el patrón como antes. Continuar de la misma manera hasta que la labor mida un total de 64-66-68-70-72-74 cm, ajustar para finalizar con una repetición completa de A.z. Asegurar el hilo. HOMBRO/MANGA IZQUIERDA: Trabajar de la misma manera que el hombro derecho pero a la inversa, trabajar A.1 en lugar de A.3 al inicio de la fila. DELANTERO DERECHO: Se trabaja de ida y vta. Trabajar 63-65-70-74-81-86 p.de cad (incl 3 p.de cad para girar) con ag de ganchillo tamaño 5 mm y con Merino Extra Fine. Trabajar 1 p.a. en el 4º p.de cad desde el ganchillo, 1 p.a. en cada uno de los sig 5-5-7-7-9-9 p. de cad (= cenefa), A.1 sobre los sig 8 p.de cad, A.2 sobre los sig 12 p.de cad, A.3 sobre los sig 5 p.de cad, 1 p.a. en cada uno de los sig 4-6-9-13-6-11 p. de cad, A.1 sobre los sig 8 p.de cad, A.2 sobre cada uno de los sig 12-12-12-12-24-24 p.de cad, A.3 sobre los últimos 5 p.de cad. Ahora trabajar repeticiones de A.z en vertical hasta finalizar las medidas. ATENCIÓN: en la primera fila de A.z (= por el LR) trabajar como sigue: A.3, A.2 1-1-1-1-2-2 vcs en el ancho, A.1, 3 p.de cad. (= 1 p.a.), 1 p.a. en cada uno de los sig 2-4-7-11-4-9 p.a, 3 p.de cad. (= 1 p.a.), A.3, A.2, A.1, 3 p.de cad.(= 1 p.a.), 1 p.a. en cada uno de los sig 5-5-7-7-9-9 p.a. Cuando la labor mida aprox 45-46-47-48-49-50 cm, ajustar para finalizar con la 2º fila de A.z. Cortar el hilo. Ahora trabajar 29 p.de cad flojos para la manga y continuar como la espalda Cuando la labor mida 62-64-66-68-70-72 cm - ajustar para finalizar con una repetición completa de A.z (es decir, la última fila se trabaja por el LD) - cortar el hilo. Ahora trabajar el cuello chal. CUELLO CHAL: El cuello chal se trabaja de ida y vta. Comenzar por el LD como sigue: trabajar 1 p.a. en cada uno de los primeros 6-6-8-8-10-10 p.a., 1 p.a. en el primer p.a. de A.1, * 3 p.a. en el sig arco*, repetir de * a * 2 vcs más, 1 p.a. en el sig p.a., *3 p.a. en el sig arco*, repetir de * a * 2 vcs más, 1 p.a. en el último p.a. de A.3, 0-0-0-1-1-1 p.a. en el sig p.a. = 27-27-29-30-32-32 p.a. Ahora trabajar filas acortadas sobre los pts de la cenefa como sigue: FILA 1 (= LR): 5 p.b., 5 p.m.a., 17-17-19-20-22-22 p.a. FILA 2 (= LD): Trabajar 1 p.a. en cada uno de los 27-27-29-30-32-32 pts. Repetir estas 2 filas hasta que la labor mida aprox 10 cm en la parte más estrecha - ajustar para finalizar con la 2ª fila (= LD). Asegurar el hilo. DELANTERO IZQUIERDO: Trabajar de la misma manera que el delantero derecho pero a la inversa. Trabajar según el diagrama A.3 en lugar de A.1 al inicio de la fila. Cuando la labor mida 45-46-47-48-49-50 cm, ajustar para finalizar con la 2ª fila de A.z - trabajar como antes sobre el delantero por el LR, después trabajar 31 p.de cad. flojos para la manga. Cuando la labor mida 64-66-68-70-72-74 cm, ajustar para finalizar con una repetición completa de A.z (es decir, la última fila se trabaja por el LD) , trabajar el cuello chal. ATENCIÓN: Aquí no es necesario cortar el hilo. TERMINACIÓN: Colocar los delanteros en la parte superior de la espalda y trabajar los hombros como sigue: 1 p.b. pinchando ambas partes, *3 p.de cad., 1 p.b. en el sig arco*, repetir de * a * a lo largo del hombro/manga entera y acabar con 1 p.b. Unir los lados como sigue: 1 p.b., *3 p.de cad., 1 p.b. en el arco de la sig fila*, repetir de * a * a lo largo del lado entero y finalizar con 1 p.b. Unir bajo la manga como sigue: *1 p.b. en el p.de cad. del sig arco, 3 p.de cad.*, repetir de * a * y finalizar con 1 p.b. |
||||||||||||||||||||||
Explicaciones del diagrama |
||||||||||||||||||||||
|
||||||||||||||||||||||
 |
||||||||||||||||||||||
 |
||||||||||||||||||||||
¿Terminaste este patrón?Entonces, etiqueta tus fotos con #dropspattern #shiningstarcardigan o envíalas a la galería #dropsfan. ¿Necesitas ayuda con este patrón?Encontrarás 8 videos tutoriales, un espacio para comentarios/preguntas y más visitando la página del patrón en garnstudio.com © 1982-2026 DROPS Design A/S. Todos los derechos reservados. Este documento, incluyendo todas sus sub-secciones, está protegido por los derechos de autor (copyright). Lee más acerca de lo que puedes hacer con nuestros patrones en la parte de abajo de cada patrón de nuestro sitio. |
||||||||||||||||||||||


Con más de 40 años en el diseño de modelos de punto y de ganchillo, DROPS Design ofrece una de las más vastas colecciones de patrones gratuitos en el internet - traducidos en 17 idiomas. Al día de hoy, contamos con 324 catálogos y 12290 patrones - de los cuales 11685 están traducidos en español.
Nosotros trabajamos con mucho esmero para brindarte lo mejor que las labores de punto y ganchillo tienen para ofrecer,inspiración y consejos, así como hilos de magnífica calidad a precios increíbles! Te gustaría usar nuestros patrones para otro fin además del uso personal? Puedes leer acerca de lo que estás permitida a hacer en el texto de Copyright en la parte de abajo de todos nuestros patrones. Felices labores!
Escribe un comentario sobre DROPS 157-18
¡Nos encantaría saber qué piensas acerca de este patrón!
Si quieres escribir una pregunta referente al patrón, por favor asegúrate de elegir la categoría correcta en el formulario debajo, para acelerar el proceso de respuesta. Los campos obligatorios están marcados con un *.