
Categorías populares
¿Buscas un hilo?


Comentarios / Preguntas (52)
Nina escribió:
4th symbol in diagram makes 1 st out of 3 (you pass one over two already knitted tog.)
11.08.2014 - 14:10
![]() Cresta escribió:
Cresta escribió:
Help! I end up with a spare stitch in each block. Can you write out in standard knitting code what the steps over 4 rows should be? My version would be this: over 5 stitches: r1: p, kt (knit twisted), p, k, yo, k (ie 6 stitches now exist in place of 5) r2: k, pt (purl twisted), k, p, p, p, yo (ie 7 stitches now exist in place of 5) r3: p, kt, p, slip, k, k, psso 2 (now 6 stitches) r4: k, pt, k, p, p - ie instructions for 5 stitches, but still have a sixth one.
10.08.2014 - 20:14DROPS Design respondió:
Dear Cresta, diagram is read from the right to the left from RS and from the left to the right from WS, so that row 2 will be P3, YO, K, Ptwisted, P and row 4: K2, K, P twisted, K. NB: the YO created on row 2 should be dropped off needle on row 3. Happy knitting!
12.08.2014 - 11:44
![]() Gerd escribió:
Gerd escribió:
Hej! Jag har en kund som gör den här modellen i storlek L. Det har gått 3 nystan mer än på garnåtgången. Ändå stickade hon storlek M på ärmarna. Vi ser också på kommentarena att det har hänt fler gånger. Så det vore bra om det ändrades.
28.05.2014 - 08:59Leonor escribió:
En la explicacion del punto M1 hay un simbolo q significa "este punto no existe en esta vuelta", como lo tejo entonces?
12.05.2014 - 01:27DROPS Design respondió:
Hola Leonor. El símbolo "no existe" significa que no hay punto en la vta y como no hay punto - no se trabaja. Eso pasa porque tenemos que explicar la labor en un diagrama plano.
17.05.2014 - 20:33
![]() Susan Loudon escribió:
Susan Loudon escribió:
On your lace pattern, row 1 says: 1 YO between 2 sts, K YO on next row." But below, you say that row 2 is P3, YO. Where do I K the YO?, as described above? It lines up right in the middle of the P3... Also, the stitch count varies row to row, so the patterns don't line up, making the stripe pattern as shown in the photo...what am I doing wrong? Could you please describe the Lace Diagram, stitch by stitch, row by row , including the edge sts etc for one complete block?
11.05.2014 - 06:51DROPS Design respondió:
Dear Mrs Loudon, you are right for row 2. The pattern should be lined up, repeat A.1 until 4 sts remain on row, P 1, K 1 twisted, P 1 and 1 edge st in garter st. Work the twisted st P twisted from WS (as the 3 first sts in A.1). From WS, work these 3 sts then repeat A.1 starting from left towards right. Happy knitting!
12.05.2014 - 09:17
![]() Susan Loudon escribió:
Susan Loudon escribió:
Thank-you for the description of the lace... but I'm still confused! You note that on R3 to slip 1 st as if to P,K2,psso the 2K sts...etc... but your pattern says" drop YO off the needle on next row (which would be Row 3),. So I'm not sure when to drop that YO because you don't mention it in your instruction.??? thanks! Susan
10.05.2014 - 00:48DROPS Design respondió:
Dear Susan, the YO made on 2nd row is then dropped on 3rd row (you don't work this YO), so that on 3rd row you will: drop the yo from previous row, then slip 1 st as if to P, K 2, psso the 2 K sts (2 sts remain). Happy knitting!
10.05.2014 - 09:43
![]() Susan escribió:
Susan escribió:
Could you please send me a link to your video instruction for the complete lace pattern for IBIZA 153-12. I notice on your webpage that you have a lot of lace patterns, but you don't have this one! It seems very confusing with different stitch counts on each row. thank-you!
09.05.2014 - 05:42DROPS Design respondió:
Dear Susan, your request have been forwarded. the lace pattern is worked over 3 sts as follows. R1(RS): K1,YO,K1 - R2(WS): P3,YO - R3: slip 1 st as if to P, K 2, psso the 2 K sts (2 sts remain) - R4: P2. Happy knitting!
09.05.2014 - 08:59
![]() Susan escribió:
Susan escribió:
I've just begun this challenging pattern and am having a problem with the Lace Pattern. Does the A-1 diagram read as normal, from the bottom right to the left, then up one row from left to right? I've asked the Question on other sites and have had different answers! I've completed Row 1, now want to go to Row 2 but don't know where to start .. at the P 3 end or at the K,P twist,K end?
09.05.2014 - 01:32DROPS Design respondió:
Dear Susan, diagrams are read from right towards left from RS and left towards right from WS. The 1st row finished with the first 3 sts in diagram, so that you start row 2 with K, P twisted, K and then A.1 (P3, YO). Happy knitting!
09.05.2014 - 08:54
![]() Anne escribió:
Anne escribió:
Som mange av dropsoppskriftene, stemmer ikke antall garnnøster, jeg måtte kjøpe 4 ekstra nøster. maskeantallet stemmer i cm.
21.04.2014 - 21:18
![]() M. Mulder escribió:
M. Mulder escribió:
Trui is af, hij is prachtig, maar twee bollen te weinig. En dan zit je met een ander verfbad.
27.03.2014 - 16:30
|
||||||||||||||||||||||
Ibiza#ibizasweater |
||||||||||||||||||||||
|
|
||||||||||||||||||||||
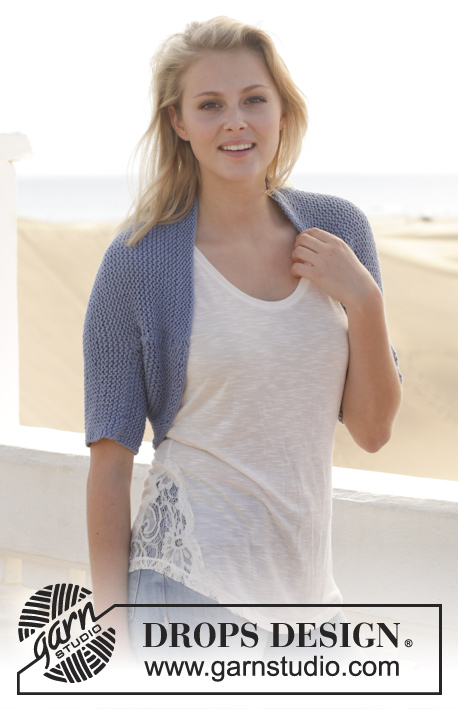
Pulóver DROPS de punto, con patrón de calados, en “Paris”. Talla: S – XXXL.
DROPS 153-12 |
||||||||||||||||||||||
|
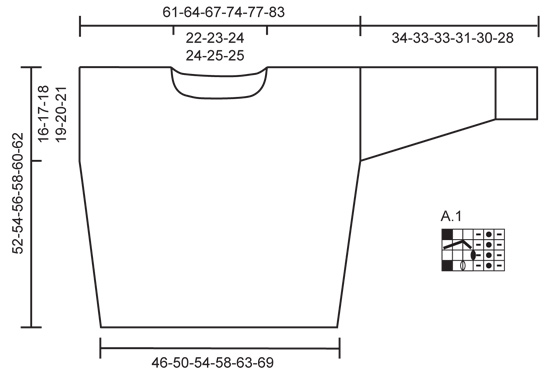
PT MUSGO (de ida y vuelta en la ag): Tejer todas las hileras de derecho. 1 surco = 2 hileras tejidas de derecho. PATRÓN: Ver diagrama A.1. El diagrama muestra todas las hileras en el patrón vistas por el LD. ------------------------------------------------------ PULÓVER: Tejido de ida y vuelta en la ag, en partes, y unidas con una costura cuando está terminado. FRENTE: Mon 76-83-88-94-103-113 pts (incl 1 pt de orillo en cada lado) en ag tamaño 5.5 mm y tejer 3 surcos en pt musgo. Después tejer en pt jersey con 1 pt de orillo en PT MUSGO – ver explicación arriba – en cada lado de la pieza. Cuando la pieza mida aprox 2 cm, aum 1 pt en cada lado, aum con 1 HEB (lazada) a 1 pt del pt de orillo y, en la hilera sig, tejer la HEB retorcida (es decir, insertar la ag por atrás del pt en vez de por delante) para evitar que se formen agujeros. Repetir los aum aprox a cada 3-3½-3½-3-3½-3½ cm 11-10-10-12-10-10 veces más (= 12-11-11-13-11-11 veces en total) = 100-105-110-120-125-135 pts en la ag. Tejer hasta que la pieza mida 36-37-38-39-40-41 cm, insertar un marcapuntos en cada lado, éstos marcan dónde coser las mangas. Después tejer de la manera sig, por el LD: 1 pt de orillo en pt musgo, repetir A.1 hasta que resten 4 pts en la hilera, 1r, 1d retorcido, 1r y 1 pt de orillo en pt musgo. El pt tejido retorcido de derecho por el LD se teje retorcido de revés por el LR. Tejer de esta manera hasta que la pieza mida 46-48-50-52-54-56 cm, ajustar después de una repetición completa de A.1 verticalmente. Tejer los primeros 35-37-39-44-46-51 pts como antes, rem los 30-31-32-32-33-33 pts sig y tejer el resto de la hilera como antes. Tejer cada hombro por separado – AL MISMO TIEMPO, rem 1 pt al inicio de cada hilera a partir del escote 3 veces en total = 32-34-36-41-43-48 pts restantes en cada hombro. Continuar hasta que la pieza mida 52-54-56-58-60-62 cm y rem. ESPALDA: Tejer como la pieza del frente PERO tejer hasta que la pieza mida 50-52-54-56-58-60 cm antes de rem para el escote – ajustar después de una repetición completa de A.1 verticalmente. Tejer como antes sobre los primeros 33-35-37-42-44-49 pts, rem los 34-35-36-36-37-37 pts sig y tejer el resto de la hilera como antes. Tejer cada hombro por separado – AL MISMO TIEMPO, rem 1 pt al inicio de la hilera sig a partir del escote = 32-34-36-41-43-48 pts restantes en cada hombro. Tejer hasta que la pieza mida 52-54-56-58-60-62 cm y rem. MANGA: Mon 45-45-50-50-53-53 pts en ag tamaño 5.5 mm (incl 1 pt de orillo en cada lado) y tejer 3 surcos de ida y vuelta en la ag. Después tejer de la manera sig: 1 pt de orillo en pt musgo, 0-0-0-0-2-2 pts reveses, A.1 hasta que resten 4-4-4-4-5-5 pts, 1r, 1d retorcido, 1-1-1-1-2-2 pts reveses y 1 pt de orillo en pt musgo. El pt tejido retorcido de derecho por el LD se teje retorcido de revés por el LR. Tejer hasta que la pieza mida 12 cm, ajustar después de una repetición completa de A.1 verticalmente. Después tejer en pt jersey y, al mismo tiempo, aum 1 pt a 1 pt del pt de orillo en pt musgo en cada lado, repetir los aum a aprox cada 6½-4½-4½-3½-4-2½ cm 3-4-4-5-4-5 veces más (= 4-5-5-6-5-6 veces en total) = 53-55-60-62-63-65 pts en la ag. Tejer hasta que la pieza mida 34-33-33-31-30-28 cm y rem (medidas más cortas en las tallas más grandes debido a una mayor anchura de los hombros). Tejer la otra manga de la misma manera. ENSAMBLAJE Y ORILLA DEL CUELLO: Hacer la costura de uno de los hombros, dejar el otro abierto. Levantar 80-100 pts por el LD alrededor de la orilla del escote. Tejer 3 surcos de ida y vuelta en la ag, rem. Hacer la costura del otro hombro y el lado del cuello. Montar las mangas entre los dos marcapuntos insertados en el frente y pieza de la espalda. Hacer la costura bajo las mangas y de los laterales en una, a 1 pt del pt de orillo. |
||||||||||||||||||||||
Explicaciones del diagrama |
||||||||||||||||||||||
|
||||||||||||||||||||||
 |
||||||||||||||||||||||
¿Terminaste este patrón?Entonces, etiqueta tus fotos con #dropspattern #ibizasweater o envíalas a la galería #dropsfan. ¿Necesitas ayuda con este patrón?Encontrarás 20 videos tutoriales, un espacio para comentarios/preguntas y más visitando la página del patrón en garnstudio.com © 1982-2026 DROPS Design A/S. Todos los derechos reservados. Este documento, incluyendo todas sus sub-secciones, está protegido por los derechos de autor (copyright). Lee más acerca de lo que puedes hacer con nuestros patrones en la parte de abajo de cada patrón de nuestro sitio. |
||||||||||||||||||||||


Con más de 40 años en el diseño de modelos de punto y de ganchillo, DROPS Design ofrece una de las más vastas colecciones de patrones gratuitos en el internet - traducidos en 17 idiomas. Al día de hoy, contamos con 324 catálogos y 12290 patrones - de los cuales 11685 están traducidos en español.
Nosotros trabajamos con mucho esmero para brindarte lo mejor que las labores de punto y ganchillo tienen para ofrecer,inspiración y consejos, así como hilos de magnífica calidad a precios increíbles! Te gustaría usar nuestros patrones para otro fin además del uso personal? Puedes leer acerca de lo que estás permitida a hacer en el texto de Copyright en la parte de abajo de todos nuestros patrones. Felices labores!
Escribe un comentario sobre DROPS 153-12
¡Nos encantaría saber qué piensas acerca de este patrón!
Si quieres escribir una pregunta referente al patrón, por favor asegúrate de elegir la categoría correcta en el formulario debajo, para acelerar el proceso de respuesta. Los campos obligatorios están marcados con un *.