
Categorías populares
¿Buscas un hilo?


Comentarios / Preguntas (52)
![]() Selva escribió:
Selva escribió:
Bonjour, Je ne comprends pas le diagramme A1, Au second rang, j'ai une maille en trop. Pourriez -vous m'expliquer ? Cdt.
16.03.2025 - 22:18DROPS Design respondió:
Bonjour Mme Selva, c'est normal, vous avez fait 1 jeté entre les 2 mailles endroit vous avez donc 1 m en plus; au 3ème rang, vous allez diminuer cette maille en plus: glissez la 1ère de ces 3 mailles endroit comme pour la tricoter à l'envers, tricotez les 2 mailles suivantes à l'endroit et passez la maille glissée par-dessus les 2 mailles tricotées = il reste 2 mailles de nouveau. (n'oubliez pas le jeté du 2ème rang qu'il faudra laisser tomber au 3ème rang). Retrouvez ici comment tricoter ce type de petites torsades. Bon tricot!
17.03.2025 - 09:51
![]() Kath escribió:
Kath escribió:
Where's A1? I don't see it in the pattern.
13.05.2022 - 23:52DROPS Design respondió:
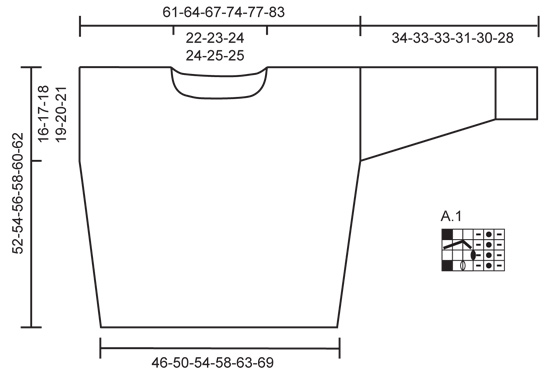
Dear Kath, you can find chart A.1 just under the sleeve in the measurements sketch, below the pattern instructions. Happy knitting!
15.05.2022 - 22:32
![]() Eva escribió:
Eva escribió:
Nagyon orulok, hogy vannak ezek a mintak, de a megadott fonalmennyiseg nem elegendo. Hogy leget az, higy a magyar leirasban kevesebbet adnak meg, mint pl az angolnal?
25.12.2021 - 20:08
![]() Jackie escribió:
Jackie escribió:
This is a lovely jumper and worth the time and effort it took to work out the pattern! Last advice very helpful however you do need to remember that rows 1 and 3 you start with the pattern as stated but with rows 2 and 4 you need to first do 4 stitches (plus the edge stitch makes 5 total) as follows: K (edge stitch), K1, P1 twisted, K1 then do the pattern. Also, don't forget to drop the yarn overs in row 3. They are there purely to make the thread loose enough to go over 2 stitches.
12.08.2020 - 17:39
![]() Victoria escribió:
Victoria escribió:
Thank you so much :)
09.07.2020 - 16:16
![]() Victoria escribió:
Victoria escribió:
I have read the lesson but still find it confusing - perhaps it is my age. I cannot see how hard it would be to provide 4 lines of pattern for those of us who are struggling with the digram
08.07.2020 - 17:12DROPS Design respondió:
Hi Victoria, The jumper is worked back and forth, so the rows alternate from the right side to the wrong side (when working from the wrong side, you work from left to right). Starting on the right side the pattern is as follows Row 1: P1, K1 twisted, P1, K1. 1YO, K1, repeat. Row 2: P3, 1YO, K1, P1 twisted, K1, repeat Row 3: P1, K1 twisted, P1, slip 1, k2, psso, repeat Row 4: P2, K1, P1 twisted, K1, repeat. Happy knitting!
09.07.2020 - 07:39
![]() Victoria escribió:
Victoria escribió:
I have read all the Q&As but I'm still struggling with the pattern in the A1 diagram. Is it possible to PLEASE just write out the full instructions. From the numbers of questions here I am sure many knitters would appreciate it. Thx
08.07.2020 - 15:54DROPS Design respondió:
Dear Victoria, The DROPS patterns are knitted and crocheted by thousands and thousands of people around the world. We understand however that in certain countries, with different knitting/crochet traditions than Scandinavia, our patterns might be written in a way that differs from what some are used to. But of course we want everyone to understand our patterns, so that’s why we have created an extensive library of tutorial videos as well as step by step lessons that explain how to follow the techniques we use and how to read the diagrams in our patterns. Give them a try!
08.07.2020 - 16:43
![]() Mia escribió:
Mia escribió:
Hello, other than the garter edge stitch, how do we knit the 4 stitches in row 2 that we knitted at the end of row 1, before we start on the A.1 Diagram (pattern?) I am saying this because in row 1 we are not finishing the row with the same 6 stitches that are part of the A.1 Diagram. The 4 stitches are extra, not part of the A.1 Diagram. Can you please describe row 2 right at the start? like edge garter stitch, ...... Thank you
30.03.2020 - 09:16DROPS Design respondió:
Dear Mia, from RS you work: 1 edge st in garter st, repeat A.1 until 4 sts remain and work these 4 sts like this: P1, K1 twisted, P1, 1 edge st in garter st. From WS work: 1 edge st in garter st, K1, P1 twisted, K1, repeat A.1 (reading now from the left towards the right), 1 edge st in garter st. read more about diagrams here. Happy knitting!
30.03.2020 - 11:30
![]() Lotte Meincke escribió:
Lotte Meincke escribió:
Hvad gør man, når der står at “omslaget slippes ned på næste pind”??? (Opskrift 153-12) Findes der videoer, der viser, hvad der menes med symbolerne? Mvh Lotte
13.02.2020 - 12:20DROPS Design respondió:
Hej Lotte, prøv at lave en lille strikkeprøve over de 5 masker i diagrammet, med 2 kantmasker i hver side 1.pind strikker du 2 kantm, 1vr, 1drejet ret, 1vrang, 1ret, 1 omslag, 1ret, 2 kantm 2.pind strikker du (fra vrangen) 2kantm, 3 vrang, 1omslag, 1 ret, 1 drejet vrang, 1ret, 2kantm 3.pind strikker du (fra retten) 2 kantm, 1vrang, 1drejet ret, 1vrang, slip omlaget af pinden så der bliver hul, tag 1 m løst af p som om den strikkes vrang, 2ret, løft den løse maske over de 2ret, 2kantm 4.pind strikker du fra vrangen, 2kantm, 2vrang, 1ret, 1 drejet vrang,1ret, 2kantm Strik gerne de 4 pinde 2-3 gange i højden så du kan se systemet. God fornøjelse!
14.02.2020 - 11:22
![]() Manuela escribió:
Manuela escribió:
Herzlichen Dank für die rasche Antwort, natürlich gleich ausprobiert und klappt wunderbar. Möchte jedoch darauf hinweisen dass dann die Beschreibung des Symbols nicht korrekt ist, bei dieser wird nämlich davon gesprochen diesen Umschlag in der nächsten Reihe rechts zu stricken ! LG und danke nochmal
30.09.2019 - 17:07
|
||||||||||||||||||||||
Ibiza#ibizasweater |
||||||||||||||||||||||
|
|
||||||||||||||||||||||
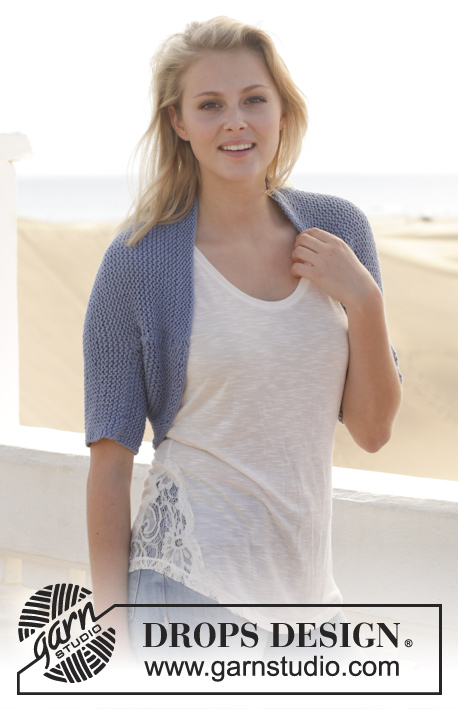
Pulóver DROPS de punto, con patrón de calados, en “Paris”. Talla: S – XXXL.
DROPS 153-12 |
||||||||||||||||||||||
|
PT MUSGO (de ida y vuelta en la ag): Tejer todas las hileras de derecho. 1 surco = 2 hileras tejidas de derecho. PATRÓN: Ver diagrama A.1. El diagrama muestra todas las hileras en el patrón vistas por el LD. ------------------------------------------------------ PULÓVER: Tejido de ida y vuelta en la ag, en partes, y unidas con una costura cuando está terminado. FRENTE: Mon 76-83-88-94-103-113 pts (incl 1 pt de orillo en cada lado) en ag tamaño 5.5 mm y tejer 3 surcos en pt musgo. Después tejer en pt jersey con 1 pt de orillo en PT MUSGO – ver explicación arriba – en cada lado de la pieza. Cuando la pieza mida aprox 2 cm, aum 1 pt en cada lado, aum con 1 HEB (lazada) a 1 pt del pt de orillo y, en la hilera sig, tejer la HEB retorcida (es decir, insertar la ag por atrás del pt en vez de por delante) para evitar que se formen agujeros. Repetir los aum aprox a cada 3-3½-3½-3-3½-3½ cm 11-10-10-12-10-10 veces más (= 12-11-11-13-11-11 veces en total) = 100-105-110-120-125-135 pts en la ag. Tejer hasta que la pieza mida 36-37-38-39-40-41 cm, insertar un marcapuntos en cada lado, éstos marcan dónde coser las mangas. Después tejer de la manera sig, por el LD: 1 pt de orillo en pt musgo, repetir A.1 hasta que resten 4 pts en la hilera, 1r, 1d retorcido, 1r y 1 pt de orillo en pt musgo. El pt tejido retorcido de derecho por el LD se teje retorcido de revés por el LR. Tejer de esta manera hasta que la pieza mida 46-48-50-52-54-56 cm, ajustar después de una repetición completa de A.1 verticalmente. Tejer los primeros 35-37-39-44-46-51 pts como antes, rem los 30-31-32-32-33-33 pts sig y tejer el resto de la hilera como antes. Tejer cada hombro por separado – AL MISMO TIEMPO, rem 1 pt al inicio de cada hilera a partir del escote 3 veces en total = 32-34-36-41-43-48 pts restantes en cada hombro. Continuar hasta que la pieza mida 52-54-56-58-60-62 cm y rem. ESPALDA: Tejer como la pieza del frente PERO tejer hasta que la pieza mida 50-52-54-56-58-60 cm antes de rem para el escote – ajustar después de una repetición completa de A.1 verticalmente. Tejer como antes sobre los primeros 33-35-37-42-44-49 pts, rem los 34-35-36-36-37-37 pts sig y tejer el resto de la hilera como antes. Tejer cada hombro por separado – AL MISMO TIEMPO, rem 1 pt al inicio de la hilera sig a partir del escote = 32-34-36-41-43-48 pts restantes en cada hombro. Tejer hasta que la pieza mida 52-54-56-58-60-62 cm y rem. MANGA: Mon 45-45-50-50-53-53 pts en ag tamaño 5.5 mm (incl 1 pt de orillo en cada lado) y tejer 3 surcos de ida y vuelta en la ag. Después tejer de la manera sig: 1 pt de orillo en pt musgo, 0-0-0-0-2-2 pts reveses, A.1 hasta que resten 4-4-4-4-5-5 pts, 1r, 1d retorcido, 1-1-1-1-2-2 pts reveses y 1 pt de orillo en pt musgo. El pt tejido retorcido de derecho por el LD se teje retorcido de revés por el LR. Tejer hasta que la pieza mida 12 cm, ajustar después de una repetición completa de A.1 verticalmente. Después tejer en pt jersey y, al mismo tiempo, aum 1 pt a 1 pt del pt de orillo en pt musgo en cada lado, repetir los aum a aprox cada 6½-4½-4½-3½-4-2½ cm 3-4-4-5-4-5 veces más (= 4-5-5-6-5-6 veces en total) = 53-55-60-62-63-65 pts en la ag. Tejer hasta que la pieza mida 34-33-33-31-30-28 cm y rem (medidas más cortas en las tallas más grandes debido a una mayor anchura de los hombros). Tejer la otra manga de la misma manera. ENSAMBLAJE Y ORILLA DEL CUELLO: Hacer la costura de uno de los hombros, dejar el otro abierto. Levantar 80-100 pts por el LD alrededor de la orilla del escote. Tejer 3 surcos de ida y vuelta en la ag, rem. Hacer la costura del otro hombro y el lado del cuello. Montar las mangas entre los dos marcapuntos insertados en el frente y pieza de la espalda. Hacer la costura bajo las mangas y de los laterales en una, a 1 pt del pt de orillo. |
||||||||||||||||||||||
Explicaciones del diagrama |
||||||||||||||||||||||
|
||||||||||||||||||||||
 |
||||||||||||||||||||||
¿Terminaste este patrón?Entonces, etiqueta tus fotos con #dropspattern #ibizasweater o envíalas a la galería #dropsfan. ¿Necesitas ayuda con este patrón?Encontrarás 20 videos tutoriales, un espacio para comentarios/preguntas y más visitando la página del patrón en garnstudio.com © 1982-2026 DROPS Design A/S. Todos los derechos reservados. Este documento, incluyendo todas sus sub-secciones, está protegido por los derechos de autor (copyright). Lee más acerca de lo que puedes hacer con nuestros patrones en la parte de abajo de cada patrón de nuestro sitio. |
||||||||||||||||||||||


Con más de 40 años en el diseño de modelos de punto y de ganchillo, DROPS Design ofrece una de las más vastas colecciones de patrones gratuitos en el internet - traducidos en 17 idiomas. Al día de hoy, contamos con 324 catálogos y 12290 patrones - de los cuales 11685 están traducidos en español.
Nosotros trabajamos con mucho esmero para brindarte lo mejor que las labores de punto y ganchillo tienen para ofrecer,inspiración y consejos, así como hilos de magnífica calidad a precios increíbles! Te gustaría usar nuestros patrones para otro fin además del uso personal? Puedes leer acerca de lo que estás permitida a hacer en el texto de Copyright en la parte de abajo de todos nuestros patrones. Felices labores!
Escribe un comentario sobre DROPS 153-12
¡Nos encantaría saber qué piensas acerca de este patrón!
Si quieres escribir una pregunta referente al patrón, por favor asegúrate de elegir la categoría correcta en el formulario debajo, para acelerar el proceso de respuesta. Los campos obligatorios están marcados con un *.