
Categorías populares
¿Buscas un hilo?


Comentarios / Preguntas (10)
![]() Monika Jüngling escribió:
Monika Jüngling escribió:
Vielen lieben Dank für die schnelle Antwort, wahrscheinlich hätte man mehr überlegen sollen. Klappt prima. Alles Gute und Gruß aus Berlin
19.09.2023 - 10:21
![]() Monika Jüngling escribió:
Monika Jüngling escribió:
Hallo, können Sie bitte noch einmal so nett sein, es mir in deutsch zu beantworten, wenn ich dieses tolle Teil in Runden stricken möchte. herzlichen Dank Monika Jüngling
17.09.2023 - 13:24
![]() Monika Jüngling escribió:
Monika Jüngling escribió:
Hallo, können Sie bitte noch einmal so nett sein, es mir in deutsch zu beantworten, wenn ich dieses tolle Teil in Runden stricken möchte. herzlichen Dank Monika Jüngling
17.09.2023 - 13:21DROPS Design respondió:
Liebe Frau Jüngling, bei der 1. Runde stricken Sie dann (2 Maschen links, 1 Masche rechts) die ganze Runde, dann stricken Sie die 2. Runde wie bei der 2. Reihe und diese 2 Runden wiederholen Sie. Viel Spaß beim stricken!
18.09.2023 - 15:40
![]() Jacqueline Moore escribió:
Jacqueline Moore escribió:
Can this hat be knitted in the round on circular needles? I ask because I prefer not to have a seam.
08.12.2020 - 17:47DROPS Design respondió:
Dear Mrs Moore, probably, you just have to cast on 2 sts less (= edge sts are not necessary when working in the round) and adjust pattern to be worked on every row from RS. Happy knitting!
09.12.2020 - 06:39
![]() Sanna Koskinen escribió:
Sanna Koskinen escribió:
I tryed to do this but I notice after trying that start needs to be reverse side. So when in the instruction says 1right "2wrong, 1right" this extent first layer needs to be 1wrong "2right, 1wrong" and second layer needs to be 1right "2wrong, false englsih rib"
17.09.2014 - 20:44Renée escribió:
In your answer to my query you stated finish with P2 for the WS row. Did you mean you finish with P1? As this is what the pattern states for the WS row. Can you please clarify.
05.02.2014 - 14:45DROPS Design respondió:
Dear Renée, you are correct, I'm sorry, WS row are worked starting with K2 and finishing with P1. Happy knitting!
05.02.2014 - 14:59RHS escribió:
The pattern states: 'Repeat the 1st and 2nd rows AT THE SAME TIME...', but by this stage in the pattern 3 rows have been knitted. Can you tell me how you continue from this point. What are the 1st and 2nd rows that one needs to continue in/repeat. The pattern is rather unclear.
03.02.2014 - 17:25DROPS Design respondió:
Dear RHS, you repeat row 1 (WS) and row 2 (RS) from "False english rib with double sts" until piece measures 12 cm for neckwarmer or 17-18 cm for hat. Happy knitting!
04.02.2014 - 09:03Renee escribió:
I worked 1st (RS) and 2nd (WS) rows. Then pattern states: repeat 1st & 2nd rows. Do you continue knitting exactly as you did for the 1st & 2nd rows? Starting each RS row with K1 & then False English rib with double sts, finishing with P2? Then knit each WS row starting with K2 then False English rib & finishing with P1? Or do you just continue after the 1st and 2nd rows with the False English rib with double st pattern?
03.02.2014 - 17:09DROPS Design respondió:
Dear Renee, from WS you start row with K2, then repeat from *-* from false english rib row 1 and finish with P2. From RS, you start with K1, repeat from *-* for row 2 in pattern, and finish with P2. Repeat these 2 rows this way. Happy knitting!
04.02.2014 - 09:02Renée escribió:
Is this pattern a revised version of an older pattern, with pattern no. ee469? I prefer the hat in pattern ee469, but the neck warmer in this pattern, as it has a firmer around the neck. Do you think it would look odd to knit the hat from the older pattern and the neck warmer from this pattern? As slightly different stitches and needle sizes are used.
30.12.2013 - 13:19DROPS Design respondió:
Dear Renée, ee-469 is another version of a set with this kind of pattern but different result. If you like to, you can use both patterns to make your own set. Just have a swatch and check how far you like it. Happy knitting!
30.12.2013 - 15:56
![]() Hanna escribió:
Hanna escribió:
Sehr harmonische Kombination. Einfach, klar und schön
11.06.2013 - 17:13
|
|
Red Hot Chili Pepper#redhotchilipepperset |
|
|
|
|
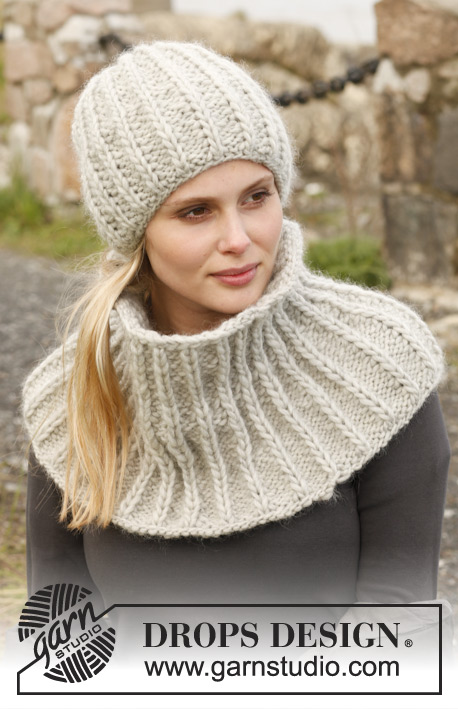
Gorro y cuello de punto DROPS en ”Snow” con falso punto inglés con puntos dobles.
DROPS 150-34 |
|
|
FALSO PT INGLÉS - CON PTS DOBLES: Fila 1 (LR): *1 r., 2 d.*. Fila 2 (LD): *2 r, 1 pt doble (ver explicación abajo)*, repetir de * a *. Repetir 1ª y 2 ª fila. PT DOBLE: Trabajar 1 pt de derecho en el pt de debajo del sig pt de derecho en la ag. ( es decir, los pts de las dos filas anteriores se trabajan como una). TIP PARA LOS AUMENTOS: Aum por el LD trabajando 1 HEB después de los pts de derecho. En la sig fila (LR) trabajar la HEB como pt de derecho retorcido ( es decir, tejer por detrás del pt en vez de por delante) para evitar que se formen agujeros. En la sig aum hacer la HEB antes de los pts de derecho para que los aum se alternen en el lado izquierdo y derecho de las secciones de revés). ----------------------------------------------------------------------------------------------------------------------- CUELLO: Se trabaja de ida y vta en ag circular, de arriba abajo. Mont 42 pts en ag circular tamaño 9 mm con Snow. Trabajar la primera fila como sigue por el lado derecho: 1 d., * 2 r., 1 d.*, repetir de * a * y finalizar con 2 r. Después trabajar como sigue por el LR: 2 d., FALSO PT INGLÉS - CON PTS DOBLES - ver explicación arriba, finalizar con 1 r. En la sig fila por el LD trabajar como sigue: 1 d., falso pt inglés - con pts dobles, finalizar con 2 r. Repetir 1ª y 2ª fila AL MISMO TIEMPO cuando la labor mida 12 cm aum todos grupos de 2r. a 3 r. ( ver por el LD) = 14 pts aum - leer TIP PARA LOS AUMENTOS - 56 pts. Repetir los aum en los grupos de pt de revés cuando la labor mida 14 cm = 70 pts. Después aum de la misma manera cada 3 cm 3 vcs más = 112 pts en la ag. Cuando la labor mida 24 cm, rem flojo. Coser el cuello borde con borde cogiendo la parte exterior del pt. GORRO: Se trabaja de ida y vta en ag circular. Mont 44 pts con ag circular tamaño 9 mm con Snow. Trabajar en pt elástico = 1 d./1 r. Trabajar de la misma manera hasta que la labor mida 4 cm. En la sig fila por el LD aum 1 pt en cada grupo de pts de revés (= 22 pts aum) = 66 pts. Después trabajar como sigue por el LR: 2 d., FALSO PT INGLÉS - CON PTS DOBLES - ver explicaciones arriba, finalizar con 1 r. En la sig fila por el LD trabajar como sigue: 1 d., falso pt inglés - con pts dobles, finalizar con 2 r. Repetir la 1ª y 2ª fila hasta que la labor mida 17-19 cm. En la sig fila por el LD trabajar como sigue: 1 d., * 2 pjr, 1 d.*, repetir de * a * hasta que queden 2 pts, finalizar con 2 r. = 44 pts. Trabajar 3 filas con derecho sobre derecho y revés sobre revés. Trabajar ahora todos los pts juntos de derecho de 2 en 2 = 22 pts. Cortar el hilo y pasarlo por los pts restantes. Estirar el hilo y asegurar. Coser el gorro borde con borde cogiendo la parte exterior del pt. |
|
¿Terminaste este patrón?Entonces, etiqueta tus fotos con #dropspattern #redhotchilipepperset o envíalas a la galería #dropsfan. ¿Necesitas ayuda con este patrón?Encontrarás 13 videos tutoriales, un espacio para comentarios/preguntas y más visitando la página del patrón en garnstudio.com © 1982-2026 DROPS Design A/S. Todos los derechos reservados. Este documento, incluyendo todas sus sub-secciones, está protegido por los derechos de autor (copyright). Lee más acerca de lo que puedes hacer con nuestros patrones en la parte de abajo de cada patrón de nuestro sitio. |


Con más de 40 años en el diseño de modelos de punto y de ganchillo, DROPS Design ofrece una de las más vastas colecciones de patrones gratuitos en el internet - traducidos en 17 idiomas. Al día de hoy, contamos con 324 catálogos y 12290 patrones - de los cuales 11685 están traducidos en español.
Nosotros trabajamos con mucho esmero para brindarte lo mejor que las labores de punto y ganchillo tienen para ofrecer,inspiración y consejos, así como hilos de magnífica calidad a precios increíbles! Te gustaría usar nuestros patrones para otro fin además del uso personal? Puedes leer acerca de lo que estás permitida a hacer en el texto de Copyright en la parte de abajo de todos nuestros patrones. Felices labores!
Escribe un comentario sobre DROPS 150-34
¡Nos encantaría saber qué piensas acerca de este patrón!
Si quieres escribir una pregunta referente al patrón, por favor asegúrate de elegir la categoría correcta en el formulario debajo, para acelerar el proceso de respuesta. Los campos obligatorios están marcados con un *.