
Suositut kategoriat
Etsitkö tiettyä lankaa?


Kommentit / Kysymykset (11)
![]() Monika Jüngling kirjoitti:
Monika Jüngling kirjoitti:
Vielen lieben Dank für die schnelle Antwort, wahrscheinlich hätte man mehr überlegen sollen. Klappt prima. Alles Gute und Gruß aus Berlin
19.09.2023 - 10:21
![]() Monika Jüngling kirjoitti:
Monika Jüngling kirjoitti:
Hallo, können Sie bitte noch einmal so nett sein, es mir in deutsch zu beantworten, wenn ich dieses tolle Teil in Runden stricken möchte. herzlichen Dank Monika Jüngling
17.09.2023 - 13:24
![]() Monika Jüngling kirjoitti:
Monika Jüngling kirjoitti:
Hallo, können Sie bitte noch einmal so nett sein, es mir in deutsch zu beantworten, wenn ich dieses tolle Teil in Runden stricken möchte. herzlichen Dank Monika Jüngling
17.09.2023 - 13:21DROPS Design vastasi:
Liebe Frau Jüngling, bei der 1. Runde stricken Sie dann (2 Maschen links, 1 Masche rechts) die ganze Runde, dann stricken Sie die 2. Runde wie bei der 2. Reihe und diese 2 Runden wiederholen Sie. Viel Spaß beim stricken!
18.09.2023 - 15:40
![]() Jacqueline Moore kirjoitti:
Jacqueline Moore kirjoitti:
Can this hat be knitted in the round on circular needles? I ask because I prefer not to have a seam.
08.12.2020 - 17:47DROPS Design vastasi:
Dear Mrs Moore, probably, you just have to cast on 2 sts less (= edge sts are not necessary when working in the round) and adjust pattern to be worked on every row from RS. Happy knitting!
09.12.2020 - 06:39
![]() Sanna Koskinen kirjoitti:
Sanna Koskinen kirjoitti:
I tryed to do this but I notice after trying that start needs to be reverse side. So when in the instruction says 1right "2wrong, 1right" this extent first layer needs to be 1wrong "2right, 1wrong" and second layer needs to be 1right "2wrong, false englsih rib"
17.09.2014 - 20:44Renee kirjoitti:
The increase tip states: On next row (WS) K YO twisted (ie work in the back of the loop instead of the front of the loop) to avoid holes. However, on the wrong side when one comes to the YO the stitch that should be knitted is a purl stitch (according to the pattern) not a knit stitch. So you need to purl into the back of the loop, do you not? I have no idea how to do this. Can you please clarify what is needed here.
08.02.2014 - 12:31DROPS Design vastasi:
Dear Renee, you inc in P sections seen from RS, from WS, these sts are K. Happy knitting!
10.02.2014 - 09:19Renée kirjoitti:
In your answer to my query you stated finish with P2 for the WS row. Did you mean you finish with P1? As this is what the pattern states for the WS row. Can you please clarify.
05.02.2014 - 14:45DROPS Design vastasi:
Dear Renée, you are correct, I'm sorry, WS row are worked starting with K2 and finishing with P1. Happy knitting!
05.02.2014 - 14:59RHS kirjoitti:
The pattern states: 'Repeat the 1st and 2nd rows AT THE SAME TIME...', but by this stage in the pattern 3 rows have been knitted. Can you tell me how you continue from this point. What are the 1st and 2nd rows that one needs to continue in/repeat. The pattern is rather unclear.
03.02.2014 - 17:25DROPS Design vastasi:
Dear RHS, you repeat row 1 (WS) and row 2 (RS) from "False english rib with double sts" until piece measures 12 cm for neckwarmer or 17-18 cm for hat. Happy knitting!
04.02.2014 - 09:03Renee kirjoitti:
I worked 1st (RS) and 2nd (WS) rows. Then pattern states: repeat 1st & 2nd rows. Do you continue knitting exactly as you did for the 1st & 2nd rows? Starting each RS row with K1 & then False English rib with double sts, finishing with P2? Then knit each WS row starting with K2 then False English rib & finishing with P1? Or do you just continue after the 1st and 2nd rows with the False English rib with double st pattern?
03.02.2014 - 17:09DROPS Design vastasi:
Dear Renee, from WS you start row with K2, then repeat from *-* from false english rib row 1 and finish with P2. From RS, you start with K1, repeat from *-* for row 2 in pattern, and finish with P2. Repeat these 2 rows this way. Happy knitting!
04.02.2014 - 09:02Renée kirjoitti:
Is this pattern a revised version of an older pattern, with pattern no. ee469? I prefer the hat in pattern ee469, but the neck warmer in this pattern, as it has a firmer around the neck. Do you think it would look odd to knit the hat from the older pattern and the neck warmer from this pattern? As slightly different stitches and needle sizes are used.
30.12.2013 - 13:19DROPS Design vastasi:
Dear Renée, ee-469 is another version of a set with this kind of pattern but different result. If you like to, you can use both patterns to make your own set. Just have a swatch and check how far you like it. Happy knitting!
30.12.2013 - 15:56
|
|
Red Hot Chili Pepper#redhotchilipepperset |
|
|
|
|
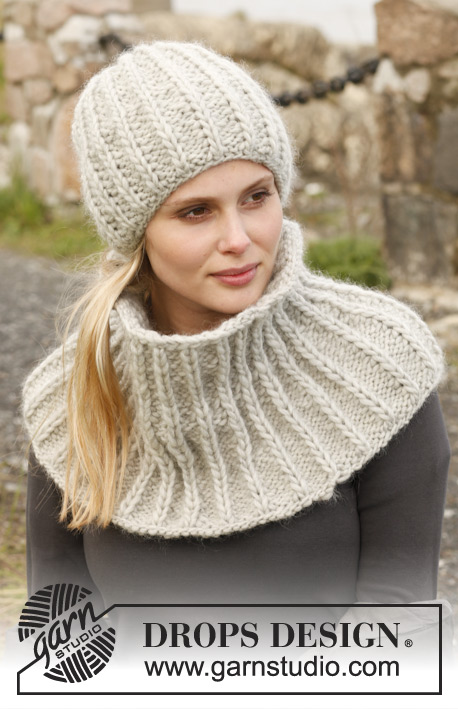
Neulotut myssy ja kauluri DROPS Snow-langasta. Työssä on puolipatenttineuletta.
DROPS 150-34 |
|
|
PUOLIPATENTTINEULE: 1. krs (nurja puoli): *1 n, 2 o*. 2. krs (oikea puoli): *2 n, neulo alla olevaan s:aan 1 oikea s*, toista * - *. Toista krs:t 1.-2. LISÄYSVINKKI: Lisää työn oikealla puolella, tekemällä oikean s:n jälkeen 1 langankierto. Seuraavalla krs:lla (= nurja puoli) langankierto neulotaan kiertäen oikein (eli neulo langankierto takakautta), jottei muodostuisi reikää. Seuraavalla kerralla lisäys tehdään ennen oikeaa s, eli lisäykset tehdään vuorotellen nurjien raitojen oikeassa ja vasemmassa reunassa. ---------------------------------------------------------- KAULURI: Neulotaan tasona pyöröpuikolla, ylhäältä alas. Luo 42 s pyöröpuikolle nro 9 Snow-langalla. Ensimmäinen krs (= oikea puoli) neulotaan näin: 1 o, *2 n, 1 o*, toista *-* ja neulo lopuksi 2 n. Seuraava krs (= nurja puoli) neulotaan näin: 2 o, neulo sitten PUOLIPATENTTINEULETTA (ks. selitys yllä), neulo lopuksi 1 n. Neulo seuraava krs (= oikea puoli) neulotaan näin: 1 o, neulo puolipatenttineuletta, neulo lopuksi 2 n. Toista krs:t 1.-2. SAMANAIKAISESTI kun työn korkeus on 12 cm, lisää jokaiseen 2 nurjan s:n raitaan (oikealta puolelta katsottuna) 1 s (LUE LISÄYSVINKKI) = 56 s (työhön lisättiin 14 s). Toista tällaiset nurjan raidan lisäykset, kun työn korkeus on 14 cm = 70 s. Toista sitten tällaiset lisäykset 3 cm välein vielä 3 kertaa = 112 s työssä. Kun työn korkeus on 24 cm, päätä s:t löyhästi. Ompele kauluri yhteen reunat vastakkain uloimmista silmukanreunoista. MYSSY: Neulotaan tasona pyöröpuikolla. Luo 44 s pyöröpuikolle nro 9 Snow-langalla. Neulo 1 o/1 n -joustinneuletta. Jatka joustinneuletta, kunnes työn korkeus on 4 cm. Lisää seuraavalla oikean puolen krs:lla jokaiseen nurjaan raitaan 1 s (työhön lisättiin 22 s) = 66 s. Seuraava krs (= nurja puoli) neulotaan näin: 2 o, neulo PUOLIPATENTTINEULETTA (ks. selitys yllä), neulo lopuksi 1 n. Neulo seuraava krs (= oikea puoli) näin: 1 o, neulo puolipatenttineuletta, neulo lopuksi 2 n. Toista krs:t 1.-2., kunnes työn korkeus on 17-19 cm. Neulo seuraava krs (= oikea puoli) näin: 1 o, *2 s nurin yhteen, 1 o*, toista *-* kunnes jäljellä on 2 s, neulo lopuksi 2 n = 44 s. Neulo s:t siten miltä ne näyttävät 3 krs:n ajan. Neulo sitten kaikki s:t pareittain oikein yhteen = 22 s. Katkaise lanka ja vedä se jäljellä olevien silmukoiden läpi. Kiristä aukko umpeen ja päättele langanpäät hyvin. Ompele myssy yhteen reunat vastakkain uloimmista silmukanreunoista. |
|
Oletko tehnyt tämän mallin?Tägää tällöin kuviasi #dropspattern #redhotchilipepperset tai lähetä kuvat #dropsfan galleriaan. Tarvitsetko apua tämän ohjeen kanssa?Löydät 13 ohjevideota, kommentteja/kysymyksiä ja muuta osoitteessa www.garnstudio.com © 1982-2025 DROPS Design A/S. Pidätämme kaikki oikeudet. Tämä tiedosto ja kaikki sen alatiedostot on suojattu tekijänoikeuslailla. Lue lisää siitä, mitä voit tehdä ohjeillamme, verkkosivujemme jokaisen ohjeen alaosasta. |


DROPS Design on toiminut neule- ja virkkausalalla yli 40 vuotta ja meillä on yksi kaikkein laajin valikoima ilmaisia ohjeita verkossa - käännettynä 17 kielelle. Tänään meiltä löytyy 314 lehteä ja 11822 ohjetta - joista 11201 ohjetta on käännetty suomeksi.
Työskentelemme ahkerasti, jotta voisimme antaa teille kaikkein parhaimpia neule- ja virkkausohjeita, inspiraatiota ja neuvoja sekä korkealaatuisia lankoja todella edulliseen hintaan! Haluaisitko käyttää ohjeitamme muuhun kuin henkilökohtaiseen käyttöön? Voit lukea säännöistä ohjeiden Tekijänoikeus -tekstissä, joka löytyy kaikkien ohjeidemme alapuolelta. Hauskoja hetkiä käsitöiden parissa!
Lisää kommentti ohjeeseen DROPS 150-34
Haluamme mielellämme kuulla mielipiteesi tästä ohjeesta!
Mikäli haluat esittää kysymyksen, valitse oikea kategoria alla olevasta valikosta - tällä tavoin saat vastauksen nopeammin. Pakolliset kentät on merkitty tähdellä *.