
Categorías populares
¿Buscas un hilo?


Comentarios / Preguntas (29)
![]() Claire escribió:
Claire escribió:
Bonjour, à partir de la reprise après les diminutions du talon, à quel moment faut-il faire les diminutions du dessus du pied pour équilibrer les deux augmentations centrales ? Si on s'en tient aux deux diminutions après et après les 41 mailles du dessus du pied tous les deux tours, le nombre de maille reste toujours égal à 81 et on n'arrive jamais à 58... (?) Merci pour votre aide
30.11.2025 - 21:42DROPS Design respondió:
Bonjour Claire, lorsque vous avez vos 82 mailles sur l'aiguille, vous allez continuer le jeu de diminutions/augmentations comme avant, et, en même temps, au 1er tour, commencez à diminuer 1 m de chaque côté des 41 m du dessus du pied, vous diminuez 12 x 2 m tous les 2 tours soit: 82-24=58m. Bon tricot!
01.12.2025 - 10:47
![]() Pfleger Margarete escribió:
Pfleger Margarete escribió:
Ich habe noch einen Nachtrag zur Spitze ( siehe der Beitrag von Katrin). Wenn ich richtig rechne, sind das 17 Runden rechts gestrickt und laut Beschreibung 5 cm. D. h. die Spitze erscheint rechts und nicht wie in der Abbildung mit Fischgratmuster.
07.05.2021 - 19:14
![]() Pfleger Margarete escribió:
Pfleger Margarete escribió:
Herringbone Socken: Mir scheint das Maschenverhältnis Schaft zu Fuß (72 zu 58 für Gr. 41/42) unverhältnismäßig, d. h. zu wenig für den Fuß. Ich hatte am Fuß 68 Maschen auf der Nadel und das hat gepaßt.
07.05.2021 - 12:10
![]() Katrin escribió:
Katrin escribió:
Vielen Dank für diese tolle Sockenidee! Doch die Beschreibung für die Spitze ist eine andere als die, die auf dem Bild abgebildet ist. Wie bekomme ich denn die Spitze so hin wie auf dem Bild? Vielen Dank für eine Antwort!
03.09.2020 - 21:49DROPS Design respondió:
Liebe Katrin, die Spitze sollte wie aus dem Foto aussehen. Es sind nur einigen Runden für die Spitze. Viel Spaß beim stricken!
04.09.2020 - 08:06
![]() Suzanne LaRocque escribió:
Suzanne LaRocque escribió:
Thank you for your help! It was an easy pattern once I got it rolling. I can't believe I had tribble figuring it out. Lol. One sock is complete in pink/purple and looks great. Now to finish the second one.
11.04.2020 - 08:05
![]() Suzanne LaRocque escribió:
Suzanne LaRocque escribió:
Thank you for the quick responses. One other clarification. Where we do the K2 tog decrease, would that be a knit on the next round and then followed also by a K over K and P over P?
01.04.2020 - 21:38DROPS Design respondió:
Dear Mrs LaRocque, these stitches should be knitted (the 27-31 middle stitches are started with P3 and ending with P3, so that the decrease on either side of these 27-31 stitches will be knitted. Happy knitting!
02.04.2020 - 07:55
![]() Suzanne LaRocque escribió:
Suzanne LaRocque escribió:
Thank you. Regarding the increase at the front...the YO K1 YO. The pattern says to K YO on the second round of the pattern. If you are knitting both YO, you would then have 3 knit stitches in a row. Is that correct and then you would continue the rib before and after those 3 stitches?
01.04.2020 - 16:22DROPS Design respondió:
Dear Mrs LaRocque, knit the yarn overs on next round (= there will be K3 in the middle of upper foot), then work the new stitches in rib pattern, keeping the middle stitch knit. Happy knitting!
01.04.2020 - 16:32
![]() Suzanne LaRocque escribió:
Suzanne LaRocque escribió:
In pattern 149-23, How do you maintain the rib pattern while working the herringbone inc/dec? I’ve ripped this back multiple times already. After the cuff, you continue the P3 K1 rib. The first decrease follows a P3 with “slip 1 stitch,K1, psso”. Then the rib is supposed to continue. My quandry is ….is this followed by P2 K1 P3 K1… or P3 K1 P3 K1…? Same with the other inc/dec. How do you carry on the rib pattern
01.04.2020 - 02:24DROPS Design respondió:
Dear Mrs LaRocque, since you are decreasing after the first 27-31 sts, the rib will not fit on these place, you just have to work K over K and P over P - do not forget to increase on mid front and work the increase in rib. The rib decreased will be "eaten" by the decrease, but should then match with the rib pattern behind leg and on mid upper foot after the transtion with decrease. Happy knitting!
01.04.2020 - 08:30
![]() Karoline escribió:
Karoline escribió:
Vielleicht habe ich meine Frage ungünstig gestellt, ich wollte eigentlich wissen, ob es richtig ist, dass ich nach der Abnahme nur noch 17M für die Sohle habe und wie ich von denen zu den 28M komme, die ich bei dem Setzen der Markierung für die Sohle benötige
16.11.2018 - 10:07DROPS Design respondió:
Liebe Karoline, nach den Abnahmen für den Fuss haben Sie 58 M übrig = 17 M für die Sohle + die 41 M mit dem Muster - dann setzen Sie die Markierer für die Spitze und die Maschen so verteilen daß es 30 M oben für den Fuss un 28 M für die Sohle gibt, dh einige Maschen beidseitig vom Fuss werden jetzt zu den Sohlen "gehören". Viel Spaß beim stricken!
16.11.2018 - 10:37
![]() Karoline escribió:
Karoline escribió:
Wie genau funktioniert die Abnahme nachdem die Ferse gestrickt wurde? Wenn jeweils vor und nach den 41 M (die mit dem Muster?) abgenommen wird, nehme ich doch nur an der Sohle ab und habe am Ende 41M oben und 17M für die Sohle und nicht 30 und 28
15.11.2018 - 18:15DROPS Design respondió:
Liebe Karoline, am Ende der Ferse haben Sie 15 M + 13 M werden an der Ferse aufgefasst: 15 + 2x13 + die stillgelegten 41 M = 82 M. Dann werden 2 Maschen auf beiden Seiten der 41 M abgenommen insgesamt 12 x = 82-24= 58 M bleiben. Viel Spaß beim stricken!
16.11.2018 - 09:13
|
|
Herringbone#herringbonesocks |
|
|
|
|
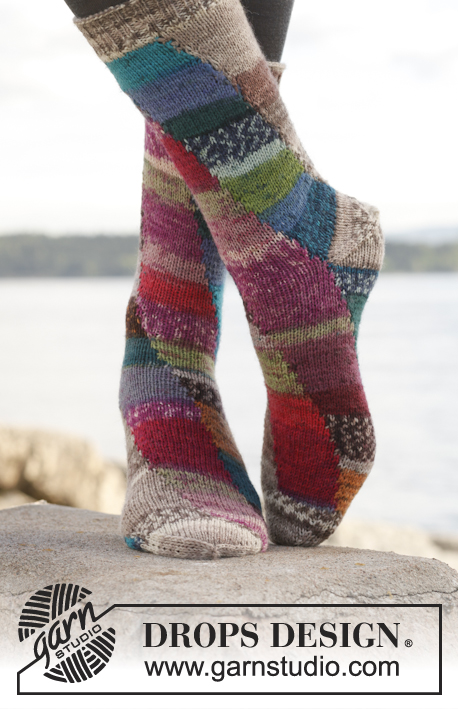
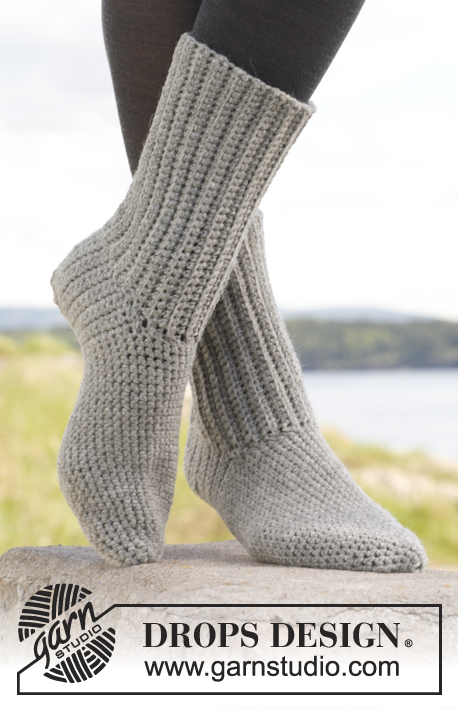
Calcetas de punto DROPS con resorte inclinado, en “Delight”. Talla: 35 – 43.
DROPS 149-23 |
|
|
DISMINUCIÓN DEL TALÓN: Hilera 1 (= LD): Tejer en pt jersey hasta que resten 7-7-9 pts, deslizar 1 pt de derecho, 1d, pasar el pt desl por encima, virar la pieza. Hilera 2 (= LR): Tejer en pt jersey hasta que resten 7-7-9 pts, deslizar 1 pt de revés, 1r, pasar el pt desl por encima, virar la pieza. Hilera 3 (= LD): Tejer en pt jersey hasta que resten 6-6-8 pts, deslizar 1 pt de derecho, 1d, pasar el pt desl por encima, virar la pieza. Hilera 4 (= LR): Tejer en pt jersey hasta que resten 6-6-8 pts, deslizar 1 pt de revés, 1r, pasar el pt desl por encima, virar la pieza. Continuar dism de esta manera con 1 pt de menos antes de cada dism hasta tener 15 pts en la ag. ------------------------------------------------------ CALCETA: Tejida en redondo en ag de doble punta. Mon 68-68-72 pts en ag de doble punta tamaño 2.5 mm con Delight. Tejer 1 vta de derecho. Continuar con resorte 3r/1d. RECUERDE MANTENER LA MISMA TENSIÓN DE TEJIDO DE LA MUESTRA! Tejer en resorte por 3 cm, después tejer de la manera sig: Continuar en resorte sobre los primeros 27-27-31 pts (es decir, terminar con 3r), deslizar 1 pt de derecho, 1d, pasar el pt desl por encima, continuar en resorte sobre los 18 pts sig, 1 HEB (lazada), 1d, 1 HEB, resorte sobre los 18 pts sig, 2 pjd. Repetir los aum y dism a cada 2 vtas, tejer las HEB de derecho (para crear agujeros), y tejer los nuevos pts siempre en resorte. NOTA! El número de pts no varía. Cuando la pieza mida 19 cm, mantener los primeros 27-27-31 pts en la ag para el talón y deslizar los otros 41 pts a 1 gancho o seguro aux = empeine. Continuar de ida y vuelta en la ag con resorte sobre los pts del talón por 5½ cm. Insertar 1 marcapuntos en el centro del talón – ahora medir la pieza a partir de aquí! Ahora dism para el talón – ver DISMINUCIÓN DEL TALÓN! Después de la dism del talón, levantar 13 pts en cada lado del talón y deslizar los 41 pts del empeine nuevamente a la ag = 82 pts. Insertar 1 marcapuntos en cada lado de los 41 pts del empeine. Después continuar en resorte con las dism y aum en el empeine, y en pt jersey en la planta del pie. AL MISMO TIEMPO, dism en cada lado de la manera sig: Tejer juntos retorcidos de derecho los últimos 2 pts antes de los 41 pts del empeine (es decir, insertar la ag por atrás del pt en vez de por delante) y tejer juntos de derecho los primeros 2 pts después de los 41 pts del empeine (= 2 pts dism). Dism de esta manera a cada 2 vtas 11 veces más (= 12 veces en total) = 58 pts. Tejer hasta que la pieza mida 17-19-22 cm a partir del marcapuntos del talón (= faltan 5 cm). Insertar 1 marcapuntos en cada lado para tener 30 pts en el empeine y 28 pts en la planta del pie. Continuar en pt jersey sobre todos los pts y, AL MISMO TIEMPO, dism para la punta del pie en cada lado de ambos marcapuntos tejiendo de la manera sig: 2 pjd, 1d, marcapuntos, 1d y 2 pts juntos retorcidos de derecho (= 2 pts dism en cada lado). Repetir las dism en cada lado, a cada 2 vtas, 5 veces más (= 6 veces en total) y, después, en cada vta 5 veces en total = 14 pts restantes en la ag. En la vta sig, tejer todos los pts juntos de derecho, de 2 en 2 = 7 pts. Cortar el hilo y pasarlo a través de los pts restantes, fruncir y asegurar. |
|
¿Terminaste este patrón?Entonces, etiqueta tus fotos con #dropspattern #herringbonesocks o envíalas a la galería #dropsfan. ¿Necesitas ayuda con este patrón?Encontrarás 15 videos tutoriales, un espacio para comentarios/preguntas y más visitando la página del patrón en garnstudio.com © 1982-2026 DROPS Design A/S. Todos los derechos reservados. Este documento, incluyendo todas sus sub-secciones, está protegido por los derechos de autor (copyright). Lee más acerca de lo que puedes hacer con nuestros patrones en la parte de abajo de cada patrón de nuestro sitio. |


Con más de 40 años en el diseño de modelos de punto y de ganchillo, DROPS Design ofrece una de las más vastas colecciones de patrones gratuitos en el internet - traducidos en 17 idiomas. Al día de hoy, contamos con 324 catálogos y 12290 patrones - de los cuales 11685 están traducidos en español.
Nosotros trabajamos con mucho esmero para brindarte lo mejor que las labores de punto y ganchillo tienen para ofrecer,inspiración y consejos, así como hilos de magnífica calidad a precios increíbles! Te gustaría usar nuestros patrones para otro fin además del uso personal? Puedes leer acerca de lo que estás permitida a hacer en el texto de Copyright en la parte de abajo de todos nuestros patrones. Felices labores!
Escribe un comentario sobre DROPS 149-23
¡Nos encantaría saber qué piensas acerca de este patrón!
Si quieres escribir una pregunta referente al patrón, por favor asegúrate de elegir la categoría correcta en el formulario debajo, para acelerar el proceso de respuesta. Los campos obligatorios están marcados con un *.