
Categorías populares
¿Buscas un hilo?


Comentarios / Preguntas (38)
![]() Willeke escribió:
Willeke escribió:
Hoe is de onderkant nadat je de kop gevuld hebt dicht gemaakt. Groetjes Willeke
21.07.2025 - 16:21DROPS Design respondió:
Dag Willeke,
Je kunt de kop vullen, maar volgens het patroon wordt het verder niet dicht gemaakt, dus de vulling zit er als het ware los in.
22.07.2025 - 21:27
![]() April Stevenson escribió:
April Stevenson escribió:
Ok so this is a clarification question about the head of the chicken. I understand moving the st marker 12 st ahead before you reach your last stitch. So when you crochet 12 st it reach your new stitch marker spot do you slip stitch into the first stitch on the left the start of the 24 st to create a circle that you work upwards?
15.11.2024 - 20:53DROPS Design respondió:
Dear April, you move the marker 12 stitches back, so you will have 12 stitches between the marker and the stitch where you stop (which would be the mid-front of the head). Then, from there, without cutting the thread, work 12 more stitches. The 12 stitches from before + the new 12 stitches = 24 stitches, so now you have the 24 stitches of the head. Then join the round simply with a dc in the stitch with the marker (first stitch of the head) and continue working as indicated over the 24 stitches. Happy crochetting!
17.11.2024 - 20:52
![]() Raquel escribió:
Raquel escribió:
Cuanto debería medir la pieza desde el centro de la labor (vuelta 1) hasta la última vuelta del cuerpo antes de empezar a hacer la cabeza?
30.10.2024 - 01:10DROPS Design respondió:
Hola Raquel, la altura de la labor antes de empezar la cabeza serían 16cm. La base de la pieza son 20 cm de diámetro (desde el centro 10cm). Así que deberías tener 10 cm de media base (plana) y 16 cm de altura.
03.11.2024 - 13:03
![]() Betsy escribió:
Betsy escribió:
Thank you for this adorable hen pattern. I just finished my first one ( love it so much I want to make another ) I had no trouble following the pattern. I added wattles and gave her white tail feathers.
24.10.2024 - 17:08
![]() Marion Nijman escribió:
Marion Nijman escribió:
Hallo ik ben nu bij de kop maar snap niet hoe het verder moet ik. Weer niet hoe dat zit met die 24 vasten ik kom op 12 vasten ., ik denk dat er nu rond gehaakt moet worden klopt dat verder bedankt alvast groetjes marion nijman
02.04.2024 - 12:02DROPS Design respondió:
Dag Marion,
Op midden voor van de kop zit de markeerder en aan beide kanten daarvan zitten 12 vasten waarover je de kop in de rondte haakt.
03.04.2024 - 20:26
![]() Sandra escribió:
Sandra escribió:
Hej! Ska de 16 centimetrarna mätas från mitten eller från sista varvet med ökning? Mvh Sandra
06.03.2024 - 10:39DROPS Design respondió:
Hei Sandra. Fra siste omgang med økninger. Omgang 1. til 21. med økninger er bunnen, høyden på høna blir da fra siste omgang med økninger. mvh DROPS Design
11.03.2024 - 10:10
![]() Brandie Stewart escribió:
Brandie Stewart escribió:
I am having a hard time working the head portion of this pattern. When starting the head, it's a new round, I move my stitch marker from its og spot to 12 SC over, then do I start from that marker and crochet 12 more SC then SC in each of those making a 14 count? Or do crochet 12 SC into the last 12 SC to make it stacked?
15.02.2024 - 20:18DROPS Design respondió:
Dear Mrs Stewart, the marker is inserted into the 12th sc before the end of the round, now work 1 sc in each of the next 12 sc = the first 12 sc at the beginning of the round and join now in the round working 1 sc in the stitch with the marker = there are 24 sc for head: 12 before marker + 12 after marker. Happy crocheting!
16.02.2024 - 07:44
![]() Ashleigh Cole escribió:
Ashleigh Cole escribió:
Hello, I’m making the body of the chicken and it more wide and narrow than the one on the picture. I did the same amount of stitches and everything it says in the body category, however, it is more than like a wide basket (a taco shape) than a bag (a u shape) I was wondering if you could tell me what I did wrong or how to fix it?
06.01.2024 - 03:26DROPS Design respondió:
Dear Ashleigh, firstly, if the shape is too different, it may be an issue with the gauge. Also, after finishing and assemblying the piece, you will shape as much as possible to your desired shape, so if it isn't finished yet then maybe that is the difference with the one in the photo. Happy crocheting!
08.01.2024 - 00:05
![]() Sandy escribió:
Sandy escribió:
I had asked the question about working the head of the pattern. My second message indicated that I still didn't understand even with your response. BUT, I figured it out! So happy for myself. LOVING this pattern now that I figured it out. So happy with the results so far. Thank you for your help!
17.03.2023 - 03:05
![]() Sandy escribió:
Sandy escribió:
Your response to my last question, unfortunately did not answer my question. Do you have a video tutorial for this pattern? I don't understand the directions for the head. It would be helpful for me to see a tutorial. I am not understanding what is meant by moving the market 12 stitches and then turning so the marker is toward me and then working in the round. I am very visual and I am just not getting how to work this step of the pattern. A video would be most helpful. Thank you.
17.03.2023 - 01:27DROPS Design respondió:
Dear Sandy, we don't have any video to that pattern sorry, the head is worked following the body part, at the end of the bordy, you moved the marker in the 12th stitch before the last stitch worked, for the head, you will now work 12 sts, these 12 sts + the 12 sts worked at the end of previous round are now a total of 24 sts and you will worke now these 24 stitches in the round, work now 1 st in each of the 24 sts starting with the first of the 12 sts worked at the end of previous round on body, and continue with 1 st in each st for 6 rounds. Hope it can help. Happy crocheting!
17.03.2023 - 08:53
|
|
Henny Penny#hennypennybasket |
|
 |
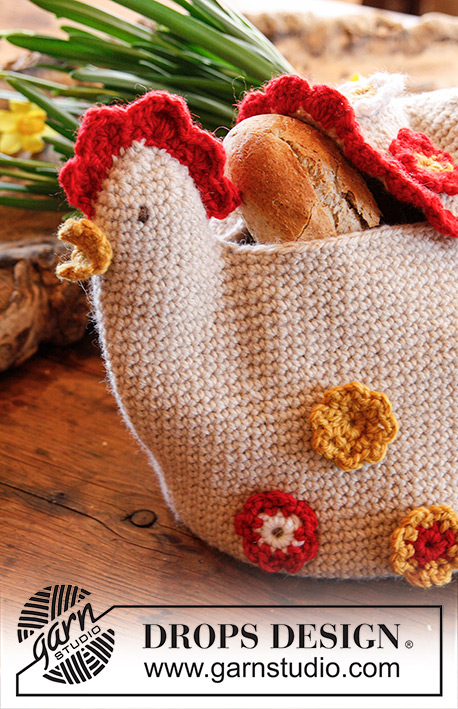 |
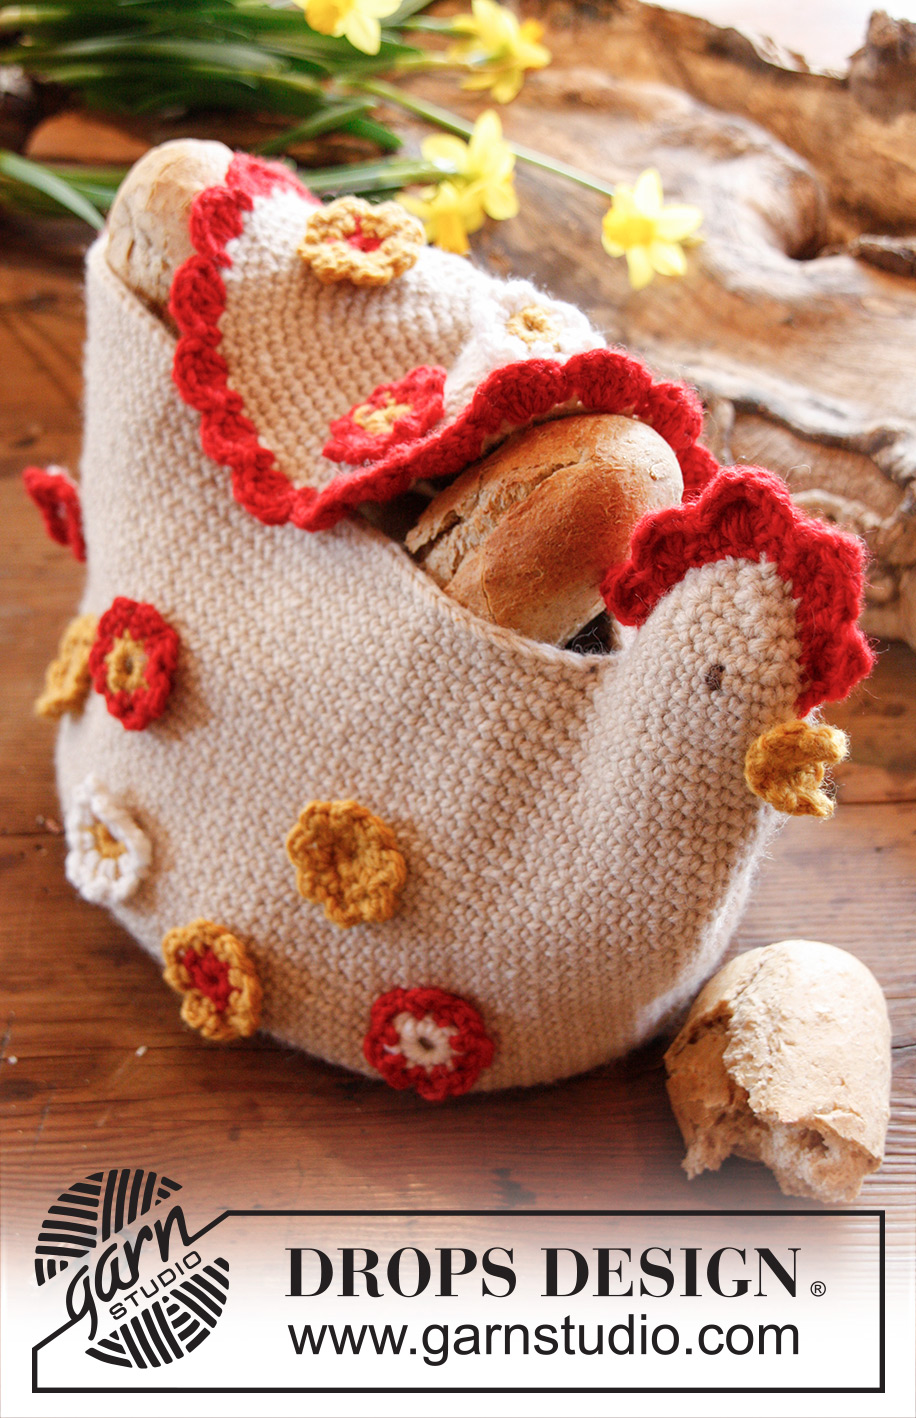
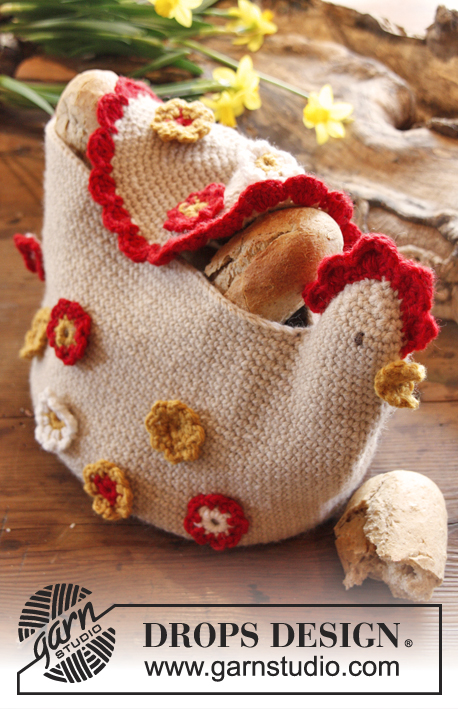
Pascua DROPS: Cesta DROPS con forma de gallina, en ganchillo, en “Nepal”.
DROPS Extra 0-908 |
|
|
CÍRCULO MÁGICO: Cuando la pieza se trabaja en redondo, empezar con esta técnica para evitar que se formen agujeros en el centro (en vez del anillo de cadenas): Sostener el extremo del hilo y enrollarlo una vez alrededor del dedo índice para formar un bucle. Sostener el bucle con el pulgar izquierdo y el dedo medio, colocar el hilo sobre el dedo índice izquierdo. Insertar la ag a través del bucle, hacer una lazada y extraer el hilo a través del bucle, hacer 1 cad, después hacer p.b. alrededor del bucle. Cuando se ha alcanzado el número de p.b. deseado, tirar del extremo del hilo para apretar el bucle. Asegurar el extremo del hilo por el lado de atrás. Continuar trabajando en redondo, en espiral. TRABAJAR EN REDONDO, EN ESPIRAL: Después del último p.b. de la vta, continuar hacia la vta sig con 1 p.b. en el p.b. sig (= primer p.b. de la vta anterior). NOTA: Insertar un marcapuntos al inicio de la vta entre el último p.b. y el primer p.b. de la vta, mover el marcapuntos hacia arriba a medida que avanza en el trabajo. TIP PARA AUMENTO: Aum 1 pt haciendo 2 p.b. en el p.b. sig. TIP PARA DISMINUCIÓN: Dism 1 p.b. trabajando 2 p.b. juntos de la manera sig: * Insertar la ag en el p.b. sig, tomar el hilo *, repetir de *a* una vez más, hacer 1 lazada extraer el hilo a través de todos los 3 pts en la ag. ------------------------------------------------------ CESTA: Trabajada en redondo en espiral. Empezar haciendo un CÍRCULO MÁGICO – leer explicación arriba – en la parte de abajo de la cesta con beige claro, en ag de ganchillo tamaño 4 mm. VUELTA 1: Hacer 8 p.b. en el círculo mágico. Leer TRABAJAR EN REDONDO, EN ESPIRAL arriba. VUELTA 2: Aum 1 p.b. en cada p.b. – Leer TIP PARA AUMENTO arriba = 16 p.b. VUELTA 3: * 1 p.b. en el p.b. sig, aum 1 p.b. *, repetir de *a* en toda la vta = 24 p.b. VUELTA 4: * 1 p.b. en cada uno de los 2 p.b. sig, aum 1 p.b. *, repetir de *a* en toda la vta = 32 p.b. VUELTA 5: * 1 p.b. en cada uno de los 3 p.b. sig, aum 1 p.b. *, repetir de *a* en toda la vta = 40 p.b. VUELTA 6 (y, después, en cada vta con número par): Hacer 1 p.b. en cada p.b. VUELTA 7: * 1 p.b. en cada uno de los 4 p.b. sig, aum 1 p.b. *, repetir de *a* en toda la vta = 48 p.b. VUELTA 9: * 1 p.b. en cada uno de los 5 p.b. sig, aum 1 p.b. *, repetir de *a* en toda la vta = 56 p.b. VUELTA 11: * 1 p.b. en cada uno de los 6 p.b. sig, aum 1 p.b. *, repetir de *a* en toda la vta = 64 p.b. VUELTA 13: * 1 p.b. en cada uno de los 7 p.b. sig, aum 1 p.b. *, repetir de *a* en toda la vta = 72 p.b. VUELTA 15: * 1 p.b. en cada uno de los 5 p.b. sig, aum 1 p.b. *, repetir de *a* en toda la vta = 84 p.b. VUELTA 17: * 1 p.b. en cada uno de los 6 p.b. sig, aum 1 p.b. *, repetir de *a* en toda la vta = 96 p.b. VUELTA 19: * 1 p.b. en cada uno de los 7 p.b. sig, aum 1 p.b. *, repetir de *a* en toda la vta = 108 p.b. VUELTA 21: * 1 p.b. en cada uno de los 8 p.b. sig, aum 1 p.b. *, repetir de *a* en toda la vta = 120 p.b. Después hacer 1 p.b. en cada p.b. hasta que la cesta mida aprox 16 cm verticalmente. Después de haber hecho el último p.b. de la última vta, mover el marcapuntos al 12º p.b. a partir de la ag (en el lado derecho del último p.b., fin de la vta = centro del frente de la cabeza). No cortar el hilo. CABEZA: Continuar haciendo 1 p.b. en cada uno de los 12 p.b. sig, se tienen ahora 24 p.b. en total contados a partir del pt con marcapuntos. Ahora trabajar la cabeza en redondo sobre estos 24 pts, de la manera sig: Virar la cesta para que el pt con marcapuntos esté en dirección hacia usted, hacer 1 p.b. en este p.b. (este pt es ahora el 1er p.b. de la vta, mover el marcapuntos hacia arriba), continuar con 1 p.b. en cada uno de los 23 p.b. sig = 24 p.b. en la vta. Mover el marcapuntos hacia arriba a medida que avanza en el trabajo. Después hacer 1 p.b. en cada p.b. por 5 vtas más (= 6 vtas en total). Después dism de la manera sig: VUELTA 1: * 1 p.b. en cada uno de los 4 p.b. sig, dism 1 p.b. – LEER TIP PARA DISMINUCIÓN arriba *, repetir de *a* en toda la vta = 20 p.b. VUELTA 2: * 1 p.b. en cada uno de los 3 p.b. sig, dism 1 p.b. *, repetir de *a* en toda la vta = 16 p.b. VUELTA 3: * 1 p.b. en cada uno de los 2 p.b. sig, dism 1 p.b. *, repetir de *a* en toda la vta = 12 p.b. VUELTA 4: * 1 p.b. en el p.b. sig, dism 1 p.b. *, repetir de *a* en toda la vta = 8 p.b. VUELTA 5: Trabajar todos los p.b. juntos, de 2 en 2 = 4 p.b., cortar el hilo. Pasar la punta del hilo a través de los últimos 4 p.b. CRESTA: Trabajada de ida y vuelta. Hacer 20 cad con rojo, después hacer 1 p.bjs en la 2ª cad a partir de la ag, después hacer 1 p.bjs en cada cad = 19 p.bjs, virar. Saltar el 1er p.bjs, en el p.bjs sig hacer: 1 p.a., 1 p.a.d. y 1 p.a., saltar 1 p.bjs, 1 p.b. en el p.bjs sig, saltar 1 p.bjs, en el p.bjs sig hacer: 2 p.a., 1 p.a.d. y 2 p.a., saltar 1 p.bjs, 1 p.b. en el p.bjs sig, saltar 1 p.bjs, en el p.bjs sig hacer: 2 p.a., 3 p.a.d. y 2 p.a., saltar 1 p.bjs, 1 p.b. en el p.bjs sig, saltar 1 p.bjs, en el p.bjs sig hacer: 2 p.a., 1 p.a.d. y 2 p.a., saltar 1 p.bjs, 1 p.b. en el p.bjs sig, saltar 1 p.bjs, en el p.bjs sig hacer: 1 p.a., 1 p.a.d. y 1 p.a., terminar con 1 p.bjs en el último p.bjs, cortar y asegurar el hilo. PICO: Trabajado de ida y vuelta. Hacer 2 cad con ocre. HILERA 1: Hacer 2 p.b. en la 2ª cad a partir de la ag = 2 p.b., virar. HILERA 2: Hacer 1 cad, aum 1 p.b. en cada p.b. = 4 p.b., virar. HILERA 3-4: Hacer 1 cad, 1 p.b. en cada p.b. HILERA 5: 1 cad, trabajar todos los p.b. juntos, de 2 en 2 = 2 p.b. HILERA 6: 1 cad, trabajar los 2 p.b. juntos = 1 p.b. Cortar y asegurar el hilo. COLA: Trabajada de ida y vuelta. Hacer 12 cad con rojo, después 1 p.b. en la 2ª cad a partir de la ag, después 1 p.b. en cada cad = 11 p.b., virar. Saltar el 1er p.b., en el p.b. sig hacer 3 p.a., saltar 1 p.b., 1 p.b. en el p.b. sig, saltar 1 p.b., en el p.b. sig trabajar de la manera sig: 1 p.a., 3 p.a.d. y 1 p.a., saltar 1 p.b., 1 p.b. en el p.b. sig, saltar 1 p.b., en el p.b. sig hacer 3 p.a., terminar con 1 p.bjs en el último p.b., cortar y asegurar el hilo. ALA: Trabajada en redondo, en espiral. Empezar haciendo un CÍRCULO MÁGICO en beige claro. Trabajar las vueltas 1 a 17 como se hizo en la cesta = 96 p.b. VUELTA 18: Cambiar a rojo y trabajar de la manera sig: * 1 p.b., saltar 1 p.b., 5 p.a. en el p.b. sig, saltar 1 p.b. *, repetir de *a* en toda la vta, cortar y asegurar el hilo. FLORES: Trabajadas en redondo. Hacer 2 de cada flor. FLOR 1: VUELTA 1: Mon 3 cad con ocre y formar un anillo con 1 p.bjs en la 1ª cad. Hacer 1 cad, 8 p.b. en el anillo de cad, terminar con 1 p.bjs en el primer p.b. VUELTA 2: Hacer 1 cad, * 1 p.b. en el p.b. sig, 3 cad *, repetir de *a* en toda la vta, terminar con 3 cad y 1 p.bjs en el 1er p.b. (= 8 bucles de cad). Cortar y asegurar el hilo. FLOR 2: Trabajar como la FLOR 1, mas hacer la 1ª VUELTA con ocre y la 2ª VUELTA con rojo. FLOR 3: Trabajar como la FLOR 1, mas hacer la 1ª VUELTA con rojo y la 2ª VUELTA con ocre. FLOR 4: Trabajar como la FLOR 1, mas hacer la 1ª VUELTA con blanco y la 2ª VUELTA con rojo. FLOR 5: Trabajar como la FLOR 1, mas hacer la 1ª VUELTA con ocre y la 2ª VUELTA con blanco. TERMINACIÓN: Coser la cresta en la parte de arriba de la cabeza, coser la cola en el otro lado de la cesta. Coser el pico en el frente de la cabeza y bordar los ojos con café medio. Colocar el ala por encima de la cesta, fijarla en un lado. Usar el ala como tapadera. Fijar las flores en la cesta y en la tapadera. Rellenar la parte de arriba de la cabeza con un poco de algodón hidrófilo, papel o similar para que quede firme. |
|
¿Terminaste este patrón?Entonces, etiqueta tus fotos con #dropspattern #hennypennybasket o envíalas a la galería #dropsfan. ¿Necesitas ayuda con este patrón?Encontrarás 9 videos tutoriales, un espacio para comentarios/preguntas y más visitando la página del patrón en garnstudio.com © 1982-2026 DROPS Design A/S. Todos los derechos reservados. Este documento, incluyendo todas sus sub-secciones, está protegido por los derechos de autor (copyright). Lee más acerca de lo que puedes hacer con nuestros patrones en la parte de abajo de cada patrón de nuestro sitio. |
|


Con más de 40 años en el diseño de modelos de punto y de ganchillo, DROPS Design ofrece una de las más vastas colecciones de patrones gratuitos en el internet - traducidos en 17 idiomas. Al día de hoy, contamos con 324 catálogos y 12290 patrones - de los cuales 11675 están traducidos en español.
Nosotros trabajamos con mucho esmero para brindarte lo mejor que las labores de punto y ganchillo tienen para ofrecer,inspiración y consejos, así como hilos de magnífica calidad a precios increíbles! Te gustaría usar nuestros patrones para otro fin además del uso personal? Puedes leer acerca de lo que estás permitida a hacer en el texto de Copyright en la parte de abajo de todos nuestros patrones. Felices labores!
Escribe un comentario sobre DROPS Extra 0-908
¡Nos encantaría saber qué piensas acerca de este patrón!
Si quieres escribir una pregunta referente al patrón, por favor asegúrate de elegir la categoría correcta en el formulario debajo, para acelerar el proceso de respuesta. Los campos obligatorios están marcados con un *.