
Categorías populares
¿Buscas un hilo?
















Comentarios / Preguntas (121)
 Jayne Bradbury escribió:
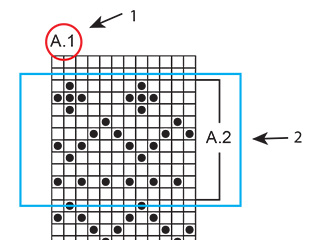
Regarding the chart: Are all rows, both right and wrong side, on the chart? Or just the right side? There are no numbers on the side of the chart to clarify and I want to be sure.
31.05.2016 - 16:17DROPS Design respondió:
Dear Mrs Bradbury, diagram shows all rows both from RS and from WS, seen from RS - read more about diagrams here. Happy knitting!
31.05.2016 - 17:01
 Sue escribió:
I do not understand the construction of this garment. Where are the sleeves? Where is the head?
29.05.2016 - 02:59DROPS Design respondió:
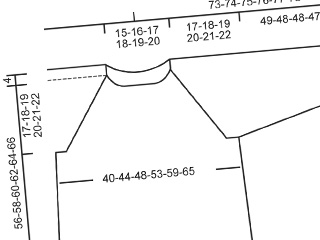
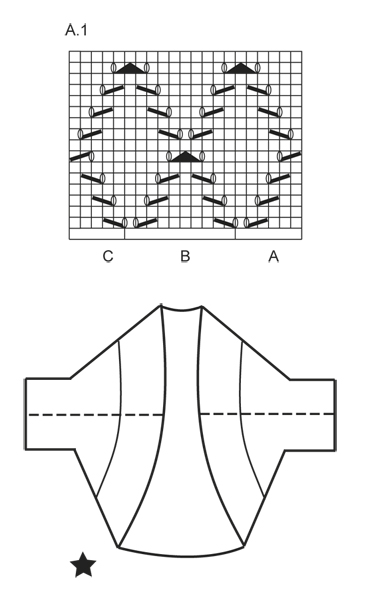
Dear Sue, the moss st edge around opening consists on the 7 cm worked at the beg of piece and the 7 cm worked at the end of piece (see measurement chart). The sts cast on /cast off on each side are for sleeves. The dotted lines on each side are the sides you will sew tog to create sleeves. In chart with black star, you can see the dotted line (seam for sleeves) and the 7 cm moss st edge around opening. Happy knitting!
30.05.2016 - 09:26
Jayne Bradbury escribió:
I am just beginning this project and cannot visualize how the two diagrams given relate to one another, nor can I visualize even how this is constructed. I imagine that once I get going, I may figure it out, but I want to be sure to select the correct size. My bust measurement is 36, which of course is between sizes S and M. Can you give me some guidance as to how this is constructed and perhaps which size might be best?
25.04.2016 - 02:33DROPS Design respondió:
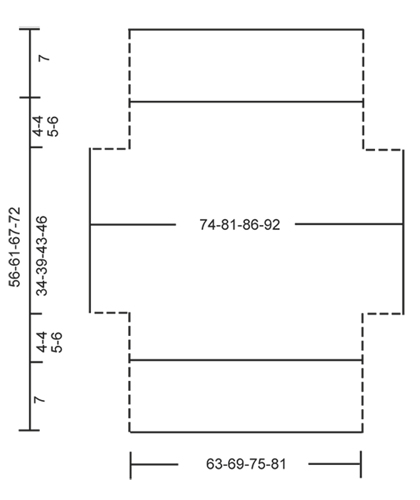
Dear Mrs Bradbury, check the measurement from chart compared to a similar garment you have. The dotted line in measurement chart are the seam on sides and sleeves (34-46 cm = around sleeve), and the 7 cm at the beg (bottom) and end (top) of chart = the garter st edge worked at the beg and end of piece. Happy knitting!
25.04.2016 - 10:24
Marlie escribió:
This looks like a great pattern but in the picture it looks like there is a seam in the garter stitch border. Is that right? Is there any way to make that less obvious? I am looking forward to making something in Big Merino...it is so soft! Many thanks
11.04.2016 - 15:09DROPS Design respondió:
Dear Marlie, yes that's correct, there is a seam on each side: you sew tog side and underarm seams in one - see also dotted line in chart and how the bolero looks when it's ready to wear. Happy knitting!
11.04.2016 - 16:04
Rose escribió:
I am very confused about construction. I cannot seem to figure out how to fold and "seam the sides and underarm seams. Your diagram is not helping me.
27.07.2015 - 01:29DROPS Design respondió:
Dear Rose, fold piece along the line where you see (74-81-86-92) on the measurement chart and sew tog the dotted lines from upper part to the dotted line on the lower part, the 34-39-343-46 cm in each side = armholes. Happy knitting!
27.07.2015 - 17:57
 Inger Andersson escribió:
Jag har monterat boleron men det blir så konstigt vid ärmen. Det blir inte någon ärm utan snarare en strut. Ser väldigt konstigt ut. Jag har kollat igenom mönstret och enligt diagrammet är måtten helt rätt.
07.07.2015 - 15:08DROPS Design respondió:
Har du måttet på ärmen enligt måttskissen nederst i mönstret innan du syr ihop? Den skall se ut som på bilden om du följer beskrivningen!
08.07.2015 - 14:56
 Tina escribió:
Fertig! Ich habe den Bolero in Farbe Natur gestrickt - ich brauchte allerdings 1 Knäuel mehr in Größe XXXL.
03.12.2014 - 07:23
Brigitte escribió:
Ich bin jetzt an der Reihe in der jeweils am Anfang und Ende die 10 M zugenommen werden. Wie füge ich die jetzt in das Muster ein? Wenn ich 3 M kraus und dann 6 M Muster stricke, sind das nur 9 Maschen bevor der Rapport kommt. Ich verstehe das leider nicht? Grüße Brigitte
06.09.2014 - 17:37DROPS Design respondió:
Liebe Brigitte, zählen Sie das Muster am besten ausgehend von den Rapporten vor den Ärmelzunahmen ab und setzen es einfach fort. Lesen Sie auch die Frage und Antwort weiter unten in der Kommentarliste vom 16.08.2013/19.08.2013.
11.09.2014 - 10:05
 Suponte escribió:
Hola: voy a tejer este bolero pero mi pregunta es como tejo las vueltas del reves del diagrama ? con punto reves?
06.08.2014 - 15:14DROPS Design respondió:
Hola. El diagrama muestra todas las filas del patrón vistas por el LD. Las filas por el LR se trabajan con pt revés.
06.08.2014 - 22:44
Pat Y escribió:
Thanks for your response. I realized afterwards that the pattern folds crosswise and thus the differing stitches are not an issue.
02.08.2014 - 15:49
|
|||||||||||||||||||
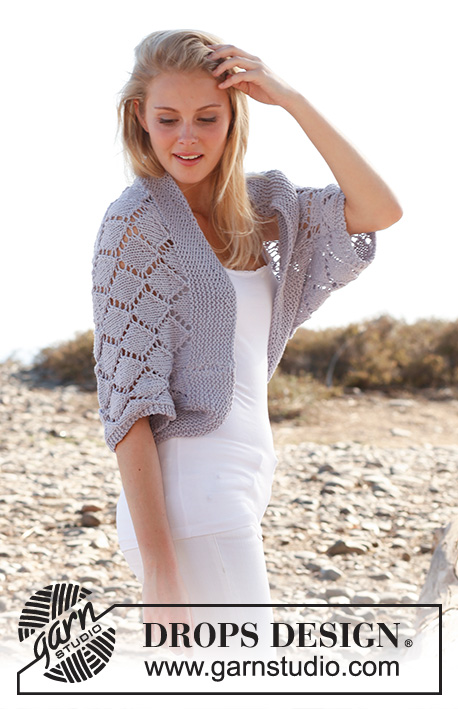
Cassie#cassiebolero |
|||||||||||||||||||
 |
 |
||||||||||||||||||
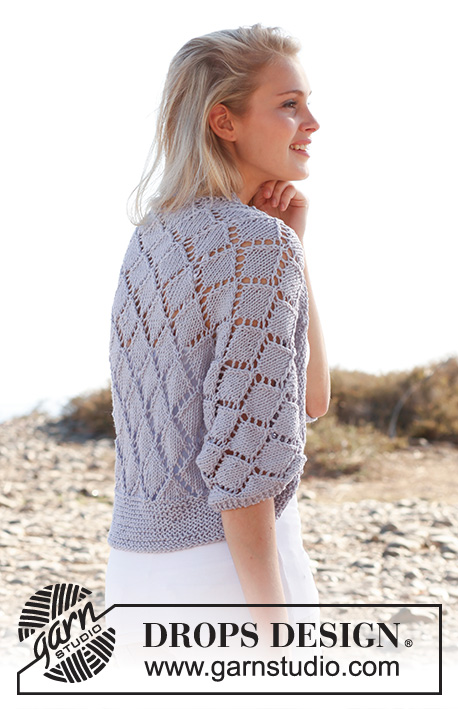
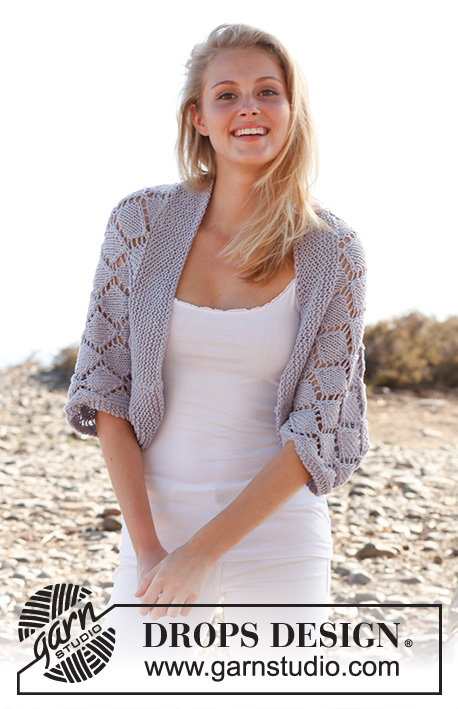
Bolero de punto DROPS con patrón de calados, en “Big Merino”. Talla: S – XXXL.
DROPS 146-16 |
|||||||||||||||||||
|
PT MUSGO (de ida y vuelta en la ag): Tejer todas las hileras de derecho. 1 surco = 2 hileras tejidas de derecho. PATRÓN: Ver diagrama A.1, el diagrama muestra todas las hileras en el patrón vistas por el LD. ------------------------------------------------------ BOLERO: Tejido de ida y vuelta en ag circular para tener espacio suficiente para todos los pts. Mon 107-117-127-137 pts en ag circular tamaño 5 mm con Big Merino. Tejer en pt musgo hasta que la pieza mida 7 cm. Después tejer de la manera sig, por el LD: 3 pts en PT MUSGO – ver explicación arriba, A.1A (= 6 pts), A.1B sobre los 90-100-110-120 pts sig, terminar con A.1 C (= 5 pts) y 3 pts en PT MUSGO. Continuar A.1 con 3 pts en pt musgo en cada lado. RECUERDE MANTENER LA MISMA TENSIÓN DE TEJIDO DE LA MUESTRA! Cuando la pieza mida 11-11-12-13 cm, mon 10 nuevos pts al final de las 2 hileras sig para la manga = 127-137-147-157 pts. Tejer de la manera sig: 3 pts en pt musgo, A.1A (= 6 pts), A.1 B sobre los 110-120-130-140 pts sig, terminar con A.1 C (= 5 pts) y 3 pts en PT MUSGO. NOTA! Continuar A.1 para que calce correctamente antes de los aum para la manga. Cuando la manga mida 45-50-55-59 cm, rem 10 pts al inicio de las 2 hileras sig = 107-117-127-137 pts. Tejer de la manera sig: 3 pts en pt musgo, A.1A (= 6 pts), A.1B sobre los 90-100-110-120 pts sig, terminar con A.1 C (= 5 pts) y 3 pts en pt musgo. Cuando la pieza mida 49-54-60-65 cm, tejer en pt musgo sobre todos los pts. Rem cuando la pieza mida 56-61-67-72 cm. TERMINACIÓN: Hacer las costuras laterales y debajo de las mangas en una, a 1 pt del pt de orillo – ver la línea punteada en el esquema. |
|||||||||||||||||||
Explicaciones del diagrama |
|||||||||||||||||||
|
|||||||||||||||||||
 |
|||||||||||||||||||
 |
|||||||||||||||||||
¿Terminaste este patrón?Entonces, etiqueta tus fotos con #dropspattern #cassiebolero o envíalas a la galería #dropsfan. ¿Necesitas ayuda con este patrón?Encontrarás 8 videos tutoriales, un espacio para comentarios/preguntas y más visitando la página del patrón en garnstudio.com © 1982-2026 DROPS Design A/S. Todos los derechos reservados. Este documento, incluyendo todas sus sub-secciones, está protegido por los derechos de autor (copyright). Lee más acerca de lo que puedes hacer con nuestros patrones en la parte de abajo de cada patrón de nuestro sitio. |
|||||||||||||||||||


Con más de 40 años en el diseño de modelos de punto y de ganchillo, DROPS Design ofrece una de las más vastas colecciones de patrones gratuitos en el internet - traducidos en 17 idiomas. Al día de hoy, contamos con 333 catálogos y 12537 patrones - de los cuales 12031 están traducidos en español.
Nosotros trabajamos con mucho esmero para brindarte lo mejor que las labores de punto y ganchillo tienen para ofrecer,inspiración y consejos, así como hilos de magnífica calidad a precios increíbles! Te gustaría usar nuestros patrones para otro fin además del uso personal? Puedes leer acerca de lo que estás permitida a hacer en el texto de Copyright en la parte de abajo de todos nuestros patrones. Felices labores!
Escribe un comentario sobre DROPS 146-16
¡Nos encantaría saber qué piensas acerca de este patrón!
Si quieres escribir una pregunta referente al patrón, por favor asegúrate de elegir la categoría correcta en el formulario debajo, para acelerar el proceso de respuesta. Los campos obligatorios están marcados con un *.