
Categorías populares
¿Buscas un hilo?


Comentarios / Preguntas (119)
![]() Marcia Ebert escribió:
Marcia Ebert escribió:
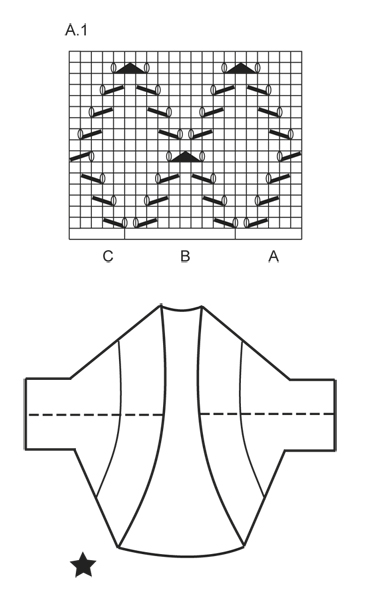
The pattern calls for knitting A then B then C That would be following the pattern right to left. Is this correct? It would be much easier to follow it left to right. I find this confusing. It is a pretty sweater.
15.01.2019 - 04:08DROPS Design respondió:
Dear Mrs Ebert, diagrams are worked top down, from RS read from the right towards the left and from WS from the left towards the right. Work A, then repeat B and finish row with C. On row 15, work the last 2 sts in A/B together with the first st B/next B/C. Happy knitting!
15.01.2019 - 09:39Carla escribió:
Drops 146-16. I’ve never read a pattern like this before and I’m very lost is there a tutorial showing what to do after doing the garter st for 7cm??
12.11.2018 - 00:51DROPS Design respondió:
Dear Carla, you can find the videos, related to this pattern at the left of the page, below the pictures. Also there are detailed explanation of the symbos of the pattern chart. If you need further help you can also ask for it in person in the store where you bought your DROPS yarn from. Happy Crafting!
12.11.2018 - 01:50
![]() Kitty Neijssel escribió:
Kitty Neijssel escribió:
Voor dit patroon zou voor maat XXXL 350 gram nodig zijn. Ik heb dus 7 bolletjes besteld. Al na 1 bolletje zag ik dat die hoeveelheid lang niet genoeg zou zijn. Na 4 bollen ben ik nog niet op de helft. Volgens mijn berekening heb ik nog 2 bollen nodig. Ik ben zeker geen beginnende breister ( ex-lerares Textiele Werkvormen en gedegen hobby-breister). Alles klopt volgens de stekenproef e.d. Ik ben een enthousiaste fan van Drops en tot nog toe heb ik nog nooit een probleem gehad met de patronen.
26.03.2018 - 13:20
![]() Anna escribió:
Anna escribió:
Da quale lato va letto il diagramma A1? La linea tratteggiata è la manica?
20.11.2017 - 07:53DROPS Design respondió:
Buongiorno Anna. Il diagramma si legge dal basso verso l’alto e da destra verso sinistra (lavorando avanti e indietro, i ferri pari si leggono da sinistra verso destra). Nel grafico con le misure, le linee tratteggiate sono le parti che verranno cucite: dovrà cucire sotto le maniche e i lati del davanti e dietro. Buon lavoro!
20.11.2017 - 11:04
![]() Natasja escribió:
Natasja escribió:
Hi. Im about to cast on for the sleeves, and i dont understand the 10 st. Is it 10 st in each side or 5 st in each side, and how ?
07.08.2017 - 12:24DROPS Design respondió:
Hi Natasja, You cast on 10 new stitches at the end of the next 2 rows, so 10 stitches at the end of the first row and then 10 new stitches at the end of the next row. So 20 stitches all in all. I hope this helps. Happy knitting!
07.08.2017 - 15:53
![]() Karine escribió:
Karine escribió:
Bonjour, Je tricote la taille L J'ai un souci à la première ligne du diagramme A1. 3 m. pt mousse - A1a - A1b - terminer par A1c OK mais il me reste 6 mailles avant de terminer 3 m pt mousse de la fin ? Logiquement, répétition de 5 fois diagramme A1 sur la ligne c'est juste ? Je refais plusieurs fois, j'arrive toujours pareil, je ne comprends pas :(
03.04.2017 - 17:49DROPS Design respondió:
Bonjour Karine, vérifiez bien que vous avez bien 6 m pour A.1A, 10 m pour chaque motif de A.1B et 5 m pour A.1C, ainsi, vous devriez bien avoir: 3 m point mousse, 6 m de A.1A, 11-12-13-14 fois A.1B (= 110-120-130-140 m en A1B), 5 m de A.1C et 3 m point mousse = 127-1237-147-157 m. Bon tricot!
04.04.2017 - 10:04
![]() April escribió:
April escribió:
Reading the pattern as we add the sleeves which pattern do we follow. It says to fit A.1 in before the increase. I'm confused as to which diagram we use for the sleeves.
18.07.2016 - 04:05DROPS Design respondió:
Dear April, start with 3 sts in garter st, then work A.1A on the next 6 sts (= new sts cast on for sleeve), now work first A.1B over the next 10 sts (= last st cast on for sleeve + the next 3 sts previously worked in garter st + the next 6 sts previously worked in A.1A), then repeat A.1B and A.1C as before until end of row, cast on the 10 new sts and continue as before. Happy knitting!
18.07.2016 - 09:35
![]() Arika escribió:
Arika escribió:
There is no way size L needs just 300 g. I am at 24 cm and I'm starting my 4th skein. I did the gauge and it was correct so it is not an issue of my loose knitting style. Now I have to order one more skein just to finish the garment. This is extremely frustrating as I'm not even sure if the dye lots match. Not to mention extra shipping cost (I was not planning to buy any yarn anytime soon). PLEASE correct the yardage for other knitters!
15.06.2016 - 05:07
![]() Jayne Bradbury escribió:
Jayne Bradbury escribió:
Regarding the chart: Are all rows, both right and wrong side, on the chart? Or just the right side? There are no numbers on the side of the chart to clarify and I want to be sure.
31.05.2016 - 16:17DROPS Design respondió:
Dear Mrs Bradbury, diagram shows all rows both from RS and from WS, seen from RS - read more about diagrams here. Happy knitting!
31.05.2016 - 17:01
![]() Sue escribió:
Sue escribió:
I do not understand the construction of this garment. Where are the sleeves? Where is the head?
29.05.2016 - 02:59DROPS Design respondió:
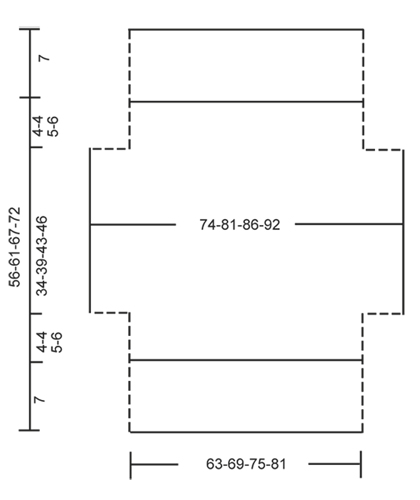
Dear Sue, the moss st edge around opening consists on the 7 cm worked at the beg of piece and the 7 cm worked at the end of piece (see measurement chart). The sts cast on /cast off on each side are for sleeves. The dotted lines on each side are the sides you will sew tog to create sleeves. In chart with black star, you can see the dotted line (seam for sleeves) and the 7 cm moss st edge around opening. Happy knitting!
30.05.2016 - 09:26
|
|||||||||||||||||||
Cassie#cassiebolero |
|||||||||||||||||||
 |
 |
||||||||||||||||||
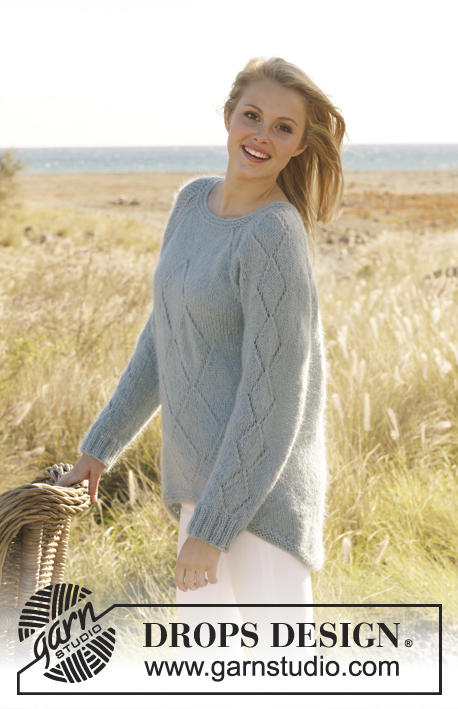
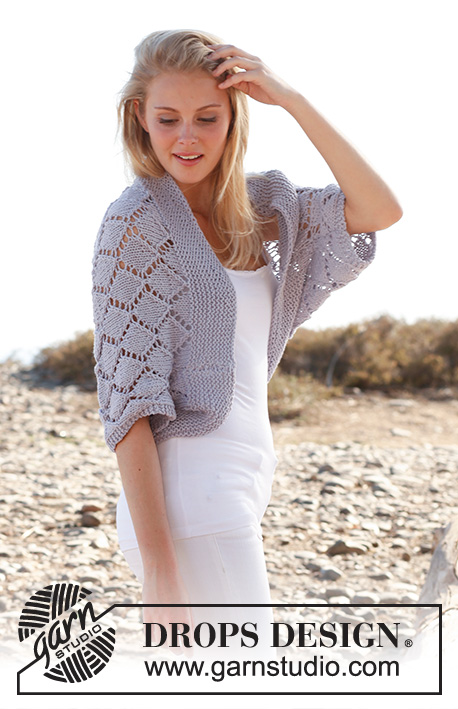
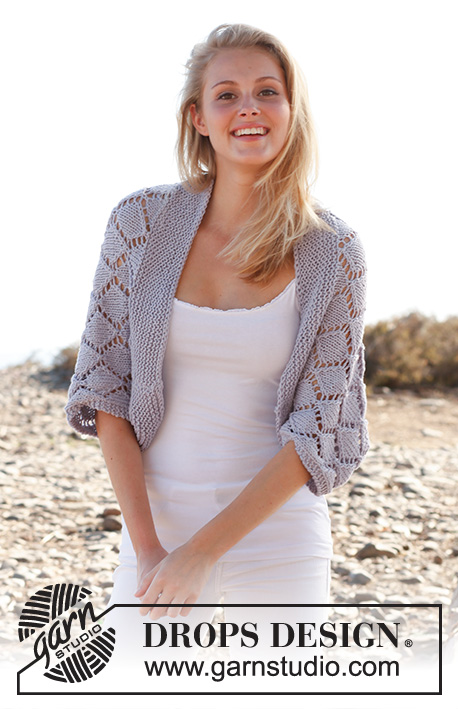
Bolero de punto DROPS con patrón de calados, en “Big Merino”. Talla: S – XXXL.
DROPS 146-16 |
|||||||||||||||||||
|
PT MUSGO (de ida y vuelta en la ag): Tejer todas las hileras de derecho. 1 surco = 2 hileras tejidas de derecho. PATRÓN: Ver diagrama A.1, el diagrama muestra todas las hileras en el patrón vistas por el LD. ------------------------------------------------------ BOLERO: Tejido de ida y vuelta en ag circular para tener espacio suficiente para todos los pts. Mon 107-117-127-137 pts en ag circular tamaño 5 mm con Big Merino. Tejer en pt musgo hasta que la pieza mida 7 cm. Después tejer de la manera sig, por el LD: 3 pts en PT MUSGO – ver explicación arriba, A.1A (= 6 pts), A.1B sobre los 90-100-110-120 pts sig, terminar con A.1 C (= 5 pts) y 3 pts en PT MUSGO. Continuar A.1 con 3 pts en pt musgo en cada lado. RECUERDE MANTENER LA MISMA TENSIÓN DE TEJIDO DE LA MUESTRA! Cuando la pieza mida 11-11-12-13 cm, mon 10 nuevos pts al final de las 2 hileras sig para la manga = 127-137-147-157 pts. Tejer de la manera sig: 3 pts en pt musgo, A.1A (= 6 pts), A.1 B sobre los 110-120-130-140 pts sig, terminar con A.1 C (= 5 pts) y 3 pts en PT MUSGO. NOTA! Continuar A.1 para que calce correctamente antes de los aum para la manga. Cuando la manga mida 45-50-55-59 cm, rem 10 pts al inicio de las 2 hileras sig = 107-117-127-137 pts. Tejer de la manera sig: 3 pts en pt musgo, A.1A (= 6 pts), A.1B sobre los 90-100-110-120 pts sig, terminar con A.1 C (= 5 pts) y 3 pts en pt musgo. Cuando la pieza mida 49-54-60-65 cm, tejer en pt musgo sobre todos los pts. Rem cuando la pieza mida 56-61-67-72 cm. TERMINACIÓN: Hacer las costuras laterales y debajo de las mangas en una, a 1 pt del pt de orillo – ver la línea punteada en el esquema. |
|||||||||||||||||||
Explicaciones del diagrama |
|||||||||||||||||||
|
|||||||||||||||||||
 |
|||||||||||||||||||
 |
|||||||||||||||||||
¿Terminaste este patrón?Entonces, etiqueta tus fotos con #dropspattern #cassiebolero o envíalas a la galería #dropsfan. ¿Necesitas ayuda con este patrón?Encontrarás 15 videos tutoriales, un espacio para comentarios/preguntas y más visitando la página del patrón en garnstudio.com © 1982-2026 DROPS Design A/S. Todos los derechos reservados. Este documento, incluyendo todas sus sub-secciones, está protegido por los derechos de autor (copyright). Lee más acerca de lo que puedes hacer con nuestros patrones en la parte de abajo de cada patrón de nuestro sitio. |
|||||||||||||||||||


Con más de 40 años en el diseño de modelos de punto y de ganchillo, DROPS Design ofrece una de las más vastas colecciones de patrones gratuitos en el internet - traducidos en 17 idiomas. Al día de hoy, contamos con 324 catálogos y 12290 patrones - de los cuales 11675 están traducidos en español.
Nosotros trabajamos con mucho esmero para brindarte lo mejor que las labores de punto y ganchillo tienen para ofrecer,inspiración y consejos, así como hilos de magnífica calidad a precios increíbles! Te gustaría usar nuestros patrones para otro fin además del uso personal? Puedes leer acerca de lo que estás permitida a hacer en el texto de Copyright en la parte de abajo de todos nuestros patrones. Felices labores!
Escribe un comentario sobre DROPS 146-16
¡Nos encantaría saber qué piensas acerca de este patrón!
Si quieres escribir una pregunta referente al patrón, por favor asegúrate de elegir la categoría correcta en el formulario debajo, para acelerar el proceso de respuesta. Los campos obligatorios están marcados con un *.