
Categorías populares
¿Buscas un hilo?


Comentarios / Preguntas (133)
![]() Peg Mohr escribió:
Peg Mohr escribió:
I am finding this really challenging to get started. On my 13th attempt. How is it possible to eliminate the visible shift when switching from knit to purl in order to accomplish the garter stitch in the round? Thanks for your help.
30.08.2016 - 19:38DROPS Design respondió:
Dear Mrs Mohr, beg of round should be at 1st st (first marker), and when you inc on each side of markers, the inc before 1st marker has to be worked at the end of round to make a sweet transition, ie work 1st st from beg of round, YO, continue as before until end of round and make a YO (inc before 1st marker). On next round, work the yos in garter sts as the other sts around (if you are making YO's on a P round, K all Yos on next round). Happy knitting!
31.08.2016 - 09:21
![]() Plüschappel escribió:
Plüschappel escribió:
Thank you Canada! Your hint solved my problem too (visible line in the solid part)!!! Für alle, die sich damit auch rumschlagen: um eine sichtbare Naht an der Stelle zu vermeiden, an der Rundenende und -anfang aufeinander treffen, muss man den Rundenwechsel bei jeder Reihe wieder genau vor den ersten Umschlag schieben. Der Versatz wird neben dem Umschlagsloch dann quasi unsichtbar.
03.07.2016 - 10:19
![]() Gio escribió:
Gio escribió:
Buonasera,quando arrivo a dover fare il giro in cui mettere in attesa le 16 maglie per il collo, e continuare avanti e indietro, le 26 maglie dopo il primo segnapunti ( dove cambiavo giro) e prima delle 16 maglie in attesa, non tornano col resto e mi vengono 2 ferri a maglia rasata. Il ferro prima di questo giro l'ho fatto a rovescio come indicato ma al segnapunti ho dovuto cambiare giro.Dove sbaglio ? Spero di esser stata chiara.. Grazie infinite
06.04.2016 - 23:16DROPS Design respondió:
Buonasera Gio. Quando ritorna a lavorare sulle 26 m dopo il primo segno, dovrebbe lavorare queste m a rov per avere la maglia legaccio corretta. Buon lavoro!
06.04.2016 - 23:51
![]() Joanne escribió:
Joanne escribió:
Is it possible to see an English translated version of these comments?
27.02.2016 - 03:50DROPS Design respondió:
Dear Joanne, you are welcome to use an online translator, and/or to ask your question here. Happy knitting!
27.02.2016 - 16:18
![]() Laura escribió:
Laura escribió:
Ich habe den Pullover fast fertig bis auf die Ärmel. Ich habe für Größe M wie angegeben 13 Knäuel bestellt. Nun ist meine Wolle aufgebraucht aber die Ärmel fehlen noch. Wie viele Knäuel brauche ich in etwa für beide Ärmel und das vernähen des Pullovers? Drei, vier?
17.02.2016 - 15:04DROPS Design respondió:
Haben Sie denn die Originalwolle verwendet, die Maschenprobe eingehalten und passen die Maße Ihres Pullovers zur Maßskizze? Eigentlich sollte die Garnmenge ausreichen. Sie sollten für die Ärmel 4 Knäuel einplanen.
18.02.2016 - 10:55
![]() Joanne escribió:
Joanne escribió:
I have completed the increasing on the front of this sweater. Where the stitches change from a knit to a pearl row there is a very visible line up the centre of the solid part. Is there some way of avoiding this line from forming.
17.02.2016 - 06:11DROPS Design respondió:
Dear Joanne, you can displace beg of round so that round always start before first YO to make it less visible. Happy knitting!
17.02.2016 - 09:41
![]() Sara escribió:
Sara escribió:
Volevo chiedere : io inizio ha lavorare con 4 ferri a doppia punta e continuo a lavorare con 4 ferri fino a quando ? . come fanno a stare 60 maglie su un ferro a doppia punta? non cascano dalle parti ?? . poi se ho capito bene chiudo i 3 ferri dopo i 29 aumenti e vado avanti con il collo ??. scusate ma non ho mai lavorato con doppi ferri e quindi vi chiedo questo e non è chiaro nella spiegazione quando si chiudono gli altri . grazie
20.01.2016 - 10:40DROPS Design respondió:
Buongiorno Sara, il lavoro inizia in tondo sui f a doppia punta, con 8 m divise su 4 f (2 m per f) e prosegue come indicato; quando aumentano le maglie e sono troppe per lavorare sui f a doppia punta deve proseguire con i ferri circolari lavorando sempre in tondo fino alla fine degli aumenti: a questo punto deve mettere in sospeso le maglie centrali per il collo e lavorare avanti e indietro come indicato sul resto delle m. Ci riscriva se ha altri dubbi. Buon lavoro!
20.01.2016 - 15:11
![]() Giovanna Degl'Innocenti escribió:
Giovanna Degl'Innocenti escribió:
Buonasera, mi scuso ma non so se ho capito bene cosa devo fare dopo aver lasciato in attesa 16 maglie: Lei scrive che devo intrecciare 2 m "2 volte" e poi 1 m 2 volte ( 4+2) ; quindi dal ferro devo diminuire in totale sei maglie dividendo gli intrecci sui due lati del collo, (3 per ogni lato) oppure 12 maglie in totale ( 6 per ogni lato) ? Grazie infinite
11.11.2015 - 21:45DROPS Design respondió:
Buonasera Giovanna. Le diminuzioni sono 6 per ogni lato, quindi 12 in totale. Buon lavoro!
11.11.2015 - 22:09
![]() Plüschappel escribió:
Plüschappel escribió:
Hallo! Mein Problem von neulich besteht leider noch, hat vielleicht jemand eine Idee? "Bei mir entsteht beim Stricken des Vorderteils immer eine Naht, d.h. die Runde schließt versetzt. Wie kann ich das ohne Naht hinbekommen?" Über eine Antwort würde ich mich sehr freuen!
09.11.2015 - 20:29DROPS Design respondió:
Sie stricken ja immer 1 Rd re und 1 Rd li im Wechsel. Ein ganz leichter Versatz ist normal beim Stricken von kraus rechts in Runden.
13.11.2015 - 22:13
![]() Plüschappel escribió:
Plüschappel escribió:
Hallo! Bei mir entsteht beim Stricken des Vorderteils immer eine Naht, d.h. die Runde schließt versetzt. Wie kann ich das ohne Naht hinbekommen? Danke und liebe Grüße!
03.11.2015 - 15:16
|
|
Hugs and kisses#hugsandkissessweater |
|
 |
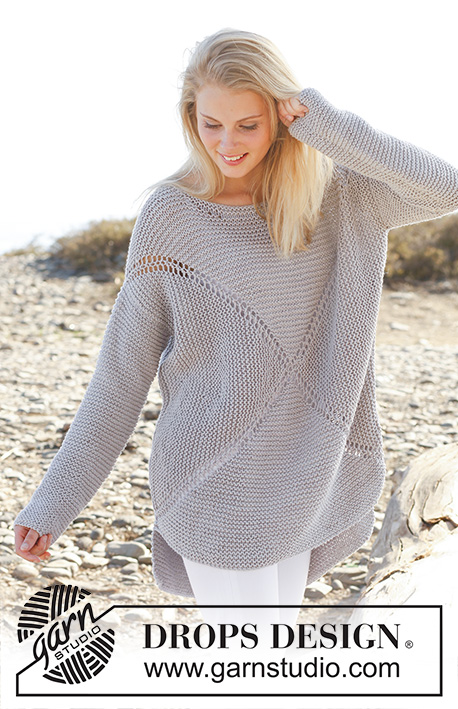 |
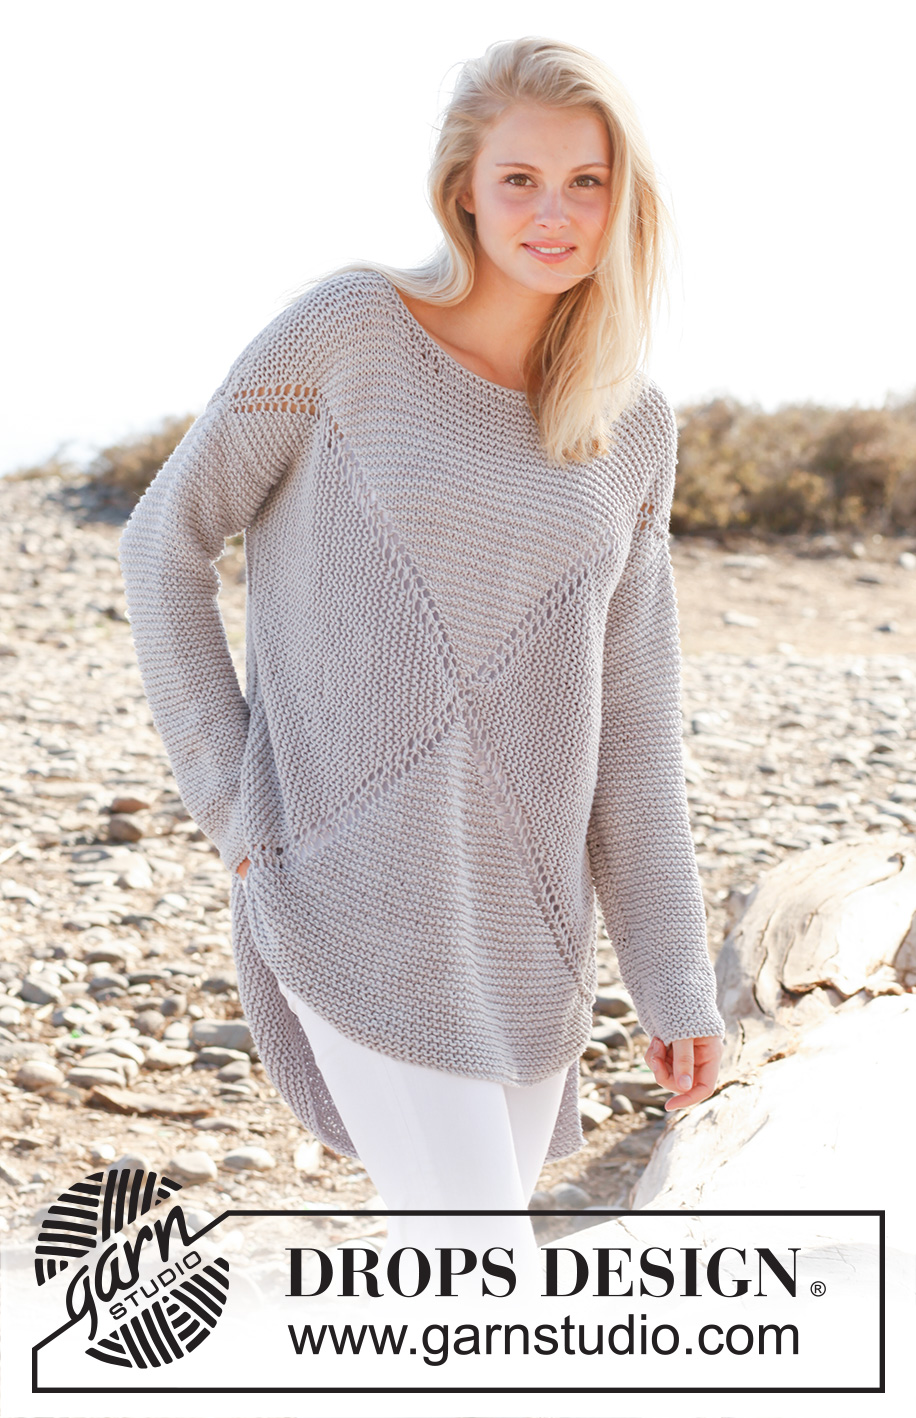
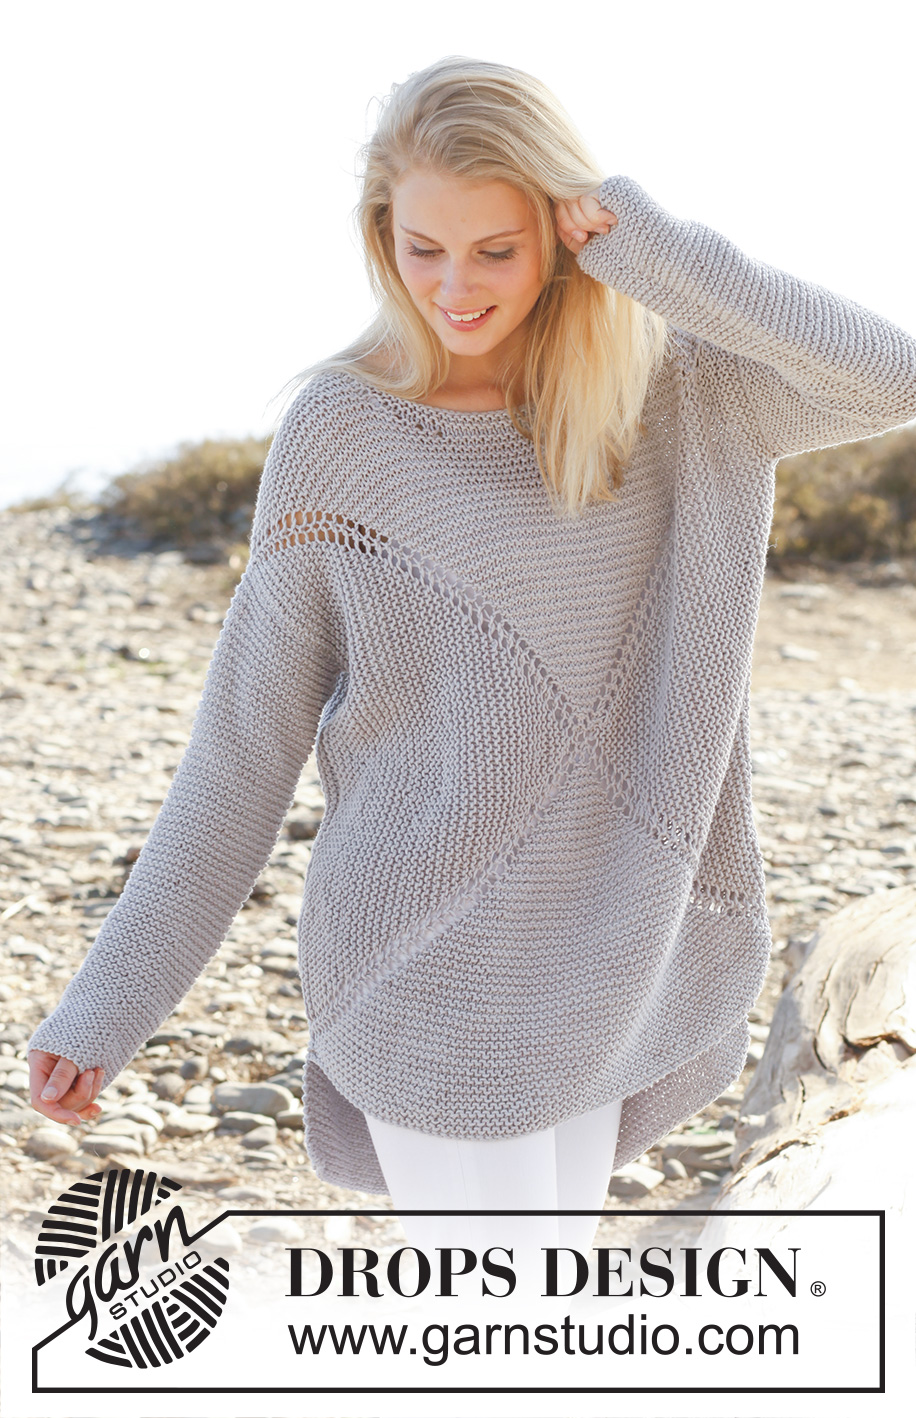
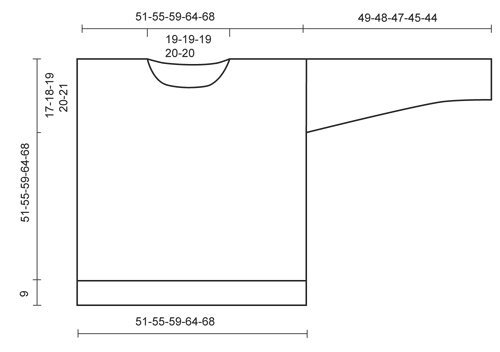
Pulóver de punto DROPS tejido en un cuadrado, en pt musgo, en “Paris”. Talla: S – XXXL.
DROPS 146-2 |
|
|
PT MUSGO (en redondo en ag circular): 1 surco = 2 vueltas = * 1 vta de derecho y 1 vta de revés *, repetir de *a*. PT MUSGO (de ida y vuelta en la ag): Tejer todas las hileras de derecho. 1 surco = 2 hileras tejidas de derecho. TIP PARA TOMAR LAS MEDIDAS: Sostener la pieza en vertical cuando se tomen las medidas. Debido al punto musgo y al peso del hilo, la manga será un poco más larga. Si se desea una manga más liviana, tejer 4 surcos en la parte de abajo de la manga, después tejer en pt jersey revés. ------------------------------------------------------ PULÓVER: Tejido en 2 partes a partir del centro del frente/centro de la espalda en un cuadrado. Mon y tejer en ag de doble punta, cambiar a ag circular cuando sea necesario. Terminar tejiendo las mangas. DELANTERO: Mon 8 pts con Paris y distribuirlos en 4 ag de doble punta tamaño 6 mm (= 2 pts en cada ag). Insertar un marcapuntos en el 1º, 3º, 5º y 7º pt (= 4 marcapuntos). Después tejer en redondo y en PT MUSGO sobre todos los pts – ver explicación arriba. AL MISMO TIEMPO, a cada 2 vtas, hacer 1 HEB (lazada) en cada lado de cada marcapuntos (= 8 aum a cada 2 vtas), en la vta sig, tejer las HEB de derecho para crear agujeros. Continuar de esta manera hasta tener 240-264-288-320-344 pts en la ag (= 29-32-35-39-42 aum y 60-66-72-80-86 pts en cada uno de los 4 lados). Parar con 1 vta de revés. Ahora deslizar los 16-16-18-18-18 pts centrales entre el 1º y el 2º marcapuntos a un gancho o seguro aux para el escote, después tejer la pieza de ida y vuelta. Continuar en pt musgo y continuar los aum en los marcapuntos – AL MISMO TIEMPO, rem en el lado del escote, a cada 2 hileras, de la manera sig: 2 pts 2 veces y 1 pt 2 veces. Continuar aum hasta tener 284-308-330-362-386 pts en la ag (= 38-41-44-48-51 aum, 78-84-90-98-104 pts entre los marcapuntos, 25-28-30-34-37 pts en cada lado del escote). Mantener los pts entre el 3º y 4º marcapuntos en la ag, rem los otros pts = 78-84-90-98-104 pts en la ag. Tejer 2 surcos de ida y vuelta sobre estos pts. Rem. Insertar un marcapuntos en cada lado, a 17-18-19-20-21 cm en dirección hacia abajo a partir del hombro. Este muestra dónde será cosida la manga. ESPALDA: Mon 8 pts con Paris y distribuirlos en 4 ag de doble punta tamaño 6 mm (= 2 pts en cada ag). Insertar un marcapuntos en el 1º, 3º, 5º y 7º pt (= 4 marcapuntos). Después tejer en redondo y en pt musgo sobre todos los pts, AL MISMO TIEMPO, a cada 2 vtas, hacer 1 HEB en cada lado de cada marcapuntos (= 8 aum a cada 2 vtas), en la vta sig, tejer las HEB de derecho para crear agujeros. Continuar de esta manera hasta tener 288-312-336-368-392 pts en la ag (= 35-38-41-45-48 aum y 72-78-84-92-98 pts entre los marcapuntos). Ahora rem los 28-28-30-30-30 pts centrales entre el 1º y 2º marcapuntos para el escote, después tejer la pieza de ida y vuelta = 260-284-306-338-362 pts. Continuar aum hasta tener 284-308-330-362-386 pts en la ag (= 38-41-44-48-51 aum, 78-84-90-98-104 pts entre los marcapuntos, 25-28-30-34-37 pts en cada lado del escote). Mantener los pts entre el 3º y 4º marcapuntos en la ag, rem los otros pts = 78-84-90-98-104 pts en la ag. Tejer 15 surcos de ida y vuelta sobre estos pts. Rem. Insertar un marcapuntos en cada lado, a 17-18-19-20-21 cm en dirección hacia abajo a partir del hombro. Este muestra dónde será cosida la manga. MANGA: Tejida de ida y vuelta en ag circular. LEER TIP PARA TOMAR LAS MEDIDAS! Mon 37-38-41-44-45 pts (incl 1 pt de orillo en cada lado) en ag circular tamaño 6 mm con Paris. Tejer en pt musgo. Cuando la pieza mida 8 cm, aum 1 pt en cada lado. Repetir el aum a cada 5-4½-4½-4-3½ cm 7-8-8-8-9 veces más (= 8-9-9-9-10 aum en total) = 53-56-59-62-65 pts. Rem cuando la pieza mida 49-48-47-45-44 cm (medidas más cortas en las tallas más grandes debido a una mayor anchura de hombros). TERMIINACIÓN: Hacer las costuras de los hombros. Coser las mangas hasta los marcapuntos en la pieza del delantero/espalda. Hacer las costuras bajo las mangas y las laterales en una, a 1 pt del pt de orillo, dejar los 10 cm inferiores = abertura. ORILLA DEL CUELLO: Levantar aprox 66 a 74 pts alrededor del escote (incl los pts en el gancho o seguro aux) en una ag circular corta (40 cm). Tejer 2 surcos. Rem. |
|
 |
|
¿Terminaste este patrón?Entonces, etiqueta tus fotos con #dropspattern #hugsandkissessweater o envíalas a la galería #dropsfan. ¿Necesitas ayuda con este patrón?Encontrarás 17 videos tutoriales, un espacio para comentarios/preguntas y más visitando la página del patrón en garnstudio.com © 1982-2026 DROPS Design A/S. Todos los derechos reservados. Este documento, incluyendo todas sus sub-secciones, está protegido por los derechos de autor (copyright). Lee más acerca de lo que puedes hacer con nuestros patrones en la parte de abajo de cada patrón de nuestro sitio. |
|


Con más de 40 años en el diseño de modelos de punto y de ganchillo, DROPS Design ofrece una de las más vastas colecciones de patrones gratuitos en el internet - traducidos en 17 idiomas. Al día de hoy, contamos con 324 catálogos y 12290 patrones - de los cuales 11675 están traducidos en español.
Nosotros trabajamos con mucho esmero para brindarte lo mejor que las labores de punto y ganchillo tienen para ofrecer,inspiración y consejos, así como hilos de magnífica calidad a precios increíbles! Te gustaría usar nuestros patrones para otro fin además del uso personal? Puedes leer acerca de lo que estás permitida a hacer en el texto de Copyright en la parte de abajo de todos nuestros patrones. Felices labores!
Escribe un comentario sobre DROPS 146-2
¡Nos encantaría saber qué piensas acerca de este patrón!
Si quieres escribir una pregunta referente al patrón, por favor asegúrate de elegir la categoría correcta en el formulario debajo, para acelerar el proceso de respuesta. Los campos obligatorios están marcados con un *.