
Categorías populares
¿Buscas un hilo?


Comentarios / Preguntas (89)
![]() France escribió:
France escribió:
Merci de m’avoir répondu. Malheureusement je comprends vos explications mais ça s’avère impossible de réaliser le deuxième rang en se fiant à celles ci. Ça ne concorde pas pour la continuité du motif. Est ce possible qu’il y ait une erreur dans ce patron. Merci
19.02.2026 - 14:56DROPS Design respondió:
Bonjour France, après les mailles du raglan, au début des manches, du dos et du devant, vous allez tricoter la nouvelle maille comme la maille précédente du diagramme: si vous commencez par 2 m end, les 2 premières augmentations seront des m env, puis 2 m end et ainsi de suite; à la fin du dos, devant, manches, si vous terminez par 2 m env, les 2 premières augm. seront des m end, puis 2 m env et ainsi de suite. Bon tricot!
20.02.2026 - 07:40
![]() France escribió:
France escribió:
Quels point doit on tricoter lorsque l’on fait des augmentations raglan. On donne la directive point de fantaisie mais Je trouve très compliqué d’agencer quand on travaille la grille point de fantaisie.
16.02.2026 - 22:25DROPS Design respondió:
Bonjour France, les augmentations du raglan doivent être incorporées au point fantaisie, ainsi, tricotez la comme la maille précédente du diagramme (lisez le diagramme de droite à gauche) après les mailles du raglan, au début du dos, devant et des manches, et à la fin du dos, du devant et des manches, tricotez les augmentations comme la maille suivante du diagramme. Le motif va ainsi s'élargir sur les côtés. Bon tricot!
17.02.2026 - 15:28
![]() Lone escribió:
Lone escribió:
Jeg strikker str 134/140. Jeg kan ikke få maskeantallet til at passe efter udtagningerne når jeg skal dele krop og ærmer, mine udtagninger er først 10 gange og så 14 gange, jeg har 288 masker opskriften siger 296 masker ??
29.11.2025 - 12:02DROPS Design respondió:
Hei Lone. Første økning er forklart i oppskriften (=8 økte masker) = 96+8 = 104 masker. Så står det at økningen skal gjenta 10 ganger til = 8 x 10 = 80 økte masker = 104 + 80 = 184 masker. Så skal det økes 14 ganger til = 8 masker x 14 ganger = 112 masker. 184 masker + 112 masker = 296 masker, som det stå i oppskriften. mvh DROPS Design
01.12.2025 - 14:27
![]() Jessica escribió:
Jessica escribió:
Goedendag, Ik brei de trui voor 9/10 jaar en ben bezig met het lijf. Ik moet nu tot 48 cm door breien vanaf de schouders gemeten. Is dat inclusief de boord er bij?
30.10.2025 - 21:08DROPS Design respondió:
Dag Jessica,
Ja, dat is inclusief de boord. Je meet altijd vanaf de opzetrand tenzij anders aangegeven.
01.11.2025 - 15:01
![]() Boulan Evelyne escribió:
Boulan Evelyne escribió:
Désolé mais ce n'est pas ce qui est écrit. 4 aug avant la pose des marqueurs. Relisez votre modèle.
10.10.2025 - 18:17DROPS Design respondió:
Bonjour Mme Boulan, je cite à nouveau, en soulignant le nombre d'augmentations: Tricoter A-1, EN MÊME TEMPS au 1er tour, augmenter 1 m de chaque côté des 4 marqueurs pour le raglan(= 8 augmentations) - VOIR AUGMENTATIONS ! Répéter ces augmentations encore 7-7-9-10-11 foistous les tours et 11-13-13-14-15 fois tous les 2 tours, donc en taille 9/10 ans: 1 fois + 10 + 14 = 25 fois au total. Bon tricot!
15.10.2025 - 07:27
![]() Évelyne escribió:
Évelyne escribió:
Il est indiqué d'aug 4 m au 92 m départ. Ça fait bien 96. Puis on dit d'augmentation 10 fois + 14 fois = 24 fous 8 m. Y a erreur.
09.10.2025 - 16:13DROPS Design respondió:
Bonjour Évelyne, vous augmentez d'abord 1 fois de chaque côté des 4 marqueurs puis, je cite: encore 10 fois tous les tours et 14 fois tous les 2 tours = on obtient 296 mailles soit: 1+10+14=25 fois et pas seulement 24. Bon tricot!
10.10.2025 - 08:01
![]() Boulan escribió:
Boulan escribió:
Sur le modèle Paulina je fais la taille 9/10 ans, de 92 m +4 =96 m puis aug 10 fois 8 m = 80 m puis 14 fois 8 m = 112 m. Total 288 m et non 296 m comme mentionné es-ce une erreur ??
09.10.2025 - 09:10DROPS Design respondió:
Bonjour Mme Boulan, en taille 9/10 ans, on va augmenter 25 fois 8 mailles au total (d'abord 1 fois comme indiqué puis encore 10 fois tous les tours et enfin14 fois tous les 2 tours), on aura ainsi: 96+(25x8)=296 mailles. Bon tricot!
09.10.2025 - 15:59
![]() Carole escribió:
Carole escribió:
Je suis plutôt débutante dans le tricot et je voulais savoir à partir d'où mesurer les 8 cm de "EN MÊME TEMPS, à 8 cm de hauteur à partir du milieu devant"? Est-ce a partir du début du col sur le devant (toute la hauteur du tricot jusqu'à present sur le devant) ou a partir du bas du col? Merci beaucoup!
08.10.2025 - 09:31DROPS Design respondió:
Bonjour Carole, mesurez au milieu du devant, à partir du rang de montage, autrement dit, avec les côtes du col. Bon tricot!
08.10.2025 - 16:27
![]() REINE MARIE escribió:
REINE MARIE escribió:
Un grand merci beaucoup je vais voir .Bonne soirée
25.03.2025 - 17:56
![]() REINE MARIE escribió:
REINE MARIE escribió:
Bonjour ,merci pour votre message mais c\'est dommage,il me semblait que ce modèle pouvez exister pour femme aussi ,il est tellement joli et plait beaucoup .Si par hasard ,je faisais le modèle homme en taille( S) ,en faisant moins grand en hauteur pourrait peut être marcher ? Merci de votre conseil .Bonne après-midi
25.03.2025 - 15:43DROPS Design respondió:
Bonjour Reine Marie, fort probablement, dans ce point de la FAQ modèles nous expliquons comment adapter un modèle femme pour homme, vous pourrez suivre un modèle homme pour femme en ajustant simplement les longueurs (basez-vous sur un pull dont elle aime la forme). Bon tricot!
25.03.2025 - 15:52
|
|||||||
Paulina#paulinasweater |
|||||||
|
|
|||||||
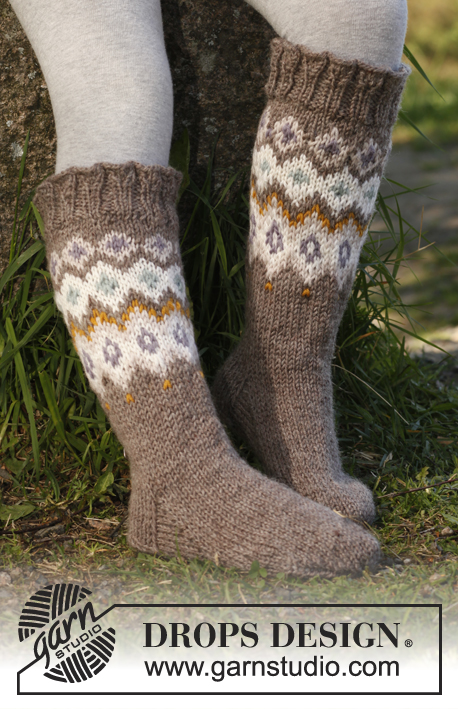
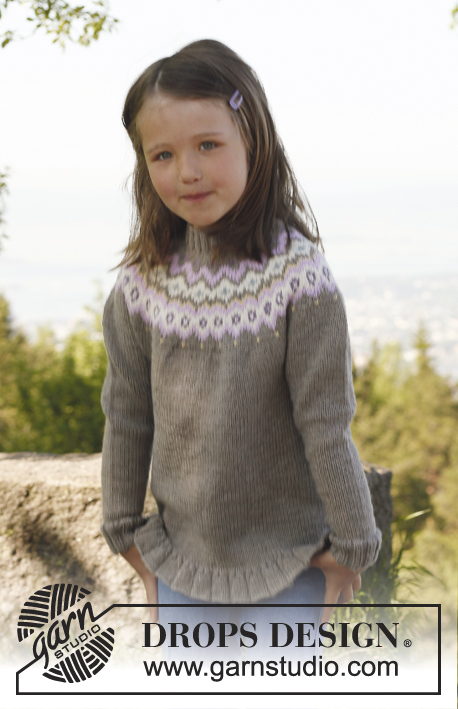
Pulóver de punto con raglán, tejido de arriba para abajo en DROPS Merino Extra Fine. Talla niños 3 a 12 años.
DROPS Children 23-7 |
|||||||
|
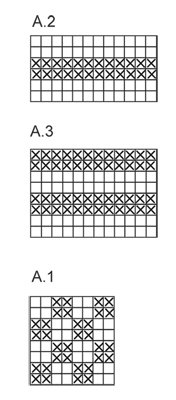
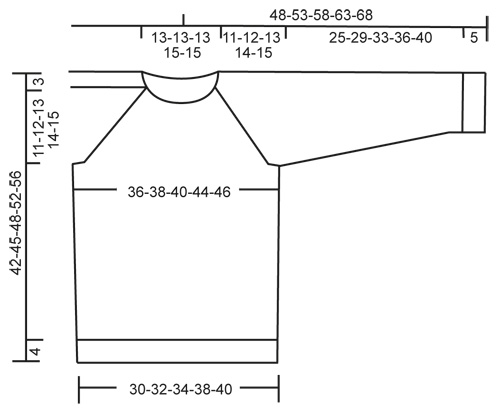
TIP PARA AUMENTO (aplica al raglán): Tejer hasta que reste 1 pt antes del marcapuntos: Hacer 1 HEB (lazada), 2d (el marcapuntos está en el centro de estos 2 pts), hacer 1 HEB. En la vta sig, tejer las HEB retorcidas de derecho (es decir, tejer por atrás del pt en vez de adelante) para evitar que se formen agujeros. Tejer los pts aum en el patrón. PATRÓN: Ver diagramas A.1, A.2 y A.3. Los diagramas muestran el patrón por el LD. TIP PARA DISMINUCIÓN (aplica al cuerpo y mangas): Tejer hasta que resten 2 pts antes del marcapuntos, 2 pjd, marcapuntos, y 2 pts juntos retorcidos de derecho (es decir, tejer por atrás del pt en vez de adelante). ------------------------------------------------------ PULÓVER: Tejido en redondo, de arriba para abajo. PECHERA: Mon 84-84-84-92-92 pts en ag circular de 40 cm tamaño 3 mm con Merino Extra Fine. Insertar un marcapuntos al inicio de la vta (= centro de la espalda). Tejer 1 vta de derecho. Después tejer en pt resorte = 2d/2r por 3 cm. Después tejer una elevación en la parte de atrás del escote, de la manera sig (continuar en pt resorte): Tejer 8 pts después del marcapuntos, virar, tensar el hilo y tejer 16 pts de regreso, virar, tensar el hilo y tejer 24 pts, virar, continuar tejiendo 8 pts más en cada viraje hasta haber tejido un total de 64 pts, virar y tejer 1 vta hasta el marcapuntos del centro de la espalda nuevamente. LEER TODA LA SECCIÓN SIGUIENTE ANTES DE CONTINUAR! Cambiar a ag circular tamaño 4 mm y tejer 1 vta en pt jersey y, al mismo tiempo, aum 4 pts distribuidos equitativamente = 88-88-88-96-96 pts. Ahora insertar 4 nuevos marcapuntos (para el raglán) de la manera sig: Tejer 15-15-15-17-17 pts a partir del marcapuntos al centro de la espalda, insertar el 1er marcapuntos aquí (al mismo tiempo retirar el marcapuntos al centro de la espalda), tejer 14 pts más (= manga), insertar el 2º marcapuntos, tejer 30-30-30-34-34 pts (= delantero) e insertar el 3er marcapuntos, tejer 14 pts (= manga), insertar el 4º marcapuntos y tejer hasta el 1er marcapuntos nuevamente (hay 30-30-30-34-34 pts entre los marcapuntos en la pieza de la espalda). Tejer A.1 y, AL MISMO TIEMPO, en la 1ª vta, aum 1 pt en cada lado de los 4 marcapuntos para el raglán (= 8 aum) – VER TIP PARA AUMENTO! Repetir los aum en cada vta 7-7-9-10-11 veces más y, después, en vtas alternas 11-13-13-14-15 veces = 240-256-272-296-312 pts en la ag. AL MISMO TIEMPO, cuando la pieza mida 8-8-8-9-9 cm a partir del centro del frente, tejer A.2 1 vez verticalmente, después tejer A.1 nuevamente. Después de todos los aum, tejer la vta sig, de la manera sig: Tejer hasta el 1er marcapuntos: Deslizar los 52-56-60-64-68 pts entre el 1er y 2º marcapuntos a un gancho o seguro aux, mon 8 pts nuevos sobre el gancho o seguro aux, tejer hasta el 3er marcapuntos, deslizar los 52-56-60-64-68 pts entre el 3er y 4º marcapuntos a un gancho o seguro aux, mon 8 pts nuevos sobre el gancho o seguro aux, tejer hasta el 1er marcapuntos nuevamente = 152-160-168-184-192 pts en la ag. CUERPO: Continuar en A.1 – AL MISMO TIEMPO, insertar un marcapuntos en el centro de los 8 pts nuevos en cada lado. Cuando la pieza mida 3 cm a partir de donde los pts de la manga fueron colocados en un gancho o seguro aux, tejer A.3 1 vez verticalmente, después continuar en pt jersey. AL MISMO TIEMPO, cuando 4 cm han sido tejidos a partir de donde los pts de la manga fueron deslizados en un gancho o seguro aux, dism 1 pt en cada lado de los marcapuntos en los lados – VER TIP PARA DISMINUCIÓN! Repetir las dism a cada 3-4-4-5-5 cm 4 veces más = 132-140-148-164-172 pts. Continuar tejiendo hasta que la pieza mida 38-41-44-48-52 cm a partir del hombro. Tejer 1 vta y, AL MISMO TIEMPO, aum 4 pts distribuidos equitativamente = 136-144-152-168-176 pts. Cambiar a ag circular tamaño 3 mm y tejer en pt resorte = 2d/2r por 4 cm. Rem FLOJAMENTE con derecho sobre derecho y revés sobre revés. La pieza mide aprox 42-45-48-52-56 cm a partir del hombro. MANGA: Deslizar los pts de uno de los ganchos o seguros aux a las ag de doble punta tamaño 4 mm y mon adicionalmente 8 pts nuevos debajo de la manga = 60-64-68-72-76 pts. Insertar un marcapuntos al centro debajo de la manga (es decir, en el centro de los 8 pts nuevos). AHORA MEDIR LA PIEZA DESDE AQUÍ! Continuar con A.1 hasta que la pieza mida 3 cm a partir del marcapuntos, ahora tejer A.3 1 vez verticalmente, después tejer en pt jersey. AL MISMO TIEMPO, después de haber tejido 1 cm de A.3, dism 1 pt en cada lado del marcapuntos – VER TIP PARA DISMINUCIÓN! Repetir las dism a cada 4-3-4-4-3½ cm 5-7-7-7-9 veces más = 48-48-52-56-56 pts. Continuar tejiendo hasta que la manga mida 25-29-33-36-40 cm. Cambiar a las ag de doble punta tamaño 3 mm y tejer en pt resorte = 2d/2r por 5 cm. Después, rem FLOJAMENTE con derecho sobre derecho y revés sobre revés. Tejer la otra manga de la misma manera. TERMINACIÓN: Coser las aberturas debajo de las mangas. |
|||||||
Explicaciones del diagrama |
|||||||
|
|||||||
 |
|||||||
 |
|||||||
¿Terminaste este patrón?Entonces, etiqueta tus fotos con #dropspattern #paulinasweater o envíalas a la galería #dropsfan. ¿Necesitas ayuda con este patrón?Encontrarás 12 videos tutoriales, un espacio para comentarios/preguntas y más visitando la página del patrón en garnstudio.com © 1982-2026 DROPS Design A/S. Todos los derechos reservados. Este documento, incluyendo todas sus sub-secciones, está protegido por los derechos de autor (copyright). Lee más acerca de lo que puedes hacer con nuestros patrones en la parte de abajo de cada patrón de nuestro sitio. |
|||||||


Con más de 40 años en el diseño de modelos de punto y de ganchillo, DROPS Design ofrece una de las más vastas colecciones de patrones gratuitos en el internet - traducidos en 17 idiomas. Al día de hoy, contamos con 324 catálogos y 12290 patrones - de los cuales 11673 están traducidos en español.
Nosotros trabajamos con mucho esmero para brindarte lo mejor que las labores de punto y ganchillo tienen para ofrecer,inspiración y consejos, así como hilos de magnífica calidad a precios increíbles! Te gustaría usar nuestros patrones para otro fin además del uso personal? Puedes leer acerca de lo que estás permitida a hacer en el texto de Copyright en la parte de abajo de todos nuestros patrones. Felices labores!
Escribe un comentario sobre DROPS Children 23-7
¡Nos encantaría saber qué piensas acerca de este patrón!
Si quieres escribir una pregunta referente al patrón, por favor asegúrate de elegir la categoría correcta en el formulario debajo, para acelerar el proceso de respuesta. Los campos obligatorios están marcados con un *.