
Categorías populares
¿Buscas un hilo?


Comentarios / Preguntas (261)
Ruth Ullstrom escribió:
What does 'RS row' mean? Thanks.
29.11.2014 - 14:15DROPS Design respondió:
Dear Mrs Ullstrom, a "RS row" means usually a row worked from the right side of work. Happy knitting!
01.12.2014 - 10:02
![]() Shannon escribió:
Shannon escribió:
Evelyn, knit front and back of the first stitch (of the 9 still left on needles) and knit the front and back of the last stitch of the 9 left on the needle. Now you will have 11 stitches.
25.11.2014 - 22:34
![]() Evelyn Lewis escribió:
Evelyn Lewis escribió:
Hello I am confused about the moon sock pattern. I have just finished the ribbing for the leg and have taken off 27 stitches onto a stitch holder. The part I am confused about is the upper part of the foot where it says to cast on 1 new st in each side (edge st)? What does that mean? Please help! Thank you in advance!
25.11.2014 - 16:24DROPS Design respondió:
Dear Mrs Lewis, you keep the middle 9-11 sts for upper foot and when upper foot is done, you will pick up sts along each side of the upper foot inside 1 edge st, on first row over these sts, cast on 1 st each side (or Kfb first and last st) to get 1 edge st each side = 11-13 sts, you will then work dec 1 st each side when measurement is reached. Happy knitting!
26.11.2014 - 09:15
![]() Rosemary Diane Phillips escribió:
Rosemary Diane Phillips escribió:
Thanks but patern does not say how many stitches on each needle thanks
24.11.2014 - 22:49
![]() Christina escribió:
Christina escribió:
Jättefin och mycket enkel att sticka men den är väldigt liten. Har stickat vristen i strl 35-37 men foten i 40-42, ändå så blir sockan liten och ja stickfastigheten stämmer. Det tar tyvärr ned betyget då jag får räkna om och göra sockan större.
15.11.2014 - 23:09Katie escribió:
So after I've placed 27 stitches on a holder and made 2 more, how do I continue ribbing like before without messing it up? The video skips that part.
30.10.2014 - 01:18DROPS Design respondió:
Dear Katie, when the 27 sts are on a st holder, you continue ribbing back and forth on the first 9-11 sts inc 1 st each side on first row (= 11-13 sts) for 7-8.5 cm. Happy knitting!
30.10.2014 - 10:20
![]() Debbie escribió:
Debbie escribió:
If I Kfb in the first and last stitch to get 13 stitches how do I get back on track for the ribbing on the next row? Don't tell me to look at the video because it goes much to fast to follow plus I am not a continental knitter
28.10.2014 - 22:07DROPS Design respondió:
Dear Debbie, after you have inc 1 st each side you continue working back and forth (= in rows) over the 13 sts for middle upper foot until piece measure 8.5-10 cm (turn at the end of each row over the 13 sts and work alternately from RS and from WS). Happy knitting!
29.10.2014 - 09:42
![]() Christine escribió:
Christine escribió:
Is there a knitting machine pattern for these?
27.10.2014 - 23:15DROPS Design respondió:
Dear Christine, there isn't any pattern for a knitting machine, you can adapt it to your knitting machine or get help from your DROPS store or any specialized forum. Happy knitting!
28.10.2014 - 09:10
![]() Debbie escribió:
Debbie escribió:
When you say to cast off a stitch at edge are you actually casting off or just knitting 2 tog. To get back to your 11 stitches? Also could I use drops Andes with 1 strand instead of drops nepal with 2 strands?
27.10.2014 - 14:12DROPS Design respondió:
Dear Debbie, that's correct, you work 2 sts tog to get back the 11 sts. You can use 1 strand Andes (group E) instead 2 strands Nepal (group C) - read more here. Remember to check your tension. Happy knnitting!
27.10.2014 - 14:45
![]() Maria escribió:
Maria escribió:
Hello again, from my last question about picking up the edge stitches... I understand how to pick them up but the problem Im encountering is that for some reason I'm not ending up with enough to pick up 14 even though I've knit to the correct length and I'm not sure what is going wrong.
16.10.2014 - 19:26DROPS Design respondió:
Dear Maria, you may have a different tension in height, and can adjust number of sts to 14 inc evenly when picking up sts. Happy knitting!
17.10.2014 - 09:18
|
|
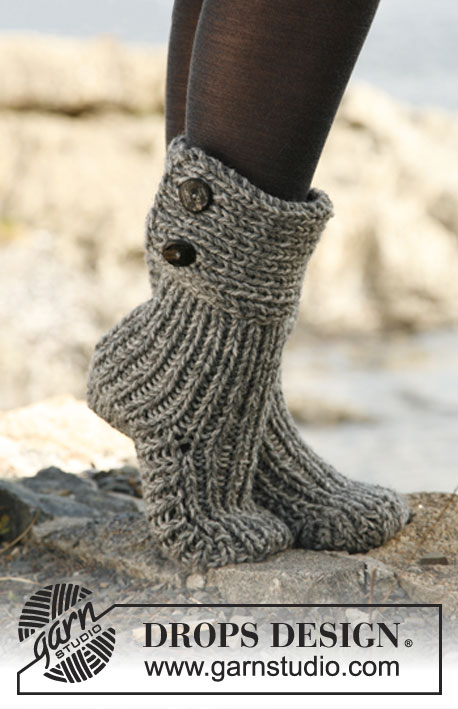
Moon Socks#moonsocks |
|
 |
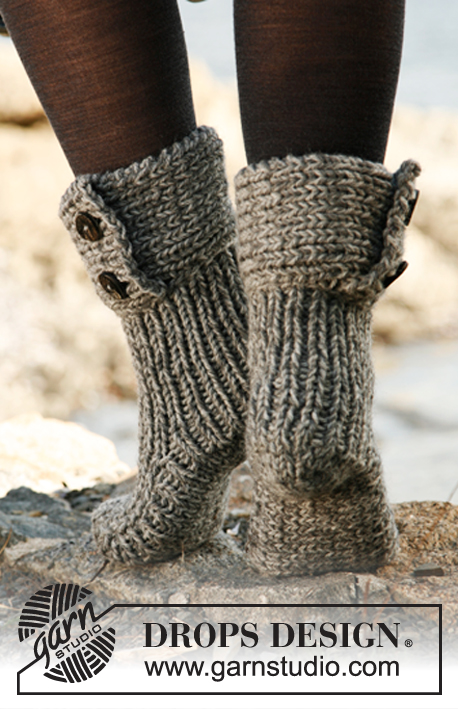 |
Pantuflas DROPS, de punto, en 2 hilos “Nepal”.
DROPS 134-42 |
|
|
PT MUSGO (de ida y vuelta en la ag): Todas las vtas de derecho. ------------------------------------------------------ PANTUFLAS: PIERNA: Mon 36-38-40 pts en ag de doble punta tamaño 6 mm con 1 hilo gris medio y 1 hilo mix gris. Tejer resorte 1d/1r, en redondo, hasta que la pieza mida aprox 10 cm. PIE: Ahora dejar los primeros 9-11-11 pts en la vta en la ag, deslizar los 27-27-29 pts restantes en un gancho o seguro aux. Continuar con resorte de ida y vuelta sobre los 9-11-11 pts – AL MISMO TIEMPO en la 1ª vta mon 1 nuevo pt en cada lado (pt de orillo) = 11-13-13 pts. Cuando haya tejido 7-8.5-10 cm, rem 1 pt de orillo en cada lado = 9-11-11 pts. Después desl los pts del gancho o seguro aux de regreso en la ag y levantar 12-14-16 pts en cada lado de la parte central (a 1 pt del pt de orillo) = 60-66-72 pts en la ag. Ahora medir la pieza desde aquí. Insertar 1 marcapuntos (MP) en el centro del frente del dedo y 1 MP en el centro de la parte de atrás en el talón. Continuar en redondo, con resorte como antes por 2 cm. Ahora terminar la pieza en pt jersey – AL MISMO TIEMPO tejer 2 pjd en cada lado de cada MP, en vtas alternas (= 4 pts menos por vta); continuar dism hasta que la sección en pt jersey mida 3-3-4 cm – rem. Hacer la costura en el centro de la parte de abajo del pie, en el pt externo, para evitar que se forme una costura abultada. ORILLA, TEJIDA DE UN LADO A OTRO: Mon 15-17-17 pts en ag tamaño 6 mm con 1 hilo gris medio y 1 hilo mix gris. Tejer de la manera sig: 1 pt en PT MUSGO – ver explicación arriba, * 1d, 1r *, repetir de *a*, terminar con 1d y 1 pt en pt musgo. Cuando la pieza mida 2 cm, rem para 2 ojales de la manera sig por el LD: 1 pt en pt musgo, 1d, 1r, desl 1 pt de derecho, 1d, pasar el pt desl por encima, 1 HEB (lazada), * 1d, 1r *, repetir de *a* hasta que resten 5 pts, 1 HEB, 2 pjd, 1r, 1d, 1 pt en pt musgo. Continuar con resorte y en pt musgo en cada lado hasta que la pieza mida aprox 36-37-38 cm. Rem pts con derecho sobre derecho y revés sobre revés. Coser los botones y abotonar. Deslizar la orilla 2 cm por encima de la pierna de la pantufla, con los botones hacia la parte externa, y coser a la orilla de montaje en la pantufla, por el LR, con puntadas invisibles. |
|
¿Terminaste este patrón?Entonces, etiqueta tus fotos con #dropspattern #moonsocks o envíalas a la galería #dropsfan. ¿Necesitas ayuda con este patrón?Encontrarás 10 videos tutoriales, un espacio para comentarios/preguntas y más visitando la página del patrón en garnstudio.com © 1982-2026 DROPS Design A/S. Todos los derechos reservados. Este documento, incluyendo todas sus sub-secciones, está protegido por los derechos de autor (copyright). Lee más acerca de lo que puedes hacer con nuestros patrones en la parte de abajo de cada patrón de nuestro sitio. |
|


Con más de 40 años en el diseño de modelos de punto y de ganchillo, DROPS Design ofrece una de las más vastas colecciones de patrones gratuitos en el internet - traducidos en 17 idiomas. Al día de hoy, contamos con 324 catálogos y 12290 patrones - de los cuales 11670 están traducidos en español.
Nosotros trabajamos con mucho esmero para brindarte lo mejor que las labores de punto y ganchillo tienen para ofrecer,inspiración y consejos, así como hilos de magnífica calidad a precios increíbles! Te gustaría usar nuestros patrones para otro fin además del uso personal? Puedes leer acerca de lo que estás permitida a hacer en el texto de Copyright en la parte de abajo de todos nuestros patrones. Felices labores!
Escribe un comentario sobre DROPS 134-42
¡Nos encantaría saber qué piensas acerca de este patrón!
Si quieres escribir una pregunta referente al patrón, por favor asegúrate de elegir la categoría correcta en el formulario debajo, para acelerar el proceso de respuesta. Los campos obligatorios están marcados con un *.