
Categorías populares
¿Buscas un hilo?


Comentarios / Preguntas (261)
![]() Gertrude McCarty escribió:
Gertrude McCarty escribió:
I would like to make the Moon Socks in sizw 7 1/2 but am not sure how much yarn to order
16.10.2014 - 00:52DROPS Design respondió:
Dear Mrs MacCarty, in size 7½, you need 150 g (= 3 balls DROPS Nepal) in each of the both colours 0517 + 0501, ie a total of 6 balls. Happy knitting!
16.10.2014 - 09:41
![]() Carol escribió:
Carol escribió:
This section of the pattern, At The Same Time k2 tog on each side of both markers on every other round (=4 st less per round) is that meant to be 4 Dec then a non decrease round. I ended up with a triangle in the bottom of the slipper.
14.10.2014 - 05:41DROPS Design respondió:
Dear Carol, you are correct, you will dec 4 sts on a round, then work 1 round withouth dec, until the section in stocking st measures 3-4 cm (see size). When you fold the slipper double, toe and heel side will "lean" towards middle to shape the sole. Happy knitting!
14.10.2014 - 10:00
![]() Janine escribió:
Janine escribió:
I have just completed the bootie/slipper part of this pattern. This has been one of the most confusing patterns I've encountered. It's not the actual knitting that is difficult, just the way it's worded, and would really have liked voice description on the video...I am going to keep trying because I like the way these slippers look...wish me luck!
14.10.2014 - 00:00
![]() Michelle escribió:
Michelle escribió:
Hi I am wondering how many needles i need as the dbl pointed needles only come with 4 and your video she uses up to 6 this is confusing
11.10.2014 - 06:51DROPS Design respondió:
Dear Michelle, when all sts are picked up/ knitted back from st holder, sts are distributed onto 4 double pointed needle, we work then with the 5th needle. Happy knitting!
11.10.2014 - 11:15
![]() Elisabeth escribió:
Elisabeth escribió:
Er det muligt at få opskriften til baby/børn?
10.10.2014 - 18:33DROPS Design respondió:
Der findes flere lignende tøfler til både baby og børn. Søg på baby og så på børn nede under søgeord. God fornøjelse!
17.10.2014 - 15:35
![]() Jess escribió:
Jess escribió:
I dont understand what it means to cast on with two different colours of yarn. Does anyone know how to do this or can direct me to a video? or do you just knit with the two colours together as if they are one strand of yarn.
08.10.2014 - 21:52DROPS Design respondió:
Dear Jess, slippers are worked with 1 strand of each colour held together as if they are only 1 strand of yarn (double thread). Happy knitting!
09.10.2014 - 10:06France Ouellet escribió:
After you pick up the 16 sts on both side it said MEASURE PIECE FROM HERE is it the length of the foot that is need it. THANK YOU
08.10.2014 - 11:29DROPS Design respondió:
Dear Mrs Ouellet, you measure for foot after picking the 16 sts on each side of middle part, work rib for 2 cm then continue in st st with dec until the stocking st section measures 3 cm (ie a total of 5 cm from sts picked up). Happy knitting!
08.10.2014 - 12:56
![]() Betty escribió:
Betty escribió:
Hva menes når det står: avslutt med en 1r og en 1 m rille? Er det snakk om enkeltmasker eller en omgang av hver?
07.10.2014 - 10:25DROPS Design respondió:
Hej Betty. Du strikker paa retten 1 ret og 1 rille, det bliver saa 1 vr og 1 rille paa vrangen. Det er begge enkeltmasker.
07.10.2014 - 16:54
![]() Susana escribió:
Susana escribió:
Olá, Seria possível obter a receita desta bota mas para crianças?? Obrigada desde ja
22.09.2014 - 22:19
![]() Tara escribió:
Tara escribió:
I'm confused on the cuff. I'm not certain what you mean by "Work as follows: 1 st in GARTER ST - see explanation above, * K 1, P 1 *, repeat from *-*, finish with K 1 and 1 st in garter st. " Does this mean that the first stitch will be a k and then work K1 P1 the rest of the way and then on the other side it will be K1 P1 and end with a K1? Thanks!
21.09.2014 - 08:13DROPS Design respondió:
Dear Tara, you will work in rib K1/P1 with 1 st in garter st each side, so that you will start from RS with K1 (edge st in garter st), *K1, P1*, repeat from *-* and finish with K1 (from rib) and K1 for edge st. From WS, you will work K1, *P1, K1*, repeat from *-* and finish with P1 and K1 (edge st). Happy knitting!
22.09.2014 - 10:17
|
|
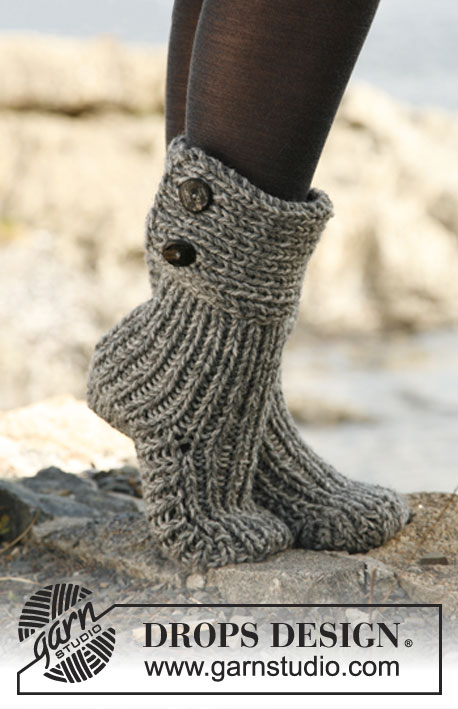
Moon Socks#moonsocks |
|
 |
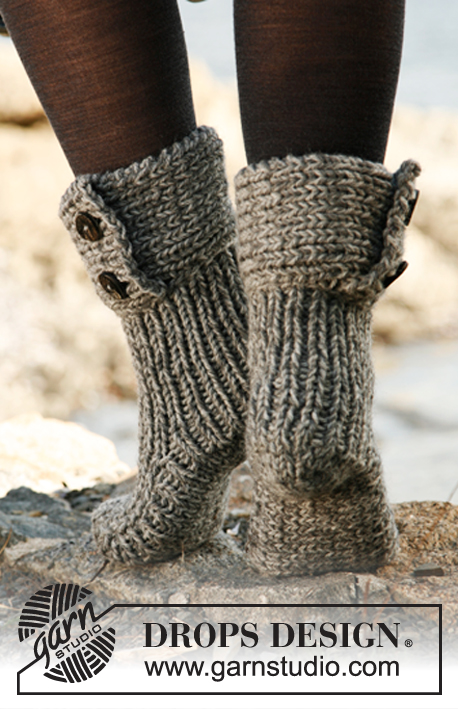 |
Pantuflas DROPS, de punto, en 2 hilos “Nepal”.
DROPS 134-42 |
|
|
PT MUSGO (de ida y vuelta en la ag): Todas las vtas de derecho. ------------------------------------------------------ PANTUFLAS: PIERNA: Mon 36-38-40 pts en ag de doble punta tamaño 6 mm con 1 hilo gris medio y 1 hilo mix gris. Tejer resorte 1d/1r, en redondo, hasta que la pieza mida aprox 10 cm. PIE: Ahora dejar los primeros 9-11-11 pts en la vta en la ag, deslizar los 27-27-29 pts restantes en un gancho o seguro aux. Continuar con resorte de ida y vuelta sobre los 9-11-11 pts – AL MISMO TIEMPO en la 1ª vta mon 1 nuevo pt en cada lado (pt de orillo) = 11-13-13 pts. Cuando haya tejido 7-8.5-10 cm, rem 1 pt de orillo en cada lado = 9-11-11 pts. Después desl los pts del gancho o seguro aux de regreso en la ag y levantar 12-14-16 pts en cada lado de la parte central (a 1 pt del pt de orillo) = 60-66-72 pts en la ag. Ahora medir la pieza desde aquí. Insertar 1 marcapuntos (MP) en el centro del frente del dedo y 1 MP en el centro de la parte de atrás en el talón. Continuar en redondo, con resorte como antes por 2 cm. Ahora terminar la pieza en pt jersey – AL MISMO TIEMPO tejer 2 pjd en cada lado de cada MP, en vtas alternas (= 4 pts menos por vta); continuar dism hasta que la sección en pt jersey mida 3-3-4 cm – rem. Hacer la costura en el centro de la parte de abajo del pie, en el pt externo, para evitar que se forme una costura abultada. ORILLA, TEJIDA DE UN LADO A OTRO: Mon 15-17-17 pts en ag tamaño 6 mm con 1 hilo gris medio y 1 hilo mix gris. Tejer de la manera sig: 1 pt en PT MUSGO – ver explicación arriba, * 1d, 1r *, repetir de *a*, terminar con 1d y 1 pt en pt musgo. Cuando la pieza mida 2 cm, rem para 2 ojales de la manera sig por el LD: 1 pt en pt musgo, 1d, 1r, desl 1 pt de derecho, 1d, pasar el pt desl por encima, 1 HEB (lazada), * 1d, 1r *, repetir de *a* hasta que resten 5 pts, 1 HEB, 2 pjd, 1r, 1d, 1 pt en pt musgo. Continuar con resorte y en pt musgo en cada lado hasta que la pieza mida aprox 36-37-38 cm. Rem pts con derecho sobre derecho y revés sobre revés. Coser los botones y abotonar. Deslizar la orilla 2 cm por encima de la pierna de la pantufla, con los botones hacia la parte externa, y coser a la orilla de montaje en la pantufla, por el LR, con puntadas invisibles. |
|
¿Terminaste este patrón?Entonces, etiqueta tus fotos con #dropspattern #moonsocks o envíalas a la galería #dropsfan. ¿Necesitas ayuda con este patrón?Encontrarás 10 videos tutoriales, un espacio para comentarios/preguntas y más visitando la página del patrón en garnstudio.com © 1982-2026 DROPS Design A/S. Todos los derechos reservados. Este documento, incluyendo todas sus sub-secciones, está protegido por los derechos de autor (copyright). Lee más acerca de lo que puedes hacer con nuestros patrones en la parte de abajo de cada patrón de nuestro sitio. |
|


Con más de 40 años en el diseño de modelos de punto y de ganchillo, DROPS Design ofrece una de las más vastas colecciones de patrones gratuitos en el internet - traducidos en 17 idiomas. Al día de hoy, contamos con 324 catálogos y 12290 patrones - de los cuales 11670 están traducidos en español.
Nosotros trabajamos con mucho esmero para brindarte lo mejor que las labores de punto y ganchillo tienen para ofrecer,inspiración y consejos, así como hilos de magnífica calidad a precios increíbles! Te gustaría usar nuestros patrones para otro fin además del uso personal? Puedes leer acerca de lo que estás permitida a hacer en el texto de Copyright en la parte de abajo de todos nuestros patrones. Felices labores!
Escribe un comentario sobre DROPS 134-42
¡Nos encantaría saber qué piensas acerca de este patrón!
Si quieres escribir una pregunta referente al patrón, por favor asegúrate de elegir la categoría correcta en el formulario debajo, para acelerar el proceso de respuesta. Los campos obligatorios están marcados con un *.