
Categorías populares
¿Buscas un hilo?


Comentarios / Preguntas (131)
![]() Ingrid escribió:
Ingrid escribió:
Hallo, ik heb een vraag over telpatroon M2. In de 3e (bovenste) regel haak je 6 st in de l-lussen van de 2e regel. Maar in regel 2 haak je zoals ik het begrijp 4 lossen en 4 stokjes (totaal 8 steken) Wat moet ik nou in welke steek doen? En klopt het dat je M2 2x boven elkaar moet haken? Alvast bedankt voor de hulp.
15.03.2015 - 17:47DROPS Design respondió:
Hoi Ingrid. Je haakt om de lussen en niet in de lossen, dus het aantal is niet van toepassing. Er stond ook niet om in de vertaling van het symbool, dat heb ik aangepast. Mijn excuses voor mijn vertraagde antwoord!
03.06.2015 - 14:58
![]() Annette Lohse escribió:
Annette Lohse escribió:
Hej Vil gerne i gang med denne flotte jakke, men er i tvivl om str. Der er ingen brystvidde angivet. Har ledt på siden efter generel størrelsesguide, men kan ingen finde. Kan i hjælpe? På forhånd tak. Mvh Annette
17.02.2015 - 16:52DROPS Design respondió:
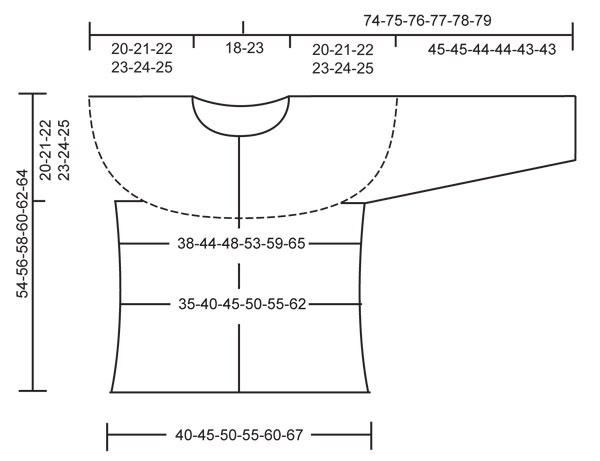
Hej Annette. Nederst paa mönstret er der en maalskitse med alle maal i cm per störrelse.
18.02.2015 - 12:54
![]() Hilary escribió:
Hilary escribió:
Hi. Following the pattern, it says that after M1 continue till piece measures 18cm. But after the 10 rows of M1, my piece measures 23 cm. Will this be a problem?
07.02.2015 - 02:20DROPS Design respondió:
Dear Hilary, remember to check your tension, you should get and keep 12 tr x 7 rows = 10 x 10 cm. Happy crocheting!
07.02.2015 - 09:21Kari escribió:
When reading the pattern, I know that you start at the bottom right corner. When moving on to the second and so on rows do you continue to read it right to left or do you switch to left to right?
01.02.2015 - 19:51DROPS Design respondió:
Dear Kari, you read 1st row in diagram and every other row from the right towards the left, and 2nd row and every other row from the left towards the right. Happy crocheting!
02.02.2015 - 12:58
![]() Hilary escribió:
Hilary escribió:
Hi. This is the first time I am attempting one of your patterns. Your sizes are listed as XS/S M, L etc. Is it possible to know the exact measurements in inches or cm please?
28.01.2015 - 16:19DROPS Design respondió:
Hi Hilary. The measurements are listed on the schematic drawing at the bottom of the pattern. The measurements are in cm per size.
28.01.2015 - 16:31
![]() Sunny escribió:
Sunny escribió:
Hello again, Could you pls list the number of chains after each row during M.1? I keep getting wrong number of chains after 10 rows.
24.01.2015 - 21:31DROPS Design respondió:
Dear Sunny, I'm sorry I'm not sure which chains you are wondering - you crochet 3 turning ch at the end of each row and work 5 dc, repeat diag M.1, 5 dc. Diag. M.1 starts at the bottom corner on the right side and read towards the left (row 1 and every other row), then read from the left towards the right (row 2 and every other row). Row 1 is worked over 3 sts (and becomes 4 sts in each repeat), last row is worked over 7 sts (and becomes 8 sts in each repeat). Happy crocheting!
26.01.2015 - 09:57
![]() Sunny escribió:
Sunny escribió:
The cardigan is beautiful! At the row 2, we need to do 10 rows of M1 where the diagram is shown below the pattern. By the way, it starts with 3+1 DC till it becomes 7+1 with after 10 rows. I suppose this is a step to increase total number of chains. Can you explain how to achieve to from ch 67 to ch 162 (small size here). Thank you in advance.
22.01.2015 - 04:14DROPS Design respondió:
Dear Sunny, you will work M.1 as follows, starting at the bottom corner on the right side reading towards the left from RS, and from the left towards the right from WS: 5 dc, repeat M.1 (= 2 dc in next st, 1 dc in each of the next 2 sts) until 5 sts remains at the end of row, 1 dc in each of the last 5 sts. Continue upwards until the 10 rows of M.1 has been made, you will have 162 dc when M.1 has been worked 1 time in height over all sts. Happy crocheting!
22.01.2015 - 10:29
![]() Kate escribió:
Kate escribió:
In body piece - M.2., repeat M2 until 7 tr remain. Question, 7 stitches remain where? Can't be 7 stitches left to be worked. Sorry but I can't understand this one. Thank you. Doing well until this point, now I'm stuck!
19.01.2015 - 01:48DROPS Design respondió:
Dear Kate, you repeat M2 until 7 sts remain before the end of row, then work over the last 7 sts on row as follows: 2 tr in next st, 1 tr in each of the next 5 tr. Happy crocheting!
19.01.2015 - 14:08
![]() Monika escribió:
Monika escribió:
Ich verstehe den Abschnitt nach der Reihe mit den Luftmaschen für den Ärmeleinsatz nicht. Wenn ich die Maschenzahl für die Ärmelreihe addiere, komme ich in Größe L auf 194 Maschen. "Weiter je ein Stb/jede fM=126 Maschen" Wie komme ich von 194 auf 216 Maschen? Wieso fM?
16.01.2015 - 21:49DROPS Design respondió:
Sie haben ja eine bestimmte Anzahl M für die Ärmel übersprungen und dafür nur 8 Lm gehäkelt. Nun häkeln Sie also 30 Stb für das Vorderteil, 8 Stb für den Armausschnitt (in jede Lm 1 Stb), 50 Stb für das Rückenteil, 8 Stb für den anderen Armausschnitt und 30 Stb für das Vorderteil = 126 M. Die Angabe "fM" war ein Fehler, der gerade korrigiert wurde, es muss "Lm" heißen.
17.01.2015 - 18:26
![]() Bettina escribió:
Bettina escribió:
Buonasera,complimenti per questo modello facile e elegante!Quale taglia porta la modella nella foto? Non sono sicura di aver capito bene la misura da fare per me. La ringrazio
04.09.2014 - 21:34DROPS Design respondió:
Buonasera Bettina. Nel diagramma in basso, alla fine delle spiegazioni del modello, trova le taglie espresse in cm. Confrontando queste misure con quelle di un suo indumento analogo, dovrebbe riuscire ad individuare la taglia corretta da seguire. Buon lavoro!
04.09.2014 - 22:47
|
|||||||||||||
A Kiss For Midwinter#akissformidwintercardigan |
|||||||||||||
 |
 |
||||||||||||
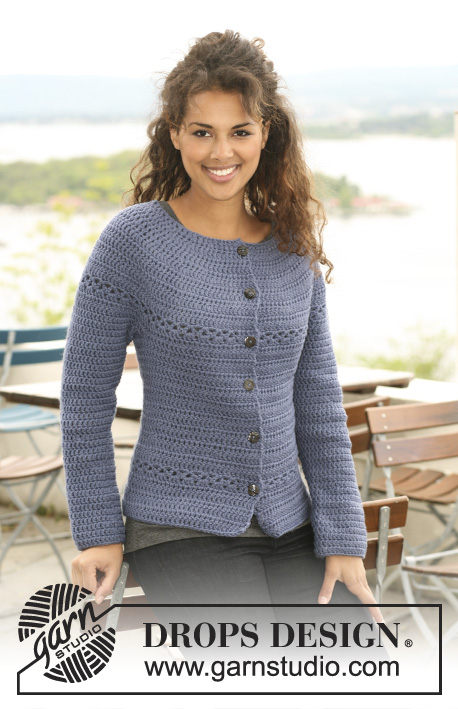
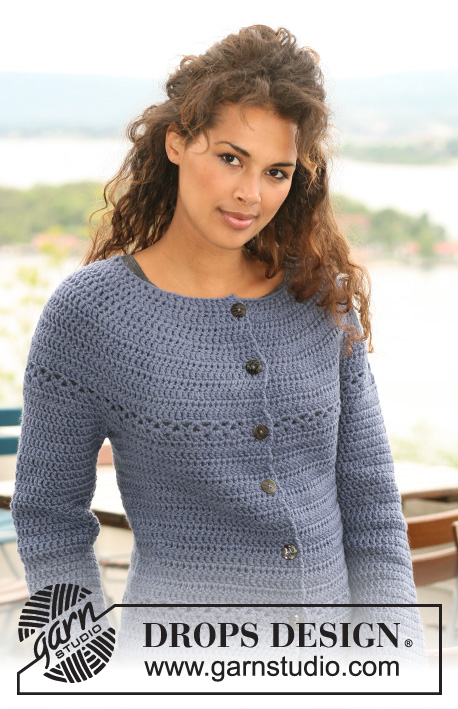
Chaqueta de ganchillo DROPS en ”Nepal”. Talla XS a XXXL.
DROPS 121-33 |
|||||||||||||
|
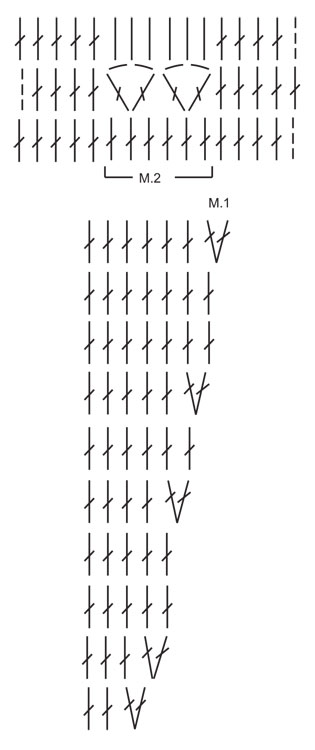
TIP PARA REALIZACIÓN DEL TRABAJO: Sustituir el 1er p.a. en cada vta/fila por 3 p.de cad. Finalizar cada vta con 1 p.e. en el 3er p.de cad. de inicio de la vtala fila anterior. PATRÓN: Ver los diagramas M.1 y M.2, Los diagramas muestran el patrón por el LD. TIP PARA LAS DISMINUCIONES: Trabajar 1 p.a., pero sin hacer la última lazada (= 2 pts en el ganchillo), trabajar el sig p.a., pero al hacer la última lazada pasar el hilo por todos los pts en el ganchillo - 1 p.a. dism --------------------------------------------------------------------------------------------------------------------- CUERPO: Se trabaja de arriba abajo, de ida y vta desde el centro del delantero. Trabajar 91-99-107-115-123-131 p.de cad. (incl 3 p.de cad. para girar) con ag de ganchillo tamaño 4.5 mm y Nepal. Trabajar la sig fila como sigue: 1 p.a. en el 4º p.de cad, *saltar 1 p.de cad., 1 p.a. en cada uno de los sig 3 p.de cad*, repetir de * a *, saltar 1 p.de cad. y finalizar con 1 p.a. en los últimos 2 p.de cad. = 67-73-79-85-91-97 p.a. - ver TIP PARA REALIZACIÓN DEL TRABAJO. Ahora trabajar 10 filas según M.1 (5 p.a. a cada lado = la cenefa, trabajar 1 p.a. en cada p.a. - no incluidos en el diagrama). Después de M.1 hay 162-178-194-210-226-242 p.a. en la fila. Continuar con 1 p.a. en cada p.a. Cuando la labor mida 16-17-18-19-20-21 cm continuar como sigue: 5 p.a. de la cenefa, 1-0-2-1-0-2 p.a., repetir M.2 hasta que queden 6-5-7-6-5-7 p.a., finalizar con 1-0-2-1-0-2 p.a. y 5 p.a. de la cenefa. Continuar con 1 p.a. en cada p.a. hasta que la labor mida 20-21-22-23-24-25 cm. Trabajar la sig fila como sigue: 24-27-30-33-36-40 p.a. (delantero), 8 p.de cad. (bajo la manga/sisa), saltar 38-40-42-44-46-46 p.a. de la fila anterior (se usa más tarde para la manga), 38-44-50-56-62-70 p.a. (la espalda), 8 p.de cad. (bajo la manga/sisa), saltar 38-40-42-44-46-46 p.a. de la fila anterior (se usa más tarde para la manga) y 24-27-30-33-36-40 p.a. (delantero). Continuar con 1 p.a. en cada p.a./p.de cad. = 102-114-126-138-150-166 p.a. Insertar un marcapuntos (MP) en el centro de los 8 p.de cad. bajo la manga a cada lado ( espalda = 46-52-58-64-70-78 p.a., delantero = 28-31-34-37-40-44 p.a.). Continuar con 1 p.a. en cada p.a. Cuando la labor mida 34-36-38-40-42-44 cm dism 8 pts repartidos ( no dism en la cenefa) - ver TIP PARA LAS DISMINUCIONES = 94-106-118-130-142-158 p.a. Cuando la labor mida 40-42-44-46-48-50 cm aum 12-12-12-12-12-14 p.a. repartidos ( no trabajar los aum en la cenefa) = 106-118-130-142-154-172 p.a. Cuando la labor mida 43-45-47-49-51-53 cm continuar como sigue: 5 p.a. de la cenefa, repetir M.2, finalizar con 5 p.a. de la cenefa. Continuar con 1 p.a. en cada p.a. hasta que la labor mida 54-56-58-60-62-64 cm, cortar el hilo y asegurar. MANGA: Se trabaja de arriba abajo. Comenzar en el centro bajo la manga como sigue: 1 p.b. en el 5º de los 8 p.de cad. bajo la manga/ la sisa. Trabajar 3 p.de cad. (=1 p.a.) y continuar con 1 p.a. en cada p.de cad. ATENCIÓN: Antes de continuar sobre la sisa trabajar 1 p.a. en la transición (para evitar que se forme un agujero). Continuar con 1 p.a. en cada p.a. sobre la sisa, trabajar 1 p.a. en la transición y trabajar 1 p.a. en cada uno de los p.de cad. restantes bajo la manga = 48-50-52-54-56-56 p.a. Insertar un MP en el centro bajo la manga. AHORA MEDIR LA LABOR DESDE AQUÍ. Trabajar 1 p.a. en cada p.a. Cuando la labor mida 4 cm dism 1 p.a. a cada lado del MP, ver TIP PARA LAS DISMINUCIONES, y repetir las dism cada 4.5-4.5-4-4-4-4 cm un total de 8-8-9-9-9-9 vcs = 32-34-34-36-38-38 p.a. Cortar el hilo y asegurar cuando la manga mida 45-45-44-44-43-43 cm - ATENCIÓN - menos para las tallas más grandes debido a una mayor anchura del escote y el hombro. TERMINACIÓN: Coser los botones en la cenefa izquierda - colocar el más alto 1 cm más abajo del escote, el resto con aprox 8 cm entre ellos. Usar los agujeros entre 2 p.a. en la cenefa como ojales. |
|||||||||||||
Explicaciones del diagrama |
|||||||||||||
|
|||||||||||||
 |
|||||||||||||
 |
|||||||||||||
¿Terminaste este patrón?Entonces, etiqueta tus fotos con #dropspattern #akissformidwintercardigan o envíalas a la galería #dropsfan. ¿Necesitas ayuda con este patrón?Encontrarás 7 videos tutoriales, un espacio para comentarios/preguntas y más visitando la página del patrón en garnstudio.com © 1982-2026 DROPS Design A/S. Todos los derechos reservados. Este documento, incluyendo todas sus sub-secciones, está protegido por los derechos de autor (copyright). Lee más acerca de lo que puedes hacer con nuestros patrones en la parte de abajo de cada patrón de nuestro sitio. |
|||||||||||||


Con más de 40 años en el diseño de modelos de punto y de ganchillo, DROPS Design ofrece una de las más vastas colecciones de patrones gratuitos en el internet - traducidos en 17 idiomas. Al día de hoy, contamos con 324 catálogos y 12290 patrones - de los cuales 11685 están traducidos en español.
Nosotros trabajamos con mucho esmero para brindarte lo mejor que las labores de punto y ganchillo tienen para ofrecer,inspiración y consejos, así como hilos de magnífica calidad a precios increíbles! Te gustaría usar nuestros patrones para otro fin además del uso personal? Puedes leer acerca de lo que estás permitida a hacer en el texto de Copyright en la parte de abajo de todos nuestros patrones. Felices labores!
Escribe un comentario sobre DROPS 121-33
¡Nos encantaría saber qué piensas acerca de este patrón!
Si quieres escribir una pregunta referente al patrón, por favor asegúrate de elegir la categoría correcta en el formulario debajo, para acelerar el proceso de respuesta. Los campos obligatorios están marcados con un *.