
Categorías populares
¿Buscas un hilo?


Comentarios / Preguntas (83)
![]() Simone Van Der Gaag escribió:
Simone Van Der Gaag escribió:
Thank you for the lovely pattern. I knitted it with handspun yarn and it worked out very well. I really love the pattern amd the fact you almost knit the whole cardigan in one piece. Great!
01.02.2021 - 09:23
![]() Jo escribió:
Jo escribió:
Can you clarify the ribbing please? Is it two by two or four by four or two by four. (The site isn’t allowing me to write asterisks or numbers so apologies for weird phrasing.) thanks.
28.12.2020 - 14:05
![]() Sylvia Lees escribió:
Sylvia Lees escribió:
You say to buy 7 buttons, and to make 7 buttonholes, but there are 8 in the picture. Why?
23.05.2020 - 21:07DROPS Design respondió:
Dear Sylvia, there are 7 buttons on tthe sweter seen at the picture, the top button is abot 1-1.5 cm from the top, the bottom is left open. Where do you see an 8th? Happy Knitting!
25.05.2020 - 00:42
![]() Ine escribió:
Ine escribió:
Is er al iemand die het vest met lange mouwen heeft gebreid..? ( geprobeerd te breien..) Gelukkig 2020!
01.01.2020 - 12:58
![]() Lee escribió:
Lee escribió:
Would it be possible to give instructions on how to modify this sweater to a pull over instead of button front?
22.07.2019 - 21:45
![]() Anja escribió:
Anja escribió:
Hallo, Ik brei graag top-down en wil dat model ook zo breien. Zou het met het patroon lukken wanneer ik het omkeer en i.p.v. steken bijv. 2 steken Samen te breien - 1 steek toevoegen? Zou het lukken?
07.03.2019 - 11:09DROPS Design respondió:
Dag Anja,
Theoretisch zou je het om moeten kunnen keren. Waar je meerdert moet je dan minderen en vice versa. Zo kun j e ook de kabel andersom breien. Het is wel verstandig om het eerst even goed uit te denken en evt. ook uit te schrijven.
07.03.2019 - 20:42Arcadia escribió:
I'm not sure if I've understood correctly. I have just finished the rib. The next row, on the RS (where the rib looks like KK PPPP KK) is KNIT (with decreases - K2, * K2 tog, K2 tog, K2 *) Now it's asking for reverse stocking, which means the RS is all PURL - but I just did a row of KNIT. Is it correct that on the RS there's one row of KNIT before PURLing the rest of the garment? Thank you :)
01.05.2018 - 03:17DROPS Design respondió:
Dear Arcadia, Knit the sts as described on first row after rib (= from RS) then continue with reversed stocking st (= P from RS and K from WS). Happy knitting!
02.05.2018 - 09:45
![]() Bärbel escribió:
Bärbel escribió:
Hallo liebes Drops-Team, ich habe eben die Anleitung ausgedruckt. Leider ist das Diagramm und die Zeichnung mit den Maßen nicht dabei, auch nicht in der Druckvorschau. Da werden auch nur 2 Seiten angezeigt. Wie könnt Ihr mir helfen? LG, Bärbel
10.03.2018 - 10:50DROPS Design respondió:
Liebe Bärbel, prüfen Sie die Druckeinstellungen, damit alle Seiten gedrückt werden. Viel Spaß beim stricken!
12.03.2018 - 08:35
![]() Marti Hand escribió:
Marti Hand escribió:
I have a question about the number of stitches for the size Small. My test sample came out correct -> 17x22 stitches = 4"x4" in Alaska. The number of cast on stitches called for = 240 stitches =56" in circumference...is the number of CO stitches correct for a size small? My hip measurement is 35 inches, and feel the above 56" is much too big to fit my frame. Either I'm super small or Norwegians are super big! If this is the case, can you please provide knitting instructions for XS?
16.11.2017 - 13:03DROPS Design respondió:
Dear Mrs Hand, you first work in rib, so that you need more sts for the correct width, then you will decrease to 164 sts in size S after ribbing. If your tension is fine, you will the finished measurements as in chart at the bottom of the pattern. Happy knitting!
16.11.2017 - 13:28
![]() Anja escribió:
Anja escribió:
Hey ihr Lieben! Ist das Zufall oder habt Ihr meinen Namen, den ich dieser Jacke meinem Projekt dazu in der großen Strickcommunity gegeben hab, verwendet? Ist mir nur grad so aufgefallen. Vorher hatte die Jacke nämlich nur diese Nummer und ich hab mein Projekt "Keltischer Wintertraum" genannt... LG Anja
25.10.2017 - 09:46DROPS Design respondió:
Liebe Anja, die Namen der Modellen sind aus der Empfehlungen und Vorschläge der Website Besucher ausgewählt; es ist dann nur Zufall.
25.10.2017 - 12:22
|
|||||||||||||||||||||||||
Celtic Winter#celticwintercardigan |
|||||||||||||||||||||||||
|
|
|||||||||||||||||||||||||
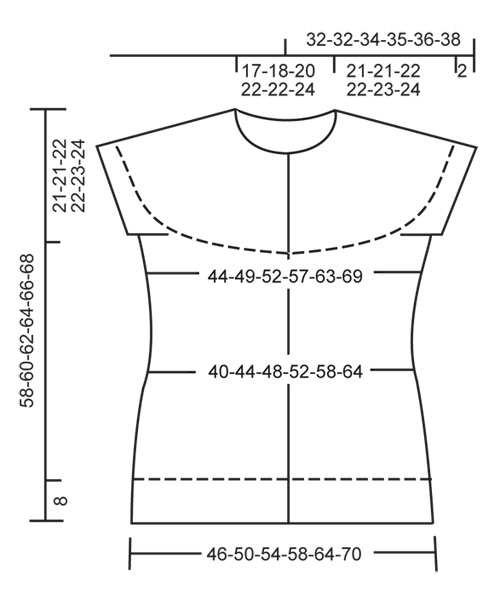
Chaleco DROPS en ”Alaska” con raglán y patrón trenzado en el canesú. Talla S a XXXL.
DROPS 121-27 |
|||||||||||||||||||||||||
|
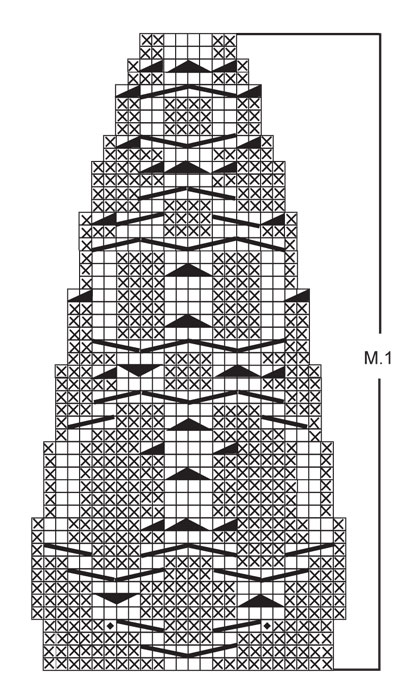
PUNTO MUSGO (de ida y vta en ag): Trabajar todas las filas de derecho. PATRÓN: Ver el diagrama M.1 - el patrón se muestra por el LD. OJALES: Hacer los ojales en la cenefa derecha. 1 ojal = trabajar juntos el 3er y 4º pt desde el centro del delantero y hacer 1 HEB (lazada). Hacer los ojales cuando la labor mida: TALLA S: 12, 19, 26, 34, 41, 49 y 56 cm. TALLA M: 12, 20, 28, 36, 43, 51 y 58 cm. TALLA L: 12, 20, 28, 36, 44, 52 y 60 cm. TALLA XL: 12, 21, 29, 37, 45, 54 y 62 cm. TALLA XXL: 12, 21, 30, 39, 47, 56 y 64 cm. TALLA XXXL: 12, 21, 30, 39, 48, 57 y 66 cm. ------------- CUERPO: Se trabaja de ida y vta en ag circular desde el centro del delantero. Mont 240-264-282-306-336-366 pts (incl 5 pts de la cenefa a cada lado hacia el centro del delantero) en ag circular tamaño 4 mm con Alaska. Continuar como sigue por el LD: 5 pts de la cenefa en PT MUSGO - ver arriba, 2 d., * 4 r./ 2 d.*, repetir de * a * y finalizar con 5 pts de la cenefa en pt musgo. Cuando el elástico mida 8 cm ( asegúrate de que la sig fila es por el LD) cambiar a ag tamaño 5 mm. Trabajar la sig fila como sigue por el LD: 5 pts de la cenefa en pt musgo, 2 d., *2 pjd, 2 pjd, 2 d.*, repetir de * a * y finalizar con 5 pts de la cenefa en pt musgo = 164-180-192-208-228-248 pts. Continuar en pt jersey revés y las cenefas en pt musgo como antes. Insertar un MP a 43-47-50-54-59-64 pts de cada lado (=78-86-92-100-110-120 pts entre los MPs en la espalda). RECUERDE MANTENER LA MISMA TENSIÓN DE LA MUESTRA! Cuando la labor mida 10-10-11-11-12-12 cm dism 1 pt a cada lado de ambos MPs y repetir las dism cada 2 cm un total de 5 vcs = 144-160-172-188-208-228 pts. AL MISMO TIEMPO cuando la labor mida 12 cm hacer los OJALES en la cenefa derecha - ver arriba! Cuando la labor mida 22-22-23-23-24-24 cm aum 1 pt a cada lado de ambos MPs y repetir los aum cada 3 cm un total de 4 vcs = 160-176-188-204-224-244 pts. Cuando la labor mida 37-39-40-42-43-44 cm cerrar 6-6-8-8-10-10 pts a cada lado para la sisa en la sig fila por el LD (= 3-3-4-4-5-5 pts a cada lado del MP) = 148-164-172-188-204-224 pts restantes en la ag. Dejar la labor en espera. BORDE DE LA MANGA: Se trabaja de ida y vta en ag circular. Mont 58-61-70-73-78-79 pts en ag circular tamaño 4 mm. Trabajar 3 filas de derecho y trabajar la sig fila como sigue: Cerrar los primeros 3-3-4-4-5-5 pts, trabajar de derecho los pts de la fila hasta que queden 3-3-4-4-5-5 pts, cerrar estos pts, cortar el hilo = 52-55-62-65-68-69 pts restantes en la ag. Dejar la labor en espera y tejer otra manga igual. CANESÚ: Desl las mangas a la misma ag circular tamaño 5 mm en la que está el cuerpo, donde se remató para las sisas = 252-274-296-318-340-362 pts. Trabajar 1 fila de derecho por el LR y trabajar 0-0-2-2-4-6 filas en pt jersey revés con las cenefas en pt musgo. Trabajar la sig fila como sigue por el LD: 5 pts de la cenefa en pt musgo, 10 r., * aum 1 pt en cada uno de los sig 2 pts y trabajar estos pts de derecho, 20 r.*, repetir de * a * un total de 10-11-12-13-14-15 vcs, aum 1 pt en cada uno de los sig 2 pts y trabajar estos 4 pts de derecho, 10 r. y 5 pts de la cenefa en pt musgo = 274-298-322-346-370-394 pts. Ahora continuar en M.1 con las cenefas en pt musgo como antes (1ª fila = LR). En la fila 4 de M.1 aum 2 pts en cada repetición como indica el diagrama = 296-322-348-374-400-426 pts. Ahora completar M.1. Después de M.1 hay 98-106-114-122-130-138 pts en la ag. Cambiar a ag circular tamaño 4 mm. Trabajar 1 fila de derecho por el LD, al mismo tiempo dism 16-18-22-24-30-30 pts repartidos (no dism en la cenefa) = 82-88-92-98-100-108 pts. Trabajar 1 fila de derecho. Insertar un MP en el centro de la espalda. Continuar en pt musgo en todos los pts, al mismo tiempo trabajar filas acortadas en el centro de la espalda como sigue (1ª fila = LD): Trabajar de derecho 7 pts pasando el MP del centro de la espalda, girar la labor trabajar 7 pts de derecho pasando el MP en el otro lado, girar la labor, 14 pts de derecho pasando el MP, girar la labor, 14 pts de derecho pasando el MP en el otro lado, girar la labor y continuar de la misma manera con 7 pts más antes de cada giro hasta haber trabajado un total de 35-35-35-42-42-42 pts a cada lado del MP. Girar la labor, trabajar de derecho en todos los pts de la fila y después trabajar 3 filas en todos los pts. Rem con der. sobre el LD. TERMINACIÓN: Coser los bordes de las mangas, borde con borde y las aberturas bajo las mangas. Coser los botones. |
|||||||||||||||||||||||||
Explicaciones del diagrama |
|||||||||||||||||||||||||
|
|||||||||||||||||||||||||
 |
|||||||||||||||||||||||||
 |
|||||||||||||||||||||||||
¿Terminaste este patrón?Entonces, etiqueta tus fotos con #dropspattern #celticwintercardigan o envíalas a la galería #dropsfan. ¿Necesitas ayuda con este patrón?Encontrarás 19 videos tutoriales, un espacio para comentarios/preguntas y más visitando la página del patrón en garnstudio.com © 1982-2026 DROPS Design A/S. Todos los derechos reservados. Este documento, incluyendo todas sus sub-secciones, está protegido por los derechos de autor (copyright). Lee más acerca de lo que puedes hacer con nuestros patrones en la parte de abajo de cada patrón de nuestro sitio. |
|||||||||||||||||||||||||


Con más de 40 años en el diseño de modelos de punto y de ganchillo, DROPS Design ofrece una de las más vastas colecciones de patrones gratuitos en el internet - traducidos en 17 idiomas. Al día de hoy, contamos con 324 catálogos y 12290 patrones - de los cuales 11675 están traducidos en español.
Nosotros trabajamos con mucho esmero para brindarte lo mejor que las labores de punto y ganchillo tienen para ofrecer,inspiración y consejos, así como hilos de magnífica calidad a precios increíbles! Te gustaría usar nuestros patrones para otro fin además del uso personal? Puedes leer acerca de lo que estás permitida a hacer en el texto de Copyright en la parte de abajo de todos nuestros patrones. Felices labores!
Escribe un comentario sobre DROPS 121-27
¡Nos encantaría saber qué piensas acerca de este patrón!
Si quieres escribir una pregunta referente al patrón, por favor asegúrate de elegir la categoría correcta en el formulario debajo, para acelerar el proceso de respuesta. Los campos obligatorios están marcados con un *.