
Categorías populares
¿Buscas un hilo?

































Comentarios / Preguntas (627)
 Marianna escribió:
La parte dietro è lavorata come il davanti?
21.10.2026 - 12:42DROPS Design respondió:
Buongiorno Marianna, i motivi vengono lavorati anche sul dietro. Buon lavoro!
31.10.2026 - 15:33
 Tania escribió:
When working the charts back and forth, how do you knit the cable patterns on the wrong side? Thank you!
18.10.2026 - 21:02DROPS Design respondió:
Dear Tania, when you work the charts back and forth the odd numbered rows are worked on the right side, while the even numbered rows are worked from the wrong side. All cable rows are on right side rows (row 3 on the charts, row 7 as well in M.1 and M.3). Wrong side rows are worked opposite as seen, so you read them from left to right and purl the stitches on white square symbols or knit them on black square symbols. However, when looking at the cable from the right side, the stitches worked in the wrong side will be seen as shown in the chart (the white squares as knitted, the black squares as purled) so the cable pattern will look the same as it did when you worked in the round; this is the reason why charts back and forth are read and worked in the opposite way on wrong side rows. Happy knitting!
18.10.2026 - 21:11
Tania escribió:
After casting off for armholes, how do you knit back and forth and stay in the cable pattern?
18.10.2026 - 16:53DROPS Design respondió:
Dear Tania, the cast off for the armholes is worked over the section in M.2, so it won't affect the cable pattern. On the other hand, when you work back and forth the charts are read differently; the rows on the right side (including the rows with the cables) are worked as before. But the rows on the wrong side are worked opposite to how they are seen (so a knit row in a wrong side row would need to be purled, so that it looks like a knitted row from the right side). Therefore, the pattern will be maintained as you work back and forth. Happy knitting!
18.10.2026 - 20:41
Tania escribió:
I need a video on how to “bind off 6 sts for armhole each side”, please. I also need a video on how to work the Back Piece, please.
17.10.2026 - 22:50DROPS Design respondió:
Dear Tania, there is no complete video tutorial for this pattern. For the armholes you work as follows: Cast off the first 3 stitches, work over the front piece stitches until there are 3 stitches left before the next marker, cast off 3 stitches before the marker and 3 stitches after the marker. Now continue working the remaining stitches over the back piece until there are 3 stitches left before the 1st marker (the final 3 stitches on the round), cast off these last 3 stitches. Then, continue only over the back piece, working back and forth over all stitches and casting off 2 stitches (and later on 1 stitch) at the beginning of each row; casting off 2 stitches at the beginning of a right side row and 2 stitches at the beginning of a wrong side row counts as casting off 1 time. Happy knitting!
18.10.2026 - 20:07
Kayla escribió:
Hello! I am currently casting off for armhole shaping on a L and am struggling with the instructions. “Bind off to shape the armhole each side at beg of every row: 2 sts 2 times and 1 st 3 times = 128 sts. Continue in pattern.” When it states beginning of every row is it meaning Dec on each side of needle or only when you turn your work? Also, are the Dec worked all together in the same row or one set per row? Thank you so much!
13.10.2026 - 01:48DROPS Design respondió:
Dear Kayla, you will cast off the stitches at the beginning of each row from both right side and wrong side, so in L cast off 2 stitches at the beg of next 4 rows (= 2 sts 2 times each side) and 1 stitch at the beginning of next 6 rows (1 st 3 times each side). Happy knitting!
13.10.2026 - 09:39
 AnneLise Eikeland escribió:
Hei Jeg får ikke maskeantallet til og stemme Strikker i XL str. Strikkerførst forklart til 8 masker N este over 52 m neste over 16 m Neste 52 m så de siste 8 maskene Det blir 136 masker Jeg masker da til overs XL er 312 masker tilsamme
09.10.2026 - 15:28DROPS Design respondió:
Hei AnneLise. I str. XL legges det opp 290 masker, når vrangborden måler 5 cm økes det 22 makser = 290 + 22 = 312 masker. Sett 2 merketråder, ved start og ved maske 156. Så strikkes det slik: M.2 over de første 8 m + M.3 (= 8 m) + M.4 (10 m) + M.3 (=8 m) + M.4 (= 10 m) + M.3 (=8 m) + M.1 over de neste 52 m + M.3 (= 8 m) + M.4 (10 m) + M.3 (=8 m) + M.4 (= 10 m) + M.3 (=8 m) + M.2 over de neste 16 m + M.3 (= 8 m) + M.4 (10 m) + M.3 (=8 m) + M.4 (= 10 m) + M.3 (=8 m) + M.1 over de neste 52 m + M.3 (= 8 m) + M.4 (10 m) + M.3 (=8 m) + M.4 (= 10 m) + M.3 (=8 m) + M.2 over de siste 8 m = 312 masker. mvh DROPS Design
12.10.2026 - 14:01
Johanne escribió:
Når jeg begynner på bilen str L skal jeg ha 276 masker, men når jeg regner sammen maskeantallene i mønstrene (17+52+34+52+17) får jeg kun 172 masker. Hva slags mønster skal være på de 104 gjenstående maskene?
30.09.2026 - 17:31DROPS Design respondió:
Hej Johanne, vi har forklaret tidligere hvordan du strikker over de 276 masker. Her ser du teksten på engelsk, men det er samme diagram osv: M.2 over 17 sts, M.3 (8 sts), M.4 (10 sts), M.3, M.1 over 52 sts, M.3, M.4, M.3, M.2 over 34 sts, M.3, M.4, M.3, M.1 over 52 sts, M.3, M.4, M.3, M.2 over 17 sts = 17+8+10+8+52+8+10+8+34+8+10+8+52+8+10+8+17=276 sts.
01.10.2026 - 13:12
 Hartmut escribió:
Hallo liebes Drops team ich noch mal am Armausschnitt hatte ich kein Problem. Ich bin oben am Rücken bezweifelt auch am Halsausschnitt. die Maschenabnahme im Tipp habe ich nicht verstanden. Lgr harry
29.09.2026 - 10:04DROPS Design respondió:
Lieber Hartmut, beim Rückenteil sind es keine Abnahme für Halsausschnitt, alle Maschen werden auf einmal abgekettet, gleichzeitig als man Maschen in den Zöpfe abnehmen wird - siehe TIPP ZUM ABKETTEN: am Anfang der Anleitung, so wissen Sie wie viele Maschen in jedem Diagram abnehmen sollen. In diesem Video zeigen wir, wie man abkettet und gleichzeitig abnimmt. Viel Spaß beim Stricken!
30.09.2026 - 07:29
Hartmut escribió:
Hallo bin der Harry und stricke den Dreams of Aran Pullover. Ich komm mit der Abnahme am Rücken nicht zurecht. Ist es im Wechsel 1Mstrick3n dann 2Mzus.strick3n und die davor drüber ziehen 1M str. Vorherige drüber ziehen 2M zus str. und die davor drüber ziehen und das im wechsel. Uber eine Antwort würde ich mich sehr freuen. Harry
25.09.2026 - 17:38DROPS Design respondió:
Lieber Hartmut, sind Sie bei dem Armausschnitt? in die 5. Grösse werden Sie so abketten: 2 Maschen 3 Mal beidseitig = 2 Maschen am Anfang der 6 nächsten Reihen (die Maschen abketten und nicht abnehmen), dann 1 Masche 4 Mal beidseitig = 1 Masche am Anfang der 8 nächsten Reihen abketten. Viel Spaß beim Stricken!
28.09.2026 - 07:50
 Anne Bluck escribió:
Front piece. I am struggling to understand the middle cast off of 48 sts for the neck and at the same time decrease 12 sts evenly on the 48 on cast off row. What would be the ratio for casting off to the decreases and how many sts would I have left on my needle at the end of that row? Thank you,
31.08.2026 - 11:18DROPS Design respondió:
Dear Mrs Bluck, you need to decrease while casting off (see video) to get a straight edge, decrease in the different diagrams as explained under DECREASE TIP at the beginning of the pattern. Happy knitting!
01.09.2026 - 19:42
|
|||||||||||||||||||
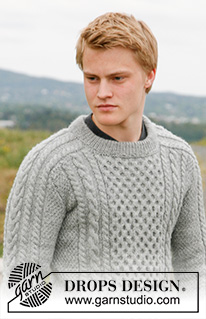
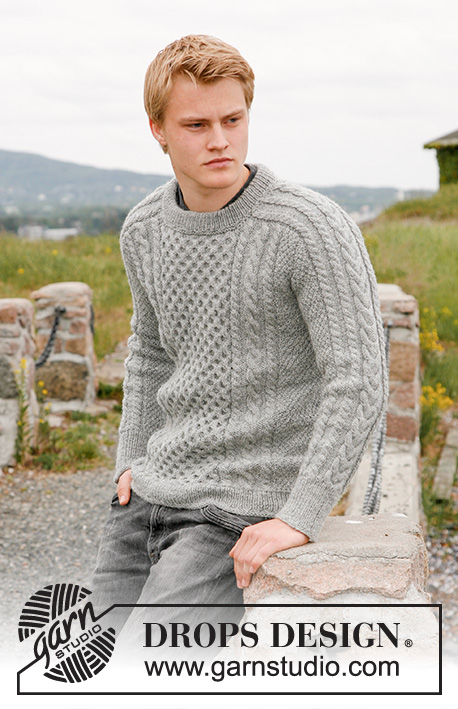
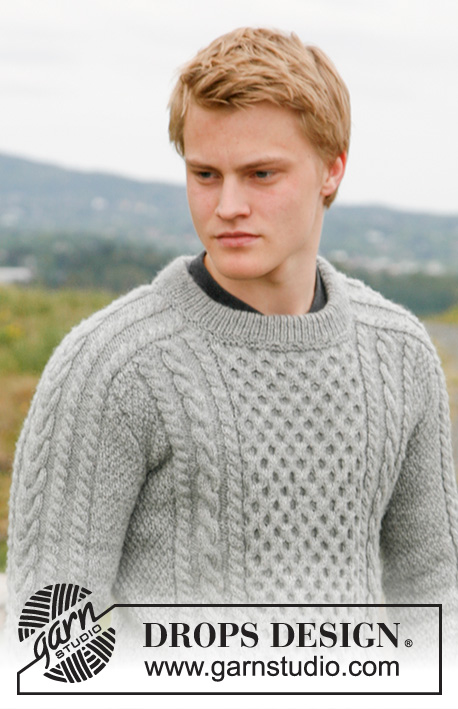
Dreams of Aran#dreamsofaransweater |
|||||||||||||||||||
 |
 |
||||||||||||||||||
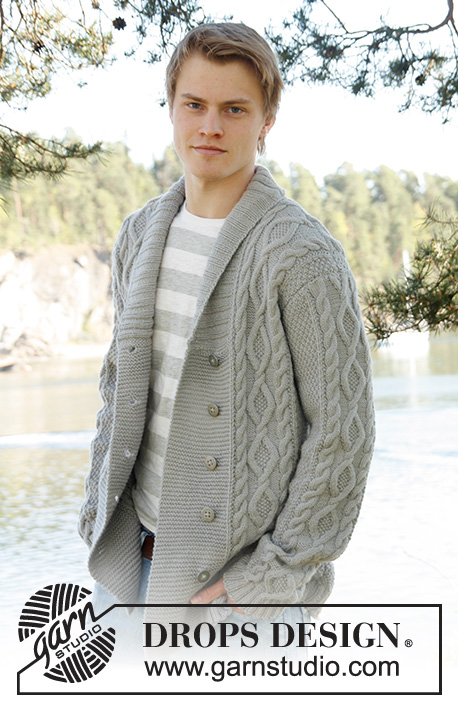
Pulóver de punto para hombre con torsadas en DROPS Karisma, DROPS Puna o DROPS Merino Extra Fine. Talla 13/14 años - XXXL.
DROPS 135-3 |
|||||||||||||||||||
|
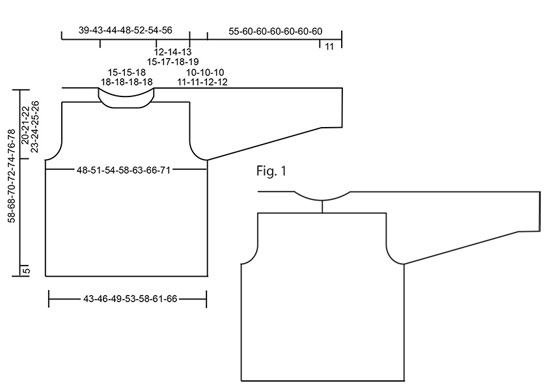
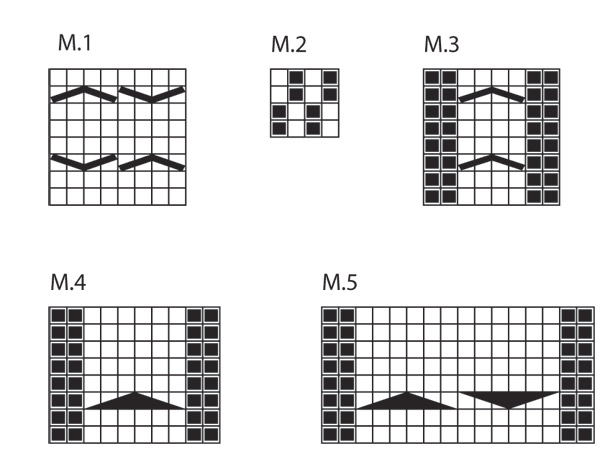
PT MUSGO (en redondo): 1 vta de derecho, 1 vta de revés PATRÓN: Ver diagrama M.1 – M.5. Los diagramas muestran el patrón por el LD. TIP PARA DISMINUIR: Tejer 1 pt como en el diagrama, tejer 2 pts juntos, pasar el primer pt por encima = 2 pts dism. Dism de la manera sig en los diferentes diagramas: M.1 (= 44-44-52-52-52-52-52 pts): 10-10-12-12-12-12-12 pts. M.3 (= 8 pts): 2 pts M.4 (= 10 pts): 3 pts M.5 (= 16 pts): 6 pts ------------------------------------------------------ ------------------------------------------------------ PULÓVER – RESUMEN DE LA PIEZA: Las mangas se tejen de abajo para arriba, continuar en los hombros y a lo largo del escote. Los puntos del escote en la parte de arriba de las mangas son disminuidos en dirección de la pieza del frente y una pequeña sección de las mangas es continuada a lo largo de la parte de arriba de la espalda y, más tarde, es cosida en el centro de la espalda, de modo que el escote esté más alto en la espalda que en el frente – ver Fig. 1. CUERPO: Tejido en redondo. Mon 208-230-250-270-290-310-330 pts en ag circular tamaño 3.5 mm con Karisma, Puna o Merino Extra Fine. Tejer 4 vtas en PT MUSGO – ver arriba – y continuar en resorte 1d/1r. Cuando la pieza mida 5 cm, tejer 2 vtas en pt musgo y, AL MISMO TIEMPO, aum 20-10-6-6-22-18-18 pts distribuidos equitativamente en la última vta = 228-240-256-276-312-328-348 pts. Insertar 2 marcapuntos en la pieza, 1 al inicio de la vta y 1 después de 114-120-128-138-156-164-174 pts (= cada lado). Cambiar a ag circular tamaño 4 mm y tejer el PATRÓN de la manera sig – ver arriba: Talla 13/14 – L: M.2 en los primeros 9-12-12-17 pts, M.3, M.4, M.3, M.1 en los 44-44-52-52 pts sig, M.3, M.4, M.3, M.2 en los 18-24-24-34 pts sig, M.3, M.4, M.3, M.1 en los 44-44-52-52 pts sig, M.3, M.4, M.3, M.2 en los últimos 9-12-12-17 pts. Talla XL-XXXL: M.2 en los primeros 8-12-17 pts, M.3, M.4, M.3, M.4, M.3, M.1 en los 52-52-52 pts sig, M.3, M.4, M.3, M.4, M.3, M.2 en los 16-24-34 pts sig, M.3, M.4, M.3, M.4, M.3, M.1 en los 52-52-52 pts sig, M.3, M.4, M.3, M.4, M.3, M.2 en los últimos 8-12-17 pts. RECORDAR MANTENER LA MISMA TENSIÓN DE TEJIDO DE LA MUESTRA! Continuar en el patrón de esta manera. AL MISMO TIEMPO, cuando la pieza mida 9 cm, aum 1 pt en cada lado de ambos marcapuntos (tejer los pts aum en M.2 a medida que se avanza en el tejido). Repetir los aum a cada 6-8-8-9-9-9-10 cm un total de 5 veces = 248-260-276-296-332-348-368 pts. Cuando la pieza mida 38-47-48-49-50-51-52 cm, rem 6 pts para la sisa en cada lado (= 3 pts en cada lado de los marcapuntos) y completar cada pieza por separado (asegurarse que las hileras de las torsadas sean hileras por el LD después de dividir la pieza). ESPALDA: = 118-124-132-142-160-168-178 pts. Continuar de ida y vuelta en ag circular. Rem para formar la sisa en cada lado, al inicio de cada hilera: 2 pts 2-2-2-2-2-3-4 veces y 1 pt 1-1-2-3-4-4-5 veces = 108-114-120-128-144-148-152 pts. Continuar en el patrón. Cuando la pieza mida 49-59-61-63-65-67-69 cm (ajustar para que la hilera sig sea la hilera 7 del diagrama M.1, M.3 y M.4) rem los pts y, AL MISMO TIEMPO, dism 24-24-26-26-36-36-36 pts en el diagrama en la hilera de remate – ver TIP PARA DISMINUIR! FRENTE: = 118-124-132-142-160-168-178 pts. Rem para la sisa como se describe para la pieza de la espalda. Cuando la pieza mida 46-56-58-60-62-64-66 cm (ajustar para que la hilera sig sea la 1ª o la 5ª hilera de M.1), rem los 40-40-48-48-48-48-48 pts para el escote y, AL MISMO TIEMPO, dism 10-10-12-12-12-12-12 pts distribuidos equitativamente en los 40-40-48-48-48-48-48 pts en la hilera de remate. Ahora completar cada hombro por separado. Rem 2 pts en la línea del escote en la hilera sig. Cuando la pieza mida 49-59-61-63-65-67-69 cm (ajustar a la pieza de la espalda) rem los pts y, AL MISMO TIEMPO, dism 7-7-7-7-12-12-12 pts en el diagrama en la hilera de remate. MANGA DERECHA: Tejida en redondo. Mon 56-58-60-62-64-66-68 pts en ag de doble punta tamaño 3.5 mm con Karisma, Puna o Merino Extra Fine. Tejer 4 vtas en pt musgo y continuar en resorte 1d/1r hasta que la pieza mida 10 cm. Tejer 2 vtas en pt musgo y, AL MISMO TIEMPO, aum 2 pts distribuidos equitativamente en la última vta = 58-60-62-64-66-68-70 pts. Insertar un marcapuntos al inicio de la vta. Cambiar a las ag de doble punta tamaño 4 mm y continuar en el patrón en la vta sig así: M.2 en los primeros 5-6-7-8-9-10-11 pts, M.3 2 veces, M.5, M.3 2 veces, M.2 en los últimos 5-6-7-8-9-10-11 pts. Continuar en el patrón de esta manera y, AL MISMO TIEMPO, cuando la pieza mida 13-12-13-12-12-14-13 cm, aum 1 pt en cada lado del marcapuntos. Tejer los pts aum en M.2 a medida que se avanza en el tejido). Repetir los aum a cada 2-2.5-2-2-2-1.5-1.5 cm un total de 14-15-16-17-18-19-20 veces = 86-90-94-98-102-106-110 pts. Cuando la pieza mida 45-50-50-49-49-48-48 cm, rem 6 pts al centro bajo la manga (= 3 pts en cada lado del marcapuntos) y completar la pieza de ida y vuelta en la ag (asegurarse de tener la hilera de torsadas por el LD después de dividir la pieza). Rem para el copete de la manga en cada lado al inicio de cada hilera: 2 pts 2-4-6-7-9-10-12 veces y 1 pt 12-10-8-8-6-6-4 veces = 48 pts restantes en la ag para todas las tallas. La pieza mide 55-60-60-60-60-60-60 cm. Ahora medir la pieza a partir de aquí! Continuar en el patrón en los pts restantes hasta que la pieza mida 12-14-13-15-17-18-19 cm. Ahora rem en el lado derecho de la pieza, al inicio de cada hilera por el LD de la manera sig: 24 pts 1 vez (AL MISMO TIEMPO que 14 de estos 24 pts son tejidos juntos de derecho, de 2 en 2, antes de ser rematados), 3 pts 2 veces. Tejer 3 hileras sin dism. Rem 1 pt en la hilera sig = 17 pts restantes para todas las tallas. Continuar hasta que la pieza mida 19-21-22-24-26-27-28 cm. Rem y, AL MISMO TIEMPO, dism 4 pts distribuidos equitativamente en el diagrama en la hilera de remate. La manga completa ahora mide aprox 74-81-82-84-86-87-88 cm. MANGA IZQUIERDA: Como la manga derecha, pero rem, al llegar a la parte de arriba, en el lado opuesto; es decir, al inicio de cada hilera por el LR. ENSAMBLAJE: Coser las mangas. Coser los pts de los hombros de la pieza del cuerpo a M.3 de cada lado de la manga (en las hebras externas de los pts). Unir la parte de arriba de las mangas con una costura al centro de la espalda y coser a la pieza de la espalda. CUELLO: Levantar 94-94-108-108-108-108-108 pts alrededor de la línea del escote en la ag circular más pequeña tamaño 3.5 mm con Karisma, Puna o Merino Extra Fine. Tejer 4 vtas en pt musgo y, AL MISMO TIEMPO, en la última hilera, aum 22-22-26-26-26-26-26 pts distribuidos equitativamente = 116-116-134-134-134-134-134 pts. Continuar en resorte 1d/1r. Cuando el resorte mida 8 cm, tejer 2 vtas en pt musgo y rem. Doblar el cuello en dos hacia el LR y coser las 2 orillas en pt musgo, una a la otra. |
|||||||||||||||||||
Explicaciones del diagrama |
|||||||||||||||||||
|
|||||||||||||||||||
 |
|||||||||||||||||||
 |
|||||||||||||||||||
¿Terminaste este patrón?Entonces, etiqueta tus fotos con #dropspattern #dreamsofaransweater o envíalas a la galería #dropsfan. ¿Necesitas ayuda con este patrón?Encontrarás 13 videos tutoriales, un espacio para comentarios/preguntas y más visitando la página del patrón en garnstudio.com © 1982-2026 DROPS Design A/S. Todos los derechos reservados. Este documento, incluyendo todas sus sub-secciones, está protegido por los derechos de autor (copyright). Lee más acerca de lo que puedes hacer con nuestros patrones en la parte de abajo de cada patrón de nuestro sitio. |
|||||||||||||||||||






Con más de 40 años en el diseño de modelos de punto y de ganchillo, DROPS Design ofrece una de las más vastas colecciones de patrones gratuitos en el internet - traducidos en 17 idiomas. Al día de hoy, contamos con 333 catálogos y 12525 patrones - de los cuales 12019 están traducidos en español.
Nosotros trabajamos con mucho esmero para brindarte lo mejor que las labores de punto y ganchillo tienen para ofrecer,inspiración y consejos, así como hilos de magnífica calidad a precios increíbles! Te gustaría usar nuestros patrones para otro fin además del uso personal? Puedes leer acerca de lo que estás permitida a hacer en el texto de Copyright en la parte de abajo de todos nuestros patrones. Felices labores!
Escribe un comentario sobre DROPS 135-3
¡Nos encantaría saber qué piensas acerca de este patrón!
Si quieres escribir una pregunta referente al patrón, por favor asegúrate de elegir la categoría correcta en el formulario debajo, para acelerar el proceso de respuesta. Los campos obligatorios están marcados con un *.