
Categorías populares
¿Buscas un hilo?


Comentarios / Preguntas (102)
![]() Soumya escribió:
Soumya escribió:
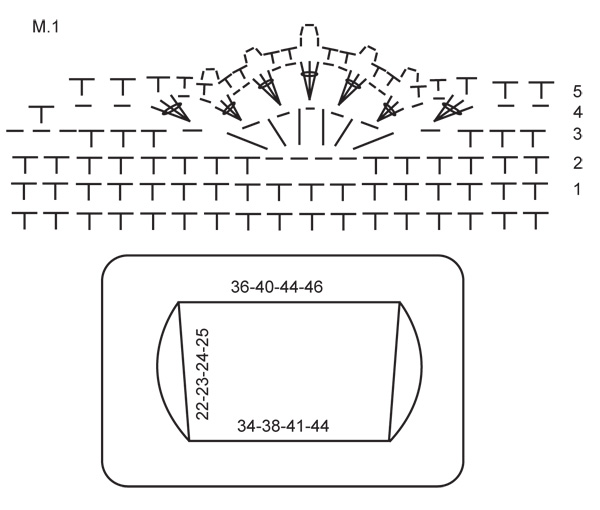
What is tr? Is it treble crochet? M.1 says I = tr so, is it treble crochet and 1 chain in the diagram?
19.03.2012 - 17:06DROPS Design respondió:
Soumya, make sure you are on the US pattern if you are a US crocheter, and the UK pattern if you are a UK crocheter. Symbols are different. tr (treble) in chart is in the UK pattern, are you a UK crocheter?
20.03.2012 - 17:24
![]() Soumya escribió:
Soumya escribió:
I am confused with "Now crochet 1 dc in each dc from back piece and around each ch band crochet 42-44-46-48 dc = 204-220-236-248 dc in total." What is the 42?? Without 42 its 232 total dc's. Need Help!! Soumya
10.03.2012 - 04:28DROPS Design respondió:
Smallest size, as an example: you have 58 dc at bottom of back piece and 62 dc at the top. You have a chain band each side. When starting edge piece, crochet 62 dc along the top, 42 dc around first ch-band, 58 dc along bottom, and 42 dc around next ch-band. 62+42+58+42 = 204 dc in total.
12.03.2012 - 21:18
![]() Jen escribió:
Jen escribió:
Thanks. Now I'm confused about the chart. Is it just repeated all the way across? Rows 4 and 5 just sort of stop, in the chart. I assume the stitches still keep going though?
01.03.2012 - 23:18DROPS Design respondió:
The chart shows one repeat of the pattern. So for pattern keep repeating the repeat over and over.
06.03.2012 - 01:33
![]() Jen escribió:
Jen escribió:
What is the second diagram for?
01.03.2012 - 02:02DROPS Design respondió:
There is one measure chart and one crochet chart for the edge. Pattern tells when to work the final edge.
01.03.2012 - 17:53
![]() Rachel escribió:
Rachel escribió:
On the first row of dc, should I be adding a ch1 where it says to skip?
22.02.2012 - 17:42DROPS Design respondió:
No you should not add a ch. The reason why you decrease on first row by skipping ch, is to make the starting row elastic.
28.02.2012 - 23:59
![]() Rachel escribió:
Rachel escribió:
On the first row of dc, should I be adding a ch1 where it says to skip?
22.02.2012 - 17:42DROPS Design respondió:
No do not add a ch.
28.02.2012 - 23:59
![]() Siv Hammarstedt escribió:
Siv Hammarstedt escribió:
Jag håller på med kantstycket och när jag har ökat klart till 220 maskor och virkar vidare står det att man ska öka 34 maskor på v det ska då bli 322 maskor. Jag förstår inte det för när jag lägger ihop 220 och 34 maskor blir det bara 254 maskor. Tacksam för svar
02.02.2012 - 11:48DROPS Design respondió:
Hej Siv, Totalt skall du öka 34 maskor ggr 3: enligt mönster så här: SAMTIDIGT när kanten mäter 5, 10 och 15 cm (avpassa så att det är ett varv med fm) ökas 34-34-34-36 fm jämnt fördelat på v. Då blir antalet maskor 322. Lycka till!
29.02.2012 - 15:12
![]() DROPS Design escribió:
DROPS Design escribió:
Hi Lindsey, there are no written instruction for the chart, the chart is showing the pattern and the chart symbols are explained above the chart. Please contact the shop where you bought the yarn for help.
08.04.2011 - 17:16
![]() Lindsey escribió:
Lindsey escribió:
What is the written version of diagram M.1?
08.04.2011 - 05:13
![]() DROPS Design escribió:
DROPS Design escribió:
Hi Melissa You are inc 34 sc 3 times, once at 2", next time at 4" and 3rd time at 6".
22.02.2011 - 04:20
|
|||||||||||||
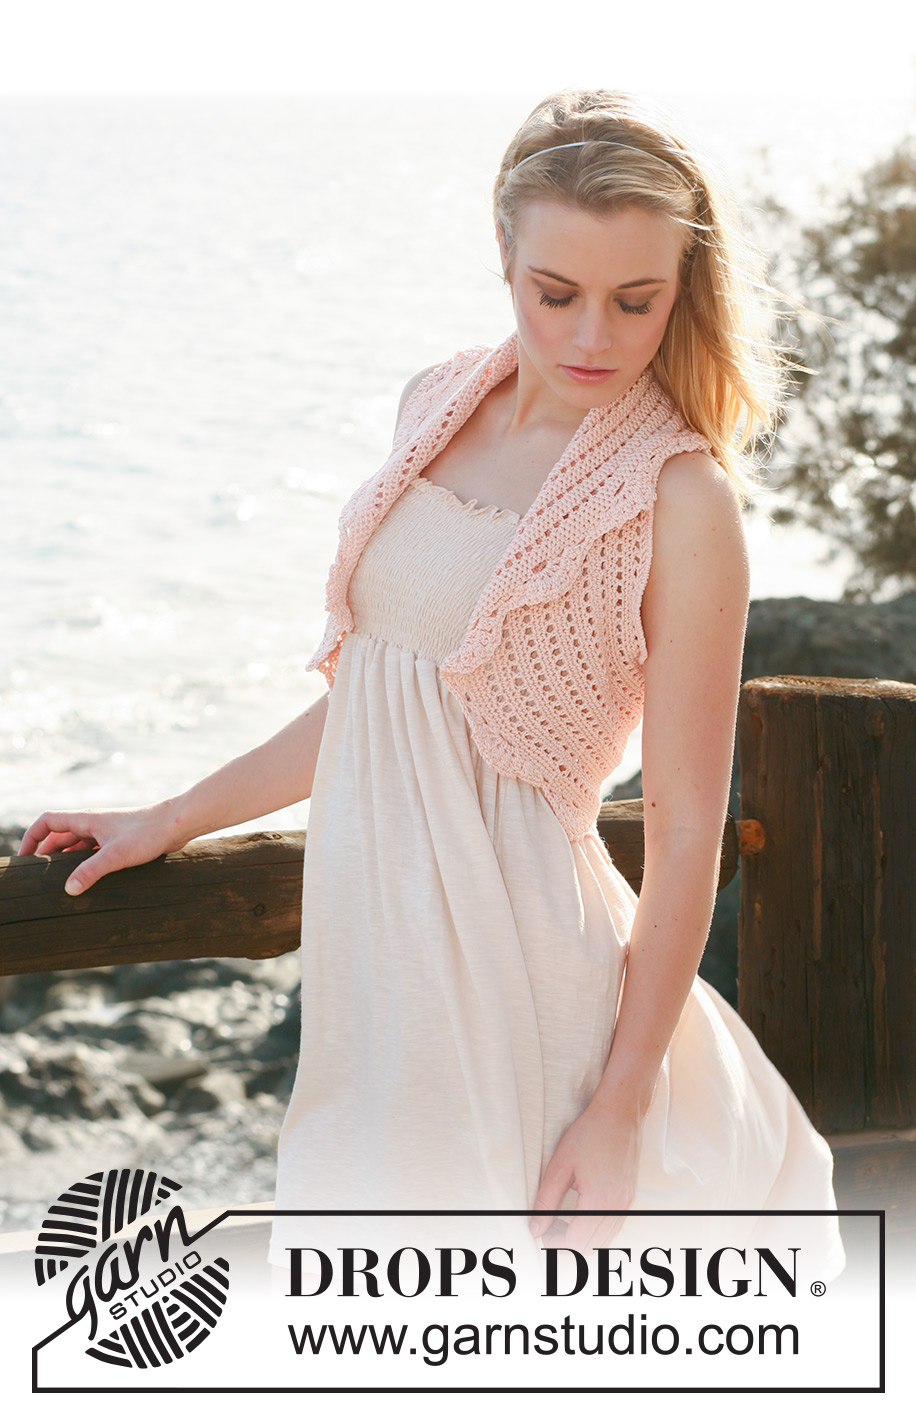
Peach Perfection#peachperfectionbolero |
|||||||||||||
 |
 |
||||||||||||
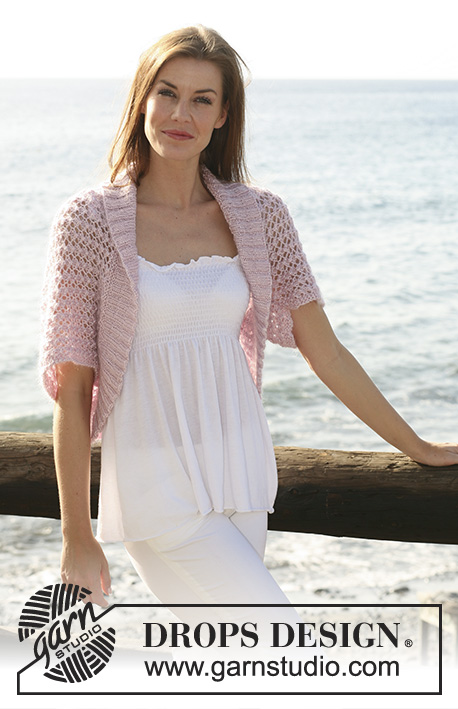
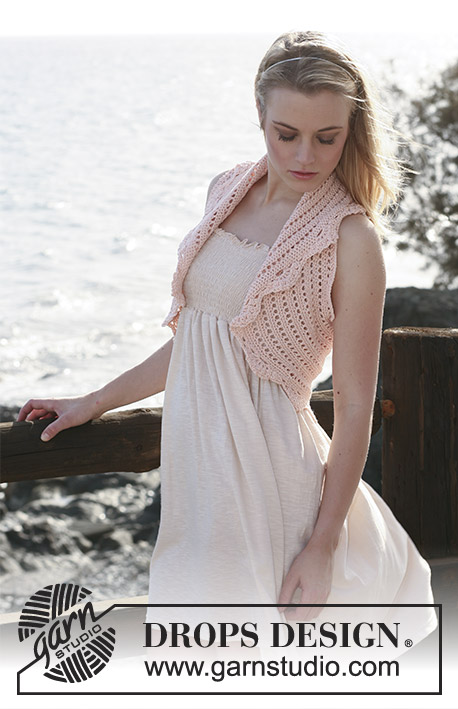
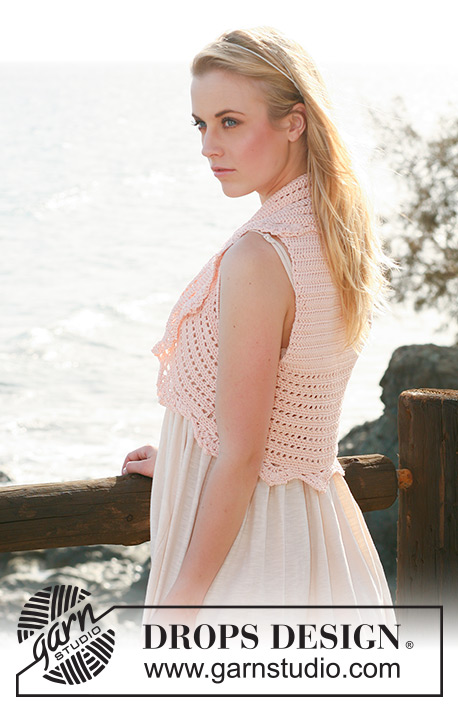
Chaleco DROPS, en ganchillo, en “Muskat”. Talla: S – XXXL.
DROPS 119-22 |
|||||||||||||
|
INFORMACIÓN PARA LA ELABORACIÓN DEL TEJIDO: Pieza de la espalda: Sustituir el primer p.a. de cada hilera con 3 cad. Pieza de la orilla: Sustituir el primer p.b. de cada vta con 1 cad. Terminar cada vta con 1 p.bjs en la última cad del inicio de la vta anterior. Sustituir el primer p.a. de cada vta con 3 cad. Terminar cada vta con 1 p.bjs en la última cad del inicio de la vta anterior. TIP PARA AUMENTO: Aum haciendo 2 pts en 1 pt. ------------------------------------------------------ ------------------------------------------------------ ESPALDA: Mon flojamente 78-86-94-99 cad con ag de ganchillo tamaño 4 mm y Muskat. Hacer 1 p.a. en la 4ª cad a partir de la ag, * 1 p.a. en cada una de las 3 cad sig, saltar 1 cad *, repetir de *a* y terminar con 1 p.a. en cada una de las últimas 2-2-2-3 cad = 58-64-70-74 p.a. Continuar con 1 p.a. en cada p.a. Cuando la pieza mida 7 cm, aum 1 p.a. en cada lado – ver TIP PARA AUMENTO, y repetir los aum cuando la pieza mida 15 cm = 62-68-74-78 p.a. Continuar hasta que la pieza mida 22-23-24-25 cm. ORILLA: Hacer 1 p.a. en cada p.a. a lo largo de la parte de arriba de la pieza de la espalda, hacer 56-58-60-64 cad, 1 p.a. en cada p.a. a lo largo de la parte de abajo de la pieza de la espalda, hacer 56-58-60-64 cad y terminar con 1 p.bjs en el primer p.a. de la parte de arriba de la pieza de la espalda. Ahora hacer 1 p.a. en cada p.a. de la pieza de la espalda y en cada hilera de cad hacer 42-44-46-48 p.a. = 204-220-236-248 p.a. en total. Continuar en redondo de la manera sig: VUELTA 1: 1 p.a. en el primer p.a., * 1 cad, saltar 1 p.a., 1 p.a. en el p.a. sig *, repetir de *a* y terminar con 1 cad, saltar 1 p.a. y 1 p.bjs en el p.a. del inicio de la vta. VUELTA 2: 1 p.b. en cada p.a. y 1 p.b. en cada cad. VUELTA 3: 1 p.b. en cada p.b. Repetir estas 3 vtas y, AL MISMO TIEMPO, cuando la orilla mida 5, 10 y 15 cm (ajustar a una hilera de p.b.) aum 34-34-34-36 p.b. distribuidos equitativamente en la vta – ver TIP PARA AUMENTO = 306-322-338-356 p.b. Cuando la orilla mida 17-18-19-20 cm (ajustar para que la hilera sig sea una hilera de p.b.) hacer 1 hilera con p.b. y, AL MISMO TIEMPO, aum 0-1-2-1 p.b. distribuidos equitativamente = 306-323-340-357 p.b. Ahora continuar en M.1. NOTA! Empezar en la hilera marcada con 1 en el diagrama. Hacer 1 repetición vertical de M.1, cortar y asegurar el hilo. |
|||||||||||||
Explicaciones del diagrama |
|||||||||||||
|
|||||||||||||
 |
|||||||||||||
¿Terminaste este patrón?Entonces, etiqueta tus fotos con #dropspattern #peachperfectionbolero o envíalas a la galería #dropsfan. ¿Necesitas ayuda con este patrón?Encontrarás 8 videos tutoriales, un espacio para comentarios/preguntas y más visitando la página del patrón en garnstudio.com © 1982-2026 DROPS Design A/S. Todos los derechos reservados. Este documento, incluyendo todas sus sub-secciones, está protegido por los derechos de autor (copyright). Lee más acerca de lo que puedes hacer con nuestros patrones en la parte de abajo de cada patrón de nuestro sitio. |
|||||||||||||


Con más de 40 años en el diseño de modelos de punto y de ganchillo, DROPS Design ofrece una de las más vastas colecciones de patrones gratuitos en el internet - traducidos en 17 idiomas. Al día de hoy, contamos con 324 catálogos y 12290 patrones - de los cuales 11675 están traducidos en español.
Nosotros trabajamos con mucho esmero para brindarte lo mejor que las labores de punto y ganchillo tienen para ofrecer,inspiración y consejos, así como hilos de magnífica calidad a precios increíbles! Te gustaría usar nuestros patrones para otro fin además del uso personal? Puedes leer acerca de lo que estás permitida a hacer en el texto de Copyright en la parte de abajo de todos nuestros patrones. Felices labores!
Escribe un comentario sobre DROPS 119-22
¡Nos encantaría saber qué piensas acerca de este patrón!
Si quieres escribir una pregunta referente al patrón, por favor asegúrate de elegir la categoría correcta en el formulario debajo, para acelerar el proceso de respuesta. Los campos obligatorios están marcados con un *.