
Categorías populares
¿Buscas un hilo?


Comentarios / Preguntas (80)
![]() DROPS Design escribió:
DROPS Design escribió:
R2 : K1, *place yarn in front of work, slip next st as if to P, K tog yo + sl st from previous row (the yarn will wrap the right needle = yo)*, end with placing yarn in front of work, sl 1 as if to P, K1. R3: K1, *K tog yo + sl st from previous row, place yarn in front of work, slip next st as if to P (yarn will wrap the right needle)*, end with K tog yo and sl st, K1. Happy knitting!
10.01.2013 - 10:58
![]() DROPS Design escribió:
DROPS Design escribió:
This is how to work English ribs with yarn in the right hand and yos : R1 : K1, *K1, place yarn in front work, slip next st as if to P* (the yarn will wrap the right needle and you'll get the yo), end with K2. (set up row)
10.01.2013 - 10:58Renée escribió:
I checked the video before I sent my first question to you & it's very confusing. Furthermore, it is not English/Fisherman's rib that's being knitted in the video. As previously stated, no k1b (knit 1 into stitch below) is being performed in the video, so I do not see how this is English/Fisherman's rib. Also, I knit in the English not continental style, so your videos can be hard to follow for English style knitters. Also, I do not see the function of the YO in English/Fisherman's rib?
10.01.2013 - 10:07DROPS Design respondió:
Dear Renée, English ribs can be worked different ways, either with K1b, or with yos. We use that method with yos, and I'll explain you row after row in the comments. Hope it will help you ! Happy knitting !
10.01.2013 - 10:54Renée escribió:
This pattern states English/Fisherman's rib. These are 2 different types of knitting that use p1, k1 and k1b stitches in different alternating formats. This pattern does not resemble either of these and does not use the classic k1b stitch which forms both English and Fisherman's rib. Can you please explain what type of stitch you are advocating here and why it does not include the k1b stitch? Thank you!
09.01.2013 - 16:52DROPS Design respondió:
Dear Renée, there is a video linked at the very bottom of the pattern explaining how to work this kind of English rib. It should help you to figure out how to work this pattern. Happy Knitting !
09.01.2013 - 17:50Renée escribió:
On row 1 of the pattern it states: 1 garter stitch. I am assuming this mean to do 1 knit stitch, as garter stitch is not an actual type of stitch but a type of knitting composed of only knit stitches. Your patterns though quite creative and beautiful are unfortunately very vague and often quite poorly translated into English and consequentially often difficult to follow. Therefore, clarification would be greatly appreciated. Thank you.
09.01.2013 - 16:21DROPS Design respondió:
Dear Renée, 1 garter st means actually K1 from RS and from WS. Please have a look on the video linked if it can help. Happy knitting !
09.01.2013 - 17:42
![]() Caro-H escribió:
Caro-H escribió:
P.S.: Das Patentmuster kommt wunderbar fluffig raus, ist nur insgesamt zu eng. Werde es mit ein paar Maschen mehr versuchen.
04.01.2013 - 13:29
![]() Caro-H escribió:
Caro-H escribió:
...nein, nicht rundgestrickt. Anschlag auf 2 Nadeln Nr. 3. Keine Ahnung warum das bei mir nicht richtig rauskommt. Aber danke für deine Mühe.
04.01.2013 - 13:00
![]() Marion escribió:
Marion escribió:
Caro,hast du das doch rundgestrickt? Da würde das Muster nicht fluffig rauskommen u.nicht stimmen. Habs eben ausprobiert---Anschlag auf 2 Nadeln?
03.01.2013 - 13:48
![]() Caro-H escribió:
Caro-H escribió:
Danke Marion! Bei mir hat das Bündchen - ungedehnt - leider nur 30cm und der Patentteil ca. 46cm. Werde ich wohl noch mal aufmachen müssen, sitzt sehr stramm. Ich versteh trotzdem nicht, warum die Maschenprobe bei mir ok war...
03.01.2013 - 12:25
![]() Caro-H escribió:
Caro-H escribió:
Danke für die rasche Info, dann werde ich erst mal weitermachen, obwohl ein Rest Skepsis bleibt, optisch und rechnerisch: Bei 21M=10cm lande ich mit 95M nur bei 45cm und in der Anleitung für das Modell Nr. U-605 (das ich mir zunächst ausgesucht hatte) schlägt man immerhin bei gleicher Maschenprobe 117-129M an. Ziehen sich die Muster so verschieden in die Breite?
02.01.2013 - 19:14DROPS Design respondió:
Liebe Caro, da haben Sie natürlich recht! Dennoch dehnt sich das Patentmuster enorm und die Maschenprobe wird ungedehnt gemessen. Ich habe diese Mütze selbst schon nachgearbeitet und sie sitzt sehr gut – das Bündchen liegt an und der obere Teil hat Volumen durch das Patentmuster.
03.01.2013 - 10:35
|
|
Cathrine#cathrinehat |
|
|
|
|
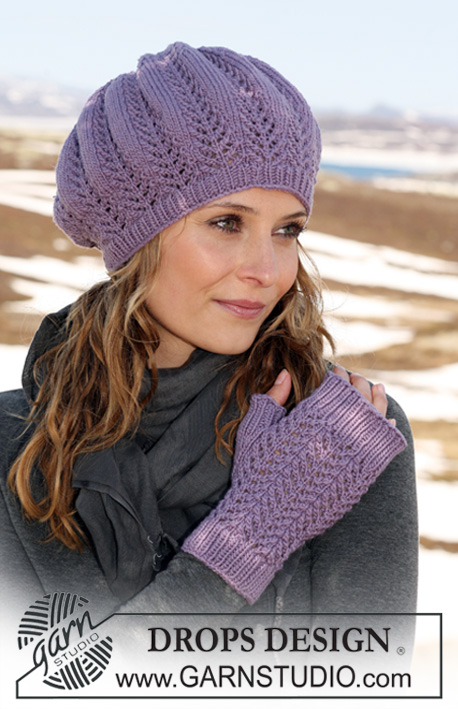
Boina DROPS tejida en punto inglés y franjas, en “Karisma” o “DROPS ♥ You #3”.
DROPS 114-30 |
|
|
PT MUSGO (de ida y vuelta en ag): Todas las vtas de derecho. PUNTO INGLÉS (de ida y vuelta en ag): Vuelta 1: 1 pt musgo, * 1d, 1 HEB (lazada), desl el pt sig de revés *, repetir de *a* hasta tener 2 pts restantes, terminar con 1d y 1 pt musgo. Vuelta 2: 1 pt musgo, * 1 HEB, desl el pt sig de revés, tejer juntos de derecho la HEB y el pt desl *, repetir de *a* hasta tener 2 pts restantes, terminar con 1 HEB, desl 1 pt de revés, 1 pt musgo. Vuelta 3: 1 pt musgo, * tejer juntos de derecho la HEB y el pt desl, 1 HEB, desl 1 pt de revés *, repetir de *a* hasta tener 3 pts restantes, tejer juntos de derecho la HB y el pt desl, 1 pt musgo. Repetir vuelta 2 y 3. ------------------------------------------------------ BOINA: Se teje de ida y vuelta en ag circular. Mon 89-95 pts en ag circular tamaño 3 mm con Karisma café beige. Tejer 1 vta de revés por el LR y cont de la manera sig por el LD: 1 PT MUSGO – ver arriba, resorte 1d/1r hasta tener 2 pts restantes, terminar con 1d y 1 pt musgo. Cuando el resorte mida 3 cm, cambiar a blanco hueso. Cuando el resorte mida 6 cm (ajustar para que la última vta sea por el LR) cambiar a café beige y ag circular tamaño 4 mm. Ahora cont en PUNTO INGLÉS en la vta sig por el LD – ver arriba! AL MISMO TIEMPO cambiar color cada 3 cm hasta completar las medidas (ajustar para que la última vta en 1 color sea por el LR). RECUERDE MANTENER LA MISMA TENSIÓN DE TEJIDO DE LA MUESTRA! Cuando la pieza mida 24 cm (ajustar después de 1 franja), cambiar color, AL MISMO TIEMPO cont en resorte 1d/1r con 1 pt musgo de cada lado. Cont en resorte por 3 cm. Ahora tejer 1 vta en pt jersey en el mismo color, AL MISMO TIEMPO tejer 2 pjd en toda la vta. La pieza ahora mide aprox 28 cm. Cortar el hilo, pasar a través de los pts restantes y coser la boina orilla con orilla. |
|
¿Terminaste este patrón?Entonces, etiqueta tus fotos con #dropspattern #cathrinehat o envíalas a la galería #dropsfan. ¿Necesitas ayuda con este patrón?Encontrarás 11 videos tutoriales, un espacio para comentarios/preguntas y más visitando la página del patrón en garnstudio.com © 1982-2026 DROPS Design A/S. Todos los derechos reservados. Este documento, incluyendo todas sus sub-secciones, está protegido por los derechos de autor (copyright). Lee más acerca de lo que puedes hacer con nuestros patrones en la parte de abajo de cada patrón de nuestro sitio. |


Con más de 40 años en el diseño de modelos de punto y de ganchillo, DROPS Design ofrece una de las más vastas colecciones de patrones gratuitos en el internet - traducidos en 17 idiomas. Al día de hoy, contamos con 324 catálogos y 12290 patrones - de los cuales 11675 están traducidos en español.
Nosotros trabajamos con mucho esmero para brindarte lo mejor que las labores de punto y ganchillo tienen para ofrecer,inspiración y consejos, así como hilos de magnífica calidad a precios increíbles! Te gustaría usar nuestros patrones para otro fin además del uso personal? Puedes leer acerca de lo que estás permitida a hacer en el texto de Copyright en la parte de abajo de todos nuestros patrones. Felices labores!
Escribe un comentario sobre DROPS 114-30
¡Nos encantaría saber qué piensas acerca de este patrón!
Si quieres escribir una pregunta referente al patrón, por favor asegúrate de elegir la categoría correcta en el formulario debajo, para acelerar el proceso de respuesta. Los campos obligatorios están marcados con un *.