
Categorías populares
¿Buscas un hilo?


Comentarios / Preguntas (30)
![]() Andrea escribió:
Andrea escribió:
Hallo, ich würde den Bolero gern für ein Fest stricken, brauche dazu aber ein rein weißes Garn. Welches würdet ihr vorschlagen? Danke Andrea
03.01.2018 - 06:07DROPS Design respondió:
Liebe Andrea, für persönnliche Hilfe um eine Farbe bzw Garn zu finden, nehmen Sie bitte Kontakt mit Ihrem DROPS Laden auf. Viel Spaß beim stricken!
03.01.2018 - 14:11
![]() Pamela escribió:
Pamela escribió:
Bonjour, Il me reste de la laine 2 pelote de laine air penssez vous que je puisse faire ce modèle?? Car la laine recommandé c'est kid silk
09.02.2017 - 12:42DROPS Design respondió:
Bonjour Pamela, 1 fil du groupe C (Air par ex) peut remplacer 2 fils du groupe A (comme Kid-Silk ici) - calculez ici la quantité nécessaire. Bon tricot!
09.02.2017 - 13:17
![]() Marian escribió:
Marian escribió:
Thank you for answering my last question. I am crocheting row 2 of the trim so I am almost finished ! My question is about: *5ch, 1 sc in next ch-loop*. Does this mean 1 sc in the very next ch next to the last one.....or first ch in next "section " ? Thank you
16.07.2015 - 02:48DROPS Design respondió:
Dear Marian, you work 1 sc around the next ch-loop (insert crochet under ch-loop to crochet the sc), then crochet 5 ch, and repeat 1 sc around next ch-loop, 5 ch... Happy crocheting!
27.07.2015 - 14:03Marian escribió:
Question about the increases on the back of this pattern. I understand that I increase at the end of the row. So when it says 1 time do I actually do it twice.....at the end of row and then at the end of the next row ? Thank you.
23.06.2015 - 20:12DROPS Design respondió:
Dear Marian, you inc 1 time at the end of every row but on each side (back piece), so that when you inc 1 st 1 time at the end of every row, you will inc 1 st on both sides = a total of 2 sts inc on row. Happy knitting!
24.06.2015 - 08:54
![]() Tigermama escribió:
Tigermama escribió:
Hallo ich habe jetzt das vorderteil gemacht werden die Ärmel nur an einer seite abgenommen oder in hin und Rückreihe ? und wie nehme ich das nun mit dem bogen ab das verstehe nicht können sie mir das erklären Lg
14.04.2015 - 13:20DROPS Design respondió:
Die Abnahmen für den Ärmel machen Sie an beiden Seiten, also immer am Anfang jeder R, d.h. am Anfang der Hin-R und am Anfang der Rück-R. "1x" heißt dabei, dass Sie das 1x in der Hin-R und 1x in der Rück-R machen, also an beiden Seiten 1x. Die Rundung arbeiten Sie nur an der Vorderseite, also nur an einer Seite. Sie nehmen am Rand des Vorderteils 1 M ab (also nicht abketten, wie es dort steht, das wird gleich geändert, sondern durch zusammenstricken neben der äußersten Masche), in jeder 4. R, danach in jeder 2. R und dann in jeder R wie beschrieben.
17.04.2015 - 10:37
![]() Tigermama escribió:
Tigermama escribió:
Halllo ich bin dabei den tollen bolero zu machen, aber ich stecke gerade bei der Zunahme fest. wie ist das gemeint 1. 1mal 2.m 2 mal ich habe die größe 7-8 jahre nur ich komme nicht auf die 130 maschen muss ich das nur auf der vorseite zunehmen oder auch die Rückseite bitte helfen sie mir Lg
30.03.2015 - 10:17DROPS Design respondió:
Die Zunahmen arbeiten Sie am Ende JEDER R, d.h. an der einen Seite immer am Ende der Rück-R und an der anderen Seite immer am Ende der Hin-R. Zuerst an beiden Seiten jeweils 1 x 1 M (= 2 M insgesamt), dann an beiden Seiten 2 x je 2 M (= 8 M insgesamt), dann an beiden Seiten 2 x je 4 M (= 16 M insgesamt), dann an beiden Seiten 2 x je 6 M = (24 M insgesamt), zuletzt beidseitig 1 x je 10 M (= 20 M insgesamt). Damit haben Sie 2 M + 8 M + 16 M + 24 M + 20 M = 70 M zugenommen. Die Zunahmen arbeiten Sie, indem Sie neue M anschlagen, wie das funktioniert, ist im Video "Seitlich neue M anschlagen" erklärt, im Kopf neben dem Foto.
31.03.2015 - 10:36Wedding Knitter escribió:
Dear Drops, I have 7 of these to knit and I am just finishing the first one and I too decreased 1st "mid-front" but that is wrong? Also, I had to severely edit the decreasing at the front or this part would have been much longer than the back. Please could you help with my next 6 garments by giving Row by row instructions, as with a large stitch it's crucial at each stage. Also, I too found inc for sleeves ambiguous.
31.01.2015 - 12:07DROPS Design respondió:
Dear Wedding knitter, remember to check and keep your gauge to be sure the front piece will match in length back piece. You first cast on each side of back piece new sts for sleeve then you will cast off/ dec these sts on front piece mirrored. For any individual assistance, please contact your DROPS store. Happy knitting!
02.02.2015 - 09:25
![]() Julie Hehir escribió:
Julie Hehir escribió:
Can you explain the following in more detail: "Dec 1 st towards mid front inside 1 st by k2 tog"? I think it means to decrease in the middle of the row nearer to the seam end of the front piece, but I am not sure where exactly you are placing the decrease stitch in order to shape the front panels of the sweater,
09.10.2014 - 23:40DROPS Design respondió:
FRONT PIECE 1: ... When piece measures 22-23-25-26 cm dec 1 st towards mid front to shape the front piece – SEE DECREASING TIP ... It means you knit first stitch from front edge, then dec 2 sts and knit rest of the row.
09.10.2014 - 23:45
![]() Astrid Hofmann escribió:
Astrid Hofmann escribió:
Meine Tochter (11 Jahre) hat die Anleitung mit passender Wolle zum Geburtstag geschenkt bekommen. Jetzt sind wir uns nicht ganz sicher, wie das mit den 2 Fäden anschlagen gemeint ist. Sollen wir 2 Knäuel parallel laufen lassen und immer als eine Masche abstricken?
09.02.2014 - 12:31DROPS Design respondió:
Liebe Astrid, der ganze Bolero wird mit doppeltem Faden, also mit 2 Knäuel, gestrickt.
10.02.2014 - 09:34
![]() Pommes escribió:
Pommes escribió:
Habe das Jäckchen zum Kommunionkleid gestrickt. Sieht sehr schön aus und ging schnell stricken.
02.02.2014 - 09:34
|
|
Ravel Kids#ravelkidsbolero |
|
|
|
|
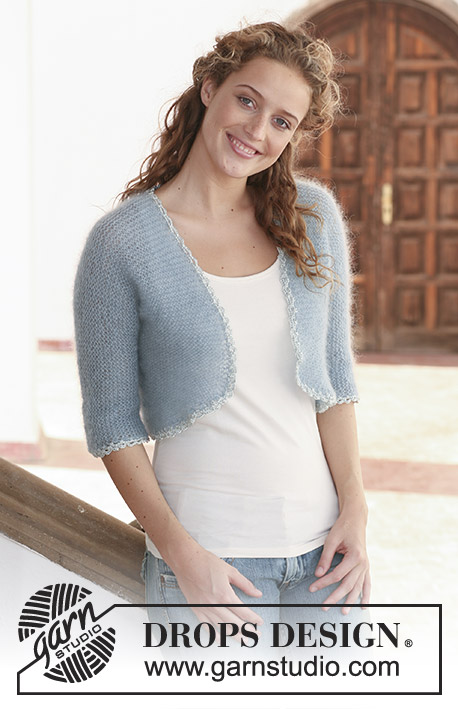
Bolero DROPS en punto musgo con 2 hilos ”Kid-Silk”, tejido en una pieza. Talla 7 a 14 años.
DROPS 113-9 |
|
|
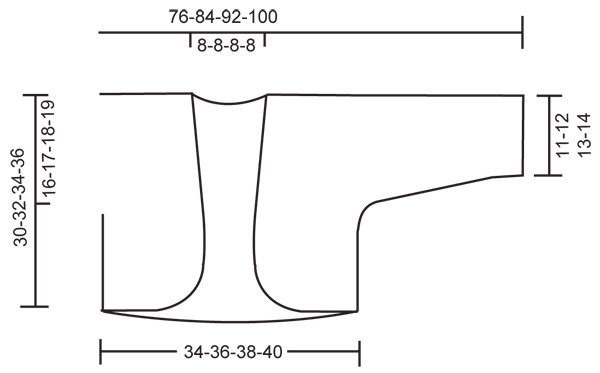
PUNTO MUSGO (de ida y vuelta en ag): todas las vtas del derecho TIP PARA DISMINUCIÓN: Dism 1 pt hacia el centro del delantero dentro de 1 pt tejiendo 2 pjd. BOLERO: Se trabaja en 1 pieza en pt musgo. Comenzar en la parte inferior de la espalda, aum para las mangas, dism para el escote, cerrar los pts de las mangas y completar la labor tejiendo las partes delanteras. Para encajar todos los pts trabajar la labor de ida y vta en ag circular. ESPALDA: Mont 60-64-66-70 pts (incl 1 pt orillo a cada lado) en ag circular tamaño 5 mm con 2 hilos Kid-Silk. Continuar en pt musgo – ver arriba. RECUERDE MANTENER LA MISMA TENSIÓN DE LA MUESTRA! Cuando la labor mida 14-15-16-17 cm mont pts nuevos a cada lado al final de cada fila: 1 pt 1-1-1-1 vez, 2pts 2-2-1-1 vcs, 4 pts 2-2-2-1 vcs, 6 pts 2-1-2-2 vcs, 8 pts 0-1-1-2 vcs y 10-12-14-15 pts 1 vez = un total 130-142-156-170 pts en la ag. Continuar hasta que la labor mida 29-31-33-35 cm. Ahora cerrar los 14 pts centrales para el escote = 58-64-71-78 pts quedan para cada hombro/manga. Desl los pts de 1 hombro/manga a 1 gancho aux. DELANTERO-1: = 58-64-71-78 pts. Trabajar 1 cm e insertar un marcapuntos (MP) en la labor = el centro del hombro. AHORA MEDIR LA LABOR DESDE AQUÍ! Cuando la labor mida 11-12-13-14 cm cerrar los pts de la manga al inicio de cada fila desde el borde de la manga: 10-12-14-15 pts 1 vez, 8 pts 0-1-1-2 vcs, 6 pts 2-1-2-2 vcs, 4 pts 2-2-2-1 vcs, 2 pts 2-2-1-1 vcs y 1 pt 1-1-1-1 vez = 23-25-26-28 pts restantes en la ag. Cuando la labor mida 22-23-25-26 cm dism 1 pt hacia el centro del delantero para dar forma al delantero – VER TIP PARA DISMINUCIÓN – y repetir dism en cada 4ª fila 2-3-3-3 vcs, después en filas alternas 4-4-4-6 vcs, y después en cada fila 8-8-8-8 vcs = 8-9-10-10 pts restantes en la ag. Rem en la sig fila. DELANTERO-2: Desl los pts desde el gancho aux de vuelta a la ag y trabajar de la misma manera que el delantero-1, pero a la inversa. TERMINACIÓN: Doblar el bolero por la mitad en la línea del hombro y coser las costuras de los lados y las mangas dentro de 1 pt orillo. RIBETE A GANCHILLO: Trabajar un ribete alrededor de la parte abierta del bolero con la ag de ganchillo tamaño 3.5 mm y Cotton Viscose como sigue: Vuelta 1:* 1 p.b., 3 p.de cad., saltar aprox 1 cm *, repetir de * a * y finalizar con 1 p.e. en el 1er p.b. del comienzo de la vta. Vuelta 2 : 2 p.de cad., 1 p.b. en el 1er arco de la vta anterior, *5 p.de cad., 1 p.b. en el sig arco*, repetir de * a *, y finalizar con 5 p.de cad. y 1 p.e. en el 1er p.b. del comienzo de la vta. Trabajar un ribete similar alrededor de los bordes de las mangas. |
|
 |
|
¿Terminaste este patrón?Entonces, etiqueta tus fotos con #dropspattern #ravelkidsbolero o envíalas a la galería #dropsfan. ¿Necesitas ayuda con este patrón?Encontrarás 13 videos tutoriales, un espacio para comentarios/preguntas y más visitando la página del patrón en garnstudio.com © 1982-2026 DROPS Design A/S. Todos los derechos reservados. Este documento, incluyendo todas sus sub-secciones, está protegido por los derechos de autor (copyright). Lee más acerca de lo que puedes hacer con nuestros patrones en la parte de abajo de cada patrón de nuestro sitio. |


Con más de 40 años en el diseño de modelos de punto y de ganchillo, DROPS Design ofrece una de las más vastas colecciones de patrones gratuitos en el internet - traducidos en 17 idiomas. Al día de hoy, contamos con 324 catálogos y 12290 patrones - de los cuales 11685 están traducidos en español.
Nosotros trabajamos con mucho esmero para brindarte lo mejor que las labores de punto y ganchillo tienen para ofrecer,inspiración y consejos, así como hilos de magnífica calidad a precios increíbles! Te gustaría usar nuestros patrones para otro fin además del uso personal? Puedes leer acerca de lo que estás permitida a hacer en el texto de Copyright en la parte de abajo de todos nuestros patrones. Felices labores!
Escribe un comentario sobre DROPS 113-9
¡Nos encantaría saber qué piensas acerca de este patrón!
Si quieres escribir una pregunta referente al patrón, por favor asegúrate de elegir la categoría correcta en el formulario debajo, para acelerar el proceso de respuesta. Los campos obligatorios están marcados con un *.