
Categorías populares
¿Buscas un hilo?


Comentarios / Preguntas (142)
![]() Esther Oz escribió:
Esther Oz escribió:
So I finished the increases in M2. What does it mean work 4 rounds see above- on 7 sts mod front, with remaining sts as before
15.10.2020 - 05:19DROPS Design respondió:
Dear Mrs Oz, you will now work the next 4 rounds as before with M.2 and stocking stitch but over the middle 7 sts on mid front you will work garter stitch instead of M.2, this means you will work them alternately knit and purl (as for garter st in the round explained at the beg of the pattern). Happy knitting!
15.10.2020 - 09:13
![]() Esther Oz escribió:
Esther Oz escribió:
Do I start each round 19 stockinette or just the first round?
12.10.2020 - 17:56DROPS Design respondió:
Dear Mrs Oz, you will now always work this way: 19 sts stocking st, M.2 over the next 25 sts, stocking st to the end of the round - repeating M.2 from row 7 to 22 and starting to increase at the same time on 4th of these round . When piece measures 67 cm you will work the 7 middle sts on front piece in garter st for 2 ridges (= 4 rounds) and cast off for armholes on each side. Happy knitting!
13.10.2020 - 10:54
![]() Esther Oz escribió:
Esther Oz escribió:
When you say in you first sentence of answer, “On next row”,do you mean next round? When I’m counting 25 sts for mid front am I repeating row for 25 sts (each row is 16 so do I do row 7 for 16 sts then repeat row 7 for 9 more sts or do I start row 8 for 9 sts and then next round do the remainder of row 8 and part of row 9 for remainder of round?
12.10.2020 - 13:49DROPS Design respondió:
Dear Mrs Oz, yes sorry I meant "round" - I'm not sure what you mean here, after you have worked M.2 one time in height over all stitches, continue in stocking stitch with only the 25 sts on mid front with M.2 working one row in diagram after the other as you worked before (except that all other sts will be worked in stocking stitch and not in lace pattern anymore). Starting with row 7 in diagram to row 22 (= end of diagram) and repeat these rows 7 to 22. Hope this helps :)
12.10.2020 - 16:21
![]() Esther Oz escribió:
Esther Oz escribió:
Finally understood the one vertical repeat in M2 means do each row for an entire round (I was doing just 16 sts then going to next row). Now I’m starting 19 stockinette, and my question is the next 25 sts is from row 7 then back to stockinette, when I get to next round after the next 19 stockinette, do I start on the pattern where I left off? This would mean I would be on row 2 of M2 in knit for 7 sts, then go to next row for 18 sts. Correct?
11.10.2020 - 15:03DROPS Design respondió:
Dear Mrs Oz, on next row (= 8th row in diagram), you continue working the other stitches in stocking stitch as before and row 8th row in diagram over the 25 sts, then work row 9 in M.2 and always stockinette over remaining sts. ie only the 25 sts will be worked as shown in the diagram, all other will be worked in stockinette. Happy knitting!
12.10.2020 - 08:26
![]() Esther Oz escribió:
Esther Oz escribió:
Not sure what you mean by “working ball”. What I have when I complete 1 vertical repeat is I have 28 sts until I get to marker 3. What do I do with these . I know when I get to marker I do 19 stockinette, but I don’t know what to knit with the 28 sts remaining BEFORE I get to first side. Do I go back to beginning of M2 for these 28 sts, then start 19 stockinette followed by M2 (starting from row7) for 25 sts?
07.10.2020 - 06:58DROPS Design respondió:
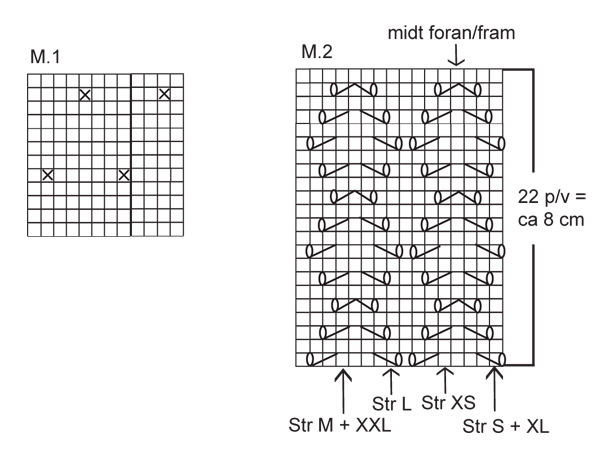
Dear Mrs Oz, it looks like the rounds do not start on the side and it's a bit tricky to find out where you should then start the round, try to put the dress flat (as ready to wear), with sides on each side and try to find the middle 25 sts on front piece. You could show your work to your store, it might be easier for them to help you (even with a picture). You can see on the 2nd picture the M.2 lace will be worked (row 7 to 22) over the middle 25 sts on fronot piece. Hope this helps. Happy knitting!
07.10.2020 - 08:40
![]() Esther Oz escribió:
Esther Oz escribió:
So if I have 12 sts before the the beginning of the round after I did 19 stockinette, what do I do with the extra 12 sts? Did I screw something up by not ending the first 22 rows of the M2 pattern at the start of the round? I am not starting exactly at the side?
06.10.2020 - 13:47DROPS Design respondió:
Dear Mrs Oz, I'm not sure what you mean with the 12 sts before the beg of the round - the beg of the round is on the side of the dress from the begining of the pattern, this means if you put the work flat, you should have the working ball on the side and the 3rd marker + 6th marker (in M.1) on each side of piece. M.2 will be now worked over the middle 25 sts on mid front - try to adjust your number of sts so that M.2 will be centered (with the previous 3rd and 6th markers on each side of piece). Hope it helps. Happy knitting!
06.10.2020 - 15:08
![]() Esther Oz escribió:
Esther Oz escribió:
I completed 1 vertical of all 22 rows, and I did 19 stockinette. Before I start from row 7, I see I am 12 sts before first side marker, so if I start 25 sts, 12 will be from one side and 12 from front middle. I thought 25 has to be front center. Did I do something wrong?
05.10.2020 - 23:55DROPS Design respondió:
Dear Mrs Oz, after the 22 rows of M.2 start next round (as before = on the side) and work from the side (as before): 19 sts stocking st, 25 sts in M.2, and continue in stocking st to the end of the round as before. But your rounds are starting from the side, as from the beginning of the dress. Happy knitting!
06.10.2020 - 11:11
![]() Esther Oz escribió:
Esther Oz escribió:
I think I understand and I will try. Thank you so much for all your help. So appreciated.
05.10.2020 - 17:06
![]() Esther Oz escribió:
Esther Oz escribió:
I want to do the first M2 in height first. Do I start xs only in first round or do I start in xs the whole time for the entire height. Then after I complete full M2 in height, I do 19 stockinette then 25 sts in M2 starting from row 7 and then the remaining 84 sts (19+25=44 and 128-44= 84)? And when I finish round of 128 sts, do I start where I left off from starting at row 7?
05.10.2020 - 16:14DROPS Design respondió:
Dear Mrs Oz,then you work: M.2 from the arrow to the end = 12 sts), then repeat the 16 sts in M.2 from the beg (from the right towards the left) a total of 7 times in width (= over the next 112 sts) and finish with the first 4 sts in diagram (the 4 sts before first arrow) = 12 + 16*7 + 4= 128 sts. After the 22 rows work: 19 sts in stocking stitch, the next 25 sts in M.2 as before but from row 7 and the remaining sts in stocking st = 19 + 25 + 84 = 128 sts. Hope this helps :)
05.10.2020 - 16:27
![]() Esther Oz escribió:
Esther Oz escribió:
I took out M2 in height cause I wasn’t sure if for each row I start at xs or just first row of pattern and the rest of height I start from beginning of pattern? Also. After I do height, and start row 7, if I follow pattern, will this mean I’m working front by just working pattern (I don’t have to figure out when I’m at 25 front)?
05.10.2020 - 13:29DROPS Design respondió:
Dear Mrs Oz, it will look somewhat different as in the foto without the first pattern all the round, but then you work M.2 only on mid front: 19 sts stocking st, 25 sts in M.2 (= whole diagram one time in width (= 16 sts) then work the first 9 sts in diagram = 25 sts) and work rest of front piece + back piece in stocking st. The lace pattern M.2 will be only worked over the middle 25 sts on front piece.Happy knitting!
05.10.2020 - 15:43
|
||||||||||||||||
Endless Summer#endlesssummerdress |
||||||||||||||||
|
|
||||||||||||||||
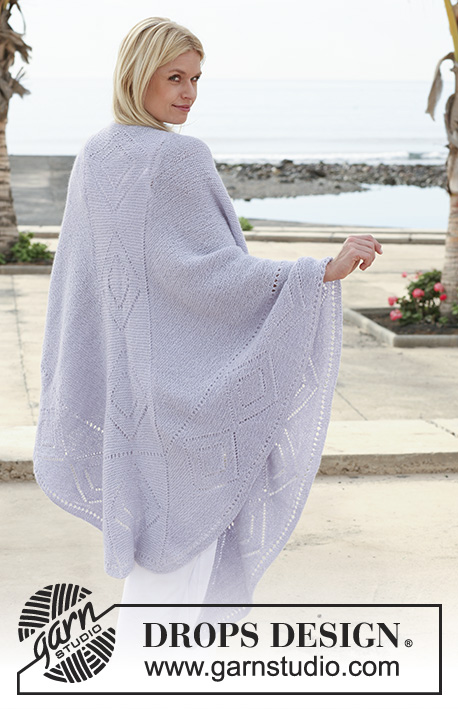
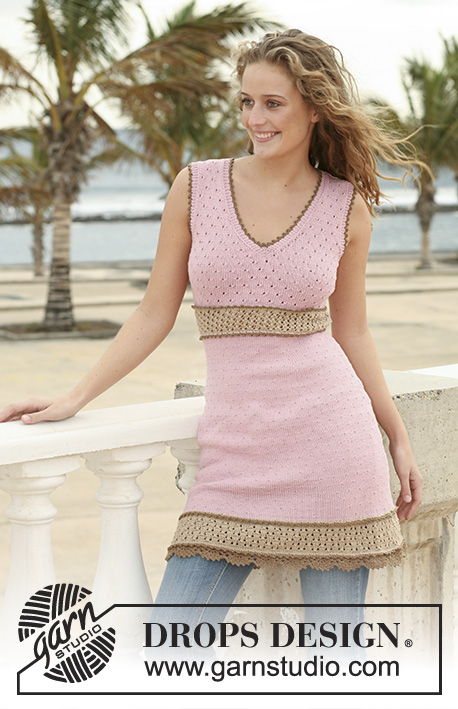
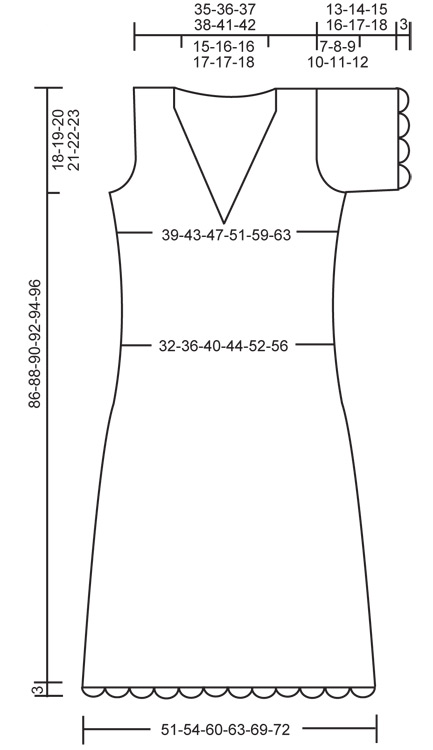
Vestido DROPS en ”Muskat” con patrón de calados, manga corta y remate a ganchillo. Talla XS - XXL.
DROPS 111-4 |
||||||||||||||||
|
PT MUSGO (en redondo): 1 vta de derecho, 1 vta de revés. PT MUSGO (de ida y vta en ag): Todas las filas de derecho. PATRÓN: Ver los diagramas M.1 y M.2 - los diagramas muestran el patrón por el LD. TIP PARA LAS DISMINUCIONES-1: Dism antes del marcapuntos (MP) como sigue: 2 pjd Dism después de MP como sigue: desl 1 pt como de derecho, 1 d., pasar el pt desl por encima. ATENCIÓN! Asegúrese de no cambiar los pts de revés en M.1 al hacer las dism. TIP PARA LAS DISMINUCIONES-2: Hacer todas las dism por el LD dentro de los 9 pts del patrón y 3 pts en pt musgo = 12 pts. Dism antes de los 12 pts como sigue: 2 pjd. Dism después de los 12 pts como sigue: desl 1 pt como de derecho, 1 d., pasar el pt desl por encima. TIP PARA LOS AUMENTOS: Aum 1 pt a cada lado del pt com MP haciendo 1 HEB (lazada). Trabajar la HEB por detrás del pt en la fila de vuelta para evitar que se formen agujeros. --------------------------------------------------------------------------------------------------- VESTIDO: Se trabaja en redondo con ag circular. Mont 204-216-240-252-276-288 pts en ag circular tamaño 4.5 mm con Muskat. Trabajar 1 vta de revés, 1 vta de derecho, 1 vta de revés y continuar en M.1. RECUERDE MANTENER LA MISMA TENSIÓN DE LA MUESTRA! Cuando la labor mida 18-18-18-20-22-26 cm insertar 6 MP en la labor como sigue: Trabajar 32-34-38-40-44-46 pts, insertar el MP-1, trabajar 37-39-43-45-49-51 pts, insertar el MP-2, trabajar 33-35-39-41-45-47 pts insertar el MP-3 en el último de estos pts (= el lado), trabajar 32-34-38-40-44-46 pts, insertar el MP-4, trabajar 37-39-43-45-49-51 pts, insertar el MP-5, trabajar 33-35-39-41-45-47 pts, insertar el MP-6 en el último de estos pts. (= otro lado). En la sig vta dism 1 pt a cada lado de los MP-3 y MP-6 (es decir, en los lados) - VER TIP PARA LAS DISMINUCIONES-1 - y repetir la dism cada 6ª vta un total de 13-12-14-13-11-10 vcs. AL MISMO TIEMPO al hacer la dism nº 8-7-9-8-6-5, dism también 1 pt al lado de los otros MP como sigue: DESPUÉS del MP-1 y MP-4 y ANTES del MP-2 y MP-5 - VER TIP PARA LAS DISMINUCIONES-1. Repetir estas dism cada 6ª vta, (es decir, en las mismas vtas que las dism en los lados) un total de 6 vcs. Cuando se han terminado todas las dism hay 128-144-160-176-208-224 pts en la vta. Continuar con M.1 hasta que la labor mida aprox 47-48-49-50-51-52 cm - ajustar para acabar después de al menos 2 vtas en pt jersey. Ahora quitar los MP-1,2,4 y 5. Continuar en M.2 - comenzar con la flecha correspondiente a su talla en la parte de abajo del diagrama, de manera que el punto central delantero = la flecha en la parte de arriba del diagrama. Después de una repetición en vertical de M.2 trabajar la sig vta como sigue: 19-23-27-31-39-43 pts en pt jersey, M.2 (continuar desde la vta 7 del diagrama y repetir desde la vta 7 a la 22) en 25 pts del centro del delantero y los pts restantes de la vta en pt jersey. AL MISMO TIEMPO en la vta 4 aum 1 pt a cada lado de los MP de los lados - VER TIP PARA LOS AUMENTOS - y repetir estos aum en cada 4ª vta un total de 7 vcs = 156-172-188-204-236-252 pts. Cuando la labor mida aprox. 67-68-69-70-71-72 cm (ajustar para que la sig vta sea una vta con HEB) trabajar 4 vtas en pt musgo - ver arriba - en 7 pts del centro del delantero, el resto de los pts se trabajan como antes. En la sig vta cerrar el pt central del delantero para la abertura y en la misma vta cerrar 7 pts a cada lado para las sisas (= el pt con MP + 3 pts a cada lado de éste). Ahora completar cada pieza por separado. DELANTERO IZQUIERDO: = 35-39-43-47-55-59 pts. Continuar con 3 pts en pt musgo hacia el escote, 9 pts en M.2 y el resto de los pts en pt jersey. AL MISMO TIEMPO disminuir para el escote y la sisa como sigue: ESCOTE: Dism 1 pt en el escote dentro de 12 pts - VER TIP PARA LAS DISM-2 - y repetir la dism cada 2ª fila un total de 9-10-10-10-10-11 vcs y después cada 4ª fila 5-5-5-6-6-6 vcs. SISA: Cerrar para la sisa al inicio de cada fila en el lado: 3 pts 0-0-1-1-2-2 vcs, 2 pts 0-1-1-2-3-4 vcs and 1 pt 1-2-2-3-3-4 vcs. Cuando se han completado todas las dism quedan 20-20-21-21-24-24 pts para el hombro. Rem cuando la labor mida 86-88-90-92-94-96 cm. DELANTERO DERECHO: Trabajar de la misma manera que el delantero izquierdo, pero a la inversa. ESPALDA: = 71-79-87-95-111-119 pts. Continuar en pt jersey y cerrar para la sisa en cada lado como se describe para el delantero = 69-71-73-75-81-83 pts. Cuando la labor mida 83-85-87-89-91-93 cm, trabajar 4 filas en pt musgo en los 35-37-37-39-39-41 pts centrales, el resto de los pts se trabajan en pt jersey. Ahora cerrar los 29-31-31-33-33-35 pts centrales para el escote y completar cada hombro por separado. Continuar en pt jersey con 3 pts en pt musgo hacia el escote y rem cuando la labor mida 86-88-90-92-94-96 cm. MANGA: Se trabaja de ida y vta en ag. Mont 62-62-68-68-74-80 pts (incl 1 pt orillo a cada lado) en ag tamaño 4.5 mm en Muskat. Trabajar 4 filas en pt musgo y continuar en M.1 con 1 pt orillo a cada lado. Cuando la labor mida 2 cm aum 1 pt a cada lado, y repetir el aum en cada 2ª fila un total de 2-4-3-5-5-4 vcs, trabajar los pts de aum en pt jersey = 66-70-74-78-84-88 pts. Cuando la labor mida 6 cm cerrar para el copete de la manga a cada lado al inicio de cada fila: 4 pts 1 vez, 2 pts 3 vcs y 1 pt 1-2-4-5-6-8 vcs, después 2 pts a cada lado hasta que la labor mida 12-13-14-15-16-17 cm, ahora cerrar 4 pts a cada lado 1 vez y rematar los pts restantes. La labor mide aprox. 13-14-15-16-17-18 cm. TERMINACIÓN: Coser los hombros. Coser la costura de las mangas dentro de 1 pt orillo y montar las mangas. REMATE A GANCHILLO: Trabajar el remate con ag de ganchillo tamaño 4 mm y Muskat alrededor de los bordes de las mangas y a lo largo del borde inferior del vestido como sigue: VUELTA 1: 1 p.b. en el 1er pt, * 4 p.de cad, saltar 2 pts, 1 p.b. en el sig pt *, repetir de *a*, y finalizar con 1 p.e. en el 1er p.b. del inicio de la vta. VUELTA 2: Trabajar con p.e. hasta el centro del 1er arco, 1 p.b. dentro del arco, * 2 p.de cad, 1 p.b. dentro del sig arco, 5 p.de cad, 1 p.b. dentro del sig arco *, repetir de *a* pero asegurar la última lazada con 1 p.e. en el 1er p.b. del inicio de la vta. VUELTA 3: Trabajar 1 p.b. en cada uno de los arcos pequeños y 1 p.b., 5 p.a. y 1 p.b. en cada uno de los arcos grandes, finalizar la vta con 1 p.e. en el 1er p.b. Trabajar el borde alrededor del escote con ag de ganchillo tamaño 4 mm y Muskat como sigue - comenzar en el centro de la espalda: 1 p.b. en el 1er pt, * 1 picot (= 4 p.de cad, 1 pt en el 1er p.de cad), saltar aprox 1.5 cm, 1 p.b. en el sig pt *, repetir de *a* y finalizar la vta con 1 p.e. en el 1er p.b. del inicio de la vta. |
||||||||||||||||
Explicaciones del diagrama |
||||||||||||||||
|
||||||||||||||||
 |
||||||||||||||||
 |
||||||||||||||||
¿Terminaste este patrón?Entonces, etiqueta tus fotos con #dropspattern #endlesssummerdress o envíalas a la galería #dropsfan. ¿Necesitas ayuda con este patrón?Encontrarás 27 videos tutoriales, un espacio para comentarios/preguntas y más visitando la página del patrón en garnstudio.com © 1982-2026 DROPS Design A/S. Todos los derechos reservados. Este documento, incluyendo todas sus sub-secciones, está protegido por los derechos de autor (copyright). Lee más acerca de lo que puedes hacer con nuestros patrones en la parte de abajo de cada patrón de nuestro sitio. |
||||||||||||||||


Con más de 40 años en el diseño de modelos de punto y de ganchillo, DROPS Design ofrece una de las más vastas colecciones de patrones gratuitos en el internet - traducidos en 17 idiomas. Al día de hoy, contamos con 324 catálogos y 12290 patrones - de los cuales 11685 están traducidos en español.
Nosotros trabajamos con mucho esmero para brindarte lo mejor que las labores de punto y ganchillo tienen para ofrecer,inspiración y consejos, así como hilos de magnífica calidad a precios increíbles! Te gustaría usar nuestros patrones para otro fin además del uso personal? Puedes leer acerca de lo que estás permitida a hacer en el texto de Copyright en la parte de abajo de todos nuestros patrones. Felices labores!
Escribe un comentario sobre DROPS 111-4
¡Nos encantaría saber qué piensas acerca de este patrón!
Si quieres escribir una pregunta referente al patrón, por favor asegúrate de elegir la categoría correcta en el formulario debajo, para acelerar el proceso de respuesta. Los campos obligatorios están marcados con un *.