
Categorías populares
¿Buscas un hilo?


Comentarios / Preguntas (58)
![]() JMoses escribió:
JMoses escribió:
This is my interpretation of the heel, based on previous projects. It's far more simple than the tutorial video. [Onto the edge of the previous round, add rows which span a little more than half of the round (ex. If last round was 20sts, add rows of approx 12sts each). When the whole thing (toe cap and flap) equals the desired foot length, fold the end of the flap in half and sl st together along the last row completed.]
28.11.2012 - 22:56
![]() Anneli escribió:
Anneli escribió:
Hej! Nybörjare på detta, men fattar inte hur ni beskriver mönstret i hälen ;( förstår att man ska dela dé, men fattar som man tar ihop dé iallafall & då blir det ju inte delat med sm i lm i början på varvet. Vill verkligen försöka göra detta, skulle ju vara kuligt att há så niceiga tofflor till jul. Tacksam för hjälp. Videon visar ju end hur man virkar ihop, de fattar jag men inte början hur de kan dela sej./A
21.11.2012 - 17:51
![]() Shelby escribió:
Shelby escribió:
I finally figured out how to do the heel and it is actually easy. When you change to red, start working in rows instead of rounds. Work until the desired measurement and then slip stitch the end rows together to form the back of the heel. That will leave an opening for you to start the leg.
03.11.2012 - 23:03
![]() Juani escribió:
Juani escribió:
Me dirijo a vds para darles la enhorabuena por su pagina tan maravillosa,pues de ella se pueden sacar muchas ideas. Pero lo que yo veo que falta y que a las aficiondas al ganchillo como yo nos vendria fenomenal es que en las explicaciones del patron aparecieran los graficos de como se hace,espero me puedan ayudar reciban un saludo y felicitaciones por tantas paginas maravillosas. Un saludo. Juani
28.10.2012 - 02:35
![]() Yvonne escribió:
Yvonne escribió:
Um das "brennen" vom Muster her wäre es vielleicht doch möglich die Schuhe zu Filzen oder ???? Wieviel größer sollte man/frau sie dann machen. Ist eine ganze schuhgröße genug????
09.10.2012 - 21:05DROPS Design respondió:
Hallo Yvonne, Sie können kein normales Modell grösser stricken und dann filzen, da das Stück in Höhe und Länge unterschiedlich filzt. Dafür sind spezielle Anleitungen (siehe Musterdatenbank) nötig.
10.10.2012 - 08:22
![]() Carmen escribió:
Carmen escribió:
I have spent hours trying to understand how the heel comes togther with no luck.
10.04.2012 - 00:32DROPS Design respondió:
There is a video linked from the pattern how to crochet the heel together.
13.04.2012 - 00:47
![]() Lilli escribió:
Lilli escribió:
Jeg forstår ikke det med hælen, Kan det passe at arbejdet skal dele straks med skifter farve og hele vejen op? og hvis, til hvad formål??
08.01.2012 - 09:24
![]() Nancy Grew escribió:
Nancy Grew escribió:
I want to make the santa slippers but do not understand the directions for the heel. I am not sure what stitches to slip stitch together, nor do the instructions state how many stitches? Can you help me?
29.10.2011 - 00:03
![]() Nadine escribió:
Nadine escribió:
Super weihnachtsgeschenk. jedoch habe ich im nachhinein erfahren, dass sie nicht sehr praktisch sind, da die füße nach einer gewissen zeit auf grund des musters anfangen zu brennen... also alles andere als nützlich!
27.02.2011 - 20:55
![]() DROPS Deutsch escribió:
DROPS Deutsch escribió:
Ja, das stimmt.
06.12.2010 - 10:48
|
|
Sneaky Santa#sneakysantaslippers |
|
|
|
|
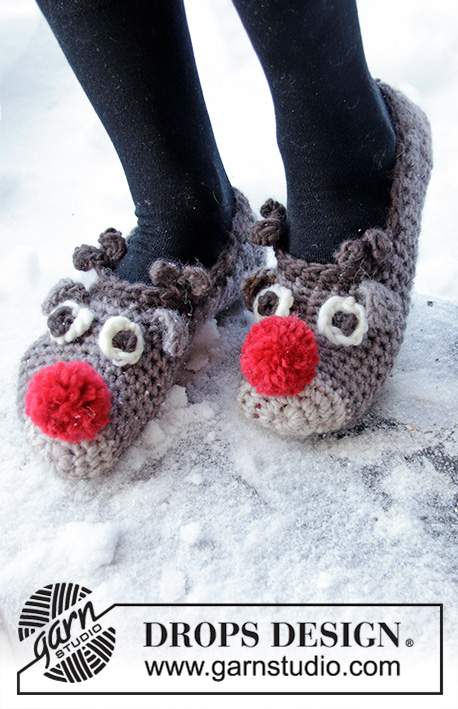
Pantuflas en ganchillo para bebé, niños y mujer en DROPS Snow. Las pantuflas están elaboradas como pantuflas de Santa Claus con ojos, nariz y pompones. Números 22 – 44. Tema: Navidad.
DROPS Extra 0-523 |
|
|
INFORMACIÓN PARA LA ELABORACIÓN DEL TEJIDO: Sustituir el primer p.b. al inicio de la vta/hilera con 1 cad. Terminar cada vta/hilera con 1 p.bjs en la cad del inicio de la vta/del inicio de la hilera anterior. ------------------------------------------------------ ------------------------------------------------------ PIE: Empezar por los dedos y trabajar con blanco hueso y ag de ganchillo tamaño 7 (8) mm. VUELTA 1: Hacer 3 cad y formar un anillo con 1 p.bjs en la primera cad. VUELTA 2: Hacer 4-4-5-5 (5-5-6) p.b. en el anillo – Ver INFORMACIÓN PARA LA ELABORACIÓN DEL TEJIDO! VUELTA 3: 2 p.b. en cada p.b. = 8-8-10-10 (10-10-12) p.b. VUELTA 4: * 1 p.b. en el primer p.b., 2 p.b. en el p.b. sig *, repetir de *a* = 12-12-15-15 (15-15-18) p.b. VUELTA 5-6: 1 p.b. en cada p.b. VUELTA 7: (aplica únicamente a los tamaños 35/37, 38/40 y 42/44): 1 p.b. en cada p.b. VUELTA 7-8: * 1 p.b. en cada uno de los primeros 2 p.b., 2 p.b. en el p.b. sig *, repetir de *a* = 16-16-20-20 (20-20-24) p.b. Continuar con 1 p.b. en cada p.b. RECUERDE MANTENER LA MISMA TENSIÓN DE TEJIDO DE LA MUESTRA! Cuando la pieza mida 5-5-6-7 (7-8-10) cm, cambiar a camello y continuar hasta que la pieza mida 7-8-9-10 (10-12-14) cm. TALÓN: Cambiar a rojo y, AL MISMO TIEMPO, dividir la pieza y trabajar de ida y vuelta a partir del centro del empeine – recuerde la INFORMACIÓN PARA LA ELABORACIÓN DEL TEJIDO! Cuando la pantufla mida 15-17-19-21 (23-25-28) cm, colocarla en horizontal y unir en el centro de la parte de atrás con una hilera de p.bjs a través de ambas partes. Cortar y asegurar el hilo. PIERNA: Trabajar 1 vta de p.b. con rojo alrededor de la abertura (empezar en el centro del frente) = aprox 22-26-28-30 (26-28-30) p.b.. Continuar en redondo con 1 p.b. en cada p.b. hasta que la pierna mida aprox 3-3-4-4 (5-5-6) cm. Ahora continuar de ida y vuelta en únicamente la mitad de los pts – es decir, a partir del centro del frente hasta el centro de la parte de atrás – trabajar p.b. y, AL MISMO TIEMPO, dism para crear una punta de la manera sig: * virar con 1 cad, saltar el primer p.b. y hacer 1 p.b. en cada p.b. hasta tener 1 p.b. restante *, repetir de *a* hasta tener 2 pts restantes, cortar y asegurar el hilo. TERMINACIÓN: Hacer un pequeño pompón con blanco hueso, con un diámetro de aprox 2-2-2-2 (3-3-3) cm y sujetarlo a la punta en uno de los lados de la pierna de la pantufla (= parte de arriba del gorro de Santa). Doblar la pierna hacia abajo. Hacer otro pompón en rojo y coserlo en el centro del empeine, en la transición entre blanco hueso y camello = nariz de Santa. Bordar los ojos con el hilo negro, en cada lado de la nariz. Trabajar la otra pantufla de la misma manera, mas para el gorro de Santa, trabajar a partir del centro de la parte de atrás en dirección al centro del frente, para que el gorro quede del otro lado del pie. |
|
¿Terminaste este patrón?Entonces, etiqueta tus fotos con #dropspattern #sneakysantaslippers o envíalas a la galería #dropsfan. ¿Necesitas ayuda con este patrón?Encontrarás 10 videos tutoriales, un espacio para comentarios/preguntas y más visitando la página del patrón en garnstudio.com © 1982-2026 DROPS Design A/S. Todos los derechos reservados. Este documento, incluyendo todas sus sub-secciones, está protegido por los derechos de autor (copyright). Lee más acerca de lo que puedes hacer con nuestros patrones en la parte de abajo de cada patrón de nuestro sitio. |


Con más de 40 años en el diseño de modelos de punto y de ganchillo, DROPS Design ofrece una de las más vastas colecciones de patrones gratuitos en el internet - traducidos en 17 idiomas. Al día de hoy, contamos con 324 catálogos y 12290 patrones - de los cuales 11685 están traducidos en español.
Nosotros trabajamos con mucho esmero para brindarte lo mejor que las labores de punto y ganchillo tienen para ofrecer,inspiración y consejos, así como hilos de magnífica calidad a precios increíbles! Te gustaría usar nuestros patrones para otro fin además del uso personal? Puedes leer acerca de lo que estás permitida a hacer en el texto de Copyright en la parte de abajo de todos nuestros patrones. Felices labores!
Escribe un comentario sobre DROPS Extra 0-523
¡Nos encantaría saber qué piensas acerca de este patrón!
Si quieres escribir una pregunta referente al patrón, por favor asegúrate de elegir la categoría correcta en el formulario debajo, para acelerar el proceso de respuesta. Los campos obligatorios están marcados con un *.