
Categorías populares
¿Buscas un hilo?


Comentarios / Preguntas (63)
![]() Lore escribió:
Lore escribió:
Cutest little bonnet ever! Easy to follow and beautiful result
04.08.2025 - 05:54
![]() Nannamira escribió:
Nannamira escribió:
Jeg har samme problem som Karolina, den blive høj i stedet for flad. Jeg kan ikke forstå det, for jeg har taget ind på hver anden pind. Hvordan skal jeg opklare dette? Må trevle op og prøve igen.
26.06.2025 - 22:57DROPS Design respondió:
Hei Nannamira. Hvilken str. strikker du? Har du riktig maskeantall når du skal sette de 6 merkene i arbeidet? mvh DROPS Design
30.06.2025 - 14:12
![]() Tracy escribió:
Tracy escribió:
So cute
19.12.2024 - 21:53
![]() Leah escribió:
Leah escribió:
Please help!! Can anyone explain the casing instructions better? Or have a video tutorial. I am not understanding what to do at all and it’s the last piece I have to figure out on this bonnet.
26.01.2024 - 05:14DROPS Design respondió:
Dear Leah, fold the ribbing edge (around face) double from RS and pick up the stitches into both layers along the rib then along the stocking stitch part, along the circle on back of hat, along the stocking stitch part and again in both layers along the rib, then work 2 cm stocking stitch cast off, fold double from RS (purl side is facing) and sew. Happy knitting!
26.01.2024 - 08:20
![]() Leah escribió:
Leah escribió:
Trying to clarify- following the ribbing the next row starting the stockinette section you decrease stitches? Why did you put remember the gauge in the middle of the instructions? What is this supposed to indicate? Not the most clearly written pattern.
22.01.2024 - 07:07
![]() Judith Jenkins escribió:
Judith Jenkins escribió:
I am really having difficulty with the tension. I have gone up to 3mm needles and I have got 8 cm across. It is a very thin fabric so if I go up 2 more needle sizes how will there be any warmth in the bonnet? I have reconciled myself to knitting the bonnet for a 3/4 year old because my 16 month old granddaughter has a head circumference of 48 where you measure for a bonnet or 47 but it will still be too small using 3 mm needles. My tension is usually fairly standard. What is happening here?
07.12.2021 - 21:25DROPS Design respondió:
Dear Mrs Jenkins, this hat is worked with a tension of 26 sts x 34 rows, to get the pattern matching the size you should have this tension. Read more about tension here. Happy knitting!
08.12.2021 - 07:56
![]() Judith Jenkins/ Judy escribió:
Judith Jenkins/ Judy escribió:
Thank you so much for replying straight away. However I always find that I have to re-knit hats smaller and she is a tiny 16 month old who has only just gone into 12 month clothes which are a generous fit on her so I cannot believe that she would need 3 - 4 years. I suppose the ribbing doesn’t need to meet as the bonnet is tied. As the ribbing would need to stretch in order not to be loose would I get away with 12 - 18 months? It must be either 12-18 months or 2 to 3 years.
22.11.2021 - 13:24
![]() Judith Jenkins escribió:
Judith Jenkins escribió:
Please will you look at my previous comment which should have been a question as it is urgent. I lost the first attempt and the second time I didn't c h range it to a question. Thank you
21.11.2021 - 08:50DROPS Design respondió:
Dear Judith, you can see the answer below.
21.11.2021 - 19:16
![]() Judith Jenkins escribió:
Judith Jenkins escribió:
Please could you advise as to size. My granddaughter has a bonnet circumference of 48 cm and a head circumference of 47 cm. The nearest I could get to 10 cm with 26 stitches is 9.1 cm on 3.25mm needles using Drops Fabel. If I knit the 12 - 18 month size it will be smaller than her head circumference suggests. On the other hand it seems unlikely that she would need the 2 - 3 year size as she is small for her age. I want it to fit her this winte r.I don't want to go up another needle size.
21.11.2021 - 08:47DROPS Design respondió:
Dear Judith, the age indicated in the sizes is not important, since the standard sizes may vary between the different countries and it would also depend on each child. If you need a head circumference of 47 cm, with the gauge you have indicated, you would need to knit an even larger size (3/4 years) to obtain the needed circumference. So you would be working the number of stitches for sizes 3/4 but the number of cm for the size 2 years. Happy knitting!
21.11.2021 - 19:15
![]() Maria escribió:
Maria escribió:
Jag har svårt att visualisera hur/var jag ska sticka upp maskorna för dragskon i den uppvikta resåren. Förstår inte hur det ska se ut sen, viker man ner uppviket efter att man stickat upp "dragskon". Det vore fint med en utförligare beskrivning, en bild eller en video. Tack på förhand!
14.04.2020 - 15:48DROPS Design respondió:
Hej Du stickar upp maskor längst hättans nederkant och där du vikt resåren dubbel stickar du upp maskor genom båda lager. Resårkanten fortsätter att vara dubbelvikt som på bilden så den ska inte vikas tillbaka. Mvh DROPS Design
22.04.2020 - 09:54
|
|
Little Miss#littlemissbonnet |
|
 |
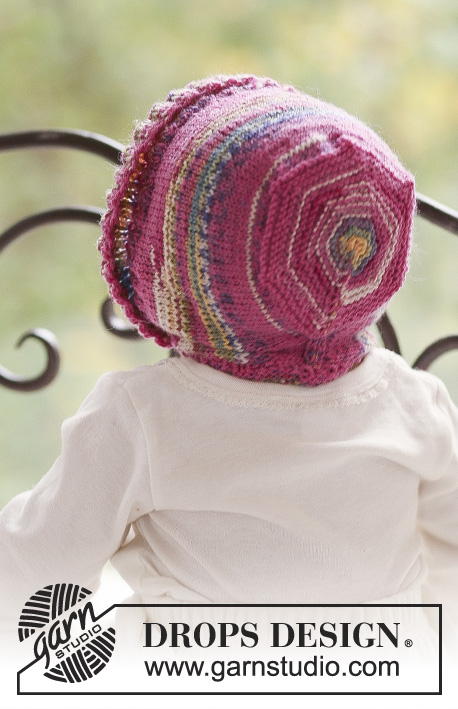 |
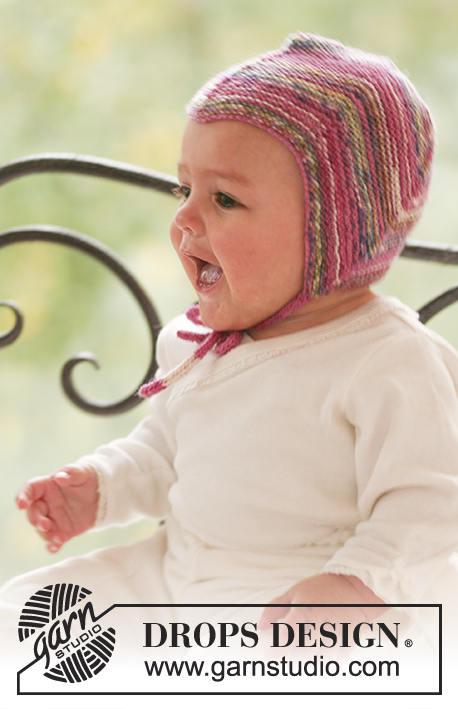
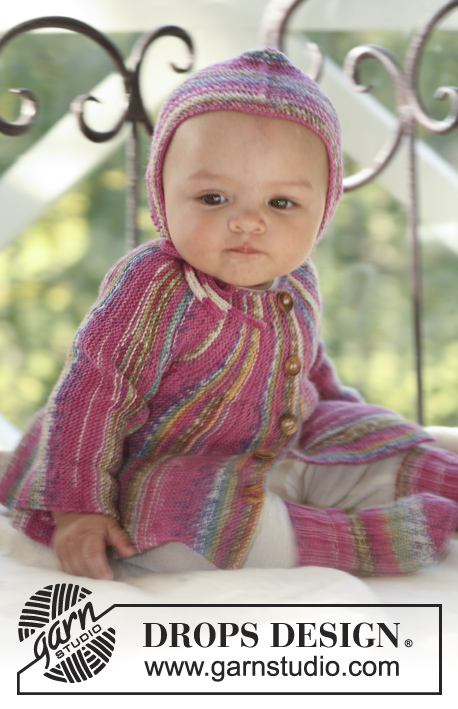
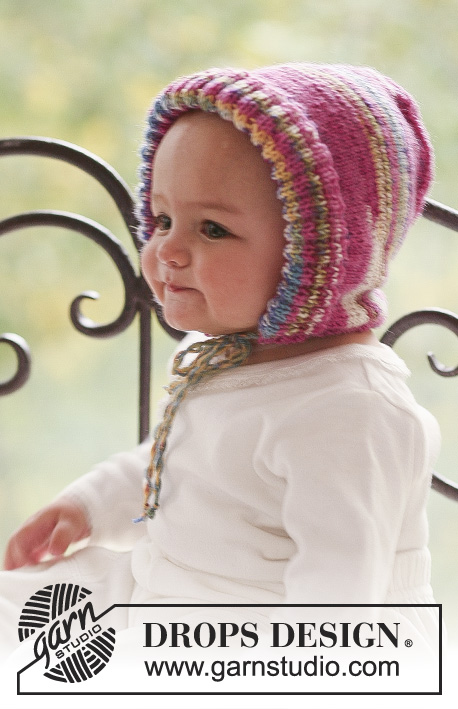
Bonete de punto para bebé y niños en DROPS Fabel
DROPS Baby 18-11 |
|
|
PT MUSGO (de ida y vuelta en la ag): Tejer todas las hileras de derecho. ------------------------------------------------------ BONETE: Tejido de ida y vuelta en la ag. Mon 104-112-120 (128-136) pts en ag tamaño 2.5 mm con Fabel. Tejer el resorte de la manera sig (primer hilera = LD): 1 pt en pt musgo – VER ARRIBA - * 2r, 2d *, repetir de *a*, y terminar con 2r y 1 pt en pt musgo. Cuando el resorte mida 6-8-8 (10-10) cm, continuar en pt jersey con 1 pt en pt musgo en cada lado y, AL MISMO TIEMPO, dism 14-16-18 (20-22) pts distribuidos equitativamente en la primera hilera = 90-96-102 (108-114) pts. RECUERDE MANTENER LA MISMA TENSIÓN DE TEJIDO DE LA MUESTRA! Cuando la pieza mida 14-16-17 (19-20) cm, rem 6 pts en la hilera sig por el LD, tejer los pts restantes en la hilera y rem 6 pts al inicio de la hilera sig por el LR, tejer los pts restantes en la hilera = 78-84-90 (96-102) pts. Insertar 6 marcapuntos en la pieza de la manera sig (visto por el LD): 1 marcapuntos después de 1 pt y los 5 marcapuntos restantes con 13-14-15 (16-17) pts entre cada uno, 12-13-14 (15-16) pts restantes después del último marcapuntos. Continuar en pt musgo en todos los pts – VER ARRIBA – AL MISMO TIEMPO, dism 1 pt después de cada marcapuntos (por el LD) tejiendo 2 pjd, a cada 2 hileras, hasta tener 12 pts restantes en la hilera. Ahora tejer 2 pjd en toda la hilera. Cortar el hilo, pasarlo a través de los pts restantes y usar el cabo del hilo para unir el bonete con una costura al centro de la parte de atrás. Coser en la hebra externa de los pts y también unir con una costura los 6 pts rem. ORILLA INFERIOR DEL BONETE: Doblar el resorte en dos, hacia el LD de la pieza. Con el hilo Fabel y las ag tamaño 2.5 mm levantar aprox 60 a 80 pts, a 1 pt del pt de orillo, en la orilla inferior del bonete – levantar los pts insertando la ag a través de ambas partes del resorte doblado. Tejer 2 cm en pt jersey, rem flojamente. Doblar la orilla en dos hacia el LD (es decir, se ve el LR) y asegurar con pequeños puntos invisibles. CORDÓN: Cortar 2 hilos de aprox 2 metros cada uno, retorcerlos juntos hasta que ofrezcan resistencia, doblarlos en dos y dejar que se retuerzan nuevamente. Hacer un nudo en cada extremo y pasarlo a través de la orilla inferior del bonete. |
|
¿Terminaste este patrón?Entonces, etiqueta tus fotos con #dropspattern #littlemissbonnet o envíalas a la galería #dropsfan. ¿Necesitas ayuda con este patrón?Encontrarás 7 videos tutoriales, un espacio para comentarios/preguntas y más visitando la página del patrón en garnstudio.com © 1982-2026 DROPS Design A/S. Todos los derechos reservados. Este documento, incluyendo todas sus sub-secciones, está protegido por los derechos de autor (copyright). Lee más acerca de lo que puedes hacer con nuestros patrones en la parte de abajo de cada patrón de nuestro sitio. |
|


Con más de 40 años en el diseño de modelos de punto y de ganchillo, DROPS Design ofrece una de las más vastas colecciones de patrones gratuitos en el internet - traducidos en 17 idiomas. Al día de hoy, contamos con 324 catálogos y 12290 patrones - de los cuales 11675 están traducidos en español.
Nosotros trabajamos con mucho esmero para brindarte lo mejor que las labores de punto y ganchillo tienen para ofrecer,inspiración y consejos, así como hilos de magnífica calidad a precios increíbles! Te gustaría usar nuestros patrones para otro fin además del uso personal? Puedes leer acerca de lo que estás permitida a hacer en el texto de Copyright en la parte de abajo de todos nuestros patrones. Felices labores!
Escribe un comentario sobre DROPS Baby 18-11
¡Nos encantaría saber qué piensas acerca de este patrón!
Si quieres escribir una pregunta referente al patrón, por favor asegúrate de elegir la categoría correcta en el formulario debajo, para acelerar el proceso de respuesta. Los campos obligatorios están marcados con un *.