
Categorías populares
¿Buscas un hilo?


Comentarios / Preguntas (158)
![]() Annelise Kristensen escribió:
Annelise Kristensen escribió:
Jeg kan desværre komme videre. Jeg kan ikke forstå jeg SKAL KLIPPE TRÅDEN EFTER EFTER 34 cm og begynde at strikke efter den 17. maske. Hvad skal jeg bruge de 17 masker til???. På forhånd tak for hjælpen. Venlig hilsen Annelise
02.11.2023 - 07:50DROPS Design respondió:
Hej Annelise, det er fordi du nu skal starte omgangen midt foran, se videoen vi har lavet for at vise hvordan du strikker den overlappende krave :)
03.11.2023 - 11:52
![]() Smo escribió:
Smo escribió:
E' possibile adattare il modello per uomo?
31.07.2023 - 21:18DROPS Design respondió:
Buonasera Smo, in questa sede non ci è possibile adattare i modelli alle singole esigenze: provi a sfogliare i cataloghi da uomo, troverà sicuramente qualcosa che le piace. Buon lavoro!
03.08.2023 - 19:36
![]() Nancy Daems escribió:
Nancy Daems escribió:
Zou het kunnen dat de stekenverhouding niet klopt ? Als ik kijk naar xxl zou ik meer dan 200 steken moeten opzetten terwijl het patroon veel minder geeft
29.06.2023 - 06:07
![]() Lea escribió:
Lea escribió:
Hallo, ein paar Fragen zur Blende bzw. zum Weiterstricken, da ich hier leider nicht weiterkomme und bei den Vorderteilen (re+li) nicht bei 110 M bin, sondern auf der Strickhöhe, wo die Blende anfängt. D. h. ich habe lediglich die Blendenreihe hin und her gestrickt. 1. Muss eine Blendenreihe still gelegt werden? 2. Wie gehe ich da mit der Rundnadel bei der Blende um, da ich niemals mit der verdrehten Rundnadel ohne Stilllegung eine komplette Runde stricken könnte. Danke vorab.
20.09.2021 - 20:44DROPS Design respondió:
Liebe Lea, wenn die Arbeit 33 cm (1. Größe) misst, schneiden Sie den Faden (am Ende der Runde) ab; dann zählen Sie 15 M ab der Markierungs an der Seite, hier beginnen nun die Reihen: 14 M Blende, bis zur Ende der Reihe stricken und 1 Masche aus jeder der 14 ersten Maschen der Reihe aufnehmen - dieses Video zeigt, wie man diese Maschen auffasst, und dann in Hin- und Rückreihen weiterstrickt. Viel Spaß beim stricken!
21.09.2021 - 08:59
![]() Britta Riess escribió:
Britta Riess escribió:
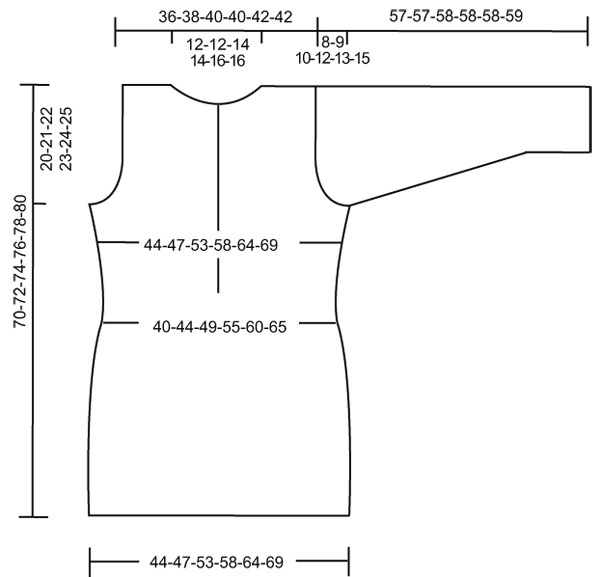
Hallo, in der Skizze ist angegeben das der Pulli in Größe M bis zum Armausschnitt eine Länge von 72 cm hat. Wenn ich die Anleitung richtig lese komme ich aber auf 10 cm Bund + 51 cm bis zur Armlochabnahme. Was ist jetzt richtig, oder wo liegt mein Fehler? Viele Grüsse Britta Riess
12.07.2021 - 10:24DROPS Design respondió:
Liebe Frau Riess, die 72 cm in M sind für die ganze Länge, dh von der Anschlagskante bis zur Schulter = 51 cm vor Armauschnitt + 21 cm Armausschnitt = 72 cm. Viel Spaß beim stricken!
12.07.2021 - 16:14
![]() SA escribió:
SA escribió:
" Beg after the 15-17-20-23-26-29 st from the first MT. Work 14 sts front band" I am not sure I understand this instruction, why do I start 20 st from MT why not 7 before and 7 after the TM?
29.06.2021 - 00:00DROPS Design respondió:
Dear Sa, because the rows should now start with the first of the 14 sts for the front band stitches, there are 54 sts between markers: 20 sts for one side/shoulder, 14 sts for front band sts, 20 sts for the other side/shoulder. Join the yarn after 20 sts and work the 14 front band sts, the next sts on needle ending with the 20 sts before these 14 sts and pick up 1 st behind each of these 14 sts. This video shows how to work such a row picking up sts behind the 14 front band sts. Happy knitting!
29.06.2021 - 09:08
![]() Nupur escribió:
Nupur escribió:
Hi! I am having trouble seaming the sleeves with the main body. Is there a tutorial available on how I can seam the two when it has been knit in the round? Thanks!
07.11.2020 - 12:03DROPS Design respondió:
Dear Mrs Nupur, sleeves are worked first in the round, then you continue back and forth for the sleeve cap - you should now sew sleeves to yoke - this video shows. Hope this video can help you. Happy knitting!
09.11.2020 - 09:56
![]() Kathy escribió:
Kathy escribió:
This is a lovely hooded sweater. I am excited to make it for the coming fall
23.08.2019 - 12:36
![]() Rebecca P escribió:
Rebecca P escribió:
Confused, bind off 3 sts each side of MT, now complete back and forth on needle. Bind off to shape sleeve cap each side at beginning of every row... Do I work through to the the end of the row after my 6 BO sts, then begin again where I had been when working in the round, but work the WS? Or, work through to the armhole and then turn to work WS, doing the BO for the sleeve cap?
24.02.2019 - 22:35DROPS Design respondió:
Dear Rebecca, after you have bound off the 6 sts mid under sleeve, continue back and forth for sleeve cap binding off at the beginning of each row (=both from RS and from WS) 2 sts 1 time, then 1 stitch 2-6 times (see size) etc.. Happy knitting!
25.02.2019 - 11:19
![]() Petra escribió:
Petra escribió:
Ich finde die Abnahme mit den Makierungsfäden etwas verwirrend. Wenn ich das richtig verstanden habe, setzt man am Anfang der Reihe eine Markierung und dann in der Mitte bei 52M. Anschließend bei z.B. 16cm nimmt man um die Markierungen jeweils 2M ab =4 M. Wie macht man das genau? 1 Abnahme, 1M stricken, wieder eine Abnahme? Dann würde da aber ein Loch entstehen:( Danke ganz herzlichst im Voraus!
19.11.2018 - 17:17DROPS Design respondió:
Liebe Petra, da die Maschenanzahl gerade ist, können Sie entweder 1 Abnahme, Markierung, 1 Abnahme stricken, oder mit 2 Maschen zwischen den Abnahmen: 1 Abnahme, 1 Masche, Markierung, 1 Masche, 1 Abnahme. Es soll kein Loch entstehen. Viel Spaß beim stricken!
20.11.2018 - 08:01
|
|
Campfire |
|
 |
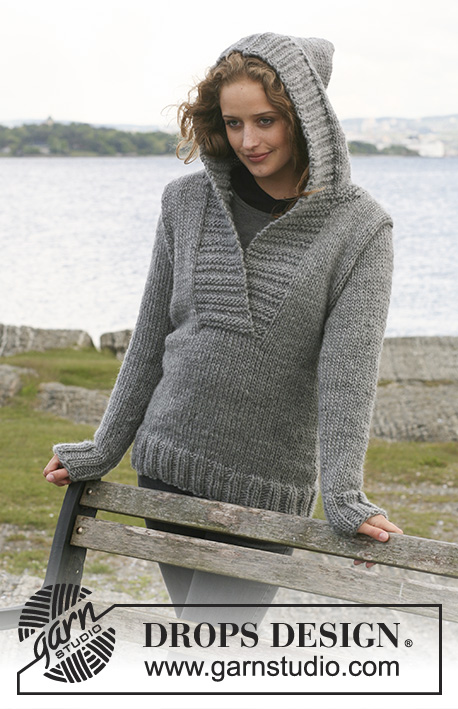 |
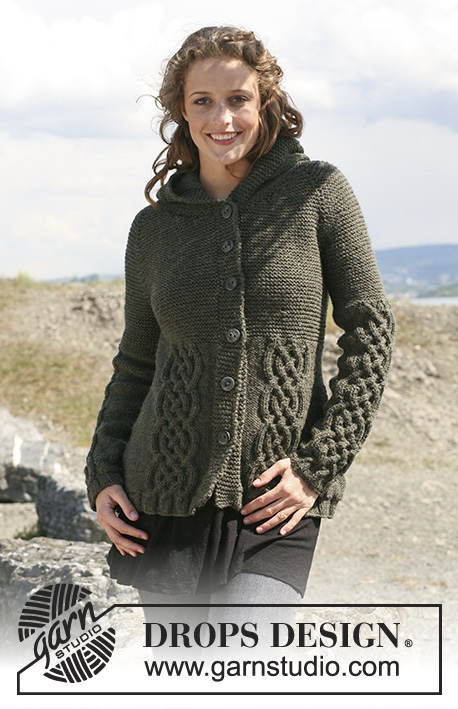
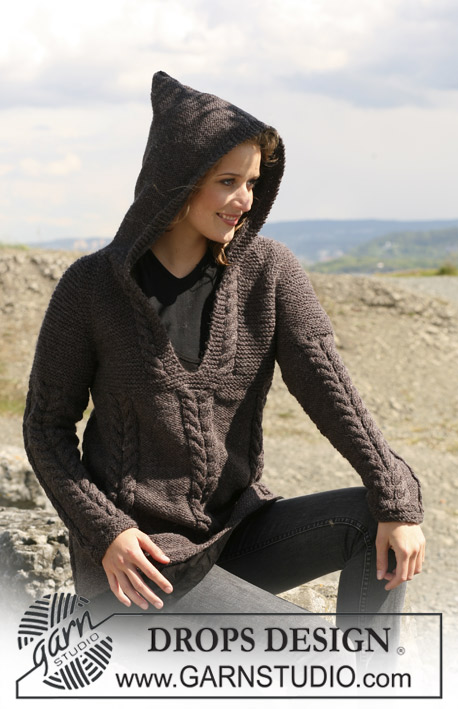
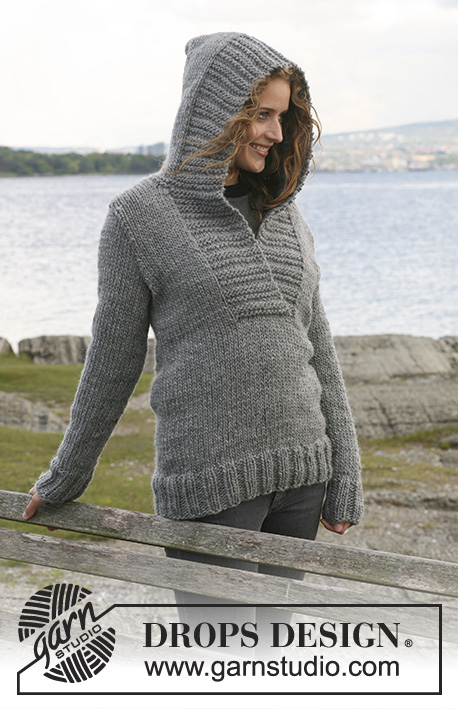
Suéter de punto DROPS con capucha (caperuza) en “Snow”. Talla S – XXXL.
DROPS 109-1 |
|
|
PATRÓN PARA LA CENEFA: *4 filas de derecho, 2 filas de revés*, repetir de *a*. ------------------------------------------------------------------------ CUERPO: Se teje en redondo. Mon 96-104-116-128-140-152 pts en ag tamaño 8 mm con Snow. Tejer 1 vta del revés y cont en pt resorte, 2d/2r. Cuando la pieza mida 10 cm cont en pt jersey. Colocar un marcapuntos (MP) al inicio de la vta y 1 MP después de 48-52-58-64-70-76 pts (= los laterales). Recuerde tejer la muestra! Cuando la pieza mida 15-16-17-18-19-20 cm dism 1 pt a cada lado de ambos MP (= 4 dism por vta). Repetir la dism cuando la pieza mida 30-31-32-33-34-35 cm = 88-96-108-120-132-144 pts (= 44-48-54-60-66-72 pts para la espalda y para la pieza delantera). Cuando la pieza mida 33-34-35-36-37-38 cm, cortar el hilo. Continuar como sigue: Comenzar después del 15-17-20-23-26-29 pt a partir del primer MP. Tejer 14 pts del borde (vista) delantero – ver arriba – y pt jersey en los sig 74-82-94-106-118-130 pts. A cont levantar 14 pts nuevos por detrás del borde (vista) delantero = 102-110-122-134-146-158 pts. Cont de ida y vuelta en la ag con 14 pts para el borde (vista) delantero a cada lado. Al mismo tiempo cuando la pieza mida 36-37-38-39-40-41 cm, aum 1 pt a ambos lados de cada MP (= 4 aum por vta). Repetir el aum cuando la pieza mida 46-47-48-49-50-51 cm = 110-118-130-142-154-166 pts. Cuando la pieza mida 50-51-52-53-54-55 cm rem 6 pts a cada lado (es decir, 3 pts a cada lado del MP) para la sisa = 98-106-118-130-142-154 pts. Ahora completar las piezas de la espalda y delanteros por separado. ESPALDA: = 42-46-52-58-64-70 pts. Rem para dar forma a la sisa a cada lado al inicio de cada vta: 2 pts 0-0-1-2-3-4 veces y 1 pt 1-2-2-3-3-4 veces = 40-42-44-44-46-46 pts. Cuando la pieza mida 68-70-72-74-76-78 cm rem los 12-12-14-14-16-16 pts centrales para el cuello y dism 1 pt en la línea del escote en la sig vta = 13-14-14-14-14-14 pts restantes en cada hombro. Rem pts cuando la pieza mida 70-72-74-76-78-80 cm. DELANTERO DERECHO: = 28-30-33-36-39-42 pts. Rem para dar forma a la sisa como se describe para la espalda = 27-28-29-29-30-30 pts. Cuando la pieza mida 60-62-64-66-68-70 cm desl 14 pts hacia el delantero central a un gancho aux y a cont dism para dar forma a la línea del escote en vtas alternas como sigue: 1 pt 0-0-1-1-2-2 veces = 13-14-14-14-14-14 pts restantes en el hombro. Rem pts cuando la pieza mida 70-72-74-76-78-80 cm. DELANTERO IZQUIERDO: Como el delantero derecho, pero a la inversa. MANGA: Se teje en redondo con ag de doble punta. Mon 28-28-28-32-32-32 pts en ag tamaño 8 mm. Colocar 1 MP al inicio de la vta. Tejer 1 vta del revés y cont en pt resorte, 2d/2r. Cuando la pieza mida 8 cm cont en pt jersey, al mismo tiempo que dism 2-2-0-4-2-2 pts repartidos equitativamente en la primera vta = 26-26-28-28-30-30 pts. Cuando la pieza mida 10 cm aum 1 pt a ambos lados del MP cada 6-5-5-3.5-3.5-2.5 cm un total de 7-8-8-10-10-12 veces = 40-42-44-48-50-54 pts. Cuando la pieza mida 49-48-48-46-45-44 cm – Nota! Menos en las tallas más grandes por copete de manga más largo y hombros más anchos – rem 3 pts a ambos lados del MP para la sisa, y ahora completar la pieza de ida y vuelta en ag. Rem para dar forma al copete de manga a cada lado al inicio de cada vta: 2 pts 1 vez y 1 pt 2-3-4-5-6-7 veces, luego 2 pts a cada lado hasta que la pieza mida 56-56-57-57-57-58 cm, rem 3 pts a cada lado 1 vez y rem pts restantes. La pieza mide aprox 57-57-58-58-58-59 cm. CAPUCHA (CAPERUZA): Levantar aprox 60 a 65 pts alrededor de la línea del escote (incluyendo los pts del gancho aux) en ag tamaño 8 mm con Snow. Tejer 4 vtas pt musgo con los bordes (vista) delanteros como lo hizo anteriormente. Al mismo tiempo aum 5 pts distribuidos equitativamente (no aum en los pts del borde (vista) delantero) en la última vta = 65 a 70 pts. Cont en pt jersey con 14 pts del borde (vista) delantero a cada lado como lo hizo anteriormente hasta que la capucha mida 35-35-36-36-37-37 cm. Rem pts. Doblar la capucha en dos y unir cosiendo en la parte superior por el lado derecho TERMINACION: Colocar mangas. |
|
 |
|
¿Terminaste este patrón?Entonces, etiqueta tus fotos con #dropspattern o envíalas a la galería #dropsfan. ¿Necesitas ayuda con este patrón?Encontrarás 21 videos tutoriales, un espacio para comentarios/preguntas y más visitando la página del patrón en garnstudio.com © 1982-2026 DROPS Design A/S. Todos los derechos reservados. Este documento, incluyendo todas sus sub-secciones, está protegido por los derechos de autor (copyright). Lee más acerca de lo que puedes hacer con nuestros patrones en la parte de abajo de cada patrón de nuestro sitio. |
|


Con más de 40 años en el diseño de modelos de punto y de ganchillo, DROPS Design ofrece una de las más vastas colecciones de patrones gratuitos en el internet - traducidos en 17 idiomas. Al día de hoy, contamos con 324 catálogos y 12290 patrones - de los cuales 11685 están traducidos en español.
Nosotros trabajamos con mucho esmero para brindarte lo mejor que las labores de punto y ganchillo tienen para ofrecer,inspiración y consejos, así como hilos de magnífica calidad a precios increíbles! Te gustaría usar nuestros patrones para otro fin además del uso personal? Puedes leer acerca de lo que estás permitida a hacer en el texto de Copyright en la parte de abajo de todos nuestros patrones. Felices labores!
Escribe un comentario sobre DROPS 109-1
¡Nos encantaría saber qué piensas acerca de este patrón!
Si quieres escribir una pregunta referente al patrón, por favor asegúrate de elegir la categoría correcta en el formulario debajo, para acelerar el proceso de respuesta. Los campos obligatorios están marcados con un *.