
Categorías populares
¿Buscas un hilo?


Comentarios / Preguntas (65)
![]() Birgitt escribió:
Birgitt escribió:
Hallo, das ist eine gute Anleitung und ergibt ein wunderbares Muster, Zum Ausprobieren habe ich eine Maschenprobe angefertigt. Nun geht es an den Strumpf. Dazu meine Frage: Das Muster (M2) wird nur auf der Vorderseite des Strumpfes gearbeitet, die Rückseite besteht nur aus linken Maschen? Oder habe ich etwas falsch verstanden? Danke für Ihre Antwort Gruß Birgitt Jestädt
14.03.2016 - 14:25DROPS Design respondió:
Liebe Birgitt, ja, das Muster ist nur auf der vorderen Seite des Strumpfes. Hier sehen Sie die Mutereinteilung: li. über die ersten 15-18-21 M., M2 (= 36 M.) stricken, li. über die letzten 15-18-21 M.
14.03.2016 - 14:57
![]() Cathy escribió:
Cathy escribió:
Hi - in the picture it doesn't look like 8" has been turned over at the top... maybe only 4"? I just wanted to make sure I understood the pattern correctly. Thanks
06.02.2016 - 00:11DROPS Design respondió:
Dear Cathy, the ribbing at the beg are worked until piece measures 8" then turn the work so that the edge will be folded outwards (and be seen from RS) and so that M.2 will be worked from RS when folded is done. Fold will be approx. 4". Happy knitting!
08.02.2016 - 11:03
![]() Heather Fryer-Goba escribió:
Heather Fryer-Goba escribió:
Ok so i have finished the roll down part and turned it inside out....however....when you pearl the first eighteen st and the last 18 sts.....they are coming out on the the original rs....that is how the pattern reads.....i am frustrated
11.12.2015 - 05:02DROPS Design respondió:
Dear Mrs Fryer-Goba, the top side of sock (with M1) will be then folded down, ie when you turn inside out, you continue working from RS (M2 and rest of sock) so that M1 looks from WS but at the end, you fold the top of sock down so that it will look from RS (like a hem). Happy knitting!
11.12.2015 - 10:03
![]() Monika escribió:
Monika escribió:
Altså, når de förste 20 cm er ferdig vrenger jeg arbeidet og strikker etter mönstret M2? For mitt problem nå er at mönstret kommer fram på innsiden så når kanten brettes ned kommer vrangsiden av de förste 20cm frem. Hjelp!!!
08.12.2015 - 20:24DROPS Design respondió:
Hej Monika, Ja det stemmer, når du har strikket de første 20 cm vrenger du arbeidet og lader vrangen være retsiden resten af arbejdet. God fornøjelse!
09.12.2015 - 08:44
![]() Julie escribió:
Julie escribió:
I've done the first row on M.1 what do I do now on the wrong side? Thank you
23.11.2015 - 17:06DROPS Design respondió:
Dear Julie, you should continue working M.1 until piece measures 20 cm from cast on row. Then turn your work inside out to work rest of socks from RS (this part with rib and M.1 will be folded down - previous WS is now RS). Happy knitting!
24.11.2015 - 09:45Elizabeth escribió:
When the instructions call for a decrease on M.2, after the 5 cm., does the decrease occur on 5cm., 7c., 9cm., etc, or does it actually mean every other row?
03.01.2015 - 04:53DROPS Design respondió:
Dear Elizabeth, that's correct, first inc each side of M2 is done when piece measures 5 cm, then 7 cm, 9cm ... = every 2 cm a total of 11-12-13 times. Happy knitting!
03.01.2015 - 15:00
![]() Maria Tiralongo escribió:
Maria Tiralongo escribió:
Are the round 7 and the round 23 inverted in the M.2 ???
07.11.2014 - 19:39DROPS Design respondió:
Dear mrs Tiralongo, on row 7 you work the mid cables as follows: slip 2 sts on cable needle behind work, K2, P2 from cable needle then slip 2 sts on cable needle in front of work, P2, K2 from cable needle then slip 2 sts on cable needle behind work, K2, P2 from cable needle and slip 2 sts on cable needle in front of work, P2, K2 from cable needle. On row 23, repeat twice slip 2 sts on cable needle in front of work, P2, K2 from cable needle + slip 2 sts on cable needle behind work, K2, P2 from cable needle. Happy knitting!
08.11.2014 - 09:56
![]() Allison escribió:
Allison escribió:
I have large calves, I'm wondering if this pattern modified a bit for them? I would hate to get one done just to have it be too tight. if so, how would I do this? Thanks!
18.07.2014 - 20:26DROPS Design respondió:
Dear Allison, What about knitting calf with larger needles ? You should swatch and check measurements to get the sock fit. Remember your Drops store can help you for any tips & advice, per mail or telefon. Happy knitting!
19.07.2014 - 09:19
![]() Mary Daigle escribió:
Mary Daigle escribió:
Instructions for heel decrease indicate knitting for every row instead of knit right side, purl wrong side. Is this correct? Thanks.
05.02.2014 - 20:52DROPS Design respondió:
It should be worked in stockinette, so the wrong side rows should be purled, not knit. We have edited the pattern to say so. Thank you so much for letting us know.
05.02.2014 - 22:20
![]() Melissa escribió:
Melissa escribió:
I'm confused. After turning my work (after first 20cm) do I continue to knit it as ws? So that when the boxes have an x in them I am knitting? Or do I treat it as the new RS? If I treat it as the WS so I get confused when it comes to the cables.
30.01.2014 - 06:06DROPS Design respondió:
Dear Melissa, the first 20 cm will be folded from RS, so when you reach this part, turn inside out and new RS is now previous WS. Happy knitting!
30.01.2014 - 10:52
|
||||||||||||||||||||||
Hilde & Winter |
||||||||||||||||||||||
|
|
||||||||||||||||||||||
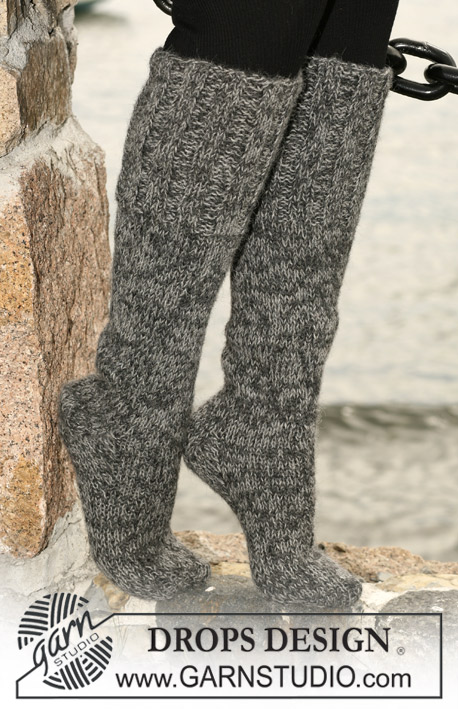
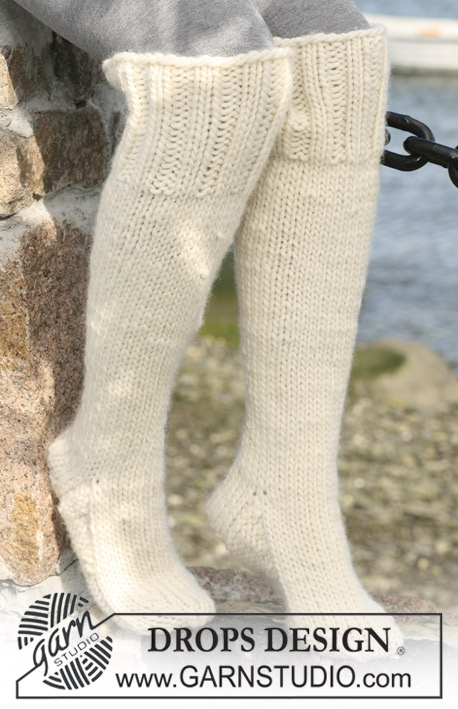
Calcetas (medias) altas DROPS en “Karisma Superwash” con torsadas (trenzas) y doblez en las orillas.
DROPS 103-10 |
||||||||||||||||||||||
|
Resorte: * 2d, 3r *, repetir de *a*. Patrón: Ver diagrama M.1, M.2 y M.3. Los diagramas son vistos por el lado derecho (LD). Disminuciones del talón: Vuelta 1 (= LD): Tejer de derecho hasta tener 7-8-9 pts restantes en la ag, desl el sig pt al derecho, 1d, pasar pt desl por encima. Vuelta 2 (= LR): Tejer de revés hasta tener 7-8-9 pts restantes en la ag, desl el sig pt al revés, 1r, pasar pt desl por encima. Vuelta 3 (= LD): Tejer de derecho hasta tener 6-7-8 pts restantes en la ag, desl el sig pt al derecho, 1d, pasar pt desl por encima. Vuelta 4 (= LR): Tejer de revés hasta tener 6-7-8 pts restantes en la ag, desl el sig pt al revés, 1r, pasar pt desl por encima. Vuelta 5 (= LD): Tejer de derecho hasta tener 5-6-7 pts restantes en la ag, desl el sig pt al derecho, 1d, pasar pt desl por encima. Vuelta 6 (= LR): Tejer de revés hasta tener 5-6-7 pts restantes en la ag, desl el sig pt al revés, 1r, pasar pt desl por encima. Continuar hasta tener 1 pt restante menos antes de desl 1 pt. Continuar hasta tener 8-10-12 pts restantes en la ag. Calcetas: La pieza se teje en redondo desde el centro posterior. Mon 80-90-100 pts en ag de doble punta tamaño 3.5 mm con Karisma y tejer en pt resorte – ver explicación arriba. Cuando el resorte mida 2 cm continuar con el diagrama M.1. Cuando la pieza mida 20 cm girar la labor – es decir, continuar tejiendo por el LR (los 20 cm que se han tejido serán el doblez cuando la calceta esté terminada). Tejer 1 vta al derecho al mismo tiempo que dism 14-18-22 pts distribuidos equitativamente = 66-72-78 pts. Tejer 1 vta al revés. Colocar 1 marcapuntos (MP) en la labor. Continuar midiendo desde este punto en adelante. Tejer la sig vta así: Tejer al revés los primeros 15-18-21 pts, M.2 (= 36 pts), tejer al revés los últimos 15-18-21 pts. Cuando la pieza mida 5 cm, dism 1 pt en cada lado de M.2 cada 2 cm un total de 11-12-13 veces (dism tejiendo 2 pjr) = 44-48-52 pts. Cuando la pieza mida 33-36-39 cm desl los 24 pts centrales arriba del pie a un hilo. Luego tejer 5-5½-6 cm en pt jersey sobre los restantes 20-24-28 pts atrás (= talón). Luego dism para el talón – leer Disminuciones del talón arriba. Después de la dism del talón levantar 11-13-15 pts en cada lado del talón. Distribuir todos los pts en ag de doble punta = 54-60-66 pts. Tejer M.3 sobre los 24 pts centrales arriba del pie (los pts restantes en pt jersey). Al mismo tiempo dism así: tejer 2 pjd antes de M.3 y luego 2d retorcidos juntos después de M.3 (es decir, retorcer tejiendo por la hebra posterior del pt en vez de por delante) en vtas alternas un total de 6 veces = 42-48-54 pts. Tejer hasta que el pie mida aprox 18-20-22 cm medidos desde la orilla del talón (es decir, donde empiezan las dism del talón). Ahora cont con pt jersey sobre todos los pts. Colocar 1 marcapuntos (MP) en cada lado del pie, es decir, 22-24-26 pts arriba del pie y 20-24-28 pts debajo del pie. Dism para los dedos en ambos lados de cada MP así: tejer 2 pjd antes del MP y 2d retorcidos juntos después del MP. Repetir la dism en vtas alternas un total de 3 veces = 30-36-42 pts. Continuar dism en cada vta un total de 6-7-9 veces = 6-8-6 pts. Pasar el hilo a través de los pts restantes y entretejer cabos. |
||||||||||||||||||||||
Explicaciones del diagrama |
||||||||||||||||||||||
|
||||||||||||||||||||||
 |
||||||||||||||||||||||
¿Terminaste este patrón?Entonces, etiqueta tus fotos con #dropspattern o envíalas a la galería #dropsfan. ¿Necesitas ayuda con este patrón?Encontrarás 15 videos tutoriales, un espacio para comentarios/preguntas y más visitando la página del patrón en garnstudio.com © 1982-2026 DROPS Design A/S. Todos los derechos reservados. Este documento, incluyendo todas sus sub-secciones, está protegido por los derechos de autor (copyright). Lee más acerca de lo que puedes hacer con nuestros patrones en la parte de abajo de cada patrón de nuestro sitio. |
||||||||||||||||||||||


Con más de 40 años en el diseño de modelos de punto y de ganchillo, DROPS Design ofrece una de las más vastas colecciones de patrones gratuitos en el internet - traducidos en 17 idiomas. Al día de hoy, contamos con 324 catálogos y 12290 patrones - de los cuales 11685 están traducidos en español.
Nosotros trabajamos con mucho esmero para brindarte lo mejor que las labores de punto y ganchillo tienen para ofrecer,inspiración y consejos, así como hilos de magnífica calidad a precios increíbles! Te gustaría usar nuestros patrones para otro fin además del uso personal? Puedes leer acerca de lo que estás permitida a hacer en el texto de Copyright en la parte de abajo de todos nuestros patrones. Felices labores!
Escribe un comentario sobre DROPS 103-10
¡Nos encantaría saber qué piensas acerca de este patrón!
Si quieres escribir una pregunta referente al patrón, por favor asegúrate de elegir la categoría correcta en el formulario debajo, para acelerar el proceso de respuesta. Los campos obligatorios están marcados con un *.