
Categorías populares
¿Buscas un hilo?


Comentarios / Preguntas (65)
![]() Annick Mercier escribió:
Annick Mercier escribió:
Bonjour, je me demandais quel type de laine utiliser puisque la laine n'est pas disponible ici au Canada. Merci, Annick
02.09.2019 - 16:01DROPS Design respondió:
Bonjour Mme Mercier, je suis heureuse de vous informer que vous pouvez trouver notre laine au Canada - plus d'infos ici. Bon tricot!
02.09.2019 - 16:47
![]() Patricia Olivia Fuchs escribió:
Patricia Olivia Fuchs escribió:
Hallo, liebes Drops-Team. Wenn ich KEIN umgeknicktes Bündchen möchte, kann ich dann anstatt * 2 re., 3 li. * gleich mit Diagrammm M1 beginnen und der weiteren Anleitung folgen, oder muss ich dafür noch etwas anderes beachten?
24.06.2019 - 14:52DROPS Design respondió:
Liebe Frau Fuchs, also wahrscheinlich können Sie dann mit Zöpfen über die gewünschte Höhe stricken, dann setzt man eine Markierung und der Socken wird ab Markierer gemessen (nicht von der Anschlagskante). Viel Spaß beim stricken!
24.06.2019 - 17:00
![]() Mathilde escribió:
Mathilde escribió:
Bonjour, Je souhaiterais savoir ce que veux dire retourner le tricot ? Je ne comprends pas .... J'ai retourner mon ouvrage mais je tricote toujours dans le même sens ... Je vous remercie de bien vouloir l'éclairer Mathilde
14.01.2019 - 19:09DROPS Design respondió:
Bonjour Mathilde, après les côtes, retournez l'ouvrage sur l'envers = les premiers rangs de côtes seront retournés sur l'endroit à la fin et ont donc été tricotés sur l'envers. Au premier tour après avoir retourné votre ouvrage, vous allez tricoter la dernière maille du tour précédent pour terminer par la première maille, continuez ensuite toujours ainsi, c'est maintenant l'endroit de la chaussette. Bon tricot!
15.01.2019 - 09:02Nicola Stuart escribió:
Would love to knit these but would have to make them longer and bigger. How would I go about changing size?
11.11.2018 - 22:41DROPS Design respondió:
Dear Nicola, the pattern goes up to size 44. If you need even bigger by using a slightly bigger needle. Conversly, you can use the yarn Lima isntead of the Karisma =with bgger needles). If you only want it somewhat higher, you can continue knitting straight for a couple more cm-s, and6 or you can increase a stitch on both ides of this middle stitch. You can find the videos, related to this pattern at the left of the page, below the pictures. Also there are detailed explanation of the symbos of the pattern chart. If you need further help you can also ask for it in person in the store where you bought your DROPS yarn from. Happy Crafting!
12.11.2018 - 01:56
![]() Nicole escribió:
Nicole escribió:
Vielen Dank für diese tolle Anleitung. Die Strümpfe sehen im Original schöner aus wie auf Eurem Foto und war für mich als Anfänger leicht verständlich nach zu stricken. Inzwischen habe ich schon 3 Paar gestricht und es macht immer wieder Spaß.
08.08.2018 - 17:26
![]() Alexandra escribió:
Alexandra escribió:
When i get to this part in the M2 chart do I pearl the 6 after i pearl the first 18 or do i knit them I'm not sure how to determine if I am working on the right side or wrong side now? Knit following round like this: P the first 15-18-21 sts, chart M.2 (= 36 sts), P the last 15-18-21 sts. I hope you understand my question thank you , Alex
08.06.2016 - 21:34DROPS Design respondió:
Dear Alexandra, when working M.2 you are now working from RS and WS of M.1 is facing you (will be folded at the very end). M.2 is 36 sts in width, work rounds like this: P the first 15-18-21 sts from beg of round, then work the 36 sts in M.2 starting to read at the bottom corner on the right side towards the left and P the last 15-18-21 sts on round. Happy knitting!
09.06.2016 - 08:49
![]() Alexandra escribió:
Alexandra escribió:
I'm talking about the Drops long Sock pattern their is M,M2, M3 Diagram it's just a little harder to understand . Thanks, Alex
18.05.2016 - 16:05DROPS Design respondió:
Dear Alexandra, then follow the legend to diagram, and start reading diagram from the bottom corner on the right side towards the left every round. 1 square = 1 st x 1 round. Read more here. Happy knitting!
18.05.2016 - 17:11
![]() Alexandra escribió:
Alexandra escribió:
Okay What about the empty space at the bottom of the diagrams? What is that about? I'm sorry I'm new and to doING and reading diagrams. Thank you, Alexandra
18.05.2016 - 04:38DROPS Design respondió:
Dear Alexandra, an empty space can be added at the bottom of a diagram when there are less sts on some rows before you inc and get then more sts than on previous rows. Maybe you could ask your question on the pattern you are thinking about, it might help to make an accurate answer. Happy knitting!
18.05.2016 - 09:23
![]() Alexandra Dick escribió:
Alexandra Dick escribió:
I am wondering about the pattern for 103-10 are you to read the diagram from top to bottom or bottom to top? And is it read right to left or left to right? And what are the empty space at the bottom of diagram ment for? And are you to repeat pattern like the M1 it was p1,k4,p1,k4 do you continue doing that for a whole round? I tried finding a video to help but was unable to . Thank you
29.04.2016 - 05:27DROPS Design respondió:
Dear Mrs Dick, diagrams are read from bottom up starting on the corner on the right side, every round from the right towards the left (see here) 1st round in M1 will be workd; (K4, P1,K4, P1) repeat from (to) over all sts on round. Happy knitting!
29.04.2016 - 09:09
![]() Birgitt escribió:
Birgitt escribió:
Hallo, danke für die schnelle Antwort. Genau so habe ich die Anleitung auch verstanden, hatte schon bedenken, ich hätte es nicht kapiert. Meinem Mann ist das aber -zu langweilig- (OTon). Da ich für ihn die Maschenzahl ohnehin ändern muss, bekommt er auf der Rückseite M3 gestrickt (bis FerseI und in den linken Maschen zw. beiden Mustern kann ich super die Abnahmen für die Wade vornehmen. Gruß Birgitt
14.03.2016 - 19:03
|
||||||||||||||||||||||
Hilde & Winter |
||||||||||||||||||||||
|
|
||||||||||||||||||||||
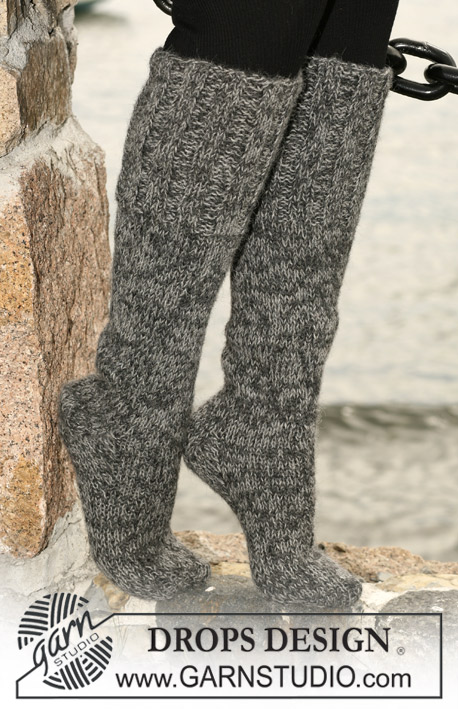
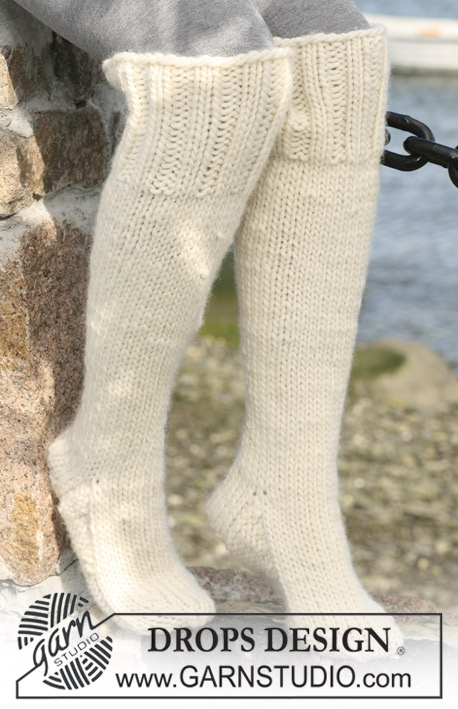
Calcetas (medias) altas DROPS en “Karisma Superwash” con torsadas (trenzas) y doblez en las orillas.
DROPS 103-10 |
||||||||||||||||||||||
|
Resorte: * 2d, 3r *, repetir de *a*. Patrón: Ver diagrama M.1, M.2 y M.3. Los diagramas son vistos por el lado derecho (LD). Disminuciones del talón: Vuelta 1 (= LD): Tejer de derecho hasta tener 7-8-9 pts restantes en la ag, desl el sig pt al derecho, 1d, pasar pt desl por encima. Vuelta 2 (= LR): Tejer de revés hasta tener 7-8-9 pts restantes en la ag, desl el sig pt al revés, 1r, pasar pt desl por encima. Vuelta 3 (= LD): Tejer de derecho hasta tener 6-7-8 pts restantes en la ag, desl el sig pt al derecho, 1d, pasar pt desl por encima. Vuelta 4 (= LR): Tejer de revés hasta tener 6-7-8 pts restantes en la ag, desl el sig pt al revés, 1r, pasar pt desl por encima. Vuelta 5 (= LD): Tejer de derecho hasta tener 5-6-7 pts restantes en la ag, desl el sig pt al derecho, 1d, pasar pt desl por encima. Vuelta 6 (= LR): Tejer de revés hasta tener 5-6-7 pts restantes en la ag, desl el sig pt al revés, 1r, pasar pt desl por encima. Continuar hasta tener 1 pt restante menos antes de desl 1 pt. Continuar hasta tener 8-10-12 pts restantes en la ag. Calcetas: La pieza se teje en redondo desde el centro posterior. Mon 80-90-100 pts en ag de doble punta tamaño 3.5 mm con Karisma y tejer en pt resorte – ver explicación arriba. Cuando el resorte mida 2 cm continuar con el diagrama M.1. Cuando la pieza mida 20 cm girar la labor – es decir, continuar tejiendo por el LR (los 20 cm que se han tejido serán el doblez cuando la calceta esté terminada). Tejer 1 vta al derecho al mismo tiempo que dism 14-18-22 pts distribuidos equitativamente = 66-72-78 pts. Tejer 1 vta al revés. Colocar 1 marcapuntos (MP) en la labor. Continuar midiendo desde este punto en adelante. Tejer la sig vta así: Tejer al revés los primeros 15-18-21 pts, M.2 (= 36 pts), tejer al revés los últimos 15-18-21 pts. Cuando la pieza mida 5 cm, dism 1 pt en cada lado de M.2 cada 2 cm un total de 11-12-13 veces (dism tejiendo 2 pjr) = 44-48-52 pts. Cuando la pieza mida 33-36-39 cm desl los 24 pts centrales arriba del pie a un hilo. Luego tejer 5-5½-6 cm en pt jersey sobre los restantes 20-24-28 pts atrás (= talón). Luego dism para el talón – leer Disminuciones del talón arriba. Después de la dism del talón levantar 11-13-15 pts en cada lado del talón. Distribuir todos los pts en ag de doble punta = 54-60-66 pts. Tejer M.3 sobre los 24 pts centrales arriba del pie (los pts restantes en pt jersey). Al mismo tiempo dism así: tejer 2 pjd antes de M.3 y luego 2d retorcidos juntos después de M.3 (es decir, retorcer tejiendo por la hebra posterior del pt en vez de por delante) en vtas alternas un total de 6 veces = 42-48-54 pts. Tejer hasta que el pie mida aprox 18-20-22 cm medidos desde la orilla del talón (es decir, donde empiezan las dism del talón). Ahora cont con pt jersey sobre todos los pts. Colocar 1 marcapuntos (MP) en cada lado del pie, es decir, 22-24-26 pts arriba del pie y 20-24-28 pts debajo del pie. Dism para los dedos en ambos lados de cada MP así: tejer 2 pjd antes del MP y 2d retorcidos juntos después del MP. Repetir la dism en vtas alternas un total de 3 veces = 30-36-42 pts. Continuar dism en cada vta un total de 6-7-9 veces = 6-8-6 pts. Pasar el hilo a través de los pts restantes y entretejer cabos. |
||||||||||||||||||||||
Explicaciones del diagrama |
||||||||||||||||||||||
|
||||||||||||||||||||||
 |
||||||||||||||||||||||
¿Terminaste este patrón?Entonces, etiqueta tus fotos con #dropspattern o envíalas a la galería #dropsfan. ¿Necesitas ayuda con este patrón?Encontrarás 15 videos tutoriales, un espacio para comentarios/preguntas y más visitando la página del patrón en garnstudio.com © 1982-2026 DROPS Design A/S. Todos los derechos reservados. Este documento, incluyendo todas sus sub-secciones, está protegido por los derechos de autor (copyright). Lee más acerca de lo que puedes hacer con nuestros patrones en la parte de abajo de cada patrón de nuestro sitio. |
||||||||||||||||||||||


Con más de 40 años en el diseño de modelos de punto y de ganchillo, DROPS Design ofrece una de las más vastas colecciones de patrones gratuitos en el internet - traducidos en 17 idiomas. Al día de hoy, contamos con 324 catálogos y 12290 patrones - de los cuales 11685 están traducidos en español.
Nosotros trabajamos con mucho esmero para brindarte lo mejor que las labores de punto y ganchillo tienen para ofrecer,inspiración y consejos, así como hilos de magnífica calidad a precios increíbles! Te gustaría usar nuestros patrones para otro fin además del uso personal? Puedes leer acerca de lo que estás permitida a hacer en el texto de Copyright en la parte de abajo de todos nuestros patrones. Felices labores!
Escribe un comentario sobre DROPS 103-10
¡Nos encantaría saber qué piensas acerca de este patrón!
Si quieres escribir una pregunta referente al patrón, por favor asegúrate de elegir la categoría correcta en el formulario debajo, para acelerar el proceso de respuesta. Los campos obligatorios están marcados con un *.