
Categorías populares
¿Buscas un hilo?


Comentarios / Preguntas (285)
![]() Sharon escribió:
Sharon escribió:
Hi! Thanks for your response, but it is impossible to pick up 36 or 42 sts. If i do there er large gaps. Had to pick up more sts and decreased. the YO is not the problem its the amount of stitches to pic up.
24.01.2022 - 08:18DROPS Design respondió:
Dear Sharon, remember that you don't have to pick up sts along the 16 sts on each front piece; this mean just pick up 8 sts on each front piece + 24 sts on neckline back piece = 42 sts. Should you get more/less sts, you can then adjust on first row. Happy knitting!
24.01.2022 - 10:25
![]() Sharon escribió:
Sharon escribió:
Hi, am picking for the collar on the largest size of the Nepal version. My question is how do i pick up so there er no large gaps between the picked up stitches. I tried twice and ripped put because there were too many stitches and when i tried to pick up 42 stitches there were large gaps between stitches as mentioned. So how do I solve this problem.
23.01.2022 - 00:16DROPS Design respondió:
Hi Sharon, If you get large gaps between the stitches, when you first work the knitted-up stitches, work them twisted (i.e. in the back loop). This should avoid holes. Happy knitting!
24.01.2022 - 08:05
![]() Sharon escribió:
Sharon escribió:
Sorry i have to ask a question about Silver Haze size 52 (made in Nepal)I have 108 stitches on the needles after casting off 3 stitches on both sides for armhole. When I decrease 2 stitches 5 times and the instructions thereafter I end up with the wrong amount of stitches. I cannot seem to get this correct. What am I missing? S
16.01.2022 - 15:11DROPS Design respondió:
Dear Sharon, if you are working the largest size, you need to decrease: 3 sts twice on each side (=12 stitches), 2 stitches 5 times on each side (= 20 stitches) and 1 stitch 4 times on each side (= 8 stitches). So you need to have 114-40 stitches= 74 stitches. Happy knitting!
17.01.2022 - 00:57
![]() Sharon escribió:
Sharon escribió:
Hi, am making the Nepal version of this sweater. How many stitches should i pick up for the collar? Thanks for your response. S
29.12.2021 - 22:45DROPS Design respondió:
Hi Sharon, follow the pattern, i.e. pick up approx. 36 to 42 sts in between the MT at the neck line (i.e do not pick up sts in the outer most 16 sts each side at the mid front). Happy knitting!
30.12.2021 - 09:20
![]() Sharon escribió:
Sharon escribió:
Hi am making Silver Haze again, but with short sleeves. 15 inches is still to long for med and would be a long sleeve. Should I start to increase earlier than stated in the pattern. If so at what point?
22.12.2021 - 10:42DROPS Design respondió:
Dear Sharon, we are unfortunately unable to adjust every pattern to every single request, you can try to take inspiration from a similar pattern - same tension and the desired length of sleeve or ask the store where you bought the yarn for any individual assistance. You can even ask other knitters in our group DROPS Workshop. Thanks for your comprehension.
22.12.2021 - 15:48
![]() Sharon escribió:
Sharon escribió:
Which row do i start on for the left front so the pattern matches? Reversing the pattern so that the stockinett stitches faces each other is ok. But how do I knit this so pattern is symmetrical.
20.11.2021 - 02:01DROPS Design respondió:
Dear Sharon, just work in pattern as for first piece, ie follow "double seed stitch" the same way (P2, K2 on first row from RS). Happy knitting!
22.11.2021 - 07:43
![]() Sharon escribió:
Sharon escribió:
Hi, Sharon again making size 52 Silver Haze with snow. Made the sleeve twice and had to redo. I would like a sleeve a longer than the short version. Following the instruction for the short version is too small in width. The instruction for the long sleeves is perfect with but way too long. Suggestion is appreciate. Sharon
18.11.2021 - 20:01DROPS Design respondió:
Dear Sharon, we are unfortunately not able to adjust every pattern to every single request, please contact your DROPS store or any knitting forum for any individual assistance adjusting the pattern as you would like it to be. Thanks for your comprehension. Happy knitting!
19.11.2021 - 07:16
![]() Sharon escribió:
Sharon escribió:
Hi. Thanks so much. Everything worked out from the explanation i received. Sharon
18.11.2021 - 16:34
![]() Sharon escribió:
Sharon escribió:
Is there a problem withthe snow version size 52. Largest size. Am here: when the piece measures 35-36-37-38-39-40 cm [13¾”- 14¼”- 14½”- 15”- 15¼“-15¾”] bind off for armholes in the beg of every row each side: 3 sts 1 time, 2 sts 0-0-1-2-3-3 times and 1 st 1-2-3-3-3-4 times = 40-42-42-44-46-48 sts left. won’t be left with 48 stitches after the decreases. Shouldn’t the stitches after decrease be 58. First Dec. instructions says to decrease 3 st. 1 time. There is 2 armholes.
17.11.2021 - 21:23DROPS Design respondió:
Dear Sharon, in Snow largest size you have 74 sts, then cast off 3 sts at the beg of next 2 row (3 sts on each side) = 68 sts, then cast off 2 sts at the beg of next 6 rows (3 times 2 sts on each side) = 68-12=56 sts; then cast off 1 stitch at the beg of next 8 rows (4 times 1 st on each side) = 56-8=48 sts. Can this help?
18.11.2021 - 08:38
![]() Sharon escribió:
Sharon escribió:
Hi, the instructions says to increase 1 stitch at the side for the front and there after every x amount of rows. Making largest side. how many rows equals 3 cm? I worked it out and I got 7 rows. Could be wrong. Is the hem a slanted shape? Is there a gauge for the seed stitch? Am confused.
09.11.2021 - 15:48DROPS Design respondió:
Dear Sharon, the number of rows depend on your exact gauge (which might be different for every individual. The pattern itself works with 15 rows = 10 cm. . Please make a gauge swatch, wash, and then measure. The hem should be straight. Happy stitching!.
09.11.2021 - 21:41
|
|
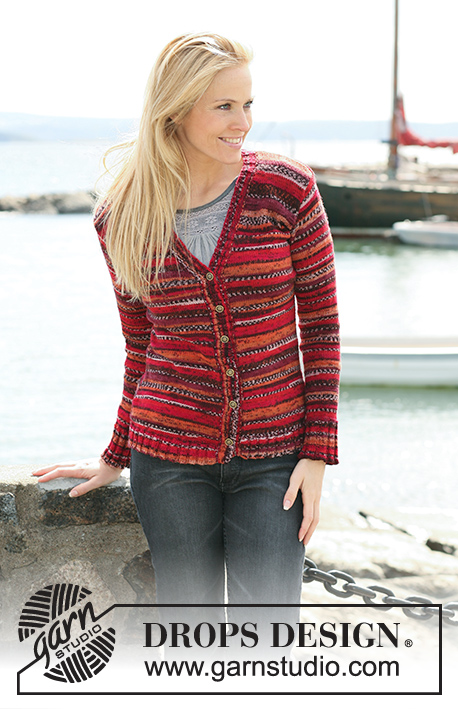
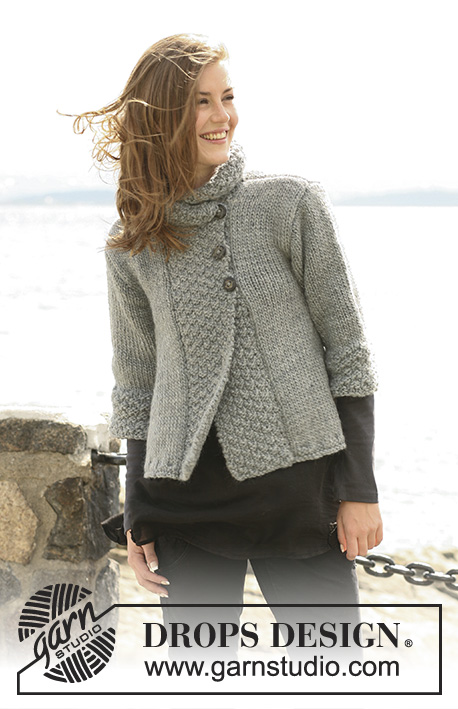
Silver Haze |
|
 |
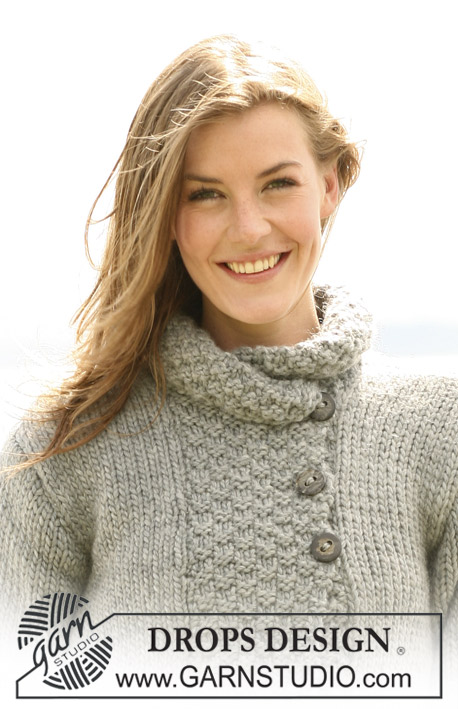 |
Saco DROPS en “Snow”, “Andes” o “Nepal” con mangas en A y ¾ o mangas largas. Talla S a XXXL.
DROPS 103-1 |
|
|
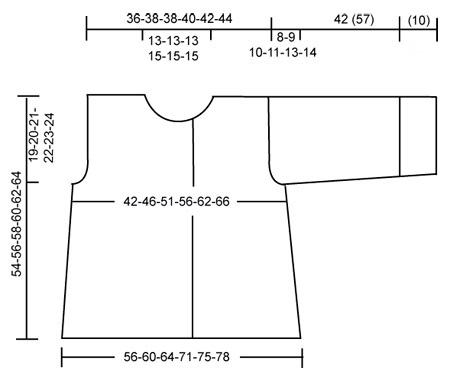
Comentario general: Los puntos arroz doble al frente tensarán un poco la prenda mientras se teje, pero darán de sí una vez esté terminada la pieza. Muestra: 11 pts x 15 vtas en puntada jersey = 10 x 10 cm. Punto arroz doble: Vuelta 1: *2r, 2d*, repetir de *a*. Vuelta 2: revés sobre revés y derecho sobre derecho. Vuelta 3: *2d, 2r*, repetir de *a* Vuelta 4: derecho sobre derecho y revés sobre revés Repetir Vuelta 1-4. Punto resorte: *2d, 2r*, repetir de *a*. Punto musgo: todas las vueltas del derecho. Ojales: rem para los ojales en la pieza delantera derecha. 1 ojal = rem el 4º pt desde la orilla, en la vta de retorno mon un nuevo pt en el mismo lugar. Rem para los ojales cuando la pieza mida: Talla S: 33, 40 y 47 cm. Talla M: 35, 42 y 49 cm. Talla L: 37, 44 y 51 cm. Talla XL: 38, 45 y 52 cm. Talla XXL: 38, 46 y 54 cm. Talla XXXL: 38, 47 y 56 cm. Espalda: Tejer de ida y vuelta! Mon 64-68-72-80-84-88 pts (incluye 1 pt de orillo a cada lado) en ag tamaño 8 mm con Snow. Tejer 2 vtas punto musgo, y luego 2 vtas de pt resorte con 1 pt de orillo y 2 d a cada lado (visto por el LD) – ver explicación arriba. Cont en pt jersey. Recuerde tejer la muestra! Cuando la pieza mida 5 cm rem 1 pt a cada lado cada 3½-3½-4½-4-5-5 cm un total de 8-8-7-8-7-7 veces = 48-52-58-64-70-74 pts. Cuando la pieza mida 35-36-37-38-39-40 cm rem para las sisas a cada lado en vtas alternas: 3 pts 1 vez, 2 pts 0-0-1-2-3-3 veces y 1 pt 1-2-3-3-3-4 veces = 40-42-42-44-46-46 pts restantes. Cuando la pieza mida 51-53-55-57-59-61 cm rem los 12-12-12-14-14-14 pts centrales para el cuello. En la sig vta rem 1 pt adicional hacia el cuello = 13-14-14-14-15-16 pts restantes para cada hombro. Rem cuando la pieza mida 54-56-58-60-62-64 cm. Pieza delantera izquierda: Mon 39-41-43-49-51-53 pts (incluyendo 1 pt de orillo a un lado) en ag tamaño 8 mm con Snow. Tejer 2 vtas pt musgo y luego 2 vtas de pt resorte con 1 pt de orillo y 2 r a un lado (visto por el LD). Cont en pt jersey y 14-14-14-16-16-16 pts en el delantero central en pt arroz doble – ver explicación arriba! Cuando la pieza mida 5 cm rem a un lado como lo hizo para la pieza de la espalda = 31-33-36-41-44-46 pts. Cuando la pieza mida 35-36-37-38-39-40 cm rem para la sisa a un lado como lo hizo para la pieza de la espalda espalda = 27-28-28-31-32-33 pts. Cuando la pieza mida 49-51-53-54-56-58 cm rem 10 pts en el delantero central para el cuello. Colocar un marcapuntos (MP) después de los pts rem. Luego rem para el cuello en vtas alternas: 2 pts 2-2-2-3-3-3 veces y 1 pt 0-0-0-1-1-1 veces = 13-14-14-14-15-16 pts restantes para el hombro. Rem los pts restantes cuando la pieza mida 54-56-58-60-62-64 cm. Pieza delantera derecha: Mon y tejer como la pieza delantera izquierda pero a la inversa. Adicionalmente, recuerde rem para los ojales en la orilla delantera – ver explicación arriba. Manga: Los números antes del () aplican para las mangas ¾ y los números dentro del () aplican para las mangas largas. Mon 34-34-34-38-38-38 pts (incluyendo 1 pt de orillo a cada lado) en ag tamaño 8 mm con Snow. Tejer en pt arroz doble – ver explicación arriba – con 1 pt de orillo a cada lado. Cuando la pieza mida 10 cm cont en pt jersey. Al mismo tiempo cuando la pieza mida 11 (25) cm aum 1 pt a cada lado cada 9-6-4½-6-4-2½ cm un total de 3-4-5-4-5-7 veces = 40-42-44-46-48-52 pts. Cuando la pieza mida 34-33-32-31-29-28 (49-48-47-46-44-43) cm rem para el copete de manga a cada lado en vtas alternas: 3 pts 1 vez, 2 pts 1 vez y 1 pt 2-3-4-4-6-7 veces, cont rem 2 pts a cada lado hasta que la pieza mida 40 (55) cm, luego rem 3 pts a cada lado 1 vez y rem los pts restantes. La pieza mide aprox 42 (57) cm. Terminación: Coser hombros. Cuello: Levantar aprox 24 a 28 pts entre el MP en la línea del escote (es decir, no levantar pts en los 10 pts más externos a cada lado en el delantero central). Tejer 2 vtas pt musgo – en la última vta aum 10 pts distribuidos equitativamente = 34-38 pts. Cont en pt arroz doble con 1 pt musgo a cada lado. Al mismo tiempo aum 2 pts a cada lado como sigue: Para aum tejer 2d en el pt más externo, luego tejer 1 heb (lazada), la cual deberá ser retorcida en la vta de retorno – incorporar los nuevos pts al patrón conforme avanza. Aum 2 pts al inicio de la vta un total de 6 veces a cada lado = 24 pts extra = un total de 58-62 pts. Rem cuando el cuello mida 12 cm centro posterior. Coser el cuello ajustado a las piezas delanteras a cada lado en la parte externa de la orilla, es decir, los pts nuevos son cosidos a los 10 pts rem a cada lado. Coser las costuras de brazos y laterales dentro de 1 pt de orillo. Coser botones. ______________________________________________________________ NEPAL Talla: S – M – L – XL – XXL – XXXL Materiales: DROPS NEPAL de Garnstudio Mangas ¾: 600-650-750-800-900-1000 g color No. 517, gris medio Mangas largas: 700-750-800-900-1000-1050 g color No. 517, gris medio Agujas rectas DROPS tamaño 4.5 mm – o el tamaño necesario para obtener la muestra correcta. Botones DROPS Buffelhorn No. 536: 3 pzs. Muestra: 17 pts x 22 vtas en puntada jersey = 10 x 10 cm Punto arroz doble: Vuelta 1: *2r, 2d*, repetir de *a* Vuelta 2: revés sobre revés y derecho sobre derecho. Vuelta 3: *2d, 2r*, repetir de *a* Vuelta 4: derecho sobre derecho y revés sobre revés. Repetir vuelta 1-4. Punto resorte: *2d, 2r*, repetir de *a*. Punto musgo: todas las vtas del derecho. Ojales: Rem para los ojales en la pieza delantera derecha. 1 ojal = rem el 5º y 6º pt desde la orilla y en la vta de retorno mon 2 nuevos pts en el mismo lugar. Rem para los ojales cuando la pieza mida: Talla S: 33, 40 y 47 cm. Talla M: 35, 42 y 49 cm. Talla L: 37, 44 y 51 cm. Talla XL: 38, 45 y 52 cm. Talla XXL: 38, 46 y 54 cm. Talla XXXL: 38, 47 y 56 cm. Espalda: Tejer de ida y vuelta! Mon 96-104-112-124-132-136 pts (incluye 1 pt de orillo a cada lado) en ag tamaño 4.5 mm con Nepal. Tejer 2 vtas pt musgo, y luego 2 vtas pt resorte con 1 pt de orillo y 2 d a cada lado (visto por el LD) – ver explicación arriba. Cont en pt jersey. Recuerde tejer la muestra! Cuando la pieza mida 5 cm rem 1 pt a cada lado cada 2½-2½-2½-2½-2½-3 cm un total de 11-12-12-13-12-11 veces = 74-80-88-98-108-114 pts. Cuando la pieza mida 35-36-37-38-39-40 cm rem para las sisas a cada lado en vtas alternas: 3 pts 1-1-1-2-2-2 veces, 2 pts 0-1-2-3-4-5 veces y 1 pt 3-3-4-3-4-4 veces = 62-64-66-68-72-74 pts restantes. Cuando la pieza mida 51-53-55-57-59-61 cm rem los 20-20-20-24-24-24 pts centrales para el cuello. En la sig vta rem 1 pt adicional hacia el cuello = 20-21-22-21-23-24 pts restantes para cada hombro. Rem cuando la pieza mida 54-56-58-60-62-64 cm. Pieza delantera izquierda: Mon 59-63-67-75-79-81 pts (incluye 1 pt de orillo a un lado) en ag tamaño 4.5 mm con Nepal. Tejer 2 vtas pt musgo y luego 2 vtas de pt resorte con 1 pt de orillo y 2r a un lado (visto por el LD). Cont en pt jersey y 22-22-22-26-26-26 pts del delantero central en pt arroz doble – ver explicación arriba! Cuando la pieza mida 5 cm rem a un lado como lo hizo para la pieza de la espalda = 48-51-55-62-67-70 pts. Cuando la pieza mida 35-36-37-38-39-40 cm rem para la sisa a un lado como lo hizo para la pieza de la espalda = 42-43-44-47-49-50 pts. Cuando la pieza mida 49-51-53-54-56-58 cm rem 16 pts en el delantero central para el cuello. Colocar 1 marcapuntos (MP) después de los pts rem. Luego rem para el cuello en vtas alternas: 2 pts 2-2-2-4-4-4 veces y 1 pt 2 veces = 20-21-22-21-23-24 pts restantes para el hombro. Rem los pts restantes cuando la pieza mida 54-56-58-60-62-64 cm. Pieza delantera derecha: Mon y tejer como la pieza delantera izquierda, pero a la inversa. Adicionalmente, recuerde rem para los ojales en la orilla delantera – ver explicación arriba. Manga: Los números antes del () aplican para las mangas ¾ y los números dentro del () aplican para las mangas largas. Mon 50-50-54-54-58-58 pts (incluye 1 pt de orillo a cada lado) en ag tamaño 4.5 mm con Nepal. Tejer en pt arroz doble – ver explicación arriba – con 1 pt de orillo a cada lado. Cuando la pieza mida 10 cm cont en pt jersey. Al mismo tiempo cuando la pieza mida 11 (25) cm aum 1 pt a cada lado cada 5-3-3-2-2-1½ cm un total de 5-7-7-9-9-11 veces = 60-64-68-72-76-80 pts. Cuando la pieza mida 34-33-32-31-29-28 (49-48-47-46-44-43) cm rem para el copete de manga a cada lado en vtas alternas: 3 pts 1 vez, 2 pts 3 veces y 1 pt 1-2-3-4-6-7 veces y cont rem 2 pts a cada lado hasta que la pieza mida 41 (56) cm, luego rem 3 pts a cada lado 1 vez y rem los pts restantes. La pieza mide aprox 42 (57) cm. Terminación: Coser hombros. Cuello: Levantar aprox 36 a 42 pts entre el MP en la línea del escote (es decir, no levantar pts en los 16 pts más externos a cada lado en el delantero central). Tejer 2 vtas pt musgo – en la última vta aum 12 pts distribuidos equitativamente = 48-54 pts. Cont en pt arroz doble con 1 pt musgo a cada lado. Al mismo tiempo aum 2 pts a cada lado como sigue: Para aum tejer 2d en el pt más externo, luego tejer 1 heb (lazada), la cual deberá ser retorcida en la vta de retorno – incorporar los nuevos pts al patrón conforme avanza. Aum 2 pts al inicio de la vta un total de 9 veces a cada lado = 36 pts extras = un total de 84-90 pts. Rem cuando el cuello mida 12 cm centro posterior. Coser el cuello ajustado a las piezas delanteras a cada lado en la parte externa de la orilla, es decir, los nuevos pts son cosidos a los 16 pts rem a cada lado. Coser las costuras de brazos y laterales dentro de 1 pt de orillo. Coser botones. |
|
 |
|
¿Terminaste este patrón?Entonces, etiqueta tus fotos con #dropspattern o envíalas a la galería #dropsfan. ¿Necesitas ayuda con este patrón?Encontrarás 19 videos tutoriales, un espacio para comentarios/preguntas y más visitando la página del patrón en garnstudio.com © 1982-2026 DROPS Design A/S. Todos los derechos reservados. Este documento, incluyendo todas sus sub-secciones, está protegido por los derechos de autor (copyright). Lee más acerca de lo que puedes hacer con nuestros patrones en la parte de abajo de cada patrón de nuestro sitio. |
|


Con más de 40 años en el diseño de modelos de punto y de ganchillo, DROPS Design ofrece una de las más vastas colecciones de patrones gratuitos en el internet - traducidos en 17 idiomas. Al día de hoy, contamos con 325 catálogos y 12298 patrones - de los cuales 11702 están traducidos en español.
Nosotros trabajamos con mucho esmero para brindarte lo mejor que las labores de punto y ganchillo tienen para ofrecer,inspiración y consejos, así como hilos de magnífica calidad a precios increíbles! Te gustaría usar nuestros patrones para otro fin además del uso personal? Puedes leer acerca de lo que estás permitida a hacer en el texto de Copyright en la parte de abajo de todos nuestros patrones. Felices labores!
Escribe un comentario sobre DROPS 103-1
¡Nos encantaría saber qué piensas acerca de este patrón!
Si quieres escribir una pregunta referente al patrón, por favor asegúrate de elegir la categoría correcta en el formulario debajo, para acelerar el proceso de respuesta. Los campos obligatorios están marcados con un *.