
Categorías populares
¿Buscas un hilo?


Comentarios / Preguntas (22)
![]() Monnier escribió:
Monnier escribió:
Bonjour, je ne comprends pas ce que vous appelez les sections : "augmenter une maille dans chacune des 3 sections". Merci d'avance
24.03.2025 - 15:44DROPS Design respondió:
Bonjour Mme Monnier, vous devez augmenter le nombre de mailles envers des côtes, autrement dit, les 3 fois 3 mailles envers à la pointe du châle doivent être augmentées à 4 mailles envers - gardez bien 3 mailles envers le long des 2 diagonales. Recommencez ensuite à 5 cm de bordure, vous aurez cette fois 5 mailles envers dans ces 3 sections en mailles envers des côtes, et toujours 3 mailles envers dans les autres le long des 2 diagonales. Bon tricot!
25.03.2025 - 08:51
![]() Marie Arlette Dubernet escribió:
Marie Arlette Dubernet escribió:
Faut il faire une augmentation de chaque côté tous les 2 rgs ou tous les rgs Jusqu'à 5cm . Je ne comprends pas la suite des explications après 5cm Modele drops 100-4
10.01.2025 - 17:09DROPS Design respondió:
Bonjour Mme Dubernet, vous augmentez 1 maille de chaque côté à 3 mailles du bord tous les 2 rangs (correction à venir) jusqu'à la fin, et, en même temps, vous augmentez le nombre de mailles envers: à 5 cm vous augmentez pour passer en côtes 3 m endroit, 4 m envers et à 9 cm, vous augmenter pour passer en côtes 3 m endroit, 5 m envers. Bon tricot!
13.01.2025 - 08:29
![]() Anni escribió:
Anni escribió:
I skriver nok å flot, at man blot kan bruge omregneren til at finde alternativt garn. Dette er ikke korrekt. Omregneren kan ikke finde ud af det, når der er tale om to forskellige slags garn. Selvom man angiver at det er to tråde af Vivaldi, kan den ikke finde et alternativ. I bedes derfor angive alternativt garn, tak.
27.12.2018 - 17:56DROPS Design respondió:
Hei Anni. Når du skal finne alternativer for 2 garn, må du skrive dem inn hver for deg. Vivaldi tilhører garngruppe C og kan derfor byttes med andre garn i den gruppen (feks Air), men det som gir likest resultat er Brushed Alpaca Silk. Cotton Merino tilhører garngruppe A, og kan byttes med et hvilket som helst garn i denne gruppen, men om du vil ha et bomullsgarn kan du bruke Safran. Du finner en overiskt over garngruppene her. Vi har nå testet begge disse garnene i garnkalkulatoren og det gikk fint- men de må som sagt puttes inn individuelt. God fornøyelse
02.01.2019 - 11:22
![]() Diana escribió:
Diana escribió:
Hi, as both yarns are not available any more I'd like to knit the shawl with just one yarn. Would you be able to let me know what options there are and how many grams I would need?
16.09.2018 - 20:27DROPS Design respondió:
Dear Diana, you can use our yarn converter to find an alternative for each yarn - read more about alternatives here. Happy knitting!
17.09.2018 - 09:32
![]() Bill Burris escribió:
Bill Burris escribió:
The way I understand this, after picking up stitches for the ribbing we begin with 3 knit stitches and end with 3 knit stitches all along so that they are always garter stitching at both ends. Do we increase in the garters starting with the first three knits or knit 3, ribbing, knit 3 with an increase inside the three then increase at the other end on the return trip? Also do we increase in the garters on every round?
18.02.2018 - 01:16DROPS Design respondió:
Dear Mrs Burris, you will increase after the first 3 sts in garter st on row and before the 3 sts in garter st at the end of row. You increase every other row (this will be added in the pattern) to the end. These new sts will be worked in rib. Then after 5 cm and 9 cm increase also in the 3 bottom P-sections. Happy knitting!
19.02.2018 - 09:39
![]() Bill escribió:
Bill escribió:
Where the instructions say to cast on 7 stitches with 1 strand of each quality, are you knitting with two yarns at the same time?
05.12.2017 - 17:11DROPS Design respondió:
Dear Bill, correct, you will work with 2 yarns at the same time all the way, ie with Cotton Viscose and Vivaldi. Happy knitting!
06.12.2017 - 08:49Athanasia escribió:
Hello again! Why is it necessary to chrochet the borders? Can I pick up the stiches without the chrochet part? Thank you
28.04.2017 - 12:57DROPS Design respondió:
Dear Athanasia, crocheting the edge first will help you to pick up sts evenly and will also make a nice eyelet row between shawl and ribbing. Happy knitting!
28.04.2017 - 13:52Athanasia escribió:
Hello, I have two questions to make. 1. The crochet is done to the three sides of the shawl or just the two sides where the pick-up stiches are made. 2. I don't understand the incorporation of the stiches at the rib. At 5 cm it says add 2 st. at the bottom 3 purl. Ok, I understand that. The 3 st become 5 add we add 6 st in total. At 9 cm says add 2st at the bottom 3 purl. Does it mean that the 5 st now becomes 7? Thank you
06.04.2017 - 12:47DROPS Design respondió:
Dear Athanasia, 1) you crochet the ch-spaces around the shawl, ie along the 3 sides. 2) You will have to inc 1 st each of the the bottom 3 P-sections only, so that you will have P4 after 5 cm in these P-sections and P5 after 9 cm in these P-sections (but still P3 in every other P sections, inc are only made at the bottom tip), pattern will be edited. Happy knitting!
06.04.2017 - 13:53
![]() Mae escribió:
Mae escribió:
Bonjour, Il y a deux choses que je ne comprends pas très bien dans les instructions: 1- quand vous dites "avec 1 fil de chaque qualité" ça veut dire que l'on double le fil? 2 - La bordure, il faut la tricoter à part et l'assembler ensuite? Est-il possible de réaliser ce modèle sans savoir crocheter? Merci de votre aide, Mae
12.12.2016 - 18:46DROPS Design respondió:
Bonjour Mae, le châle se réalise entièrement avec 2 fils: 1 fil Cotton Viscose + 1 fil Vivaldi. La bordure se réalise au tricot, en relevant les mailles le long des 2 diagonales du châle. Bon tricot!
13.12.2016 - 08:47Rebekah escribió:
I'm having trouble understanding how to pick up the stitches for the rib border - can anyone help?
29.04.2016 - 11:35DROPS Design respondió:
Dear Rebekah, the sts are picked up in the crocheted ch-spaces along the 2 diagonal of the shawl, in each ch-space work as follows; pick up 1 st, YO, pick 1 st (= 3 sts in each ch-space) - make sure your number of sts is divisible with 6 + 3. Happy knitting!
29.04.2016 - 11:44
|
|
Upstate#upstateshawl |
|
|
|
|
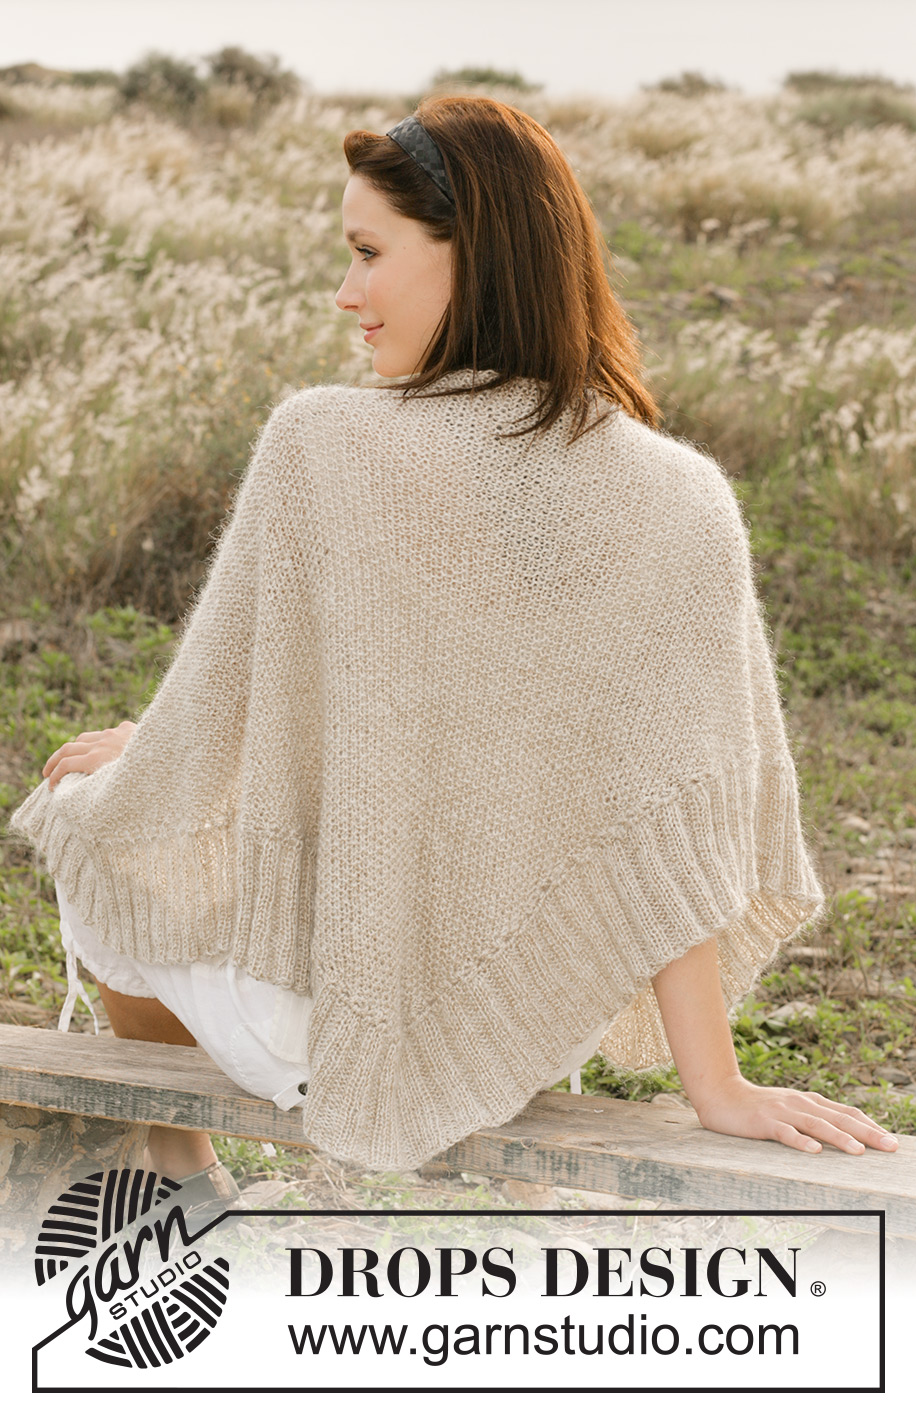
Chal DROPS tejido en punto arroz con “Vivaldi” y “Cotton Viscose”.
DROPS 100-4 |
|
|
TENSIÓN DE LA MUESTRA: 13 pts x 24 filas en ag tamaño 6 mm con 1 hilo de cada calidad en pt arroz = 10 x 10 cm. PUNTO ARROZ: Fila 1: 1 d., 1 r. Fila 2: *d. sobre r. y r. sobre d.*. Repetir la fila 2. TIP-1 PARA LOS AUMENTOS: Aum al final de cada fila como sigue: Trabajar 2 pts de derecho en el últimos pt, incorporar los pts nuevos dentro del patrón. TIP-2 PARA LOS AUMENTOS: Aum dentro de 3 pts en pt musgo como sigue: Hacer un HEB (lazada), en la fila de vta trabajar la HEB de derecho retorcido (para retorcer el pt, tejer por detrás del pt en vez de por delante). TIP PARA TOMAR LAS MEDIDAS: Debido al peso de la lana, hacer todas las mediciones con la pieza suspendida, de lo contrario quedará muy largo cuando se use. PUNTO MUSGO (de ida y vta en ag): trabajar todas las filas de derecho. ---------------------------------------------------------------------------------------------------------------------------------------------- CHAL: Mont 7 pts con ag tamaño 6 mm con 1 hilo de cada calidad. Tejer en pt arroz, al mismo tiempo aum 1 pt al final de cada fila - leer TIP-1 PARA LOS AUMENTOS - hasta que la labor mida aprox 66 cm - leer TIP PARA TOMAR LAS MEDIDAS. El ancho en la parte superior del chal mide ahora aprox 127 cm. Rematar flojo. REMATE A GANCHILLO: Trabajar el remate con ag de ganchillo tamaño 5 mm con 1 hilo de cada calidad hacia abajo a lo largo de uno de los lados como sigue: 1 p.b. en el 1er pt en la parte superior del lado, *2 p.de cad., saltar 2 pts y 1 p.b. en el sig pt*, repetir de * a * = 39-41 (divisible por 2 + 1 ) arcos de p.de cad. - asegúrate de finalizar con 1 p.b. en la esquina inferior del borde de montaje. Continuar trabajando en el borde de montaje como sigue: * 2 p.de cad, saltar 1 pt, 1 p.b. en el sig pt*, repetir de * a * un total de 3 vcs = 3 arcos de p.de cad. en el borde de montaje. Continuar trabajando hacia arriba a lo largo del otro lado de la misma manera que en el primer lado - asegúrate de finalizar con 1 p.b. en la esquina superior = 39-41 (divisible por 2 + 1 ) arcos de p.de cad. Continuar trabajando en el borde de remate como sigue: *2 p.de cad, saltar 2 pts, 1 p.b.*, repetir de * a * y finalizar con un p.e. en el p.b. del inicio de la vta. BORDE EN PT ELÁSTICO: Trabajar a lo largo de ambos lados con ag circular tamaño 5.5 mm y 1 hilo de cada calidad. Recoger 3 pts en cada arco como sigue: 1 pt, 1 HEB, 1 pt = 243-261 pts (divisible por 6 + 3). Ahora LEER TODA LA SECCIÓN SIGUIENTE ANTES DE CONTINUAR! Continuar la sig fila como sigue (visto por el LD): 3 pts en pt musgo - ver explicación arriba, *3 d., 3 r.*, repetir de * a * y finalizar con 3 d. y 3 pts en pt musgo. Al mismo tiempo aum 1 pt a cada lado dentro de los 3 pts en pt musgo - leer TIP-2 PARA LOS AUMENTOS. Incorporar los pts nuevos dentro del patrón del pt elástico. Cuando el borde mida 5 cm aum 1 pt en cada una de las 3 secciones de revés más inferiores, repetir estos aum cuando el elástico mida 9 cm = 5 pts de revés en cada una de las 3 secciones de revés más inferiores. Rematar flojo cuando el borde de pt elástico mida 12 cm |
|
¿Terminaste este patrón?Entonces, etiqueta tus fotos con #dropspattern #upstateshawl o envíalas a la galería #dropsfan. ¿Necesitas ayuda con este patrón?Encontrarás 19 videos tutoriales, un espacio para comentarios/preguntas y más visitando la página del patrón en garnstudio.com © 1982-2026 DROPS Design A/S. Todos los derechos reservados. Este documento, incluyendo todas sus sub-secciones, está protegido por los derechos de autor (copyright). Lee más acerca de lo que puedes hacer con nuestros patrones en la parte de abajo de cada patrón de nuestro sitio. |


Con más de 40 años en el diseño de modelos de punto y de ganchillo, DROPS Design ofrece una de las más vastas colecciones de patrones gratuitos en el internet - traducidos en 17 idiomas. Al día de hoy, contamos con 324 catálogos y 12290 patrones - de los cuales 11675 están traducidos en español.
Nosotros trabajamos con mucho esmero para brindarte lo mejor que las labores de punto y ganchillo tienen para ofrecer,inspiración y consejos, así como hilos de magnífica calidad a precios increíbles! Te gustaría usar nuestros patrones para otro fin además del uso personal? Puedes leer acerca de lo que estás permitida a hacer en el texto de Copyright en la parte de abajo de todos nuestros patrones. Felices labores!
Escribe un comentario sobre DROPS 100-4
¡Nos encantaría saber qué piensas acerca de este patrón!
Si quieres escribir una pregunta referente al patrón, por favor asegúrate de elegir la categoría correcta en el formulario debajo, para acelerar el proceso de respuesta. Los campos obligatorios están marcados con un *.