
Categorías populares
¿Buscas un hilo?


Comentarios / Preguntas (13)
![]() Linda Pine escribió:
Linda Pine escribió:
I am COMPLETELY confused by the instructions for working the stripe pattern "at the same time inc 1 st each side on every and every other row alternately". After reading the questions and answers in the Comments section - I am even MORE confused. Surely there is a better way to describe what should be done.!!!!
06.01.2023 - 16:39
![]() Kathy Tee escribió:
Kathy Tee escribió:
The instructions state “ inc 1 st each side on every and every other row alternately”. What specifically does “every and every other row alternately” mean. Please provide an example in your reply eg. if I have to work a total of 10 rows, on which of those rows do I include the increases.
12.08.2022 - 03:34DROPS Design respondió:
Dear Mrs Tee, this lesson explains how to decrease or increase on every 3rd and 4th row alternately, maybe it can help you to understand how to decrease here on every row (instead of on every 3rd row in the lesson) and 2nd row (instead of every 4th row in the lesson). Hope it can help you.
12.08.2022 - 09:57
![]() Kathy Tee escribió:
Kathy Tee escribió:
In your earlier reply to HCL (05.03.2020 kl. 10:06 ) you advise, ”*1 row with decreases, 1 row with decreases, 1 row without decreases*” which confirms I am to work in the first 2 of every 3 rows, but the decreases would occur on Rows 1, 2, 4, 5, 7, 8, 10, 11, 13 etc. instead. Please confirm which example, either the one shown here or the one in my previous message (12.08.2022 - 00:56.) is correct.
12.08.2022 - 01:33DROPS Design respondió:
Dear Mrs Tee, you can also work that way, you will have decreased the same number of rows at the end with the same number of rows, decreasing alternately on every row and every other row would be more likely as previous comment. Hope it can help.
12.08.2022 - 09:51
![]() Kathy Tee escribió:
Kathy Tee escribió:
Based on your reply to Jane Doe (10.08.2022 kl. 16:14), if for example I worked in pattern for 13 rows, are you indicating the decreases would occur on Rows 1, 3, 4, 6, 7, 9, 10, 12, 13 etc. So, after Rows 1 and 2, I am to then decrease in the first 2 of every next 3 rows. “Row 1 - decrease, Row 2 -no decrease, then *Decrease in next 2 rows, next row (rows 5, 8, 11 etc) no decrease* repeat from *to*”. Is this correct?
12.08.2022 - 00:56DROPS Design respondió:
Dear Mrs Tee, that's correct. Happy knitting!
12.08.2022 - 09:49
![]() Jane Doe escribió:
Jane Doe escribió:
Your answer is incredibly confusing! "you will decrease 1 stitch on both sides of the 2 middle stitches but you should decrease on every row and on every other row alternately, i.e.: *work 1 row with decrease, 1 row without decrease, 1 row with decrease* and repeat from *-*" So, I actually decrease every other row (1 row without decrease, 1 row with decrease). Not every row and every other row alternately.
11.08.2022 - 18:22DROPS Design respondió:
Dear Mrs Doe, sorry for confusion, let me try again - you have to decrease 2 stitches alternately on every row and every other row, this means the decreases might occure from the right side as well as from the wrong side, after 1 row you have decreased 2 sts, after these 3 rows you will have decreased 4 sts. Hope it can help.
12.08.2022 - 09:56
![]() Kathy Tee escribió:
Kathy Tee escribió:
Please provide detailed explanation as to which rows inc’s and dec’s are worked in the following instructions: “inc 1 st each side on every and every other row alternately”, “Continue inc each side, at the same time dec 1 st on both sides of the 2 middle sts on every and every other row alternately”, “discontinue dec in the middle of piece and now dec each side as inc before on every and every row alternately”
10.08.2022 - 16:33
![]() Jane Doe escribió:
Jane Doe escribió:
After joining the two top pieces on the front, I understand that you increase at either end of every row and decrease every other row 2 stitches in the center ? Is this correct?
10.08.2022 - 13:22DROPS Design respondió:
Dear Mrs Doe, not exactly, you will decrease 1 stitch on both sides of the 2 middle stitches but you should decrease on every row and on every other row alternately, i.e.: *work 1 row with decrease, 1 row without decrease, 1 row with decrease* and repeat from *-*. Happy knitting!
10.08.2022 - 16:14
![]() Wilma Keighley escribió:
Wilma Keighley escribió:
Sorry, it’s me again. I’m at the stage where the central deceased have been discontinued and decreases at the edges are happening. I can see that the side decreases are forming the shoulder but it really looks like the central decreases should continue. I am definitely correct that the central decreases should have stopped ;as the pattern says). Even the picture of the jersey looks like the central decreases continue the the end.
16.03.2022 - 15:59
![]() Wilma Keighley escribió:
Wilma Keighley escribió:
Re your reply. Yes tension is fine. What should mid front (where the decrease line is) measure when side measures 52cm?
08.03.2022 - 14:58DROPS Design respondió:
Hi Wilma, When you now continue and start to decrease in each side, the sides will not get any longer, but the mid front will. When piece measures 39-40-42 cm mid front, put piece aside. :)
09.03.2022 - 09:11
![]() Wilma Keighley escribió:
Wilma Keighley escribió:
I am working on the front and the side now measures 52 cm. Looking at the diagram, I think the mid front ought to be about 26 cm but it is much less than this. Have I misunderstood where to measure the side or done something else wrong? Thanks.
07.03.2022 - 23:18DROPS Design respondió:
Dear Mrs Keighley, do you have correct tension? ie 36 rows stocking stitch = 10 cm?
08.03.2022 - 11:09
|
|
City Jungle |
|
 |
 |
Jersey de punto tejido en diagonal en DROPS Alpaca. Tallas S – L.
DROPS 9-18 |
|
|
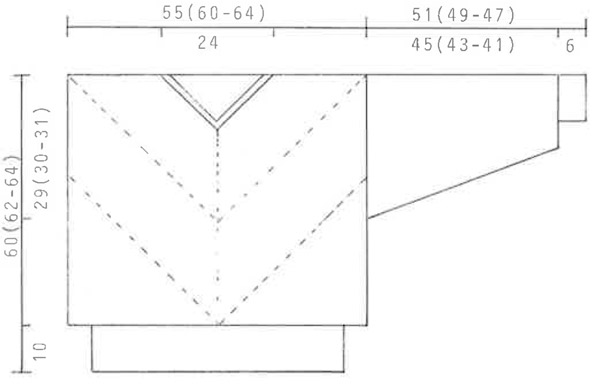
Patrón de rayas: El patrón completo se teje en punto jersey. * 2 hileras negro, 2 hileras beige *, repetir de *a*. Resorte: * 1 derecho retorcido (insertando la aguja en el bucle posterior del punto), 1 revés *. Repetir de *a*. Disminuciones centro del frente: Tejer 2 puntos juntos de derecho (insertando la aguja en el bucle posterior de los puntos) antes de los 2 puntos centrales, 2 puntos juntos de derecho después de los 2 puntos centrales. Por el lado revés tejer 2 puntos juntos de revés (insertando la aguja en el bucle posterior de los puntos) y 2 puntos juntos de revés respectivamente. Frente: Se teje de ida y vuelta en las agujas en 2 piezas, las cuales se tejen juntas después. Montar 3 puntos en agujas tamaño 3 mm con negro y tejer el patrón de rayas, al mismo tiempo aumentar 1 punto a cada lado en cada hilera y a cada 2 hileras alternadamente. ¡Recordar mantener la misma tensión de tejido de la muestra! Cuando haya un total de 99-107-115 puntos en la hilera dejar la pieza a un lado, el lado mide aprox. 28-30-32 cm. Tejer 1 pieza más y ahora deslizar todos los puntos de ambas piezas en la misma aguja tamaño 3 mm = 198-214-230 puntos. Continuar aumentando a cada lado, al mismo tiempo disminuir 1 punto en ambos lados de los 2 puntos centrales en cada hilera y a cada 2 hileras alternadamente – ver arriba. Cuando el lado de la pieza mida 50-52-54 cm, descontinuar las disminuciones en el centro de la pieza y ahora disminuir a cada lado como los aumentos anteriores en cada hilera y a cada 2 hileras alternadamente. Cuando la pieza mida 39-40-42 cm al centro del frente, dejar la pieza a un lado. Espalda: Como la pieza del frente. Mangas: Montar 50-52-54 puntos en agujas de doble punta tamaño 2.5 mm con negro y tejer 6 cm de resorte. Cambiar a agujas de doble punta tamaño 3 mm y continuar en punto jersey y las rayas, al mismo tiempo aumentar 25 puntos distribuidos equitativamente en la primera hilera = 75-77-79 puntos. Al mismo tiempo, después del resorte, aumentar 2 puntos al centro bajo el brazo un total de 35-37-38 veces a cada 4ª vuelta para la talla S y a cada * 3ª y 4ª * hilera alternadamente para la talla M + L = 145-151-155 puntos. Rematar cuando la manga mida 51-49-47 cm. Ensamblaje: Coser las costuras de los hombros. Deslizar los puntos de la pieza del frente y de la espalda en agujas de doble punta tamaño 2.5 mm y tejer 2 cm de resorte con negro, al mismo tiempo disminuir al centro del frente y al centro de la espalda de la manera siguiente: tejer la vuelta hasta los 3 puntos al centro del frente/espalda, deslizar el punto central en la aguja auxiliar al frente de la pieza, tejer juntos de derecho el primer y el tercer punto y pasar el punto central por encima por encima. Disminuir así a cada 4ª vuelta. Rematar después de 2 cm. Coser las costuras de los lados. Levantar aprox. 214-222-230 puntos a lo largo de la orilla inferior del jersey en agujas tamaño 2.5 mm con negro y tejer 10 cm de resorte, rematar. Montar las mangas. |
|
 |
|
¿Terminaste este patrón?Entonces, etiqueta tus fotos con #dropspattern o envíalas a la galería #dropsfan. ¿Necesitas ayuda con este patrón?Encontrarás 27 videos tutoriales, un espacio para comentarios/preguntas y más visitando la página del patrón en garnstudio.com © 1982-2026 DROPS Design A/S. Todos los derechos reservados. Este documento, incluyendo todas sus sub-secciones, está protegido por los derechos de autor (copyright). Lee más acerca de lo que puedes hacer con nuestros patrones en la parte de abajo de cada patrón de nuestro sitio. |
|


Con más de 40 años en el diseño de modelos de punto y de ganchillo, DROPS Design ofrece una de las más vastas colecciones de patrones gratuitos en el internet - traducidos en 17 idiomas. Al día de hoy, contamos con 324 catálogos y 12290 patrones - de los cuales 11685 están traducidos en español.
Nosotros trabajamos con mucho esmero para brindarte lo mejor que las labores de punto y ganchillo tienen para ofrecer,inspiración y consejos, así como hilos de magnífica calidad a precios increíbles! Te gustaría usar nuestros patrones para otro fin además del uso personal? Puedes leer acerca de lo que estás permitida a hacer en el texto de Copyright en la parte de abajo de todos nuestros patrones. Felices labores!
Escribe un comentario sobre DROPS 9-18
¡Nos encantaría saber qué piensas acerca de este patrón!
Si quieres escribir una pregunta referente al patrón, por favor asegúrate de elegir la categoría correcta en el formulario debajo, para acelerar el proceso de respuesta. Los campos obligatorios están marcados con un *.