
Categorías populares
¿Buscas un hilo?


Comentarios / Preguntas (62)
Lusi escribió:
Continue to crochet around the edge of the leg in Puddel as follows. 1st round: 1 sc in each sc around all of the leg (incl the slit at the centre front). Finish with a sl st in the first sc. 2nd round: *3 ch, 1 sc in the following sc*, repeat from *-*, and finish with a sl st in the first ch from beg of round. Cut the thread. can you explain this i dont quite understand
19.03.2014 - 12:13DROPS Design respondió:
Dear Lusi, with Puddel, you will work first 1 round sc all around of the leg (=1 sc in each sc around), then on 2nd round work a ch-loop edge: *ch 3, 1 sc in next sc*, repeat from *-* around. Happy crocheting!
19.03.2014 - 13:47Luci escribió:
What does it mean to crochet back until 1sc left?
19.03.2014 - 11:48DROPS Design respondió:
Dear Lucy, work 1 row sc leaving 1 sc unworked at the end of row. Happy crocheting!
19.03.2014 - 11:55Luci escribió:
What does it mean to crochet back until 1sc left?
19.03.2014 - 11:46
![]() Lucia Green escribió:
Lucia Green escribió:
When I join at the back of the heel I end up with a weird little point at the bottom. It's not rounded like the slipper in the picture appears. I've gone over and over the pattern and don't see that I'm missing a step. It seems like to have a pretty rounded heel I'm going to have to alter the pattern. Did I miss something?
31.10.2013 - 13:32DROPS Design respondió:
Dear Mrs Green, a little point may appear when crocheting heel together, but when wearing them, it shouldn't be that visible. Happy crocheting!
31.10.2013 - 15:49
![]() Soraya Va A Compartir 300 Monedas! escribió:
Soraya Va A Compartir 300 Monedas! escribió:
Este patron tiene una forma elegante y la figura del pie se ve bonita quiero probar haber como queda!
05.08.2013 - 22:55
![]() Maria escribió:
Maria escribió:
Hallo, wenn in Runde 2 steht: "5 fM häkeln", heißt das dann 1 LM + 4 fM oder 1 LM + 5 fM? Wie wird das generell in Ihren Anleitungen gehandhabt? Vielen Dank im Voraus
17.01.2013 - 12:05DROPS Design respondió:
Liebe Maria, in der Häkelinfo finden Sie die Information dazu: „Die erste fM jeder R. wird mit 1 Lm ersetzt“, es wird also nicht in jeder Runde nochmals speziell erwähnt. Viel Spaß beim Häkeln!
17.01.2013 - 13:16Guadalupe Suárez escribió:
Según puedo entender falta la vuelta 9 ya que si continuamos tejiendo con 20 puntos quedará un cono pequeño que no da aumento al pie en la parte del empeine...corríganme si estoy mal, gracias
15.12.2012 - 19:28
![]() DROPS Design escribió:
DROPS Design escribió:
Til hele tøffelen måler ca 22-25-28 cm.
19.01.2012 - 09:18
![]() Lovise escribió:
Lovise escribió:
Hvor mange masker skal jeg hekle frem og tilbake på hælen?
19.01.2012 - 00:03Shaima escribió:
I couldn't make the end of this sock .. i mean this final row that have mini sagged threads .. could anyone help me ??
21.12.2011 - 22:18
|
|
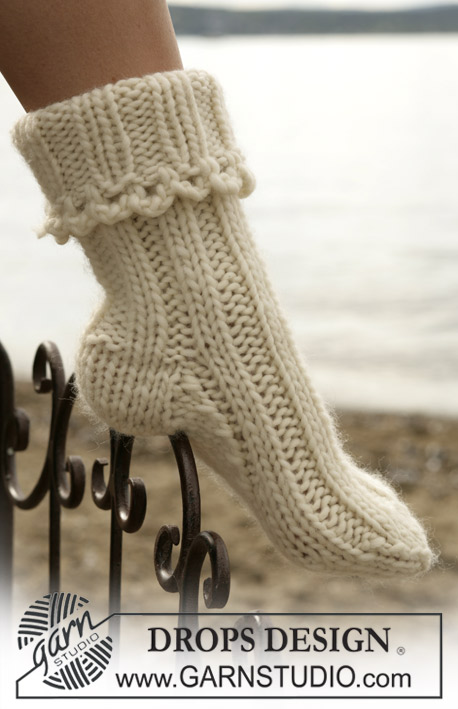
Pom Pom Adore Slippers |
|
|
|
|
Pantuflas DROPS en ganchillo / crochet en “Snow”.
DROPS 98-7 |
|
|
La sección que corresponde al pie de este patrón también se utiliza en los Modelos 25, 26 y 27 de este catálogo. MUESTRA: 11 p.b. = 10 cm de ancho. INFORMACIÓN PARA LA ELABORACIÓN DEL TEJIDO: Sustituir el primer p.b. al inicio de la vta con 1 cad. Terminar cada vta con 1 p.bjs en la cad del inicio de la vta anterior. PIE: Empezar por el dedo grande con Snow y ag de ganchillo tamaño 8 mm de la manera sig: 1ª vuelta: Mon 3 cad y formar un anillo con 1 p.bjs en la primera cad. 2ª vuelta: Tejer 5-5-6 p.b. alrededor del anillo – leer INFORMACIÓN PARA LA ELABORACIÓN DEL TEJIDO! 3ª vuelta: 2 p.b. en cada p.b. = 10-10-12 p.b. 4ª vuelta: * 1 p.b. en el primer p.b., 2 p.b. en el p.b. sig *, repetir de *a* = 15-15-18 p.b. 5ª – 7ª vuelta: 1 p.b. en cada p.b. 8ª vuelta: * 1 p.b. en el primer p.b., 1 p.b. en el segundo p.b. y 2 p.b. en el tercer p.b. *, repetir de *a* = 20-20-24 p.b. Cont tejiendo 1 p.b. dentro de cada p.b. hasta que la pieza mida aprox 11-13-14 cm. TALÓN: Ahora dividir la pieza y tejer de ida y vuelta a partir del centro del empeine – recuerde la INFORMACIÓN PARA LA ELABORACIÓN DEL TEJIDO – 1 p.b. dentro de cada p.b. Cuando la pantufla mida aprox 22-25-28 cm colocarla horizontalmente y unir en el centro posterior con una vuelta de p.b. a través de ambas partes. Cortar el hilo y asegurar. PIERNA: Tejer 1 vta de p.b. alrededor de la abertura de la pantufla (empezando en el centro del frente). Cont la vta con 1 p.b. en cada p.b. hasta que la pierna mida 11 cm, cont tejiendo de ida y vuelta a partir del centro del frente de la manera sig: 1ª vuelta: Virar la pieza y tejer de regreso hasta tener 1 pt restante (el cual deberá quedar sin tejer a partir de ahora). 2ª vuelta: Virar la pieza y tejer de regreso sobre los pts de la vta anterior hasta tener 1 pt restante (el cual deberá quedar sin tejer a partir de ahora) = 2 pts en el centro del frente. 3ª vuelta: Virar la pieza y tejer sobre los pts de la vta anterior. Cortar el hilo. Cont tejiendo alrededor de la orilla de la pierna, en Puddel, de la manera sig: 1ª vuelta: 1 pd.b. en cada p.b. alrededor de toda la pierna (incl la abertura en el centro del frente). Terminar con un p.bjs en el primer p.b. 2ª vuelta: * 3 cad, 1 p.b. en el pt sig *, repetir de *a* y terminar con un p.bjs en la primera cad del inicio de la vta. Cortar el hilo. TERMINACIÓN: Hacer un pompón con un diámetro de 5 cm en Puddel. Coser el pompón a la pantufla, en el centro del frente, entre la pierna y el pie. |
|
¿Terminaste este patrón?Entonces, etiqueta tus fotos con #dropspattern o envíalas a la galería #dropsfan. ¿Necesitas ayuda con este patrón?Encontrarás 9 videos tutoriales, un espacio para comentarios/preguntas y más visitando la página del patrón en garnstudio.com © 1982-2026 DROPS Design A/S. Todos los derechos reservados. Este documento, incluyendo todas sus sub-secciones, está protegido por los derechos de autor (copyright). Lee más acerca de lo que puedes hacer con nuestros patrones en la parte de abajo de cada patrón de nuestro sitio. |


Con más de 40 años en el diseño de modelos de punto y de ganchillo, DROPS Design ofrece una de las más vastas colecciones de patrones gratuitos en el internet - traducidos en 17 idiomas. Al día de hoy, contamos con 324 catálogos y 12290 patrones - de los cuales 11672 están traducidos en español.
Nosotros trabajamos con mucho esmero para brindarte lo mejor que las labores de punto y ganchillo tienen para ofrecer,inspiración y consejos, así como hilos de magnífica calidad a precios increíbles! Te gustaría usar nuestros patrones para otro fin además del uso personal? Puedes leer acerca de lo que estás permitida a hacer en el texto de Copyright en la parte de abajo de todos nuestros patrones. Felices labores!
Escribe un comentario sobre DROPS 98-7
¡Nos encantaría saber qué piensas acerca de este patrón!
Si quieres escribir una pregunta referente al patrón, por favor asegúrate de elegir la categoría correcta en el formulario debajo, para acelerar el proceso de respuesta. Los campos obligatorios están marcados con un *.