
Categorías populares
¿Buscas un hilo?


Comentarios / Preguntas (23)
![]() Kimberley escribió:
Kimberley escribió:
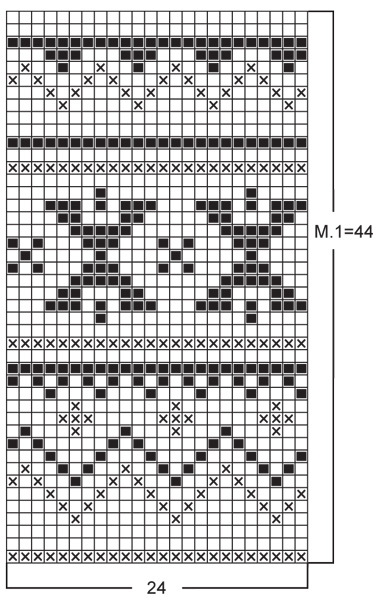
Er staat "alle naalden van het patroon zijn weergegeven op de goede kant en het patroon wordt helemaal in tricotsteek gebreid", betekend dit dat de averechte naalden niet in het telpatroon staan? Moeten de averechte naalden gebreid worden met de kleur die er op dat moment op de naald staat? Of moet ik het nog anders interpreteren?
04.11.2025 - 16:08DROPS Design respondió:
Dag Kimberley,
In de telpatronen zijn alle naalden weergegeven, dus zowel de naalden aan de goede kant als aan de verkeerde kant. Aan de goede kant lees je het telpatroon van rechts naar links en je begint onderaan. De volgende naald aan de verkeerde kant lees je het telpatroon van links naar rechts, enzovoort.
10.12.2025 - 19:39
![]() Lyndsay escribió:
Lyndsay escribió:
Thanks so much for your help - maybe the button band purpose didn't translate over to the English version? I don't see it there, but now I get it - thanks.
13.10.2025 - 20:43
![]() Lyndsay escribió:
Lyndsay escribió:
“Pick up 300-400 sts with natural Alpaca on smaller needles on outer edge of button band. Knit 4 rows stockinette st, bind off. Sew bound-off edge to button band, inside 1 st.” What is this for? Is it backing for the button band? Again, the number of picked up stitches is not specified. How many for XXL? Please can you direct me to relevant photos/video of the finished button band? There are no visible details in the pattern.
08.10.2025 - 02:17DROPS Design respondió:
Dear Lyndsay, as explained in the pattern, the lining is: To cover the pick-up edge on inside of band. You pick up the number of stitches that better fits for your row gauge, on the outer edge of the button band. You knit 4 rows in stocking stitch and bind off. Fasten lining neatly inside 1 st on body. Happy knitting!
12.10.2025 - 21:42
![]() Lyndsau escribió:
Lyndsau escribió:
The finishing instructions are super-confusing. “Button band: Pick up 209-319 sts (divisible by 5 + 4)” Why is this not specified? How many stitches to pick up for XXL? “When edge measures 6-7-7-7-7 cm, inc (as seen from the wrong side) all P 3 to P 4 over the center 38 sts (back neck)” What does this mean? Increase each 3 purls to 4 purls? If so what method of increase and into the 1st, 2nd or 3rd stitch?
08.10.2025 - 02:16DROPS Design respondió:
Dear Lyndsau, the number of stitches should be divisible by 5+4, but we leave the number open so that each can choose the number of stitches that better fits according to your row gauge, which may differ from that of the pattern. The larger the size worked, the closer the number should be to 319 sts (in fact, you can use 319 sts if you wish). As for your second question, you will work the rib (k3, p3). So now you will increase on purl sections of the rib (for example, knit 3, make 1 yarn over, purl 3) so that the rib becomes [knit 3, purl 4] in the next row. It doesn't matter in which of the purl stitches you work the increase, as long as it's in the purl stitches. Happy knitting!
12.10.2025 - 21:31
![]() Lyndsay escribió:
Lyndsay escribió:
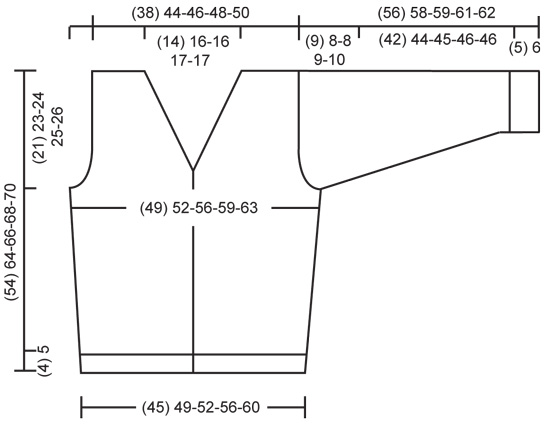
How many stitches should be on the needle when all of the deceases for the top of the sleeve are complete (= bound of stitches)?
08.10.2025 - 00:41DROPS Design respondió:
Hi Lyndsay, Depending on the size you are working, there should be (21) 24-26-26-28 shoulder-stitches left when you bind off. Regards, Drops Team.
08.10.2025 - 06:40
![]() Adri escribió:
Adri escribió:
I want to knit the button band seperately in 2 pieces. How many stitches should I have for each side in XXL. Thank you
05.07.2025 - 03:02DROPS Design respondió:
Dear Adri, you should have approx. half, but maybe not exactly; pick up stitches along the first front piece up to exactly the mid-back and then pick up the same amount on the other side. Happy knitting!
06.07.2025 - 22:54
![]() Loelia escribió:
Loelia escribió:
Good morning, would it be possible to know how much yarn is needed for just the shawl collar as I would like to make this in a contrasting colour. By collar I mean the rib all the way from the bottom front up and round the neck and back down the other side (not just the rib at the neckline). Many thanks.
09.07.2024 - 10:46DROPS Design respondió:
Dear Loelia, please understand that a) this pattern was designed many years ago, b) we have thousands of patterns available on our site, thus we are sorry, but we cannot modify them to each individual request, like redesigning and recalculating the collar). Happy Knitting!
09.07.2024 - 14:32
![]() Amanda Karlsson escribió:
Amanda Karlsson escribió:
Does the pattern continue after I have separated the fronts from the back?
18.01.2023 - 11:35DROPS Design respondió:
Dear Mrs Karlsson, yes, if the diagram M.1 is not done when you divide piece, continue the pattern on each front pieces/back piece - making sure to line it up over the first part before dividing. Happy knitting!
18.01.2023 - 16:59
![]() Joan Høst escribió:
Joan Høst escribió:
Hvad er en ærmepind. Skal/kan man strikke ærmerne på rundpind?
03.01.2023 - 14:09DROPS Design respondió:
Hej Joan, det er samme som strømpepinde, du kan vælge at strikke på strømpepinde eller lille rundpind :)
05.01.2023 - 10:35
![]() Joan Høst escribió:
Joan Høst escribió:
Man skal på ryg og forstykke starte med at tage ud når arbejdet måler 6 cm (str. XL) Når I skriver arbejdet er det så hele arbejdet eller er det efter ribben? Når jeg har strikket ribben og 2 p retstrik måler arbejdet allerede 7 cm
10.11.2022 - 19:41DROPS Design respondió:
Hej Joan, det er hele arbejdet (incl ribben), se også måleskitsen nederst i opskriften :)
11.11.2022 - 14:58
|
||||||||||
Winter Lodge |
||||||||||
 |
 |
|||||||||
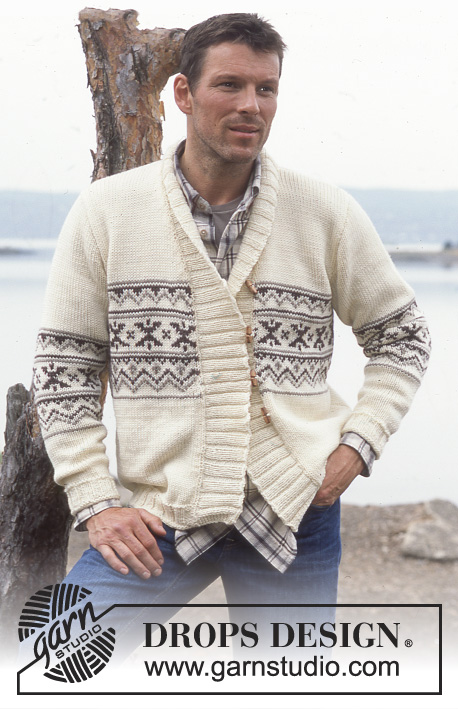
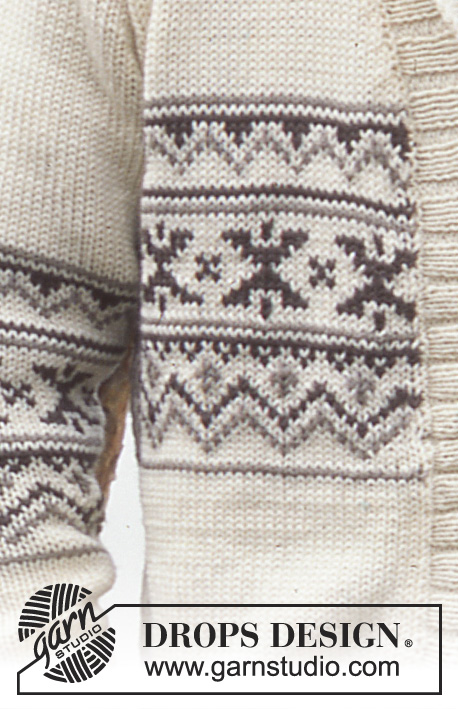
Cardigan de punto para hombre, con cuello chal y patrón de jacquard nórdico en DROPS Alaska
DROPS 85-15 |
||||||||||
|
Muestra: 17 pts x 22 vtas en las ag 5 mm en pt jersey = 10 x 10 cm. Resorte: * 3d, 2r *, repetir de *a*. Patrón: Ver el diagrama. El patrón es visto por el lado derecho y se teje completamente en pt jersey. CUERPO: Mon 155-170-180-190-210 pts en ag circular tamaño 4 mm con blanco hueso Alaska. Tejer 2 vtas de pt musgo, luego tejer resorte como sigue (visto por el lado derecho): 1d (pt de orillo tejido en pt musgo), * 3d, 2r *, repetir de *a*, terminar con 3d y 1d (pt de orillo tejido en pt musgo). Cuando el resorte mida 4-5-5-5-5 cm cambiar a ag circular tamaño 5 mm y tejer 2 vtas de pt musgo, ajustando (dis/aum conforme el caso) a 155-167-179-191-207 pts en la 1ª vta. Luego tejer pt jersey, dejando 1 pt de orillo de cada lado (delantero central) en pt musgo. Colocar marcapuntos (MP) a 39-42-45-48-52 pts de cada lado = 77-83-89-95-103 pts entre MP para la espalda. Cuando la pieza mida 5-6-6-6-10 cm aum 1 pt en ambos lados de los MP de cada lado cada 3.5-7-7-8-10 cm un total de 3-3-3-3-2 veces = 167-179-191-203-215 pts. Cuando la pieza mida 13-21-22-23-24 cm tejer M.1, dejando 1 pt de orillo de cada lado (delantero central) en pt musgo. Cuando la pieza mida 33-41-42-43-44 cm tejer la vta sig (por el lado derecho) así: 39-42-45-48-51 pts (= delantero derecho), rem 6 pts para la sisa, 77-83-89-95-101 pts (= espalda), rem 6 pts para la otra sisa, 39-42-45-48-51 pts (= delantero izquierdo). Tejer cada pieza por separado. DELANTERO IZQUIERDO: = 39-42-45-48-51 pts. Rem para la sisa a un lado en vtas alternas: 2 pts 1-1-1-2-2 veces y 1 pt 4-2-3-3-4 veces. Al mismo tiempo cuando la pieza mida 36-43-44-45-47 cm dism 1 pt para el cuello en vtas alternas: 12-14-14-15-15 veces = 21-24-26-26-28 pts restantes en el hombro. Rem los pts restantes cuando la pieza mida 54-64-66-68-70 cm. ESPALDA: = 77-83-89-95-101 pts. Rem para la sisa a un lado como lo hizo en el delantero = 65-75-79-81-85 pts restantes en las ag. Cuando la pieza mida 52-62-64-66-68 cm rem los 19-23-23-25-25 pts centrales para el cuello. Dism 1 pt en cada orilla del cuello en vtas alternas 2 veces = 21-24-26-26-28 pts restantes en cada hombro. Rem los pts restantes cuando la pieza mida 54-64-66-68-70 cm. MANGA: Mon 40-40-45-45-45 pts en las ag de doble punta tamaño 4 mm con blanco hueso Alaska; unir y colocar un MP en la unión. Tejer 2 vtas de pt musgo, luego tejer resorte hasta que la pieza mida 5-6-6-6-6 cm. Cambiar a las ag de doble punta tamaño 5 mm y tejer 2 vtas de pt musgo, ajustando (aum/dism conforme el caso) a 38-40-43-43-43 pts en la 1ª vta. Luego tejer pt jersey. Cuando la pieza mida 10-8-8-12-11 cm aum 1 pt de cada lado del MP cada 2.5-2.5-2.5-2-2 cm un total de 14-17-17-18-20 veces = 66-74-77-79-83 pts. AL MISMO TIEMPO, cuando la pieza mida 17-18-18-19-19 cm, tejer M.1 (incorporar los pts aum dentro del patrón conforme avanza en el tejido). Cuando la pieza mida 47-50-50-51-51 cm rem 3 pts de cada lado del MP. Luego rem para el copete de manga en cada lado en vtas alternas: 3 pts 2 veces, 2 pts 2-2-2-3-4 veces, 1 pt 2-1-1-1-1 veces, luego 2 pts de cada lado hasta que la pieza mida 55-57-58-60-61 cm, y después rem 3 pts de cada lado 1 vez. Rem los pts restantes, la pieza mide aprox 56-58-59-61-62 cm. TERMINACIÓN: Coser las costuras de los hombros. BORDE PARA LOS BOTONES: Levantar 209-319 pts (múltiplo de 5 + 4) a lo largo del delantero derecho, atrás del cuello y luego a lo largo del delantero izquierdo en ag circular tamaño 4 mm con blanco hueso Alaska. Tejer 1 vta del derecho por el lado revés y 1 vta del derecho por el lado derecho. Luego tejer resorte, dejando 3 pts en pt musgo en cada lado y empezando el resorte con 3d (visto por el lado derecho). Cuando la orilla mida 6-7-7-7-7 cm, aum (visto por el lado revés) todos los 3r a 4r sobre los 38 pts centrales (parte posterior del cuello). Cuando la orilla mida 8-9-9-9-9 cm rem los pts siguiendo el pt resorte. Levantar 300-400 pts con blanco hueso Alpaca en las ag tamaño 3 mm en la orilla externa del borde para los botones. Tejer 4 vtas de pt jersey, rem pts. Coser la orilla rem al borde para los botones, dentro de 1 pt. Hebillas: Tejer 4 hebillas para los botones a lo largo del delantero derecho con blanco hueso Alaska. 1 hebilla = 1 p.b. en el pt más externo del borde para los botones, 7 cad, saltar 1 pt, 1 p.b.. Empezar la hebilla superior al inicio del borde del cuello, luego distribuir las otras hebillas con 5-6-6-6-6 cm entre cada una. Coser las mangas. Coser los botones. Todas las medidas de los diagramas son en cm. Todas las medidas son de lado a lado. |
||||||||||
Explicaciones del diagrama |
||||||||||
|
||||||||||
 |
||||||||||
 |
||||||||||
¿Terminaste este patrón?Entonces, etiqueta tus fotos con #dropspattern o envíalas a la galería #dropsfan. ¿Necesitas ayuda con este patrón?Encontrarás 27 videos tutoriales, un espacio para comentarios/preguntas y más visitando la página del patrón en garnstudio.com © 1982-2026 DROPS Design A/S. Todos los derechos reservados. Este documento, incluyendo todas sus sub-secciones, está protegido por los derechos de autor (copyright). Lee más acerca de lo que puedes hacer con nuestros patrones en la parte de abajo de cada patrón de nuestro sitio. |
||||||||||


Con más de 40 años en el diseño de modelos de punto y de ganchillo, DROPS Design ofrece una de las más vastas colecciones de patrones gratuitos en el internet - traducidos en 17 idiomas. Al día de hoy, contamos con 324 catálogos y 12290 patrones - de los cuales 11675 están traducidos en español.
Nosotros trabajamos con mucho esmero para brindarte lo mejor que las labores de punto y ganchillo tienen para ofrecer,inspiración y consejos, así como hilos de magnífica calidad a precios increíbles! Te gustaría usar nuestros patrones para otro fin además del uso personal? Puedes leer acerca de lo que estás permitida a hacer en el texto de Copyright en la parte de abajo de todos nuestros patrones. Felices labores!
Escribe un comentario sobre DROPS 85-15
¡Nos encantaría saber qué piensas acerca de este patrón!
Si quieres escribir una pregunta referente al patrón, por favor asegúrate de elegir la categoría correcta en el formulario debajo, para acelerar el proceso de respuesta. Los campos obligatorios están marcados con un *.