
Categorías populares
¿Buscas un hilo?


Comentarios / Preguntas (22)
![]() Lena escribió:
Lena escribió:
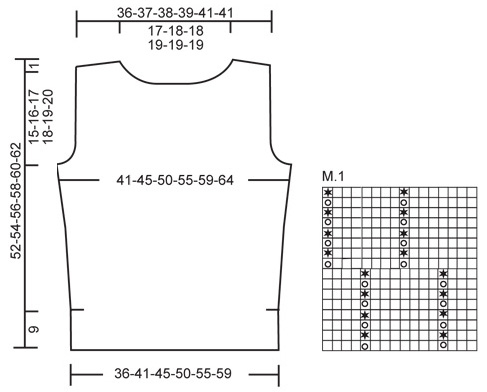
Har 101 maskor, XXL, och skall börja på M1. Jag antar att jag skall börja från höger längst ner på M1? Ingår de tre kantmaskorna, räta, för sprundet i M1? Om jag stickar tre räta maskor i varje sida och då räknar in dem på M1 blir det fel antal maskor kvar i slutet. Om jag börjar med tre räta maskor, sprund, och sedan stickar efter M1 stämmer inte maskorna i slutet heller. Hur skall jag göra för att matskandaler skall stämma?
15.04.2026 - 16:59DROPS Design respondió:
Hej Lena. De 3 kantmaskorna på varje sida ingår inte i M.1. Du stickar diagrammet nedifrån och upp, från höger till vänster på rätsidan och från vänster till höger på avigsidan. Du stickar M.1 fem gånger och sedan stickar du de första 15 maskorna i M.1 till slut. Mvh DROPS Design
16.04.2026 - 08:10
![]() Pattie Kline escribió:
Pattie Kline escribió:
Thank you so much for your patience! I finally understand that the 17 shoulder stitches are knitted until the garment is 55 cm. My mind was stuck in incorrect spatial thinking. Also I had a typo for the number of stitches left on the shoulder 17 not 27. Again thank you for your patience and assistance. Pattie
25.05.2025 - 21:26
![]() Pattie Kline escribió:
Pattie Kline escribió:
Now I am really confused. The pattern says to put the 15 middle stitches on a thread for the neck. Then the right and left neckline decreases are done separately to the shoulder pieces leaving 27 sts on each shoulder. When the piece measures 55 cm cast off outermost stitches on each shoulder pieces leaving… I don’t understand how the piece can be knitted to 55 cm as a solid piece unless those 15 stitches are added back in.
23.05.2025 - 18:16DROPS Design respondió:
Dear Pattie, after all armhole and neck decreases and putting the neck stitches on a thread, you will have 17 sts left for each shoulder. Then, if needed, work straight until you have 55cm. Then you cast off 8 sts work 1 row over the 7 remaining sts and cast these off as well on the next row. You won't work much with these 7 stitches, we just spread the 17 stitches cast off to create the effect of a dropped shoulder. Happy knitting!
25.05.2025 - 19:56
![]() Pattie Kline escribió:
Pattie Kline escribió:
Once the right and left shoulder decreases are completed separately, do I then pick up the center 15 stitches from the stitch holder to complete the rest of the front?
22.05.2025 - 22:11DROPS Design respondió:
Hi Pattie, The middle 15 stitches on the front neckline have been cast off, not placed on a stitch holder. The same is true of the middle stitches on the back neckline. When the shoulders are finished and cast off both front and back, stitches are knitted up around the neckline for a small neck to finish. Regards, Drops Team.
23.05.2025 - 05:56
![]() Pattie Kline escribió:
Pattie Kline escribió:
I stopped knitting a year ago and recently picked up my 95-29 again. I am at front piece at 46 cm. I knitted across to the middle and put the middle 15 stitches on a stitch holder. I am not sure how to work the neckline decreases on the 2 sides with the gap from the 15 stitches on the holder.
22.05.2025 - 02:01DROPS Design respondió:
Dear Mrs Kline, you will now finish each shoulder separately, so place the stitches before the 15 cast off sts on a thread (right shoulder, seen from RS if you worked this row from RS), then work the left shoulder casting off stitches at the beginning of every row from neck = from RS ; then cast off at the requested height; work now the stitches from right shoulder casting off sts at the beginning of every row from neck = from wrong side. Happy knitting!
22.05.2025 - 09:18
![]() Pattie Kline escribió:
Pattie Kline escribió:
Correction to last question: am I correct in thinking there’s only 1 garter st at each side instead of 4 garter sts with the other 3 knitted or purled according to R or W side?
29.05.2024 - 16:06DROPS Design respondió:
Dear Mrs Kline, there will be only 1 edge stitch in garter stitch on each side and remaining stitches in between will be worked following M.1. Happy knitting!
30.05.2024 - 07:32
![]() Pattie Kline escribió:
Pattie Kline escribió:
After knitting 4 rows above slit, instructions read continue in M.1 with 1 seam st each side in garter sts. Am I correct in thinking now there’s only 1st each side instead of 4 and the other 3 are knitted or purled according to right or wrong side ? Thank you again for your assistance. I have arthritis so can only knit for short time, but will finish this lovely top😁
29.05.2024 - 16:00DROPS Design respondió:
Dear Mrs Kline, at the beg of row work the first 3 sts as the last 3 sts in diagram (as the end of another/previous repeat) and at the end of the row work the last 3 sts as the first 3 sts in diagram (as the beg of a new repeat) and work the first and last stitch in garter stitch. Happy knitting!
30.05.2024 - 07:31
![]() Pattie Kline escribió:
Pattie Kline escribió:
Thank you for your past response. It was just the help thatI needed. I’m now knitting this pattern with 77 cast on stitches and need help getting the pattern symmetrical. Thank you for any help you can give. Pattie
22.04.2024 - 03:44DROPS Design respondió:
Dear Pattie, the pattern is not symmetrical here, if you like it to be, then you can get help with this lesson. Happy knitting!
22.04.2024 - 09:05
![]() Lise escribió:
Lise escribió:
Bonjour, je ne comprends pas votre graphique, est-ce des multiples de 8+6, si oui, j'arrive a 94 mailles pour la grandeur XL. On fait 3 m. point mousse, * 1 jeté, glissé 1 m end., 7m end* et terminé par 3 m.au point mousse. Est-ce exacte?
07.12.2022 - 20:36DROPS Design respondió:
Bonjour Lise, en taille XL, tricotez les 93 mailles ainsi: 3 m point mousse, répétez 5 fois les 16 mailles de M.1, tricotez ensuite les 15 premières mailles de M.1 et terminez par 3 m point mousse, le motif est ainsi symétrique de chaque côté (on commence et on termine par 3 m jersey). Bon tricot!
08.12.2022 - 09:46
![]() Baudin escribió:
Baudin escribió:
Bonjour, Je réalise ce modèle en taille M. J'ai un souci au niveau épaule. Avant de commencer les diminutions j'ai 87m. Avec les diminutions décrites je ne comprends pas comment il peut rester 17m par epaule. Merci de votre aide. Valérie
27.06.2022 - 14:05DROPS Design respondió:
Bonjour Mme Baudin, pour les emmanchures vous rabattez 4 m de chaque côté (= 79 m), et diminuez ensuite 7 x 1 m de chaque côté (= 79-14=65 m), vous mettez en attente les 15 m centrales (= il reste 50 m soit 25 pour chaque épaule); vous rabattez pour l'encolure 2 x 2 m et 4 x 1 m= 25-4-4= il reste 17 m. Bon tricot!
27.06.2022 - 15:33
|
||||||||||
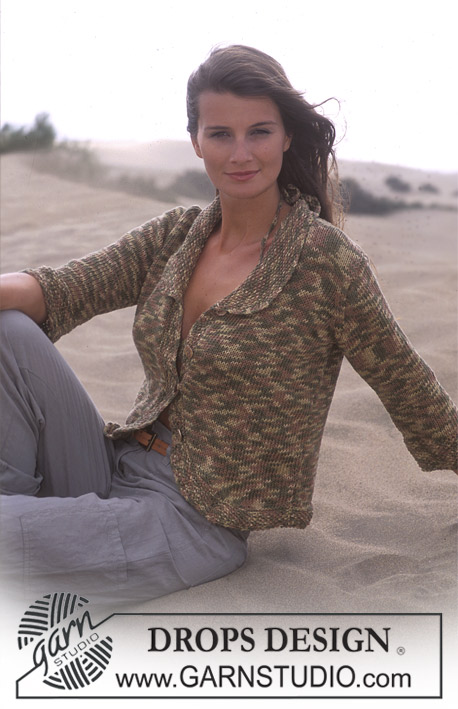
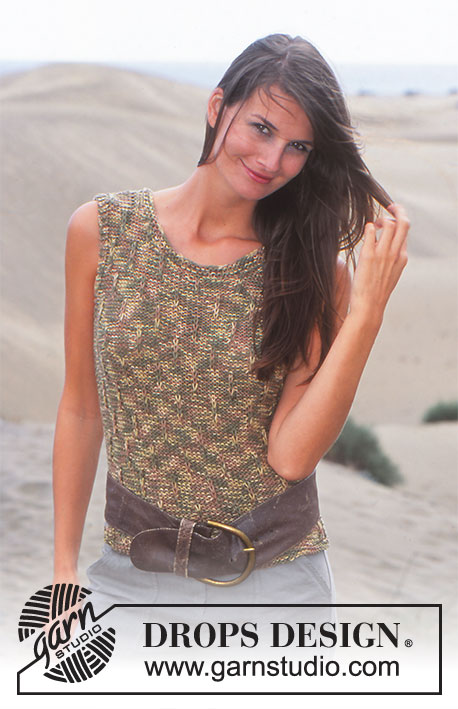
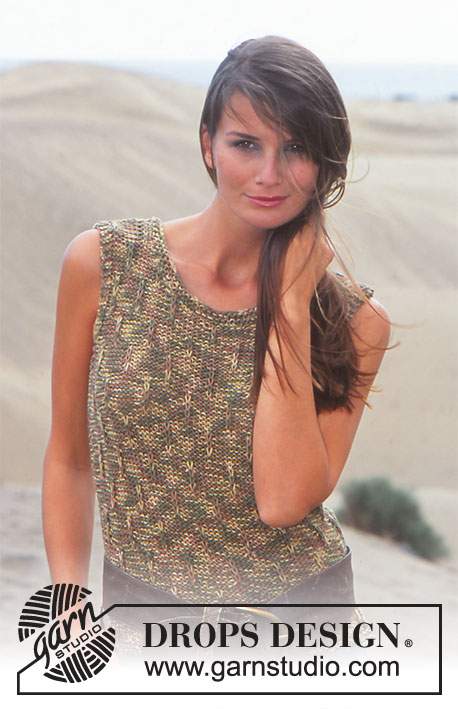
DROPS 95-29 |
||||||||||
 |
 |
|||||||||
DROPS Top in Paris
DROPS 95-29 |
||||||||||
|
Tensión del tejido: 17 pts x 22 filas con ag tamaño 5 mm en pt jersey = 10 x 10 cm Pt musgo: Trabajar todas las filas de derecho. Patrón: Ver el diagrama M.1. El diagrama muestra el patrón visto por el LD. Tip para las disminuciones (aplicar a la sisa): Dism dentro de 3 pts del borde por el LD. Dism como sigue despés de los 3 pts: 2 pjr. Dism como sigue antes de los 3 pts: 2 pjr retorcido. ----------------------------------------------------------------------- DELANTERO: Mont 61-69-77-85-93-101 pts con ag tamaño 5 mm y Paris. Trabajar 4 filas en pt musgo. Continuar con M.1 con 3 pts del borde a cada lado en pt musgo (= abertura). Cuando la labor mida 9 cm terminar la abertura y mont 1 pt orillo nuevo a cada lado = 63-71-79-87-95-103 pts. Continuar con M.1 y 4 pts a cada lado en pt musgo hasta tener 4 filas por encima de la abertura, ahora continuar con M.1 y un pt orillo a cada lado en pt musgo. Cuando la labor mida 11 cm, aum 1 pt a cada lado cada 6-6-6.5-7-7-7.5 cm un total de 4 vcs = 71-79-87-95-103-111 pts – trabajar los pts nuevos de revés por el LD y de derecho por el LR. Cuando la labor mida 35-36-37-38-39-40 cm trabajar 4 filas en pt musgo sobre los 6-6-7-7-8-9 pts más externos a cada lado (trabajar los pts restantes como antes). Ahora cerrar los 3-3-4-4-5-6 pts más externos a cada lado para la sisa y cerrar para la forma de la sisa a cada lado cada 2ª fila – ver tip para las disminuciones – 1 pt un total de 2-5-7-10-12-15 vcs – continuar con el patrón sobre los pts restantes como antes con 3 pts del borde a cada lado en pt musgo. Al mismo tiempo cuando la labor mida 44-45-46-48-49-50 cm pasar los 13-15-15-17-17-17 pts centrales oa un gancho aux para el escote. Cerrar para el escote cada 2ª fila: 2 pts 2 vcs y 1 pt 4 vcs = 16-16-17-17-18-18 pts restantes para cada hombro. Cuando la labor mida 51-53-55-57-59-61 cm cerrar los 8 pts más externos de cada hombro, trabajar 1 fila de derecho sobre los pts restantes y rematar en la sig fila, la labor mide aprox 52-54-56-58-60-62 cm. ESPALDA: Mont pts y trabajar como el delantero. Cerrar para la sisa como se describe para el delantero. Cuando la labor mida 50-52-54-56-58-60 cm cerrar los 27-29-29-31-31-31 pts centrales para el escote y cerrar 1 pt a cada lado del escote en la sig fila. Al mismo tiempo cuando la labor mida 51-53-55-57-59-61 cm cerrar en el hombro como se describe en el delantero, la labor mide aprox 52-54-56-58-60-62 cm. TERMINACIÓN: Coser el hombro derecho. Cenefa del escote: Recoger aprox 68 - 96 pts alrededor del escote (incl los pts del gancho aux en el delantero) con ag tamaño 5 mm y Paris. Trabajar 1 fila de derecho por el LR, trabajar 1 fila de derecho por el LD y rematar flojo de derecho por el LR. Coser el hombro izquierdo y la cenefa del escote. Hacer la costura de los lados dentro del pt orillo hacia abajo hasta la abertura (incl 4 filas en pt musgo). |
||||||||||
Explicaciones del diagrama |
||||||||||
|
||||||||||
 |
||||||||||
¿Terminaste este patrón?Entonces, etiqueta tus fotos con #dropspattern o envíalas a la galería #dropsfan. ¿Necesitas ayuda con este patrón?Encontrarás 22 videos tutoriales, un espacio para comentarios/preguntas y más visitando la página del patrón en garnstudio.com © 1982-2026 DROPS Design A/S. Todos los derechos reservados. Este documento, incluyendo todas sus sub-secciones, está protegido por los derechos de autor (copyright). Lee más acerca de lo que puedes hacer con nuestros patrones en la parte de abajo de cada patrón de nuestro sitio. |
||||||||||


Con más de 40 años en el diseño de modelos de punto y de ganchillo, DROPS Design ofrece una de las más vastas colecciones de patrones gratuitos en el internet - traducidos en 17 idiomas. Al día de hoy, contamos con 324 catálogos y 12290 patrones - de los cuales 11675 están traducidos en español.
Nosotros trabajamos con mucho esmero para brindarte lo mejor que las labores de punto y ganchillo tienen para ofrecer,inspiración y consejos, así como hilos de magnífica calidad a precios increíbles! Te gustaría usar nuestros patrones para otro fin además del uso personal? Puedes leer acerca de lo que estás permitida a hacer en el texto de Copyright en la parte de abajo de todos nuestros patrones. Felices labores!
Escribe un comentario sobre DROPS 95-29
¡Nos encantaría saber qué piensas acerca de este patrón!
Si quieres escribir una pregunta referente al patrón, por favor asegúrate de elegir la categoría correcta en el formulario debajo, para acelerar el proceso de respuesta. Los campos obligatorios están marcados con un *.