
Categorías populares
¿Buscas un hilo?


Comentarios / Preguntas (7)
![]() Deanas escribió:
Deanas escribió:
How long the circular needle used in this pattern? 40cm, 60cm, 80cm or 100cm? Answer this please, thank you
08.09.2025 - 10:59DROPS Design respondió:
Hi Deanas, You will need circular needles length 40 cm and 80 cm in size 3.5 mm and length 80 cm in size 2.5 mm. Regards, Drops Team.
09.09.2025 - 06:50
![]() Joan McLaggan escribió:
Joan McLaggan escribió:
Apologies have just realised I have misread the pattern
10.01.2022 - 16:36
![]() Joan McLaggan escribió:
Joan McLaggan escribió:
Pattern instructions say cast off 4 stitches for under arm when dividing work for back and front sections, but instructions for under arm on sleeves say cast off 8 stitches, is this correct or should it be 4 stitches cast off for sleeve under arm?
10.01.2022 - 16:29DROPS Design respondió:
Dear Joan, you cast off 4 stitches on each section on each side. So you cast off 4 for the front and 4 for the back on each side (=8 cast-off stitches). Happy knitting
10.01.2022 - 19:50
![]() Mary Guenther escribió:
Mary Guenther escribió:
After casting off 12 stitches (+5 steek) in center for neckline, do I then decrease 1 stitch each side of the castoffs for a total of 2/row? OR 2 STITCHES EACH side for a total of 4/row? Same question for back. Then on front, I can't figure out how to then decrease just 1 st 4 times since there are two sides to the neckline. Do I decrease 1 STITCH EACH SIDE for a total of 2 each row? I don't know how many stitches I'm suppose to end up with when I get to the shoulder seams. Help, please!
26.06.2021 - 06:49DROPS Design respondió:
Dear Mary, you are right, cast offs (to shape the armhole) are done each side of the piece. Happy Knitting!
26.06.2021 - 09:17
![]() Mary Guenther escribió:
Mary Guenther escribió:
I have never made an "edge." beginning of pattern says to knit 1 1/8 inch white and switch to beige, then purl a row. I assume this row is on what would ordinarily be a knit row? At the end of this row do you switch back to white and purl back? Or? Thank you!
18.05.2021 - 04:59DROPS Design respondió:
Hi Mary, This 'edge' is a coloured edge in off white, worked in stocking stitch for 1 1/8 inch. Then you change to beige, work 1 row in stocking stitch (purl from wrong side) and purl 1 row from the right side as you say. This row will be where you turn up the edge later, now you change back to off white and work another 1 1/8 inch before beginning the body. Happy knitting!
18.05.2021 - 08:02
![]() Mary Guenther escribió:
Mary Guenther escribió:
I have never made an "edge". Beginning of pattern says to knit 1 1/8 inches stockinette stitch and change to beige, then purl 1 row - I assume this is on what would ordinarily be the knit row of the stockinette stitch? When you get to the end of that row, do you purl back in white? Or beige? Or do I have it all wrong?
18.05.2021 - 04:57DROPS Design respondió:
Dear Mrs Guenther, this video shows how to knit such a folded edge, the purl row should be purled from RS so that piece will fold nicely. This row should be worked with beige. To avoid cutting the white yarn to work this folding row, just continue afterwards with off-white (if last row off-white was worked from WS, work now next row from RS with off-white, ie slip all sts back to the other end of the needle and you will work 2 RS row next to each other. Happy knitting!
18.05.2021 - 08:21
![]() Ingerid escribió:
Ingerid escribió:
Jeg er i tvivl om forkanterne går helt ned langs kanten, eller om de først starter der hvor selve mønstret starter...kan ikke se det på billedet
25.02.2014 - 18:12DROPS Design respondió:
Hej Ingerid. Forkanterne gaar helt ned til underkanten.
26.02.2014 - 16:31
|
|||||||||||||
DROPS 38-18 |
|||||||||||||
|
|
|||||||||||||
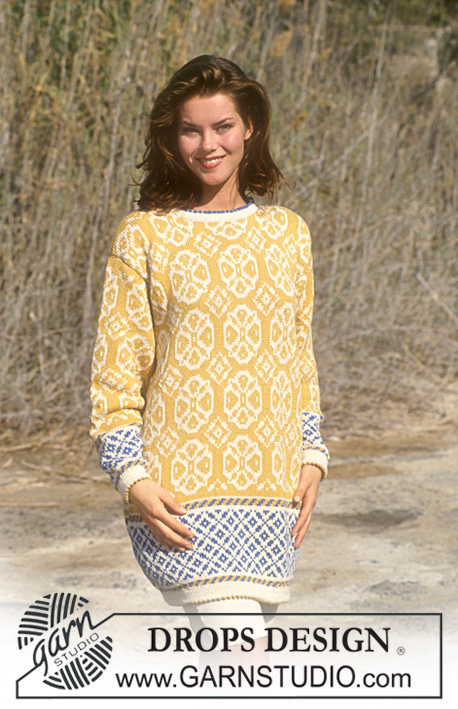
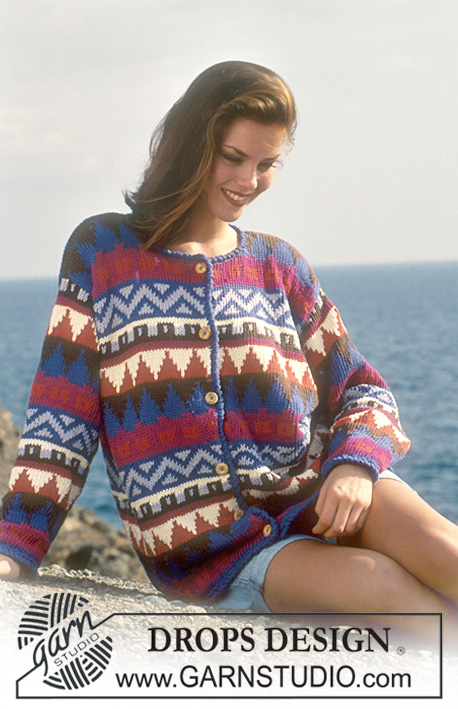
Chaqueta con jacquard en DROPS “Safran”.
DROPS 38-18 |
|||||||||||||
|
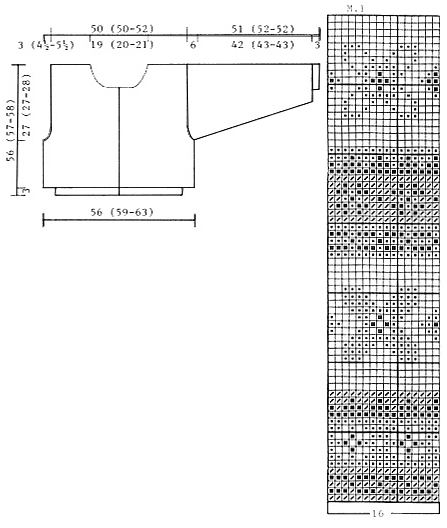
Patrón: Ver el diagrama M.1. El diagrama muestra el patrón por el LD. Borde: Trabajar 3 cm en pt jersey, cambiar a beige, trabajar 1 fila de r (= borde de doblaje, medir la labor desde aquí), cambiar a blanco hueso y trabajar 3 cm en pt jersey. Cuerpo: La chaqueta se trabaja en redondo con una aguja circular después del Borde y cortar el centro del delantero después. Montar 220-232-240 pts con una aguja circular de 2.5 mm con blanco hueso y trabajar el Borde – ver arriba – de ida y vuelta en la aguja. Cambiar a una aguja circular de 3.5 mm y continuar en redondo y M.1, al mismo tiempo aum 36-40-48 pts repartidos en la 1ª vuelta + 5 pts en el centro del delantero – estos 5 pts se cortan después y no se incluyen en el patrón = 256-272-288 pts (+ 5 pts para el corte). Recordar mantener la tensión del tejido! Continuar con M.1. Cuando la labor mida 29-30-30 cm cerrar 4 pts a cada lado para la sisa (asegurarse de tener 5 pts aum en el centro del delantero) = 124-132-140 + 5 pts en el delantero y 124-132-140 pts en la espalda. Ahora completar cada parte por separado. Delantero: = 124-132-140 pts (+ 5 pts). Dism para la forma de la sisa cada 2ª fila: 2 pts 1-3-3 veces y 1 pt 3-3-4 veces = 114-114-120 pts (+ 5 pts). Cuando la labor mida 46-47-48 cm cerrar los 12-14-16 pts centrales (+ 5 pts) para el escote y dism para la forma de la línea del escote cada 2ª fila: 2 pts 6 veces y 1 pt 4 veces. Cerrar cuando la labor mida 56-57-58 cm. Espalda: = 124-132-140 pts. Dism para la sisa como se describe para el delantero = 114-114-120 pts. Cuando la labor mida 54-55-56 cm cerrar los 40-42-44 pts centrales para el escote y dism 2 pts en la línea del escote en la siguiente fila. Cerrar cuando la labor mida 56-57-58 cm. Manga: Montar 50-54-58 pts con agujas de doble punta de 2.5 mm con blanco hueso y trabajar el Borde. Cambiar a agujas de doble punta de 3.5 mm, continuar con M.1 (asegurarse de colocar una repetición del patrón en el centro superior de la manga) y aum 12-8-6 pts repartidos en la 1ª vuelta = 62-62-64 pts. Al mismo tiempo después del Borde aum 2 pts en el centro bajo la manga un total de 31-31-32 veces cada 3ª y 4ª vuelta alternadamente = 124-124-128 pts. Cuando la labor mida 45-46-46 cm cerrar 8 pts en el centro bajo la manga y continuar de ida y vuelta en la aguja. Dism a cada lado para la forma de la copa de la manga cada 2ª fila: 6 pts 8 veces. Cerrar, la labor mide aprox. 51-52-52 cm. Terminación: Insertar un marcapuntos de arriba abajo en el centro de los pts aum en el centro del delantero. Hacer 2 costuras a máquina alrededor del marcapuntos, 1ª costura = ½ pt desde el marcapuntos, 2ª costura = ½ pt desde la 1ª costura. Cortar el centro del delantero. Hacer las costuras de los hombros. Recoger aprox. 110 a 120 pts por el delantero izquierdo con una aguja de 2.5 mm con blanco hueso y trabajar el borde de ida y vuelta en la aguja como sigue: 3 cm en pt jersey, cambiar a beige, 1 fila en pt jersey, trabajar 1 fila de r (= borde de doblaje), cambiar a blanco hueso y trabajar 3 cm en pt jersey, cerrar. Repetir por el delantero derecho, pero después de 1 cm hacer 5 ojales repartidos. 1 ojal = cerrar 2 pts y montar 2 pts nuevos en la fila de vuelta – recordar los ojales en la labor en pt jersey que se doblan hacia el LR! Recoger aprox. 106 a 114 pts alrededor del escote con una aguja de 2.5 mm con blanco hueso y trabajar el borde como se describe para las cenefas de los delanteros de ida y vuelta en la aguja. Doblar las cenefas por la mitad hacia el LR y asegurar. Coser las mangas y coser los botones. |
|||||||||||||
Explicaciones del diagrama |
|||||||||||||
|
|||||||||||||
 |
|||||||||||||
¿Terminaste este patrón?Entonces, etiqueta tus fotos con #dropspattern o envíalas a la galería #dropsfan. ¿Necesitas ayuda con este patrón?Encontrarás 27 videos tutoriales, un espacio para comentarios/preguntas y más visitando la página del patrón en garnstudio.com © 1982-2026 DROPS Design A/S. Todos los derechos reservados. Este documento, incluyendo todas sus sub-secciones, está protegido por los derechos de autor (copyright). Lee más acerca de lo que puedes hacer con nuestros patrones en la parte de abajo de cada patrón de nuestro sitio. |
|||||||||||||


Con más de 40 años en el diseño de modelos de punto y de ganchillo, DROPS Design ofrece una de las más vastas colecciones de patrones gratuitos en el internet - traducidos en 17 idiomas. Al día de hoy, contamos con 324 catálogos y 12290 patrones - de los cuales 11685 están traducidos en español.
Nosotros trabajamos con mucho esmero para brindarte lo mejor que las labores de punto y ganchillo tienen para ofrecer,inspiración y consejos, así como hilos de magnífica calidad a precios increíbles! Te gustaría usar nuestros patrones para otro fin además del uso personal? Puedes leer acerca de lo que estás permitida a hacer en el texto de Copyright en la parte de abajo de todos nuestros patrones. Felices labores!
Escribe un comentario sobre DROPS 38-18
¡Nos encantaría saber qué piensas acerca de este patrón!
Si quieres escribir una pregunta referente al patrón, por favor asegúrate de elegir la categoría correcta en el formulario debajo, para acelerar el proceso de respuesta. Los campos obligatorios están marcados con un *.