
Categorías populares
¿Buscas un hilo?


Comentarios / Preguntas (34)
![]() Joana Dinis escribió:
Joana Dinis escribió:
In which part of the row I do a inc?
22.06.2019 - 18:01DROPS Design respondió:
Dear Joana, if you want to make this knitted flat on straight needles (instead of knitting the sleeves on the round on DPN's), you shoul increase one stitch at the beginning of the row (in the 2nd stitch) and at the end of the row (in the stitch before the last stitch). Happy Knitting!
23.06.2019 - 09:06
![]() Joana Dinis escribió:
Joana Dinis escribió:
So i will cast on 52 sts for the sleeves?
14.06.2019 - 14:33DROPS Design respondió:
Dear Mrs Dinis, right, you will cast on 50 sts + 2 edge sts = 52 sts. Happy knitting!
17.06.2019 - 06:46
![]() Joana Dinis escribió:
Joana Dinis escribió:
What is the difference to Cast on 50 (50-50) sts on double pointed needles or cast on in normal needles?
14.06.2019 - 14:21DROPS Design respondió:
Dear Mrs Dinis, when you work in the round there is no seam, when you work back and forth you will have to make a seam, so that you should add 2 sts to the number of sts to cast on (= 1 edge st on each side) for the seam allowance. Read more details here. Happy knitting!
14.06.2019 - 14:24
![]() Joana Dinis escribió:
Joana Dinis escribió:
Its possible to do the sleeves with a normal needle?
14.06.2019 - 14:09DROPS Design respondió:
Dear Mrs Dinis, to adjust sleeves onto straight needles, please read here how to do. Happy knitting!
14.06.2019 - 14:15
![]() Joana Dinis escribió:
Joana Dinis escribió:
Ok i did it. now i have two parts on the needles. but this : Then cast off 2 sts on each side on next row to shape neckline. thank you so much for your patience.
11.06.2019 - 13:51DROPS Design respondió:
Dear Mrs Dinis, now continue working the shoulder on one side (where the yarn ball is), ie turn and work next row (from armhole towards neck), turn and at the beginning of the row from neck, cast off the first 2 stitches. Continue now working to the finished length, cast off and cut the yarn. Join now the yarn to the other shoulder and work the same way, ie casting off the 2 sts at the beg of a row from neck towards armhole. Happy knitting!
11.06.2019 - 14:53
![]() Joana Dinis escribió:
Joana Dinis escribió:
Thank you but i know how to blind off. i dont know where i bind off. when you said bind off in the middle...this i dont understand.
09.06.2019 - 10:35DROPS Design respondió:
Dear Mrs Dinis, you can first mark the middle 30-32 sts (see size) with a marker on either side of these stitches, then work to the first marker, bind off the next 30-32 sts (= to the 2nd marker) and work the remaining stitches on needle = you have now bound off for neck and the stitches on each side are for shoulders, turn and work now first shoulder as explained to the end, cut the yarn and join to finish the 2nd shoulder. Happy knitting!
11.06.2019 - 11:02
![]() Joana escribió:
Joana escribió:
Hello again. Can you explain this part for me please? When piece measures 44 (44-46) cm bind off middle 30 (32-32) sts to shape neckline. Then bind off 2 sts on each side on next row to shape neckline. Bind off when piece measures 46 (46-48) cm Thank you
02.06.2019 - 10:45DROPS Design respondió:
Hi Joanna, The middle stitches are the lowest part of the neckline at the back. Once they are bound off, each shoulder is continued separately. On the next row bind off 2 more stitches at the neck end of the row. Then continue working until the length measures 46 (46-48) cm, then bind off the remaining stitches for the shoulder. Do the same on the other side/shoulder. I hope this helps and happy knitting!
03.06.2019 - 08:44
![]() Joana Dinis escribió:
Joana Dinis escribió:
Thanks you!! when you said: continuing bind off for armhole like front piece = 110 (116-116) sts; it's this process: 3 sts 1 (1-2) times, 2 sts 2 (2-2) times, 1 st 1 (2-3) times = 56 (59-59) sts. ??? i need to repeat 2 times for the 2 parts right??? thank u
08.05.2019 - 10:23DROPS Design respondió:
Dear Mrs Dinis, you cast off for the armhole on each front piece (= at the beg of WS row on right front piece / at the beg of RS row on left front piece): 3 sts 1 (1-2) times, 2 sts 2 (2-2) times, 1 st 1 (2-3) times = 56 (59-59) sts - For back piece, you will cast off the same way, but at the beg of every row = both from RS and from WS so that the armholes are shaped as on each front piece. Happy knitting!
08.05.2019 - 12:00
![]() Joana Dinis escribió:
Joana Dinis escribió:
Thank you. i understood. but my neck is not regular like on the pict. how do you do the blind off?
25.04.2019 - 12:50DROPS Design respondió:
Dear Mrs Dinis, after you have finished pieces and seams, you will first pick up stitches for the front bands, then pick up 110-120 sts around the neckline and knit 2 rows for the neck edge = the neck will then sew much regular, ie as on the picture. Happy knitting!
25.04.2019 - 13:39
|
|
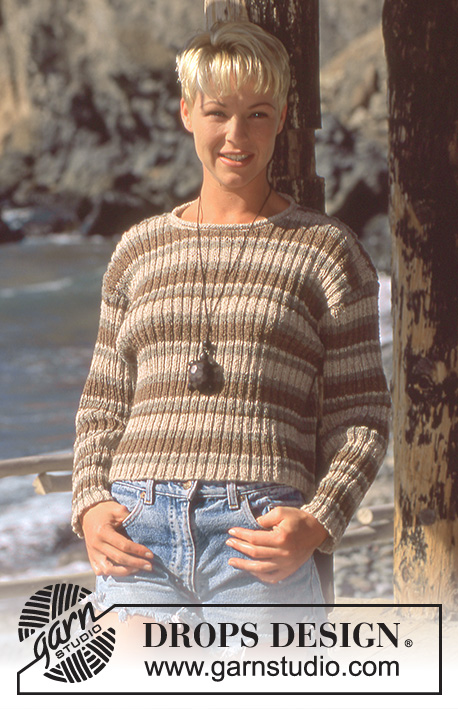
Sandy Beach |
|
 |
 |
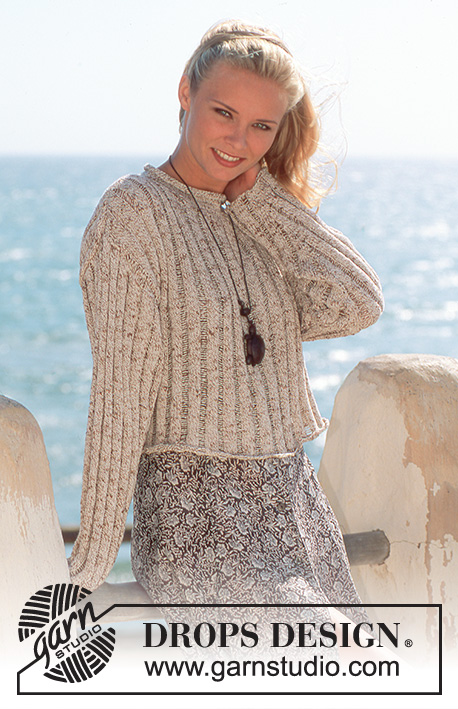
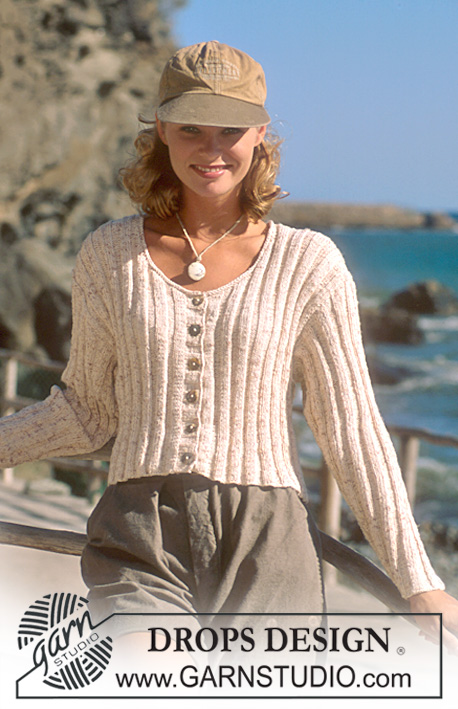
Chaqueta en DROPS Safran trabajada en punto elástico
DROPS 41-23 |
|
|
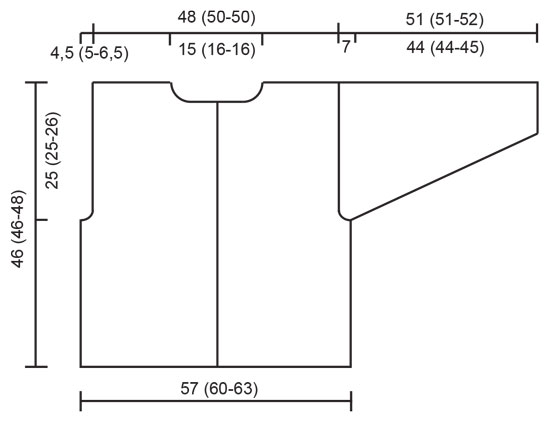
Tensión: 23 pts x 30 filas con aguja de 3.5 mm con punto jersey = 10 x 10 cm Recordar que el tamaño de la aguja es orientativo! Ver Nota!!! bajo las tallas. Patrón: * 4d, 4r *, repetir de * a *. -------------------------------------------------------------------- Cuerpo: Trabajar la chaqueta de ida y vuelta en la aguja con una aguja circular. Montar 262 (278-294) pts (incluyendo 2 pts orillo) con una aguja circular de 3.5 mm y continuar trabajando el patrón con 1 pt orillo a cada lado en el centro del delantero. Recordar mantener la tensión del tejido. Cuando la labor mida 21 (21-22) cm trabajar la siguiente fila como sigue: 64 (68-72) pts del delantero, cerrar 4 pts para la sisa, 126 (134-142) pts espalda, cerrar 4 pts para la sisa, 64 (68-72) pts del delantero. Completar cada parte por separado. Delantero: = 64 (68-72) pts. Continuar cerrando para la sisa cada 2ª fila: 3 pts 1 (1-2) veces, 2 pts 2 (2-2) veces, 1 pt 1 (2-3) veces = 56 (59-59) pts. Cuando la labor mida 29 (29-31) cm cerrar para el escote cada 2ª fila: 2 pts 7 veces y después cada 4ª fila: 1 pt 4 (5-5) veces. Cerrar cuando la labor mida 46 (46-48) cm. Espalda: = 126 (134-142) pts. Continuar cerrando para la sisa como en el delantero = 110 (116-116) pts. Cuando la labor mida 44 (44-46) cm cerrar los 30 (32-32) pts centrales para la forma de la línea del escote. Después cerrar 2 pts a cada lado en la siguiente fila para la forma de la línea del escote. Cerrar cuando la labor mida 46 (46-48) cm. Manga: Montar 50 (50-50) pts con agujas de doble punta de 3.5 mm y continuar trabajando el Patrón (asegurarse de centrar los 4d en el centro de la manga). Al mismo tiempo aum en el centro bajo la manga: 2 pts 33 (33-35) veces alternando entre cada 3ª y cada 4ª vuelta = 116 (116-120) pts. Cuando la labor mida 44 (44-45) cm cerrar 6 pts en el centro bajo la manga y completar de ida y vuelta en la aguja. Continuar cerrando para la forma de la copa de la manga a cada lado cada 2ª fila: 4 pts 9 veces, cerrar. La labor mide aprox. 51 (51-52) cm. Terminación: Hacer las costuras de los hombros. Recoger aprox. 84 pts (divisible entre 8 pts + 4 pts) por el delantero izquierdo con una aguja circular de 3 mm y trabajar 3 cm del Patrón de ida y vuelta en la aguja. Repetir por la cenefa del delantero derecho, pero después de 1 cm trabajar ojales repartidos en la fila - 1 ojal = cerrar 3 pts y montar 3 pts nuevos sobre los pts cerrados en la siguiente fila. Recoger aprox. 110-120 pts alrededor de la línea del escote con una aguja circular de 3 mm y trabajar 2 filas de derecho de ida y vuelta en la aguja, cerrar. Coser las mangas y los botones. |
|
 |
|
¿Terminaste este patrón?Entonces, etiqueta tus fotos con #dropspattern o envíalas a la galería #dropsfan. ¿Necesitas ayuda con este patrón?Encontrarás 17 videos tutoriales, un espacio para comentarios/preguntas y más visitando la página del patrón en garnstudio.com © 1982-2026 DROPS Design A/S. Todos los derechos reservados. Este documento, incluyendo todas sus sub-secciones, está protegido por los derechos de autor (copyright). Lee más acerca de lo que puedes hacer con nuestros patrones en la parte de abajo de cada patrón de nuestro sitio. |
|


Con más de 40 años en el diseño de modelos de punto y de ganchillo, DROPS Design ofrece una de las más vastas colecciones de patrones gratuitos en el internet - traducidos en 17 idiomas. Al día de hoy, contamos con 324 catálogos y 12290 patrones - de los cuales 11685 están traducidos en español.
Nosotros trabajamos con mucho esmero para brindarte lo mejor que las labores de punto y ganchillo tienen para ofrecer,inspiración y consejos, así como hilos de magnífica calidad a precios increíbles! Te gustaría usar nuestros patrones para otro fin además del uso personal? Puedes leer acerca de lo que estás permitida a hacer en el texto de Copyright en la parte de abajo de todos nuestros patrones. Felices labores!
Escribe un comentario sobre DROPS 41-23
¡Nos encantaría saber qué piensas acerca de este patrón!
Si quieres escribir una pregunta referente al patrón, por favor asegúrate de elegir la categoría correcta en el formulario debajo, para acelerar el proceso de respuesta. Los campos obligatorios están marcados con un *.