
Categorías populares
¿Buscas un hilo?


Comentarios / Preguntas (118)
![]() Eva Albinsson escribió:
Eva Albinsson escribió:
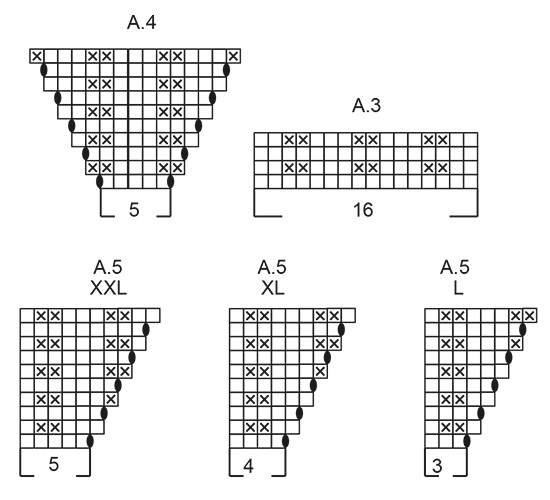
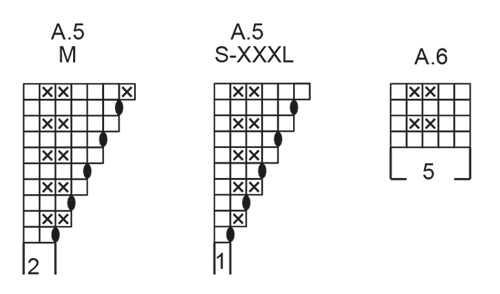
Mönster 243-1 Jag förstår inte mönstret. Är på OK: varv 1 på mönsterstickning stl XL Har följt mönstret fram till första styckets slut och har då 7 maskor kvar av de 112. A1A2 =9m, A4A3A4=37m, A5A6A2 =13 m, A3A4A3 =37m, A5A6 =9m alltså 105m. På ett ställe står det A.6 över 11m på ett annat A.6 över 6m ??? Fullkomligt obegripligt A6, har 5 maskor! Mvh Eva
09.07.2024 - 18:37DROPS Design respondió:
Hei Eva. Selv om A.6 består av 5 masker, står det i oppskriften at du skal strikke A.6 OVER 11 masker og OVER 6 masker. Da vil A.6 starte med 2 rettmasker og slutte med 2 rettmasker (når du strikker 2. og 4. pinne av diagrammet = det vil bli likt i begge sider). I str XL har du 112 masker og det strikkes slik: A.1 over 5 masker + A.2 (4 masker) + A.3 (16 masker) + A.4 (5 masker) + A.3 (16 masker) + A.5 (4 masker) + A.6 over 11 masker + A.2 (4 masker) + A.3 (16 masker) + A.4 (5 masker) + A.3 (16 masker)+ A.5 (4 masker)+ A.6 over 6 masker = 112 masker. mvh DROPS Design
10.07.2024 - 10:48
![]() Charlotte Larsen escribió:
Charlotte Larsen escribió:
Jeg tror jeg må finde en anden opskrift aldrig har jeg været så frustreret er der overhovedet nogen som bare har løst gåden
29.06.2024 - 07:23DROPS Design respondió:
Hei Charlotte. Ta en titt på svarer vi ga deg tidligere idag om du fremdeles vil prøve deg. mvh DROPS Design
01.07.2024 - 13:33
![]() Lone Nielsen escribió:
Lone Nielsen escribió:
Er igang med at strikke Winther Owl sweather i str L og er lige som mange andre gået i stå efter halskant, udt og vrangpind. I diagrammet A2 str L skal der strikkes 3 r inden udtagn. I forklaringen står der 2 m. Hvordan skal det gøres?
28.06.2024 - 22:47DROPS Design respondió:
Hei Lone. I str. L har du 108 masker etter halskanten og mønstret strikkes slik: A.1 over 5 masker + A.2 (3 m) + A.3 (16 m) + A.4 (5 m) + A.3 (16 m) + A.5 (3 m) + A.6 over 11 masker + A.2 (3 m) + A.3 (16 m) + A.4 (5 m) + A.3 (16 m) + A.5 (3 m) + A.6 over 6 masker = 108 m. 1. pinne i A.2 (i str. L) strikkes det 3 rett + 1 kast. Usikker på hva du mener med: I forklaringen står der 2 m. Hvor i oppskriften leser du det? mvh DROPS Design
01.07.2024 - 13:58
![]() Charlotte Larsen escribió:
Charlotte Larsen escribió:
Str. XL - 112 masker
28.06.2024 - 14:43DROPS Design respondió:
Hei Charlotte. Ja, 19 masker (9+10) til bakstykket, 37 masker til hvert erme og 19 masker til forstykket. Strikk A.1 over 5 masker + A.2 (4 m) + A.3 (16 m) + A.4 (5 m), + A.3 (16 m) + A.5 (4 m) + A.6 over 11 masker + A.2 (4 m) + A.3 (16) + A.4 (5 m) + A.3 (16 m) + A.5 (4 m) + A.6 over 6 masker =112 masker. Du starter midt bak, de 9 første maskene er halve bakstykket (A.1 over 5 masker + A.2), så strikker du 1. erme (A.3+A.4+A.3), deretter forstykket (A.5 + A.6 over 6 masker + A.2), så 2.erme (A.3+A.4+A.3) og til slutt den andre delen av bakstykket: A.5 + A.6 over 6 masker). mvh DROPS Design
01.07.2024 - 11:45
![]() Charlotte Larsen escribió:
Charlotte Larsen escribió:
Jeg er startet på Winter Owl sweater og forstår ikke en lyd - har lavet hals en ret omgang hvor der er taget ud en vrang omgang og pindeskift. og nu til mønster A1 over 5 mask - det er som der står en gang og mønster A2 halvt bagstykke - men hvor mange gang - det giver ingen mening og har nu haft flere til at kikke på opskriften - please hjælp - er masker til ryg 19 ? og 37 til ærmer og 19 til forstykke og så 37 til ærme
28.06.2024 - 09:13DROPS Design respondió:
Hej Charlotte, hvilke størrelse strikker du, så skal vi prøve at forklare 1.omgang
28.06.2024 - 14:23
![]() Ana Maria Alvez escribió:
Ana Maria Alvez escribió:
Me gustaria conseguir este patron,hay que comprar? Me puedes asesorar?
11.06.2024 - 19:10
![]() Diny escribió:
Diny escribió:
Hoe vaak wordt het patroon in de hoogte herhaald? Wanneer ga ik over naar tricotsteek? Ik brei het vest, maar in de beschrijving van vest en trui zie ik hetzelfde. Kan ik ook langer doorgaan met het patroon dan op de foto's is te zien?
03.06.2024 - 15:32DROPS Design respondió:
Dag Diny,
Het patroon brei je op de pas, zodra je verder gaat met het lijf, brei je tricotsteek. Je mag natuurlijk langer door gaan met het patroon.
03.06.2024 - 20:24
![]() Elke escribió:
Elke escribió:
Wie teile ich die 104 Maschen der Passe für Rücken, Vorderteil und Ärmel auf. Diese Angabe fehlt. Danke
22.04.2024 - 23:53DROPS Design respondió:
Liebe Elke, so stricken Sie die 104 Maschen: A.1 über 5 Maschen, A.2 (2 Maschen) (= ca. halbes Rückenteil) A.3 (16 Maschen), A.4 (5 Maschen), A.3 (16 Maschen) (= Ärmel), A.5 (2 Maschen), A.6 über 11 Maschen, A.2 (2 Maschen) (= Vorderteil), A.3 (16 Maschen), A.4 (5 Maschen), A.3 (16 Maschen) (= Ärmel), A.5 (2 Maschen), A.6 über 6 Maschen (restliches Rückenteil) = 5+2+16+5+16+2+11+2+16+5+16+2+6=104 Maschen. Viel Spaß beim Stricken!
23.04.2024 - 08:37
![]() Fracinel escribió:
Fracinel escribió:
Bonjour,je ne comprend pas A5,A6 au dessus des 11 mailles ( X L ) A 5=4 MAILLES A 6=5 MAILLES = 9 mailles et non 11 mailles
14.04.2024 - 12:27DROPS Design respondió:
Bonjour Mme Fracinel, quand on tricote A.6 au-dessus des 11 mailles suivantes, vous tricotez 2 fois les 5 mailles de A.6 et vous terminez par la 1ère maille de A.6 (ainsi le motif commence et se termine de la même façon. Effectivement, A.5 = 4 mailles en taille XL mais A.5 n'est pas à répéter en largeur, c'est A.6 que l'on va répéter pour avoir 11 mailles. Bon tricot!
15.04.2024 - 08:38
![]() Francinel escribió:
Francinel escribió:
Magnifique nais incompréhensible dommage j'ai essayé plusieurs fois, Je ne comprend pas ça ne correspond pas
14.04.2024 - 11:50
|
||||||||||
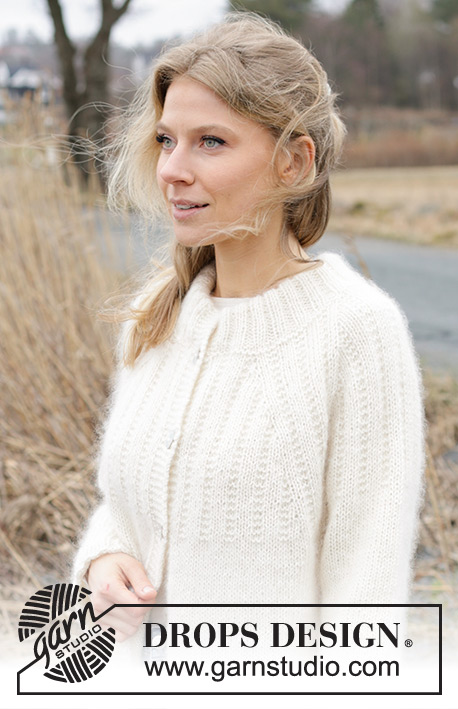
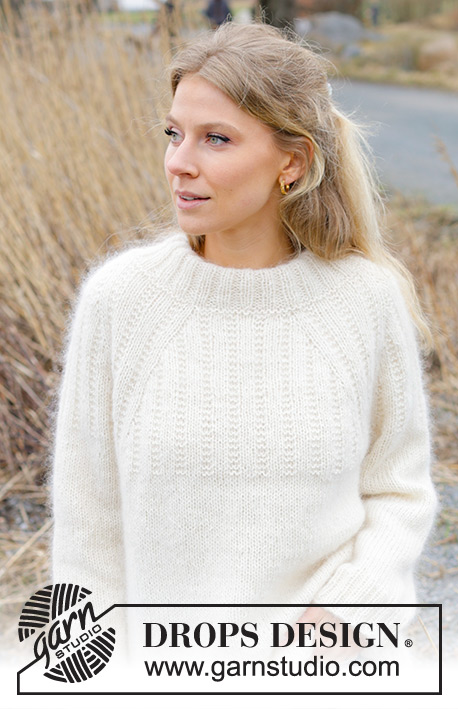
Winter Owl Sweater#winterowlsweater |
||||||||||
 |
 |
|||||||||
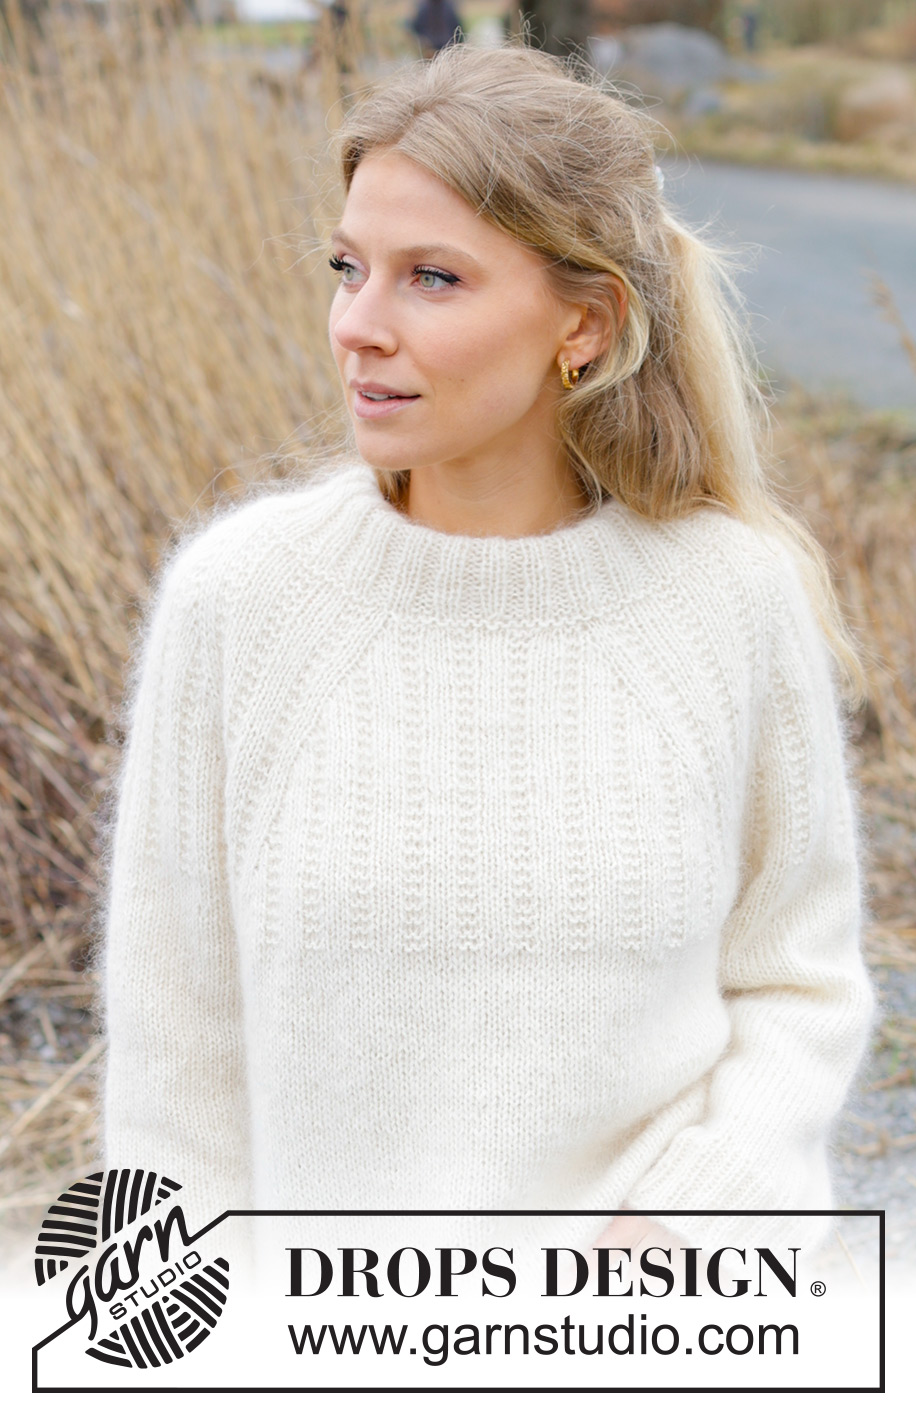
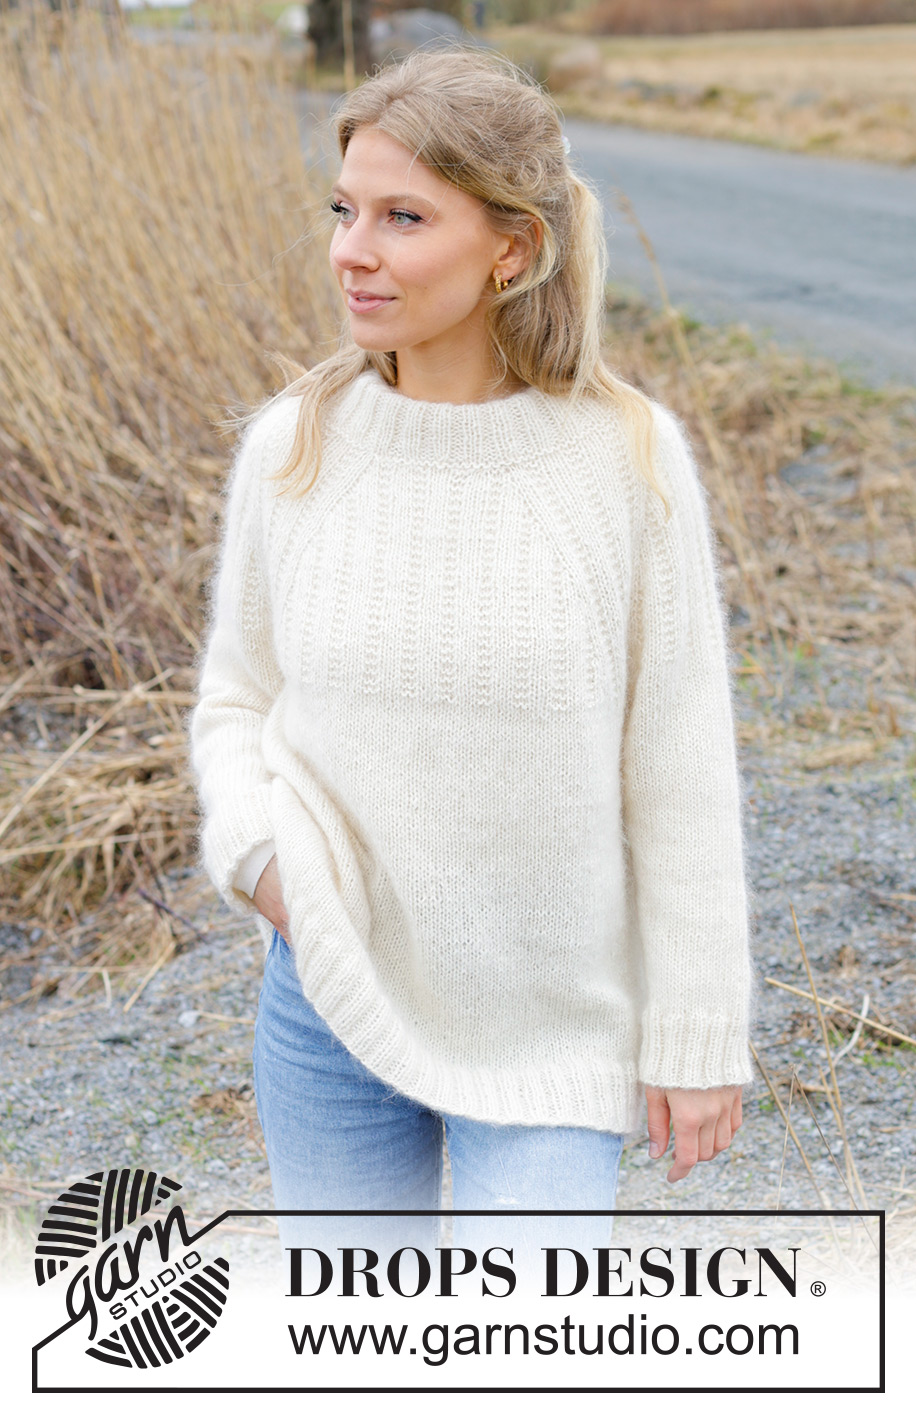
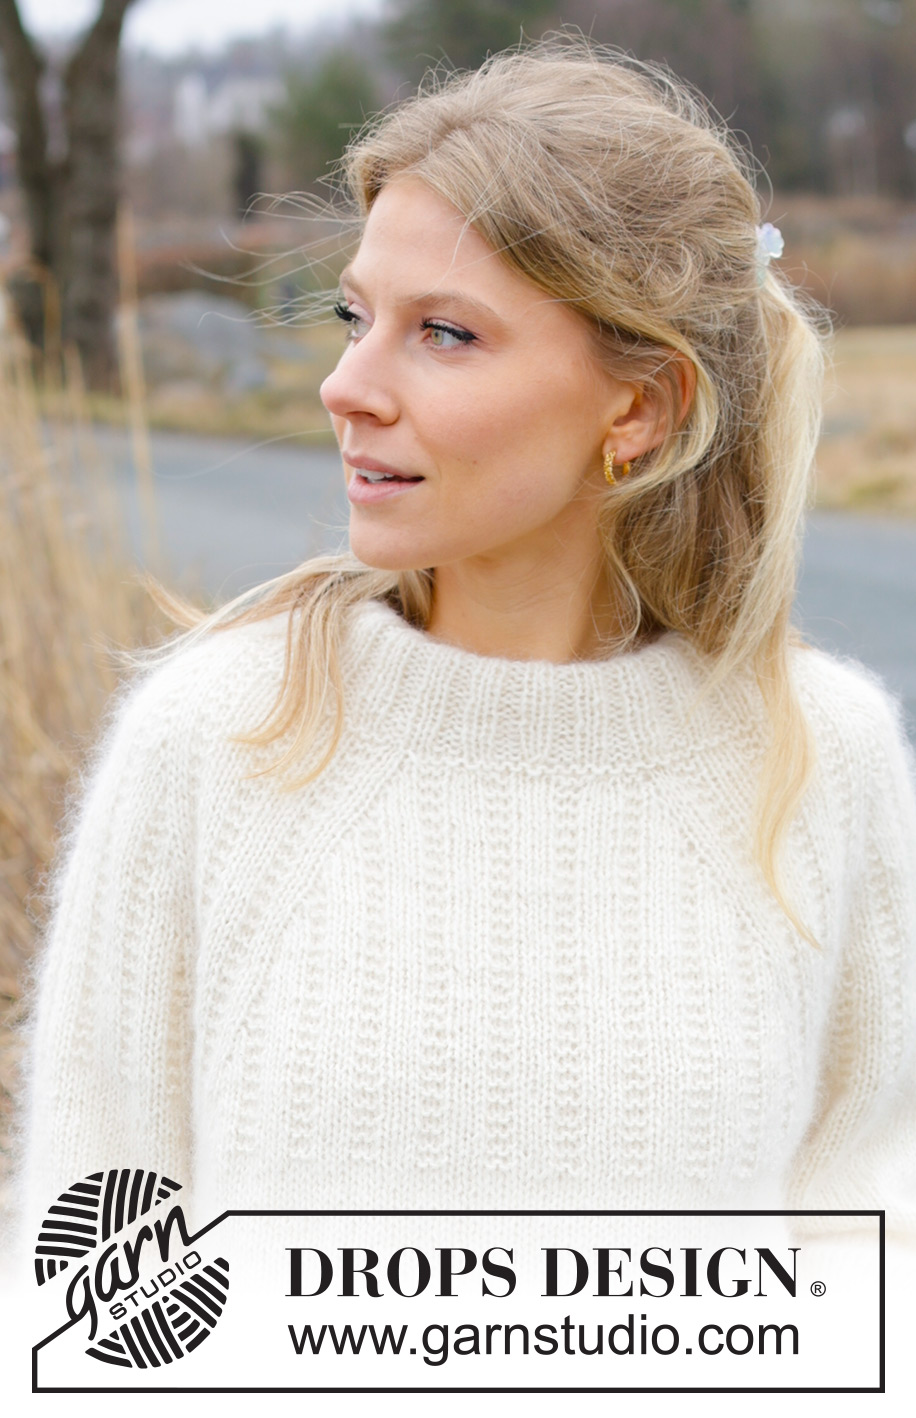
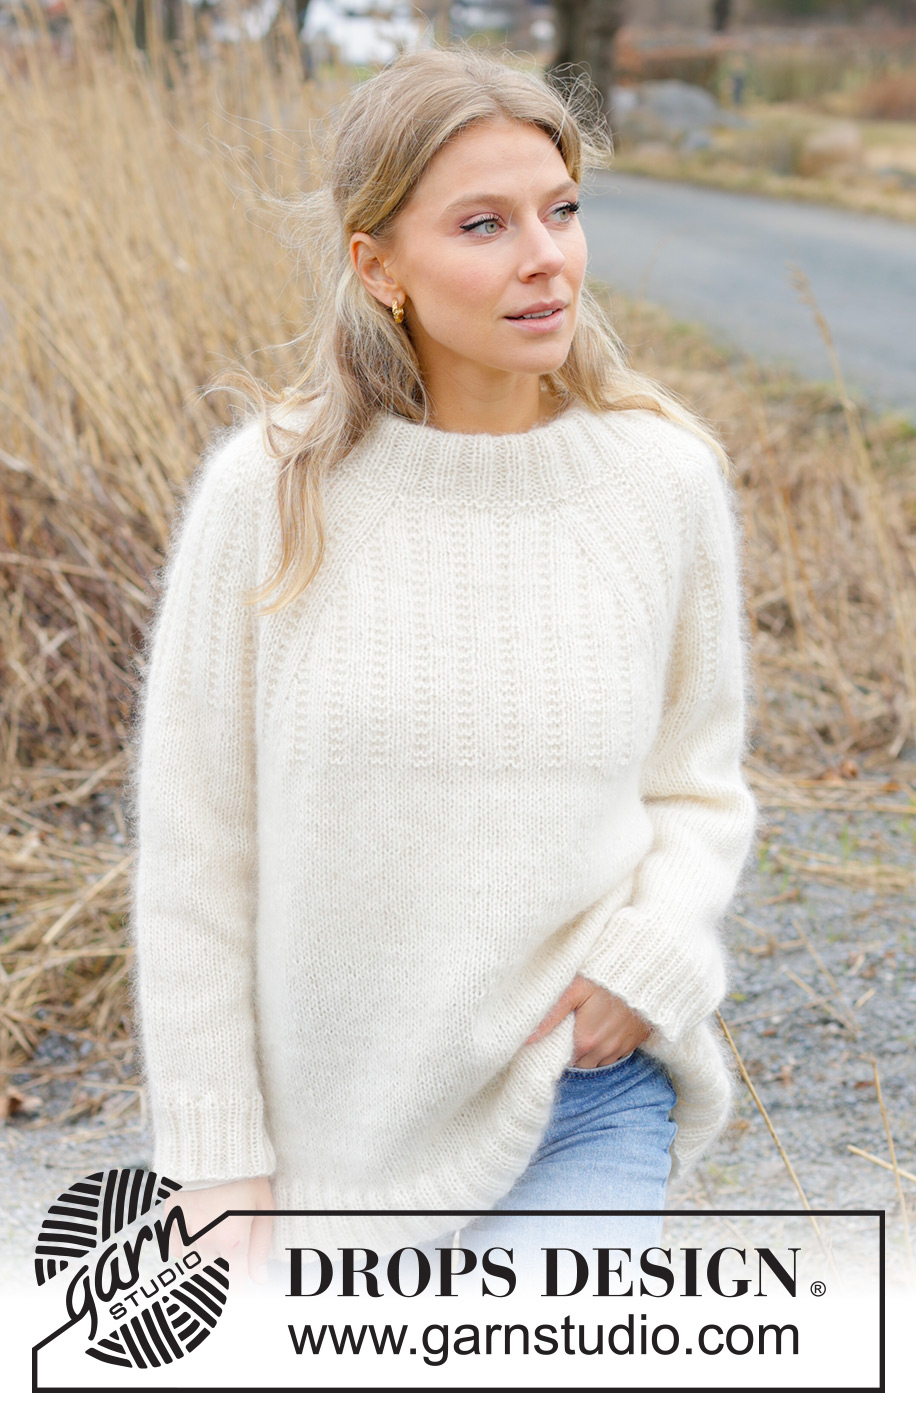
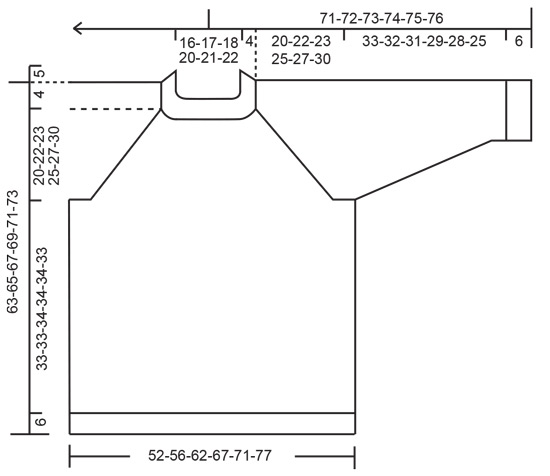
Jersey de punto en DROPS Nord y DROPS Kid-Silk. La pieza está tejida de arriba hacia abajo con cuello doble, raglán y patrón en relieve. Tallas S – XXXL.
DROPS 243-1 |
||||||||||
|
------------------------------------------------ EXPLICACIONES PARA REALIZAR EL PATRÓN: ------------------------------------------------ PATRÓN: Ver diagramas A.1 a A.6. Elegir el diagrama para tu talla (aplica a A.2 y A.5). TIP PARA DISMINUIR (para las mangas): Disminuir 1 punto a cada lado del hilo marcador de la manera siguiente: Tejer hasta que resten 3 puntos antes del hilo marcador, tejer 2 puntos juntos de derecho, tejer 2 puntos derechos (el hilo marcador está entre estos 2 puntos), deslizar 1 punto como de derecho, tejer 1 punto derecho y pasar el punto deslizado por encima del punto tejido (2 puntos disminuidos). ------------------------------------------------ COMENZAR LA PIEZA AQUÍ: ------------------------------------------------ JERSEY – RESUMEN DE LA PIEZA: El cuello y el canesú se tejen en redondo con aguja circular, a partir del centro de la espalda y de arriba hacia abajo. El canesú se divide para el cuerpo y las mangas y el cuerpo es continuado en redondo con aguja circular. Las mangas se tejen en redondo con aguja circular corta/agujas de doble punta. CUELLO DOBLE: Montar 76-80-84-88-92-96 puntos con 1 hilo DROPS Nord y 2 hilos DROPS Kid-Silk usando agujas circulares cortas tamaños 4.5 y 5.5 mm sostenidas juntas. Retirar la aguja tamaño 5.5 mm manteniendo los puntos en la aguja tamaño 4.5 mm (esto proporciona una orilla de montaje elástica). Tejer en resorte en redondo (2 derechos, 2 reveses) durante 10 cm. Doblar el cuello en dos hacia el lado de adentro y tejer 1 vuelta más de resorte, tejiendo cada 4º punto junto con su punto correspondiente en la orilla de montaje. Tejer 1 vuelta de derecho y aumentar 24 puntos distribuidos equitativamente = 100-104-108-112-116-120 puntos. Tejer 1 vuelta de revés. Insertar 1 marcador; el canesú se mide a partir de aquí. CANESÚ: Cambiar a aguja circular corta tamaño 5.5 mm y tejer el patrón de la manera siguiente (el principio de la vuelta está en la pieza de la espalda): Tejer A.1 sobre 5-5-5-5-5-10 puntos, A.2 (aprox. mitad pieza de la espalda), A.3, A.4, A.3 (manga), A.5, A.6 sobre 11-11-11-11-11-21 puntos, A.2 (pieza del frente), A.3, A.4, A.3 (manga), A.5, A.6 sobre 6-6-6-6-6-11 puntos (resto de la pieza de la espalda). Continuar este patrón y aumentar como se muestra en A.2, A.4 y A.5 (es decir, aumentar en dirección de cada repetición de A.3 y 8 aumentos cada 2ª vuelta). Los puntos aumentados se tejen retorcidos dentro del patrón – no se forma un agujero. ¡RECORDAR MANTENER LA MISMA TENSIÓN DE TEJIDO DE LA MUESTRA! Los diagramas A.1, A.3 y A.6 son repetidos en altura. Cuando los diagramas A.2, A.4 y A.5 estén terminados 1 vez en altura, continuar los aumentos como antes y tejer los puntos retorcidos como antes hasta haber aumentado un total de 17-19-23-25-27-30 veces (incluyendo los aumentos en A.2, A.4 y A.5) = 238-258-294-314-334-362 puntos. Continuar el patrón sin más aumentos hasta que el canesú mida 20-22-23-25-27-30 cm a partir del marcador. Ahora dividir para el cuerpo y las mangas de la manera siguiente: Tejer 37-39-44-48-51-57 puntos derechos (aprox. mitad pieza de la espalda), colocar los 43-49-57-59-63-65 puntos siguientes en un hilo), montar 8-10-10-10-10-8 puntos en el lado bajo la manga, tejer 76-80-90-98-104-116 puntos derechos (pieza del frente), colocar los 43-49-57-59-63-65 puntos siguientes en un hilo), montar 8-10-10-10-10-8 puntos en el lado bajo la manga, tejer los últimos 39-41-46-50-53-59 puntos derechos (resto de la pieza de la espalda). Terminar el cuerpo y las mangas separadamente. CUERPO: = 168-180-200-216-228-248 puntos. Continuar con punto jersey en redondo durante 33-33-34-34-34-33 cm más. Tejer 1 vuelta de derecho y aumentar 24-24-28-28-32-32 puntos distribuidos equitativamente = 192-204-228-244-260-280 puntos. Cambiar a aguja circular tamaño 4.5 mm. Tejer en resorte (2 derechos, 2 reveses) durante 6 cm. Rematar con derecho sobre derecho y revés sobre revés. La pieza mide aprox. 63-65-67-69-71-73 cm a partir del hombro. MANGAS: Colocar los 43-49-57-59-63-65 puntos del hilo en uno de los lados de la pieza en aguja circular corta/agujas de doble punta tamaño 5.5 mm y levantar 1 punto en cada uno de los nuevos puntos montados bajo la manga = 51-59-67-69-73-73 puntos. Insertar un hilo marcador en el centro de los nuevos puntos bajo la manga. Continuar punto jersey en redondo. Cuando la manga mida 3-3-3-2-2-2 cm, disminuir 1 punto a cada lado del hilo marcador – leer TIP PARA DISMINUIR. Disminuir así cada 6-4-2½-2½-2-1½ cm un total de 5-7-11-11-13-12 veces = 41-45-45-47-47-49 puntos. Cuando la manga mida 33-32-31-29-28-25 cm, tejer 1 vuelta de derecho y aumentar 7-7-7-9-9-11 puntos distribuidos equitativamente = 48-52-52-56-56-60 puntos. Cambiar a agujas de doble punta tamaño 4.5 mm y tejer en resorte (2 derechos, 2 reveses) durante 6 cm. Rematar. La manga mide aprox. 39-38-37-35-34-33 cm a partir de la división. Tejer la otra manga de la misma manera. |
||||||||||
Explicaciones del diagrama |
||||||||||
|
||||||||||
 |
||||||||||
 |
||||||||||
 |
||||||||||
 |
||||||||||
¿Terminaste este patrón?Entonces, etiqueta tus fotos con #dropspattern #winterowlsweater o envíalas a la galería #dropsfan. ¿Necesitas ayuda con este patrón?Encontrarás 27 videos tutoriales, un espacio para comentarios/preguntas y más visitando la página del patrón en garnstudio.com © 1982-2026 DROPS Design A/S. Todos los derechos reservados. Este documento, incluyendo todas sus sub-secciones, está protegido por los derechos de autor (copyright). Lee más acerca de lo que puedes hacer con nuestros patrones en la parte de abajo de cada patrón de nuestro sitio. |
||||||||||


Con más de 40 años en el diseño de modelos de punto y de ganchillo, DROPS Design ofrece una de las más vastas colecciones de patrones gratuitos en el internet - traducidos en 17 idiomas. Al día de hoy, contamos con 324 catálogos y 12290 patrones - de los cuales 11675 están traducidos en español.
Nosotros trabajamos con mucho esmero para brindarte lo mejor que las labores de punto y ganchillo tienen para ofrecer,inspiración y consejos, así como hilos de magnífica calidad a precios increíbles! Te gustaría usar nuestros patrones para otro fin además del uso personal? Puedes leer acerca de lo que estás permitida a hacer en el texto de Copyright en la parte de abajo de todos nuestros patrones. Felices labores!
Escribe un comentario sobre DROPS 243-1
¡Nos encantaría saber qué piensas acerca de este patrón!
Si quieres escribir una pregunta referente al patrón, por favor asegúrate de elegir la categoría correcta en el formulario debajo, para acelerar el proceso de respuesta. Los campos obligatorios están marcados con un *.