
Categorías populares
¿Buscas un hilo?


Comentarios / Preguntas (52)
![]() 周岐蓁 escribió:
周岐蓁 escribió:
ThankS ! Nice pattern!
16.05.2025 - 11:53
![]() Györki Mária escribió:
Györki Mária escribió:
Szeretném megkérdezni az xxxl méret milyen mellbőséghez van? Köszö nöm
10.05.2025 - 08:16
![]() MARIA MARGARITA CABRERA CAVIERES escribió:
MARIA MARGARITA CABRERA CAVIERES escribió:
Agradezco la oportunidad para felicitar a los creadores de esta página porque permite aprender de las personas que saben tanto y que son desinteresadas y muestran y comparten sus conocimientos.
10.04.2025 - 15:57
![]() Ingrid Neven escribió:
Ingrid Neven escribió:
Beste,ivm de steken meerderen,dat is nu heel goed gelukt,zonder gaatjes,nu zie je de rij waar je de steken hebt moeten meerderen,wat kan ik daaraan doen om dat verschil niet te hart laten opvallen,heb al een paar keer uitgetrokken,maar blijf het zien,wat zou jij doen of wat is uw idee,gr
07.04.2025 - 14:02DROPS Design respondió:
Dag Ingrid,
Het is helaas niet helemaal te voorkomen dat je dit een beetje ziet.
09.04.2025 - 10:33
![]() M Gulen escribió:
M Gulen escribió:
Als je naald 11 gebreid hebt van A2 moet je de steken dan weer terugzetten bij de volgende naald
07.04.2025 - 11:53DROPS Design respondió:
Dag M Gulen,
Nee, je hoeft geen steken terug te zetten. Er zit een verspring in waar de steken worden samen gebreid en waar de omslagen komen, maar je kunt gewoon door breien, je hoeft nergens steken terug te zetten in het telpatroon.
09.04.2025 - 10:35
![]() Christine Lynch escribió:
Christine Lynch escribió:
If you drop down to a US4 needle on the Green Grove Sweater to meet gauge would you drop down to a US0 for the neck or slightly larger?
31.03.2025 - 19:58DROPS Design respondió:
Dear Mrs Lynch, you can probably go down to a needle size US0, just make sure it's not too tight when you work neck. Happy knitting!
01.04.2025 - 08:50
![]() Christine Lynch escribió:
Christine Lynch escribió:
In the Green Grove Sweater, when knitting the graph pattern there are yarn overs. In the tips it refers to a kint in the back loop on increase stitches, would you bo the same in the design pattern listed on the graph? Than you!
31.03.2025 - 19:48DROPS Design respondió:
Hi Christine, No, the yarn overs in the diagrams are part of the lace pattern, so are worked through the front loop to leave holes. Happy knitting!
01.04.2025 - 06:45
![]() Christine Lynch escribió:
Christine Lynch escribió:
I did a swatch for gage and it come up with 18 stitches by 29 rows for the Green Grove Sweater. I went up a needle size and I blocked the piece. I read you don't block I was wondering why. And if I just went by the measurements using the size 6 instead of 7 because I prefer the tighter weave would it work? Thank you
28.03.2025 - 18:21DROPS Design respondió:
Dear Christine, if you have a 18 stitches x29 rows gauge you would need to use a smaller needle (you have too few stitches), not a larger needle, to work the pattern tighter. You'd need to try with a US4 needle instead to try a get the correct gauge. This way the weave should look even tighter and the gauge would also be closer to the actual one probably, so you could work the pattern as it is. The gauge should not be blocked if the final piece isn't blocked; otherwise it wouldn't reflect the gauge that you'll have as you work the pattern, so the garment might not have the correct shape/measurements at the end. Happy knitting!
30.03.2025 - 20:28
![]() Ingrid Neven escribió:
Ingrid Neven escribió:
Beste,ik zij aan het begin van de halsrand met 180 steken,en 5 cm,nu moet ik 36 steken meerderen,waardoor ik gaatjes heb en mog nog 2cm breien, vindt het zo vreselijk,heb al vanalles gedaan maar krijg het niet mooi,,heb uw hulp nodig,gr
18.03.2025 - 11:44DROPS Design respondió:
Dag Ingrid,
Bij het meerderen maak je omslagen en deze brei je op de volgende naald gedraaid om een gaatje te voorkomen. Wat je in plaats van omslagen maken ook kunt doen om te meerderen is de draad tussen twee steken opnemen en deze gedraaid recht breien. Zie deze video.
18.03.2025 - 20:08
![]() Anne escribió:
Anne escribió:
Bonjour, je me demande s'il n'y a pas une erreur sur cette partie du patron : Quand la manche mesure 4-3-3-2 cm depuis la division, diminuer 2 mailles au milieu sous la manche - voir DIMINUTIONS. Diminuer ainsi 2-3-3-3 fois au total tous les 4-3-3-2 cm = 78-84-88-92 mailles. Comment peut-on arriver à 88 mailles pour la taille L après diminution en partant de 82 mailles ? 🤔
17.03.2025 - 14:02DROPS Design respondió:
Bonjour, notez que la taille L est la 1ère des 4 tailles dans ce paragraphe (L à XXXL), autrement dit, vous allez diminuer en taille L à partir de 4 cm et 2 fois au total tous les 4 cm = il reste 78 mailles. Bon tricot!
17.03.2025 - 15:36
|
||||||||||||||||||||||
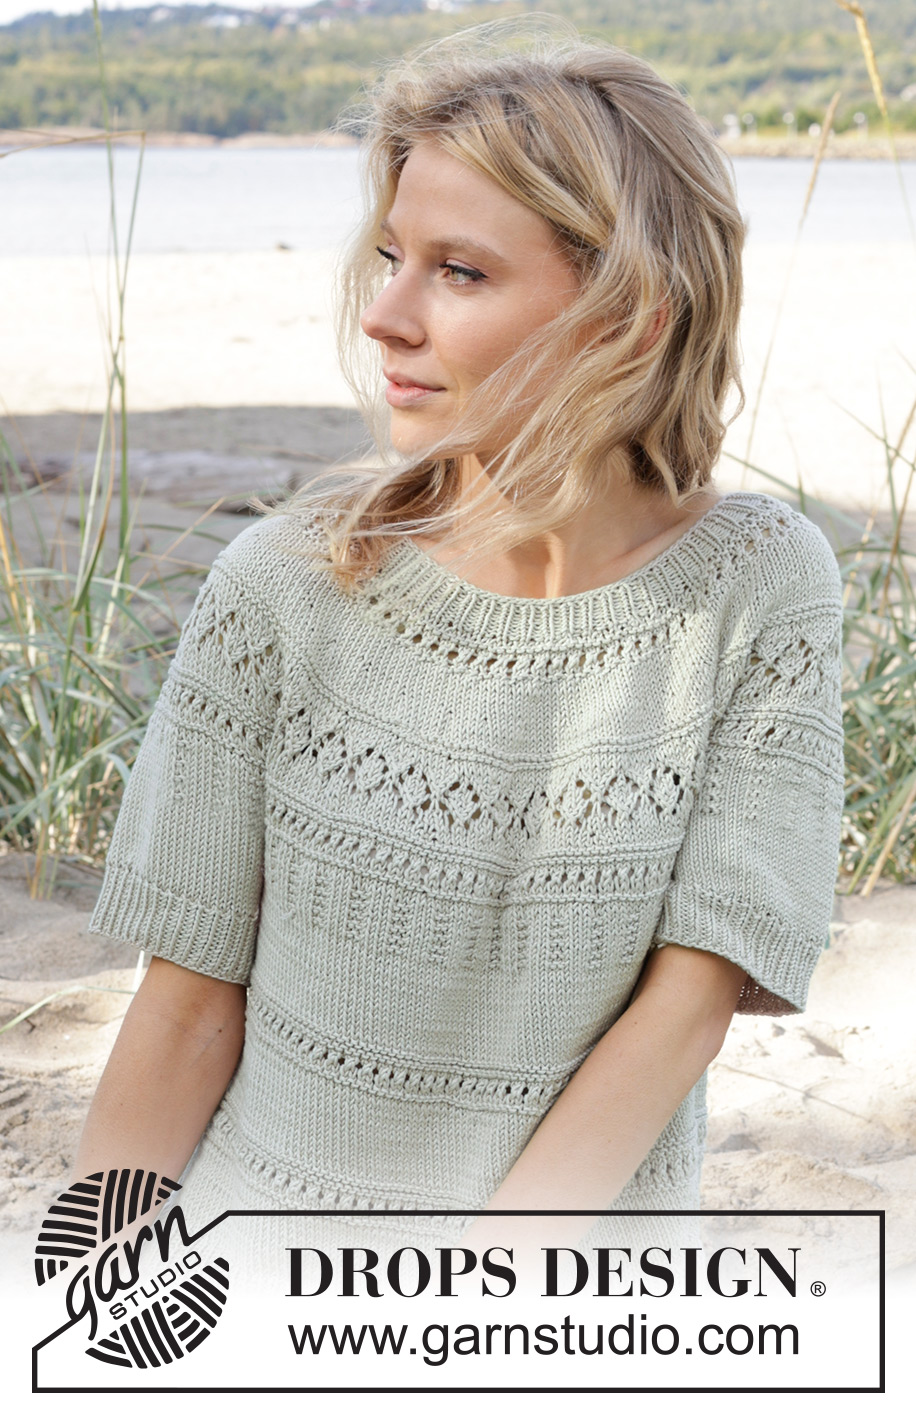
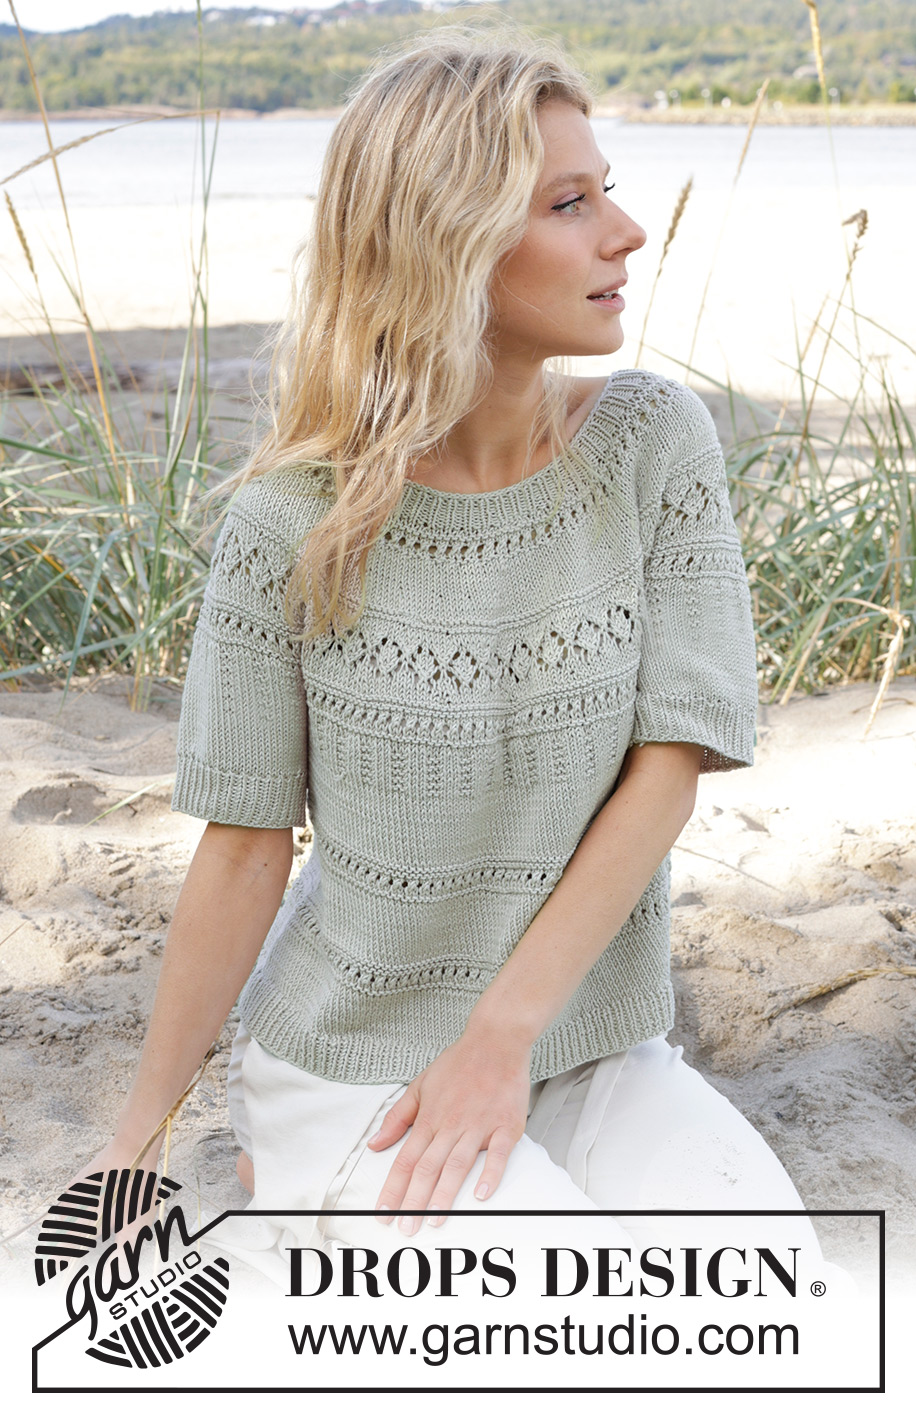
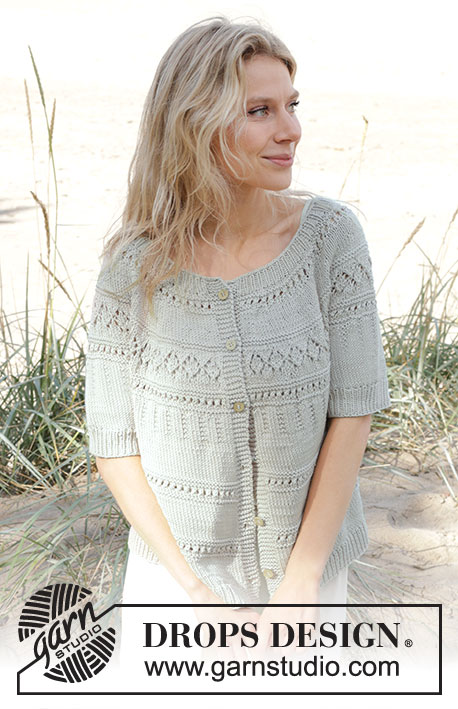
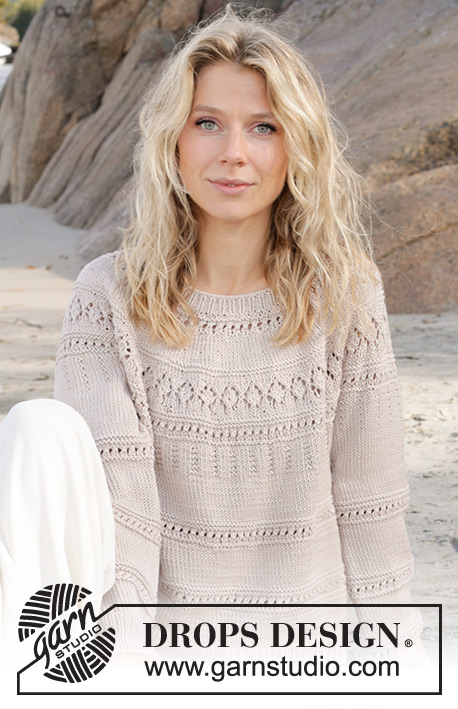
Green Grove Tee#greengrovetee |
||||||||||||||||||||||
 |
 |
|||||||||||||||||||||
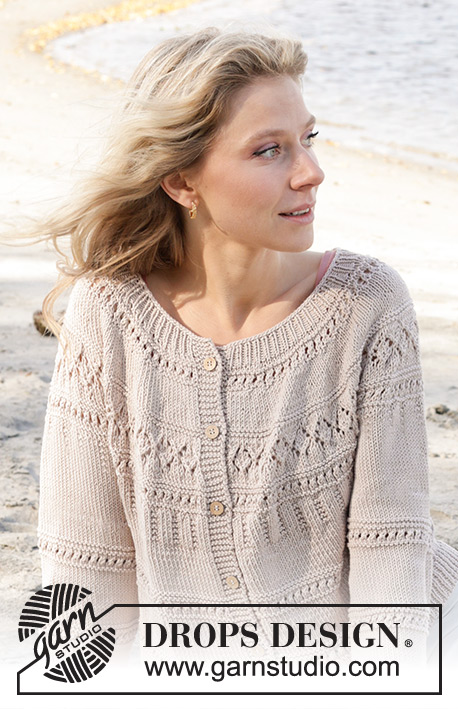
Jersey de punto con mangas cortas en DROPS Muskat o DROPS Cotton Merino. La pieza está tejida de arriba hacia abajo con canesú redondo y patrón de calados. Tallas: S – XXXL.
DROPS 239-26 |
||||||||||||||||||||||
|
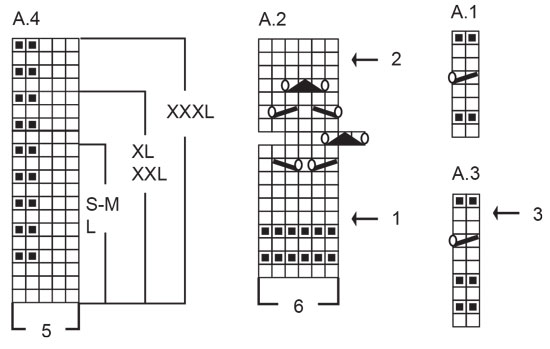
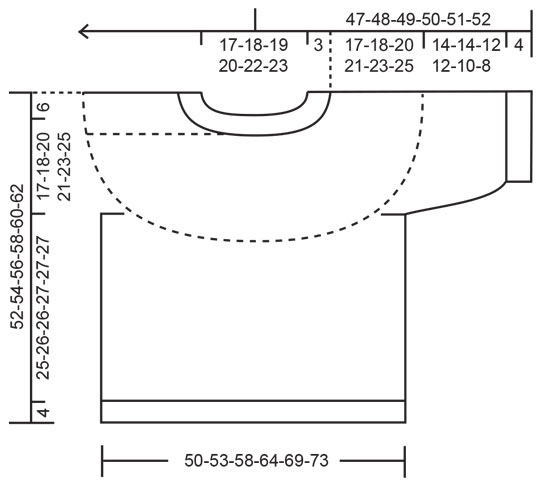
EXPLICACIONES PARA REALIZAR EL PATRÓN: ------------------------------------------------ TIP PARA AUMENTAR: Aumentar 1 punto haciendo 1 lazada. En la vuelta siguiente, tejer la lazada retorcida para evitar que se formen agujeros. PATRÓN: Ver diagramas A.1 a A.4. Los diagramas muestran todas las hileras del patrón vistas por el lado derecho. TIP PARA DISMINUIR (aplicar a las mangas tallas L, XL, XXL y XXXL): Disminuir 1 punto a cada lado del hilo marcador de la manera siguiente: Tejer hasta que resten 3 puntos antes del hilo marcador, tejer 2 puntos juntos de derecho, tejer 2 puntos derechos (el hilo marcador está entre estos 2 puntos), deslizar 1 punto como de derecho, tejer 1 punto derecho, pasar el punto deslizado por encima del punto tejido (2 puntos disminuidos). ------------------------------------------------ COMENZAR LA PIEZA AQUÍ: ------------------------------------------------ JERSEY – RESUMEN DE LA PIEZA: Tejer la orilla del escote y el canesú en redondo en aguja circular a partir del centro de la espalda, de arriba hacia abajo. Ahora dividir el canesú para el cuerpo y las mangas. Tejer el cuerpo en redondo en aguja circular. Tejer las mangas en redondo en agujas de doble punta/una aguja circular corta. ORILLA DEL ESCOTE: Montar 122-126-130-136-142-148 puntos en aguja circular corta tamaño 3 mm con DROPS Muskat o DROPS Cotton Merino. Tejer 1 vuelta de derecho. Después tejer el resorte (= 1 derecho/1 revés) durante 3 cm. Cuando el resorte esté hecho, tejer 1 vuelta de derecho y, al mismo tiempo, aumentar 36-38-40-44-48-52 puntos distribuidos equitativamente – leer TIP PARA AUMENTAR = 158-164-170-180-190-200 puntos. Insertar 1 marcador en el centro de la vuelta. Medir el canesú a partir de este marcador. CANESÚ: Cambiar a aguja circular tamaño 4 mm. Tejer A.1 en redondo en el canesú. Cuando se ha tejido A.1, continuar en punto jersey en redondo. ¡RECORDAR MANTENER LA MISMA TENSIÓN DE TEJIDO DE LA MUESTRA! Cuando la pieza mida 4-4-5-5-6-6 cm a partir del marcador, aumentar 40-44-50-56-60-64 puntos distribuidos equitativamente – recordar el TIP PARA AUMENTAR = 198-208-220-236-250-264 puntos. Cuando la pieza mida 7-7-8-8-9-10 cm a partir del marcador, tejer A.2 en redondo en el canesú. ¡NOTA! En la 11ª vuelta del diagrama, desplazar el principio de la vuelta 2 puntos hacia la derecha para que el patrón encaje en toda la vuelta. Después comenzar la vuelta siguiente como antes. AL MISMO TIEMPO, en cada vuelta marcada con flecha en el diagrama, aumentar equitativamente de la manera siguiente: Flecha-1: Aumentar 42-44-50-58-62-66 puntos distribuidos equitativamente = 240-252-270-294-312-330 puntos (ahora hay espacio para 40-42-45-49-52-55 repeticiones de A.2 en redondo en el canesú). Flecha-2: Aumentar 38-42-48-56-58-58 puntos distribuidos equitativamente = 278-294-318-350-370-388 puntos. Cuando se ha tejido A.2, tejer A.3 en redondo en el canesú. AL MISMO TIEMPO, en cada vuelta marcada con flecha aumentar equitativamente de la manera siguiente: Flecha-3: Aumentar 32-36-42-50-50-52 puntos distribuidos equitativamente = 310-330-360-400-420-440 puntos. Cuando se ha tejido A.3, tejer A.4 en redondo en el canesú. Cuando se ha tejido A.4 en tu talla, tejer en punto jersey, pero notar que en algunas tallas se divide el cuerpo y las mangas como está explicado abajo, antes de que A.4 esté terminado. DIVIDIENDO PARA EL CUERPO Y LAS MANGAS: Cuando la pieza mida 17-18-20-21-23-25 cm a partir del marcador, dividir el canesú para el cuerpo y las mangas. Si A.4 no está terminado en tu talla, terminar A.4 en el cuerpo y las mangas. Tejer 47-51-55-61-65-69 puntos como antes (mitad pieza de la espalda), deslizar los 60-64-70-78-80-82 puntos siguientes en un hilo para la manga, montar 10-10-12-12-14-16 nuevos puntos en la aguja (en el lado bajo la manga), tejer 95-101-110-122-130-138 puntos en punto jersey (pieza del frente), deslizar los 60-64-70-78-80-82 puntos siguientes en un hilo para la manga, montar 10-10-12-12-14-16 nuevos puntos en la aguja (en el lado bajo la manga), y tejer los últimos 48-50-55-61-65-69 puntos como antes (mitad pieza de la espalda). Terminar el cuerpo y las mangas separadamente. Ahora medir la pieza a partir de aquí. CUERPO: = 210-222-244-268-288-308 puntos. Si A.4 no está terminado en el canesú en tu talla, terminar A.4 (el patrón no va a encajar al centro bajo cada manga, pero asegurarse de continuar el patrón correctamente sobre los puntos del canesú y tejer el patrón hasta donde sea posible en dirección de cada lado bajo las mangas, tejer los puntos restantes en punto jersey). Cuando se ha tejido A.4, continuar en punto jersey. Cuando se han tejido 6-6½-7-7-7½-7½ cm en punto jersey después de A.4, tejer A.3 en redondo en el cuerpo. Cuando se ha tejido A.3, tejer en punto jersey durante 6-6½-7-7-7½-7½ cm. Después tejer A.3 en redondo en el cuerpo nuevamente. Cuando se ha tejido A.3, continuar en punto jersey. Cuando la pieza mida 25-26-26-27-27-27 cm a partir de la división, tejer 1 vuelta de derecho aumentando 20-22-22-26-28-30 puntos distribuidos equitativamente = 230-244-266-294-316-338 puntos. Cambiar a aguja circular tamaño 3 mm. Tejer en resorte (1 derecho/1 revés) durante 4 cm. Rematar flojo. El jersey mide aprox. 52-54-56-58-60-62 cm a partir del hombro. MANGAS: Deslizar los 60-64-70-78-80-82 puntos del hilo en uno de los lados de la pieza en agujas de doble punta o en una aguja circular corta tamaño 4 mm y levantar adicionalmente 1 punto en cada uno de los 10-10-12-12-14-16 puntos montados bajo la manga = 70-74-82-90-94-98 puntos. Insertar 1 hilo marcador al centro bajo la manga (en el centro de los 10-10-12-12-14-16 puntos). Comenzar la vuelta en el hilo marcador. Si A.4 no está terminado en tu talla, terminar A.4 (el patrón no va a encajar al centro bajo la manga, pero asegurarse de continuar el patrón correctamente sobre los puntos del canesú y tejer el patrón hasta donde sea posible en dirección al centro bajo las mangas, tejer los puntos restantes en punto jersey). Cuando se ha tejido A.4, continuar en punto jersey en redondo. En las tallas L, XL y XXXL disminuir puntos al centro bajo la manga como está explicado abajo (en S y M no se disminuyen puntos). TALLAS L, XL, XXL Y XXXL: Cuando la manga mida 4-3-3-2 cm a partir de la división, disminuir 2 puntos al centro bajo la manga – leer TIP PARA DISMINUIR. Disminuir así cada 4-3-3-2 cm 2-3-3-3 veces en total = 78-84-88-92 puntos. TODAS LAS TALLAS: Cuando la manga mida 14-14-12-11-10-8 cm a partir de la división, tejer 1 vuelta de derecho disminuyendo 4-6-8-10-10-10 puntos distribuidos equitativamente = 66-68-70-74-78-82 puntos. Cambiar a agujas de doble punta tamaño 3 mm. Tejer en resorte (1 derecho/1 revés) durante 4 cm. Rematar flojo. La manga mide aprox. 18-18-16-16-14-12 cm a partir de la división. Tejer la otra manga de la misma manera. |
||||||||||||||||||||||
Explicaciones del diagrama |
||||||||||||||||||||||
|
||||||||||||||||||||||
 |
||||||||||||||||||||||
 |
||||||||||||||||||||||
¿Terminaste este patrón?Entonces, etiqueta tus fotos con #dropspattern #greengrovetee o envíalas a la galería #dropsfan. ¿Necesitas ayuda con este patrón?Encontrarás 28 videos tutoriales, un espacio para comentarios/preguntas y más visitando la página del patrón en garnstudio.com © 1982-2026 DROPS Design A/S. Todos los derechos reservados. Este documento, incluyendo todas sus sub-secciones, está protegido por los derechos de autor (copyright). Lee más acerca de lo que puedes hacer con nuestros patrones en la parte de abajo de cada patrón de nuestro sitio. |
||||||||||||||||||||||


Con más de 40 años en el diseño de modelos de punto y de ganchillo, DROPS Design ofrece una de las más vastas colecciones de patrones gratuitos en el internet - traducidos en 17 idiomas. Al día de hoy, contamos con 324 catálogos y 12290 patrones - de los cuales 11673 están traducidos en español.
Nosotros trabajamos con mucho esmero para brindarte lo mejor que las labores de punto y ganchillo tienen para ofrecer,inspiración y consejos, así como hilos de magnífica calidad a precios increíbles! Te gustaría usar nuestros patrones para otro fin además del uso personal? Puedes leer acerca de lo que estás permitida a hacer en el texto de Copyright en la parte de abajo de todos nuestros patrones. Felices labores!
Escribe un comentario sobre DROPS 239-26
¡Nos encantaría saber qué piensas acerca de este patrón!
Si quieres escribir una pregunta referente al patrón, por favor asegúrate de elegir la categoría correcta en el formulario debajo, para acelerar el proceso de respuesta. Los campos obligatorios están marcados con un *.