
Categorías populares
¿Buscas un hilo?


Comentarios / Preguntas (189)
![]() Caroline escribió:
Caroline escribió:
Je suis fâchée! Je viens d'assembler les manches en me disant qu'elles n'étaient pas assez larges et pensant que c'était mon erreur et je découvre seulement maintenant la correction faite dernièrement: au lieu d'augmenter 5 fois aux 8 cm, il est maintenant indiqué d'augmenter 7 fois aux 5 cm, pour finir avec 43 mailles au lieu de 39. Bon, vous aurez peut-être envie de me répondre qu'il s'agit d'un patron gratuit, mais j'ai acheté pour + de 200$ de votre laine! :(
02.05.2024 - 23:39
![]() Jeanne escribió:
Jeanne escribió:
Dag mensen van DropsDesign, mooie trui, voor en achterpand zijn van verschillende lengte. Het patroon van ribbels en patentsteek loopt dan volgens mij niet mooi door. Klopt dat? Groetjes, Jeanne
08.04.2024 - 20:17DROPS Design respondió:
Dag Jeanne,
Ja, dat klopt. Het achterpand is langer en de ribbels en patentsteek lopen ook langer door naar beneden. Zo heeft de ontwerper dit bedacht. Als je het mooier vindt om voor het achterpand een langere boord te maken in plaats van de ribbels en de patentsteek door te laten lopen, dan kan dat natuurlijk.
09.04.2024 - 21:10
![]() Ana escribió:
Ana escribió:
Estoy tejido el modelo 236-9 . Llegue e las mangas, pero no sé cómo hacer la copa de las mangas . Por favor me explican gracias.
20.03.2024 - 21:18DROPS Design respondió:
Hola Ana, no se trabaja de ninguna forma específica. Quiere decir que, para la copa de la manga, pasas a trabajar en filas, de ida y vuelta, en vez de en redondo, pero sigues trabajando como antes (con el patrón). Esto es necesario para ajustar correctamente la costura de la manga al cuerpo.
24.03.2024 - 23:20
![]() Ana escribió:
Ana escribió:
Hola, estoy tejiendo este modelo, llegue a las mangas pero no sé como tejer " la copa de la manga"? Me pueden explicar. Mil gracias.
18.03.2024 - 20:54DROPS Design respondió:
Hola Ana, no se trabaja de ninguna forma específica. Quiere decir que, para la copa de la manga, pasas a trabajar en filas, de ida y vuelta, en vez de en redondo, pero sigues trabajando como antes (con el patrón). Esto es necesario para ajustar correctamente la costura de la manga al cuerpo.
24.03.2024 - 22:51
![]() Anne escribió:
Anne escribió:
Jeg forstår ikke helt opskriften omkring A.2 mht 1 retmaske i falsk patent indenfor 1 kantmaske i retstrik? Hvordan strikkes 1 retmaske i falsk patent?
15.03.2024 - 14:15DROPS Design respondió:
Hej Anne, den første maske efter kantmasken i hver side, strikkes som den glatstrikkede maske i det falske patent :)
19.03.2024 - 12:22
![]() Anne escribió:
Anne escribió:
Jeg forstår ikke helt opskriften omkring A.2 og mht 1 retmaske i falsk patent indenfor 1 kantmaske i retstrik?
11.03.2024 - 11:45DROPS Design respondió:
Hei Anne. Når du starter med A.2 er 1. pinne fra vrangen (i diagrammet er det den sorte prikken). Først strikker du kantmasken, deretter A.2 og for å få det likt på begge sider avslutter du pinnen med den sorte prikken og en kantmaske. Sett fra retten vil maske nr. 2 i begge sider være en rettmaske i falsk patent (maske nr 1 i begge sider er kantmasken). mvh DROPS Design
18.03.2024 - 13:05
![]() Tracy escribió:
Tracy escribió:
Hi. I don't understand the explanation for the diamond in the square in pattern A2
04.03.2024 - 13:21DROPS Design respondió:
Dear Tracy, A.2 is English rib, on every row from WS you work the dot as follows: make 1 yarn over, then slip the next stitch as if to purl; on every row from RS you work the diamond as follows: knit together yarn over and slipped stitch. See also how to work this English rib stitch here, in video - just note that in this pattern there is a purl stitch (seen from RS) between every English rib stitch. Happy knitting!
04.03.2024 - 15:36
![]() Clare Weight escribió:
Clare Weight escribió:
I want to use drops air. Surely my yardage will be twice that of the wish option as air is to be held double?
04.03.2024 - 00:47DROPS Design respondió:
Dear Clare, the amount in grams of DROPS Air is indicated below DROPS Wish and has already been calculated for working with double thread; you don't need to calculate anything extra. Happy knitting!
04.03.2024 - 00:50
![]() Caroline escribió:
Caroline escribió:
Bonjour, j'ai du mal à comprendre les explications du modèle 236-9 lorsqu'on arrive à l'encolure sur le devant. J'ai mis mes 11 m centrales en attente sur un fil. Mais après, on dit de "rabattre pour l'encolure tous les deux rgs: 1 x 2 m et 1 x 1 m = 16 m pour l'épaule". Je viens de mettre mes 11 m en attente et je suis sur l'endroit. Dois-je donc rabattre les mailles (1 x 2 m et 1 x 1 m et encore 1 x 2 m...) sur chaque rg envers, jusqu'à ce qu'il reste 16m?
23.02.2024 - 16:14DROPS Design respondió:
Bonjour Caroline, lorsque les 11 mailles centrales sont mises en attente, vous terminez chaque épaule séparément et, en même temps, vous rabattez pour former l'encolure au début de chaque rang à partir de l'encolure = en début de rang sur l'endroit pour l'épaule droite / en début de rang sur l'envers pour l'épaule gauche: 2 mailles 1 fois et 1 fois 1 maille, Vous aviez 49 mailles en taille L, soit 19 m pour chaque épaule - 3 mailles rabattues pour l'encolure = il reste 16 mailles pour l'épaule. Bon tricot!
23.02.2024 - 17:02
![]() Anneke Roeling escribió:
Anneke Roeling escribió:
Hallo Drops Design, Ik ben nu mijn voor- en achterpand opnieuw aan het breien want ik was niet tevreden over mijn kleurstelling ( ik gebruik 2 kleuren van drops Air) En het patentdeel komt niet overeen met de foto’s en werd veel te wijd, steek rekt erg uit. Nu opnieuw aan het breien gebruik ik de Halve Patentsteek , blijft beter in vorm en komt het wel overeen met de foto. Kan het kloppen dat het verkeerd beschreven staat in patroon? Vriendelijke groet, Anneke
10.02.2024 - 23:50DROPS Design respondió:
Dag Anneke,
Het deel in patentsteek is inderdaad vrij rekbaar, maar het klopt wel.
14.02.2024 - 20:23
|
||||||||||||||||
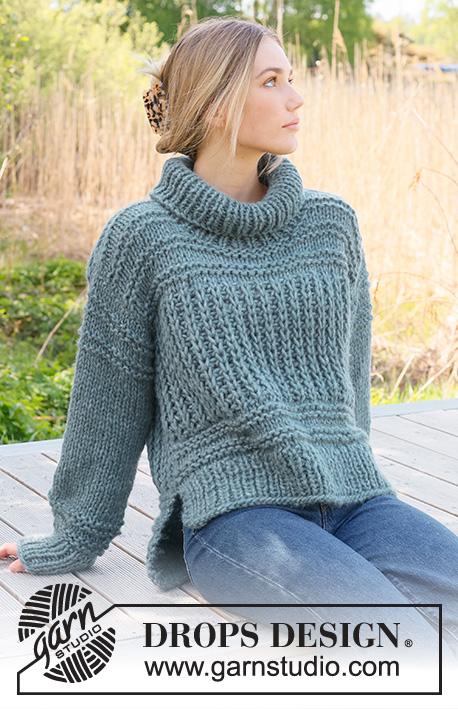
Rain Chain#rainchainsweater |
||||||||||||||||
 |
 |
|||||||||||||||
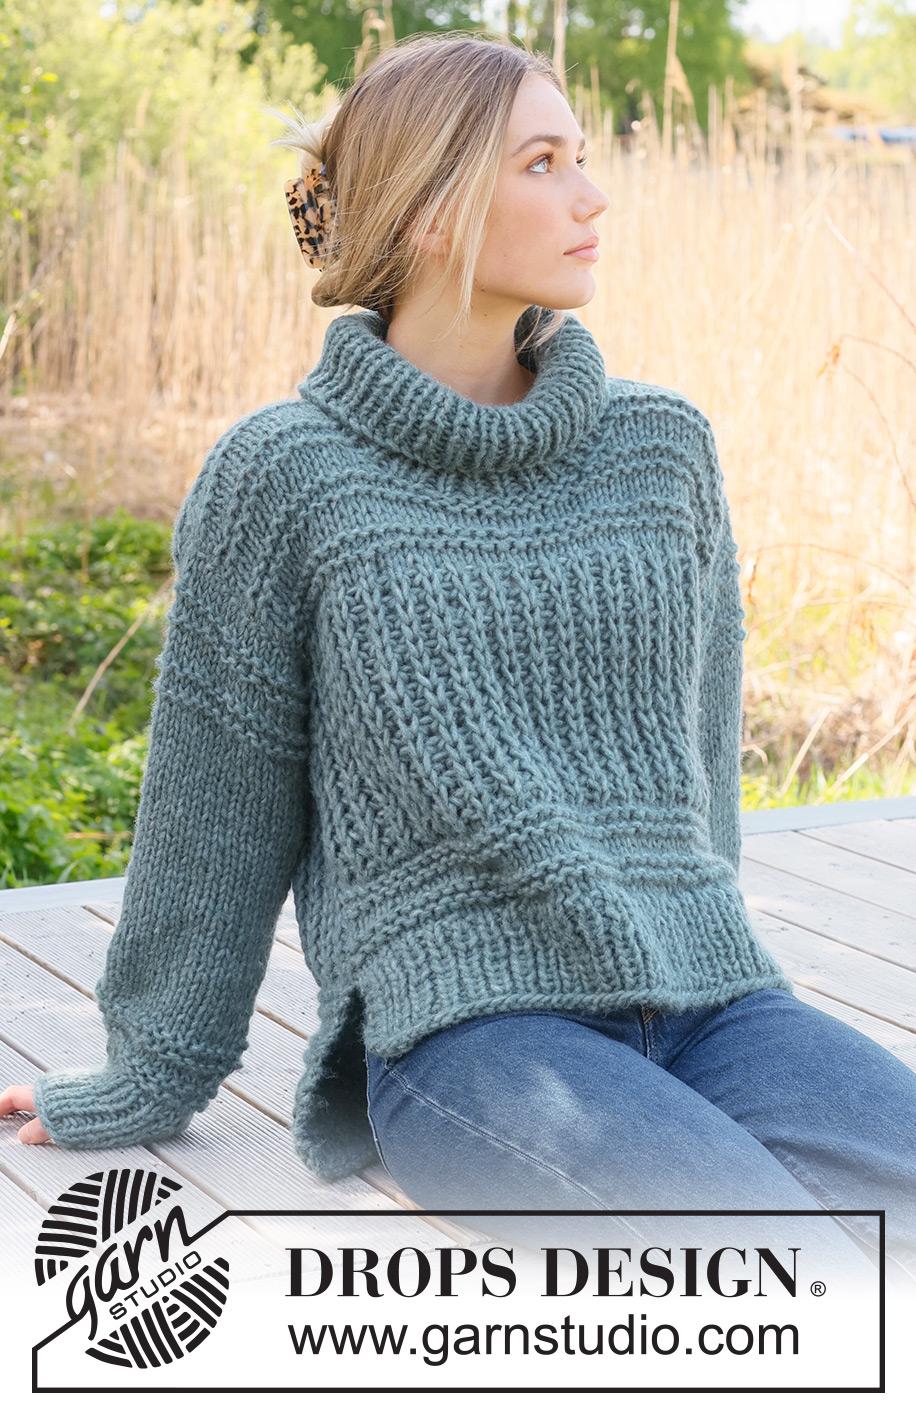
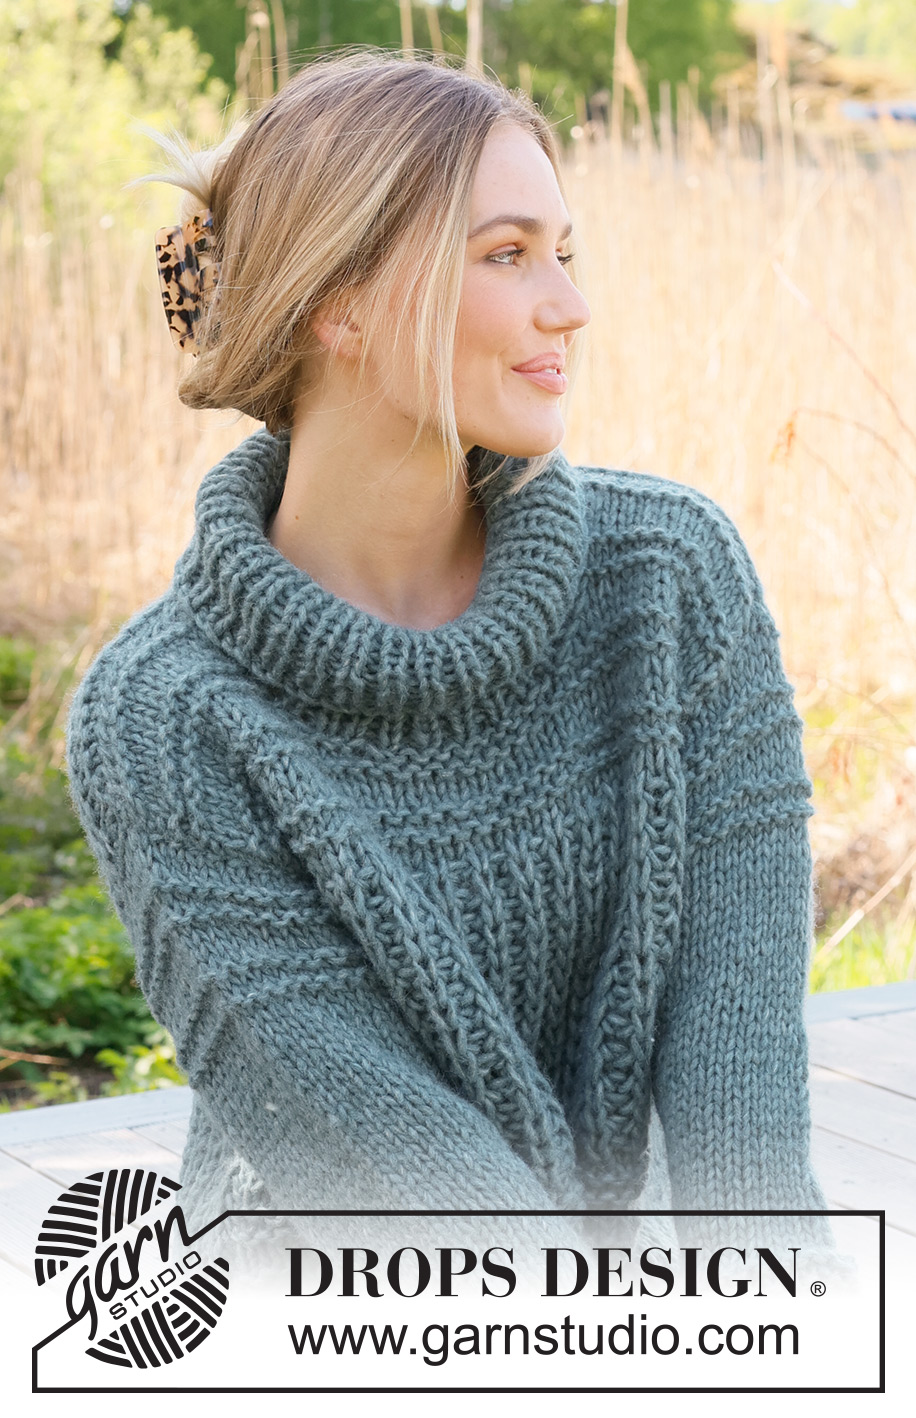
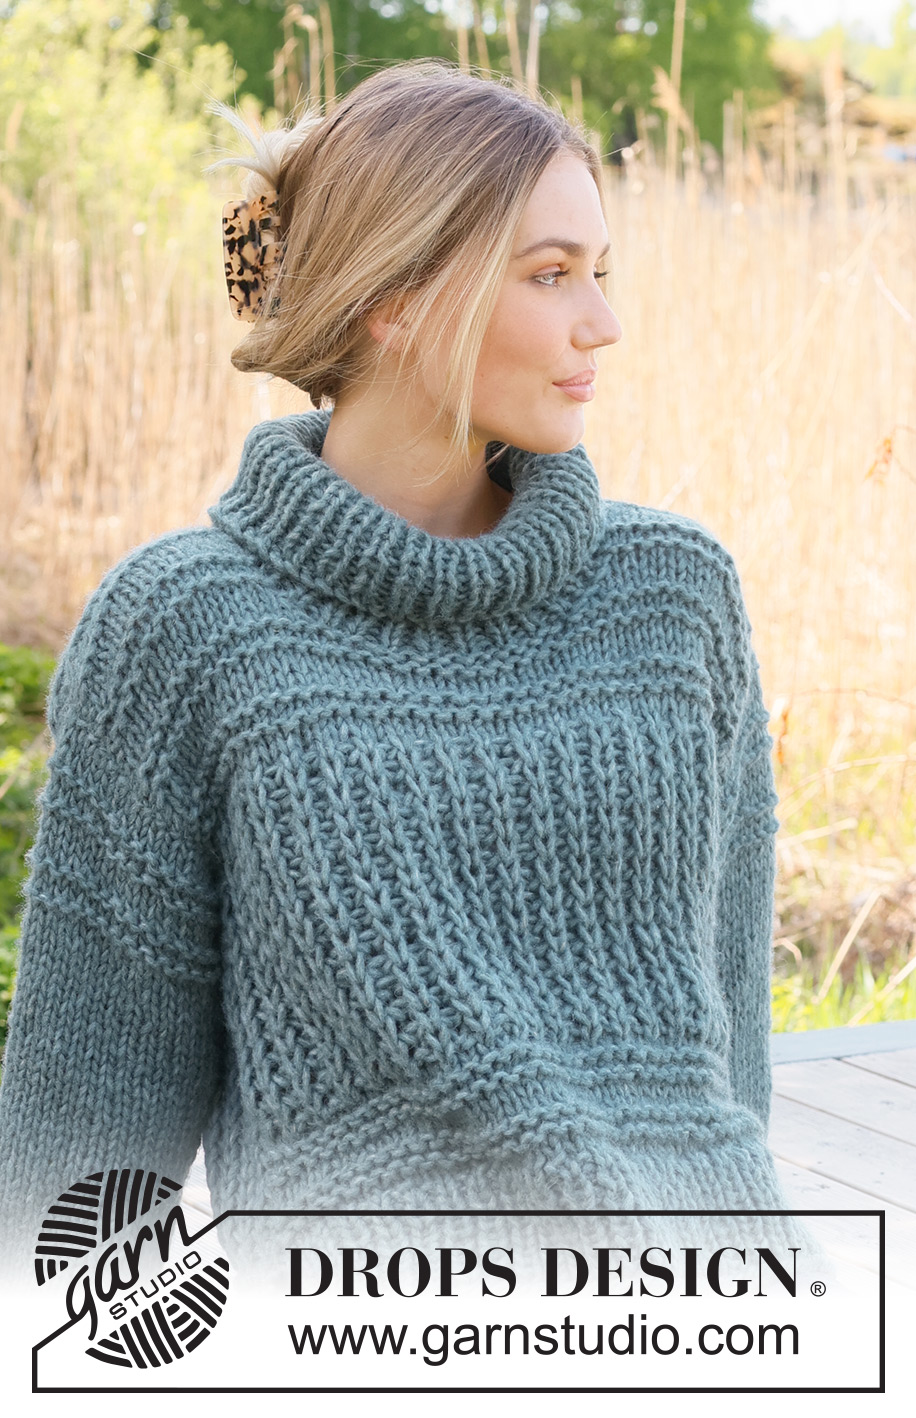
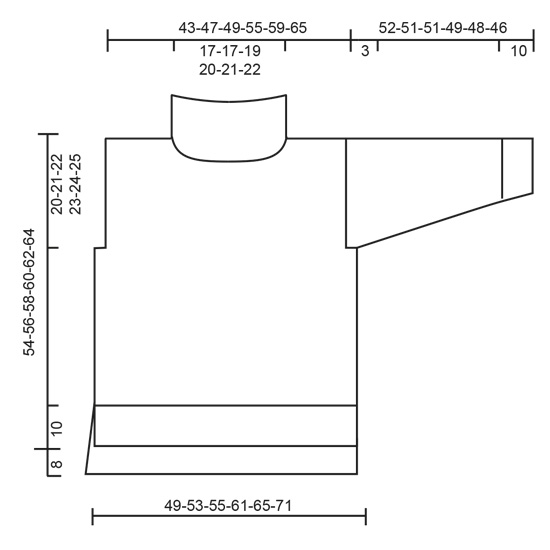
Jersey de punto en DROPS Wish. La pieza está tejida de abajo hacia arriba con punto inglés, punto musgo abierto y abertura en los lados. Tallas S – XXXL.
DROPS 236-9 |
||||||||||||||||
|
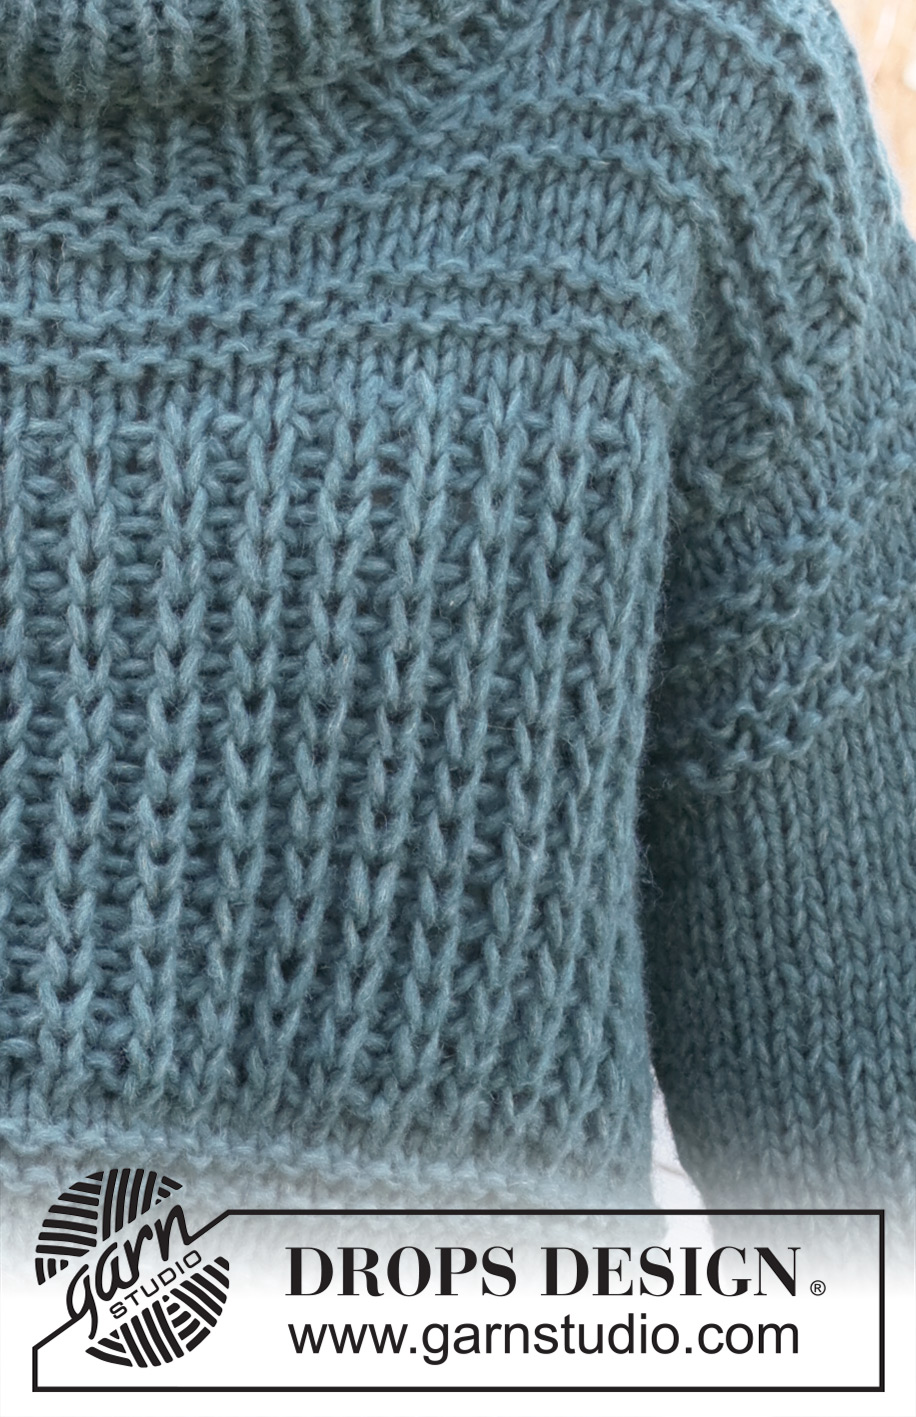
------------------------------------------------ EXPLICACIONES PARA REALIZAR EL PATRÓN: ------------------------------------------------ PATRÓN: Ver diagramas A.1 y A.2. Los diagramas muestran todas las hileras del patrón por el lado derecho. SURCO/PUNTO MUSGO (tejido de ida y vuelta): Tejer todas las hileras de derecho. 1 surco = tejer 2 hileras de derecho. TIP PARA AUMENTAR (aplicar a las mangas): Tejer hasta que reste 1 punto antes del hilo marcador, 1 lazada, tejer 2 puntos derechos (el hilo marcador está entre estos puntos), 1 lazada. En la vuelta siguiente, tejer las lazadas retorcidas de derecho para evitar que se formen agujeros. Después tejer los nuevos puntos en punto jersey. ------------------------------------------------ JERSEY – RESUMEN DE LA PIEZA: La pieza se teje en secciones, de ida y vuelta y de abajo hacia arriba, después se cosen entre sí. Las mangas se tejen en redondo con agujas de doble punta/aguja circular corta de abajo hacia arriba. La pieza de la espalda es 8 cm más larga que el frente. ESPALDA: Montar 59-63-67-73-79-85 puntos con aguja circular tamaño 8 mm y 1 hilo DROPS Wish o 2 hilos DROPS Air. Tejer 1 hilera de revés por el lado revés, después tejer el resorte de la manera siguiente por el lado derecho: 2 puntos de orillo en PUNTO MUSGO – leer descripción arriba, * 1 derecho, 1 revés *, tejer de *a* hasta que resten 3 puntos, tejer 1 derecho y 2 puntos de orillo en punto musgo. Continuar este resorte durante 10 cm. Tejer 1 hilera de revés por el lado revés y disminuir 10-10-12-12-14-14 puntos distribuidos equitativamente = 49-53-55-61-65-71 puntos. Cambiar a aguja circular tamaño 9 mm. ¡RECORDAR MANTENER LA MISMA TENSIÓN DE TEJIDO DE LA MUESTRA! Tejer A.1, 2-2-2-3-3-3 veces en altura. Ahora tejer 1 hilera de la manera siguiente por el lado derecho: 1 punto de orillo en punto musgo, * 1 derecho, 1 revés *, tejer de *a* hasta que resten 2 puntos, tejer 1 derecho y 1 punto de orillo en punto musgo. Tejer A.2 (la primera hilera por el lado revés, leyendo el diagrama de izquierda a derecha y el patrón comenzando y terminando con 1 punto derecho en punto inglés en el interior de 1 punto de orillo en punto musgo, visto por el lado derecho). Continuar A.2 en adelante. Cuando la pieza mida 42-43-44-45-46-47 cm, rematar 3 puntos al principio de las 2 hileras siguientes para las sisas = 43-47-49-55-59-65 puntos. Continuar A.2. Cuando la pieza mida 44-46-48-50-52-54 cm, tejer la hilera siguiente de revés por el lado revés. Después tejer de acuerdo a A.1. Cuando la pieza mida 60-62-64-66-68-70 cm, rematar los 13-13-15-15-17-17 puntos centrales para el escote y terminar cada hombro separadamente. Rematar 1 punto en la hilera siguiente a partir del escote = 14-16-16-19-20-23 puntos en el hombro. Rematar cuando la pieza mida 62-64-66-68-70-72 cm. Tejer el otro hombro de la misma manera. FRENTE: Montar y tejer de la misma manera como la pieza de la espalda hasta que el frente mida 34-35-36-37-38-39 cm. Rematar 3 puntos al principio de las 2 hileras siguientes para las sisas = 43-47-49-55-59-65 puntos. Continuar A.2. Cuando la pieza mida 36-38-40-42-44-46 cm, tejer la hilera siguiente de revés por el lado revés. Después tejer de acuerdo a A.1. Cuando la pieza mida 47-49-51-53-55-57 cm, tejer el escote de la manera siguiente: Colocar los 9-9-11-11-13-13 puntos centrales en un hilo y terminar cada hombro separadamente. Rematar para el escote cada 2ª hilera de la manera siguiente: 2 puntos 1 vez, 1 punto 1 vez = 14-16-16-19-20-23 puntos en el hombro. Rematar cuando la pieza mida 54-56-58-60-62-64 cm. Tejer el otro hombro de la misma manera. MANGAS: Montar 30-32-32-34-34-36 puntos con agujas de doble punta tamaño 8 mm y 1 hilo DROPS Wish o 2 hilos DROPS Air. Insertar 1 hilo marcador al principio de la vuelta (centro bajo la manga). Tejer 1 vuelta de derecho, después tejer el resorte en redondo (1 derecho, 1 revés) durante 10 cm. Tejer 1 vuelta de derecho y disminuir 3-3-3-3-3-3 puntos distribuidos equitativamente = 27-29-29-31-31-33 puntos. Cambiar a agujas de doble punta tamaño 9 mm. Tejer A.1 2 veces en altura, después continuar con punto jersey. AL MISMO TIEMPO, cuando la manga mida 12 cm, aumentar 1 punto a cada lado del hilo marcador – leer TIP PARA AUMENTAR. Aumentar así cada 5½-5½-5-4-3½-3½ cm un total de 7-7-7-8-9-9 veces = 41-43-43-47-49-51 puntos. Cuando la manga mida 43-42-42-40-39-37 cm, continuar con A.1. Cuando la manga mida 49-48-48-46-45-43 cm, tejer la copa de la manga de ida y vuelta (a partir del centro bajo la manga) hasta completar las medidas. Rematar cuando la manga mida 52-51-51-49-48-46 cm. Tejer la otra manga de la misma manera. ENSAMBLAJE: Coser las costuras de los hombros. Coser las mangas, en el interior de 1 punto de orillo y coser la parte de abajo de las sisas – ver esquema. Coser las costuras de los lados hasta el resorte (= 10 cm de abertura en la pieza del frente, 18 cm en la espalda), coser en el bucle más externo de los puntos de manera que la costura quede plana. CUELLO: Comenzar en la parte de arriba del hombro derecho y levantar (incluyendo los puntos en el hilo) 60 a 72 puntos con aguja circular corta tamaño 8 mm y 1 hilo DROPS Wish o 2 hilos DROPS Air. El número de puntos debe ser múltiplo de 2. Tejer el resorte en redondo (1 derecho, 1 revés) durante 20-20-20-22-22-22 cm. Rematar. |
||||||||||||||||
Explicaciones del diagrama |
||||||||||||||||
|
||||||||||||||||
 |
||||||||||||||||
 |
||||||||||||||||
 |
||||||||||||||||
¿Terminaste este patrón?Entonces, etiqueta tus fotos con #dropspattern #rainchainsweater o envíalas a la galería #dropsfan. ¿Necesitas ayuda con este patrón?Encontrarás 35 videos tutoriales, un espacio para comentarios/preguntas y más visitando la página del patrón en garnstudio.com © 1982-2026 DROPS Design A/S. Todos los derechos reservados. Este documento, incluyendo todas sus sub-secciones, está protegido por los derechos de autor (copyright). Lee más acerca de lo que puedes hacer con nuestros patrones en la parte de abajo de cada patrón de nuestro sitio. |
||||||||||||||||


Con más de 40 años en el diseño de modelos de punto y de ganchillo, DROPS Design ofrece una de las más vastas colecciones de patrones gratuitos en el internet - traducidos en 17 idiomas. Al día de hoy, contamos con 324 catálogos y 12290 patrones - de los cuales 11685 están traducidos en español.
Nosotros trabajamos con mucho esmero para brindarte lo mejor que las labores de punto y ganchillo tienen para ofrecer,inspiración y consejos, así como hilos de magnífica calidad a precios increíbles! Te gustaría usar nuestros patrones para otro fin además del uso personal? Puedes leer acerca de lo que estás permitida a hacer en el texto de Copyright en la parte de abajo de todos nuestros patrones. Felices labores!
Escribe un comentario sobre DROPS 236-9
¡Nos encantaría saber qué piensas acerca de este patrón!
Si quieres escribir una pregunta referente al patrón, por favor asegúrate de elegir la categoría correcta en el formulario debajo, para acelerar el proceso de respuesta. Los campos obligatorios están marcados con un *.