
Categorías populares
¿Buscas un hilo?


Comentarios / Preguntas (77)
![]() Ryann escribió:
Ryann escribió:
Would it ruin the pattern if i did not do decreases on the stockinette? or would it just make it wider?
14.01.2025 - 00:00DROPS Design respondió:
Dear Ryann, you mean after rib? Piece will be then wider as you need more stitches for rib with smaller needles than for stocking stitch with larger needles, reasion why you need to decrease after rib, on first row pattern. Happy knitting!
14.01.2025 - 10:36
![]() Susie escribió:
Susie escribió:
To insert sleeve leaves a gap in the armhole. How are you supposed to make a recess with the cast off stitches on the body. Would it be easier to put a few increase stitches in the sleeve before attaching it to body.
10.12.2024 - 22:01DROPS Design respondió:
Dear Susie, the shape of the sleeve and this armhole (which isn't too wide) don't require extra increases or cast off stitches. So both adapt to each other perfectly. Happy knitting!
15.12.2024 - 19:04
![]() Monika escribió:
Monika escribió:
Która wloczka została użyta do swetra na zdjęciu? Wish czy air?
03.11.2024 - 08:39DROPS Design respondió:
Witaj Moniko, sweter został wykonany z włóczki DROPS Wish. Pozdrawiamy!
04.11.2024 - 08:20
![]() Morgane escribió:
Morgane escribió:
Hello, can you explain how to decrease the shoulder? I'm having trouble understanding “Decrease as follows on each row from the right side by the neck: 2 stitches 4 times” do I have to decrease 4 times on the same row? Thank you
19.10.2024 - 15:51DROPS Design respondió:
Dear Morgane, you should decrease on each right side row, 2 stitches at once. Then the next time you get to a right side row, 2 stitches again, etc, until you decreased 4 times. Happy Knitting!
20.10.2024 - 10:39
![]() Renneke Visee escribió:
Renneke Visee escribió:
Er staat dat voor en achterpand apart gebreid worden op een rondbreinaald. Waarom niet op gewone breinaalden? een rondbreinaald gebruik je toch om iets rond te breien, als één geheel.
14.10.2024 - 13:07
![]() Morgane Bahier escribió:
Morgane Bahier escribió:
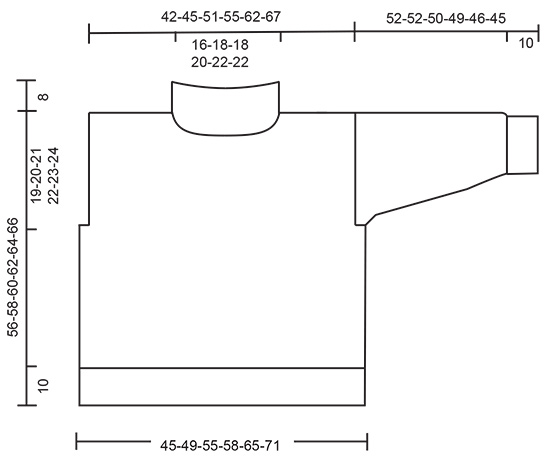
Hi, for the body, we are told to decrease evenly, does that mean that we have to decrease on A.2 and A.3 ? Because for the size XL, by following the lesson, I had to decrease after 20 stitches, and then after 21... Then the diagram will not match (instead of 12 stitches, I have 11 stitches).
06.10.2024 - 18:53DROPS Design respondió:
Dear Morgane, you decrease evenly over the stitches in stocking stitch. Start with stocking stitch over 19 stitches. You must decrease 4 stitches evenly over these 19 stitches, so you will have to alternate your decreases by knitting together every 4th and 5th stitch and every 3rd and 4th stitch alternately. You do the same at the end, over the final stitches in stocking stitch. So the charts remain the same, you simply reduce the length of the stocking stitch sections on the sides. Happy knitting!
06.10.2024 - 23:38
![]() Vicky Butterfield escribió:
Vicky Butterfield escribió:
After the first purl from wrong side then right side are you going to purn again on wrong side cause stitch not line up at all
16.09.2024 - 23:42DROPS Design respondió:
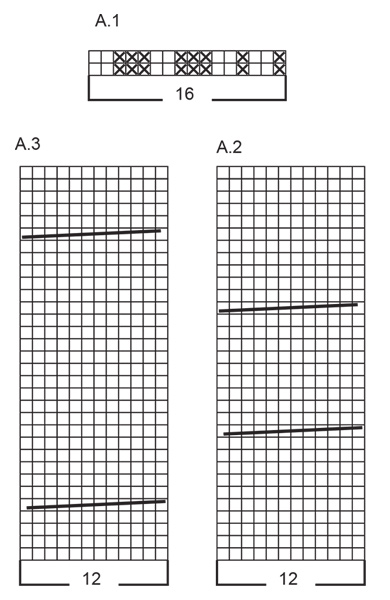
Dear Mrs Butterfield, at the very bottom of front piece, you first purl all stitches (wrong side row) then work in rib from RS with 1edge st in garter stitch on each side, then work rib with K over K and P over P. ReadA.1 from the right towards the left from RS and from the left towards the right from WS. Happy knitting!
19.09.2024 - 16:18
![]() Peta escribió:
Peta escribió:
Hi, Could you please confirm when it says. Repeat pattern on the 68 stitches until you reach the desired size length. The cable patterns have 32 rows. Do you just repeat these 32 rows until you reach your size length?
12.08.2024 - 13:14DROPS Design respondió:
Dear Peta, correct, work the remaining stitches on each side as before. Happy knitting!
12.08.2024 - 15:29
![]() Kasia escribió:
Kasia escribió:
How do you decrease for size s? n11,p4,A2,p4,A3,p4,A2,p4,11=74 nDo you decrease from the 11 stitches?
29.07.2024 - 12:37DROPS Design respondió:
Dear Kasia, decrease evenly as explained in this lesson over the 11 sts, this means you will have 11 sts - 3 sts decreased = 8 sts left on each side of piece. Happy knitting!
01.08.2024 - 09:09
![]() Kasia escribió:
Kasia escribió:
Is it possible to get this pattern with full detail - row by row instructions cs abbreviated version . Thank you
28.07.2024 - 12:41DROPS Design respondió:
Witaj Kasiu, niestety ten wzór jest dostępny w takiej formie. Możesz skorzystać z naszych instrukcji video, kursów, a jeśli w dalszym ciągu masz jakieś wątpliwości, proszę zadaj pytanie przez formularz kontaktowy na dole strony. Postaramy się pomóc. Pozdrawiamy!
28.07.2024 - 15:52
|
||||||||||
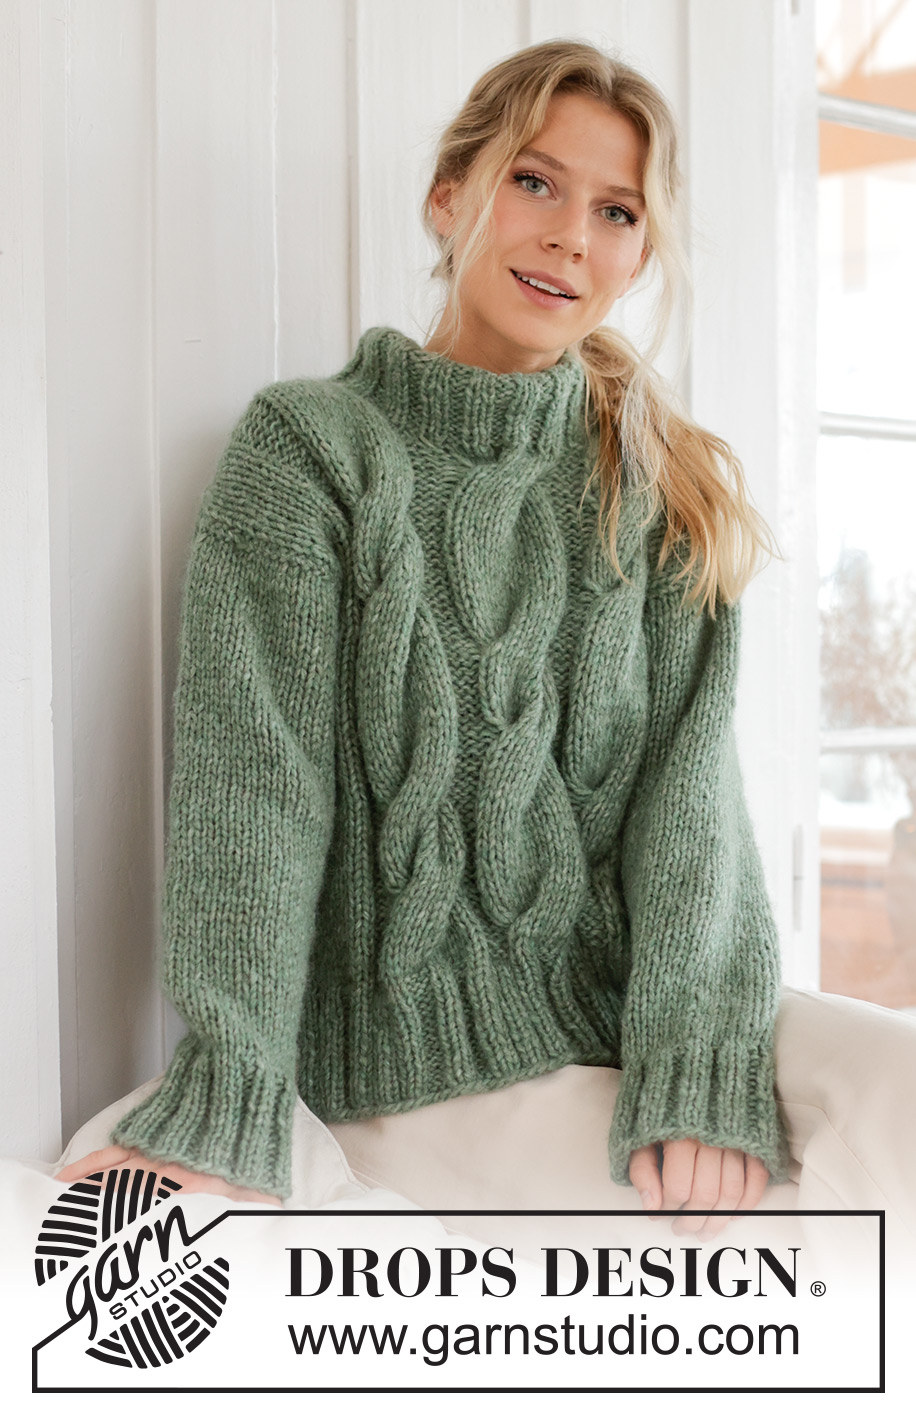
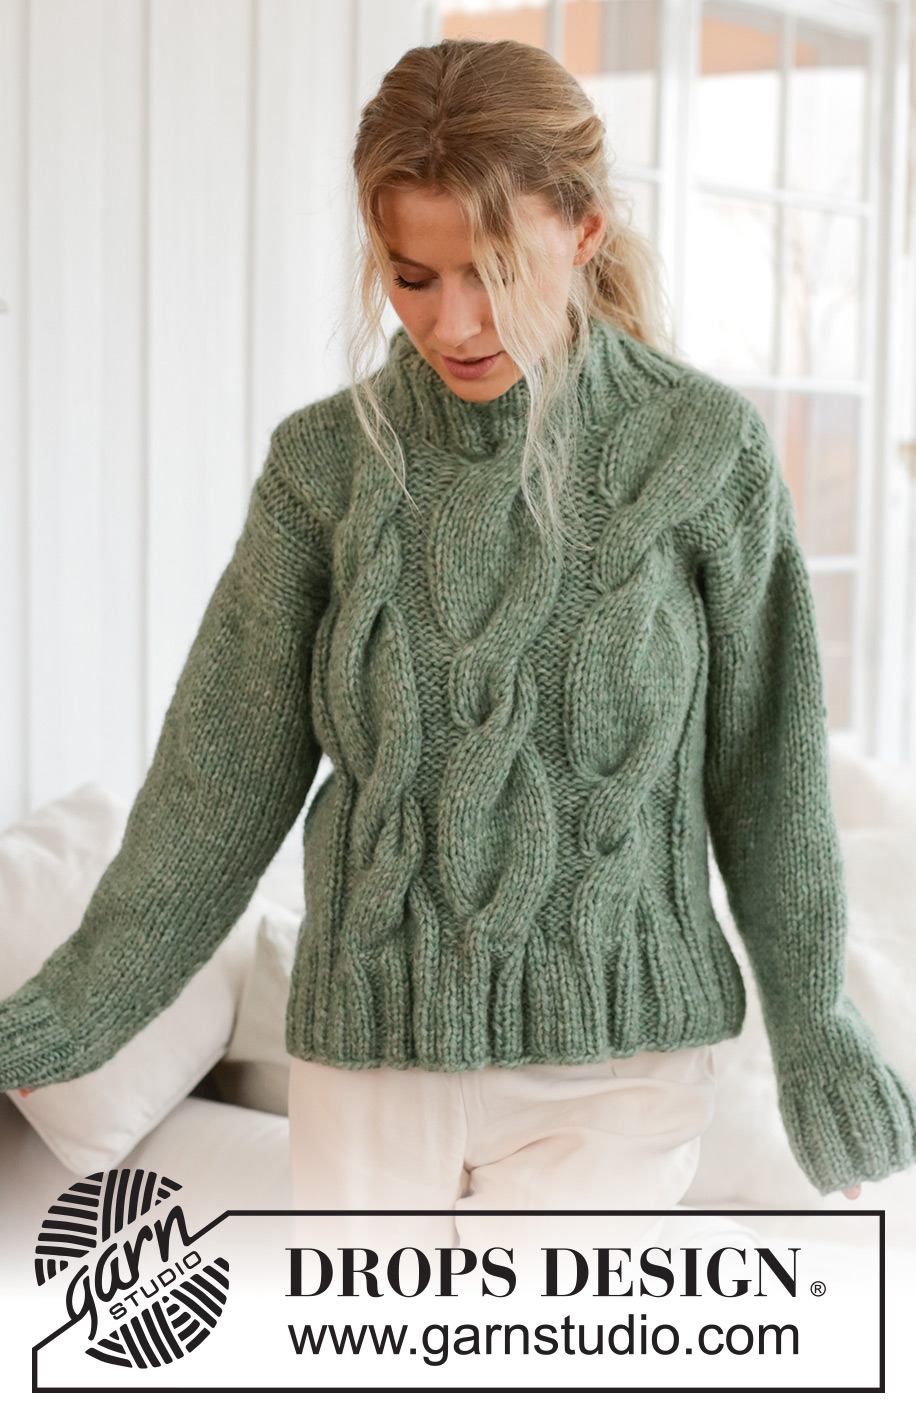
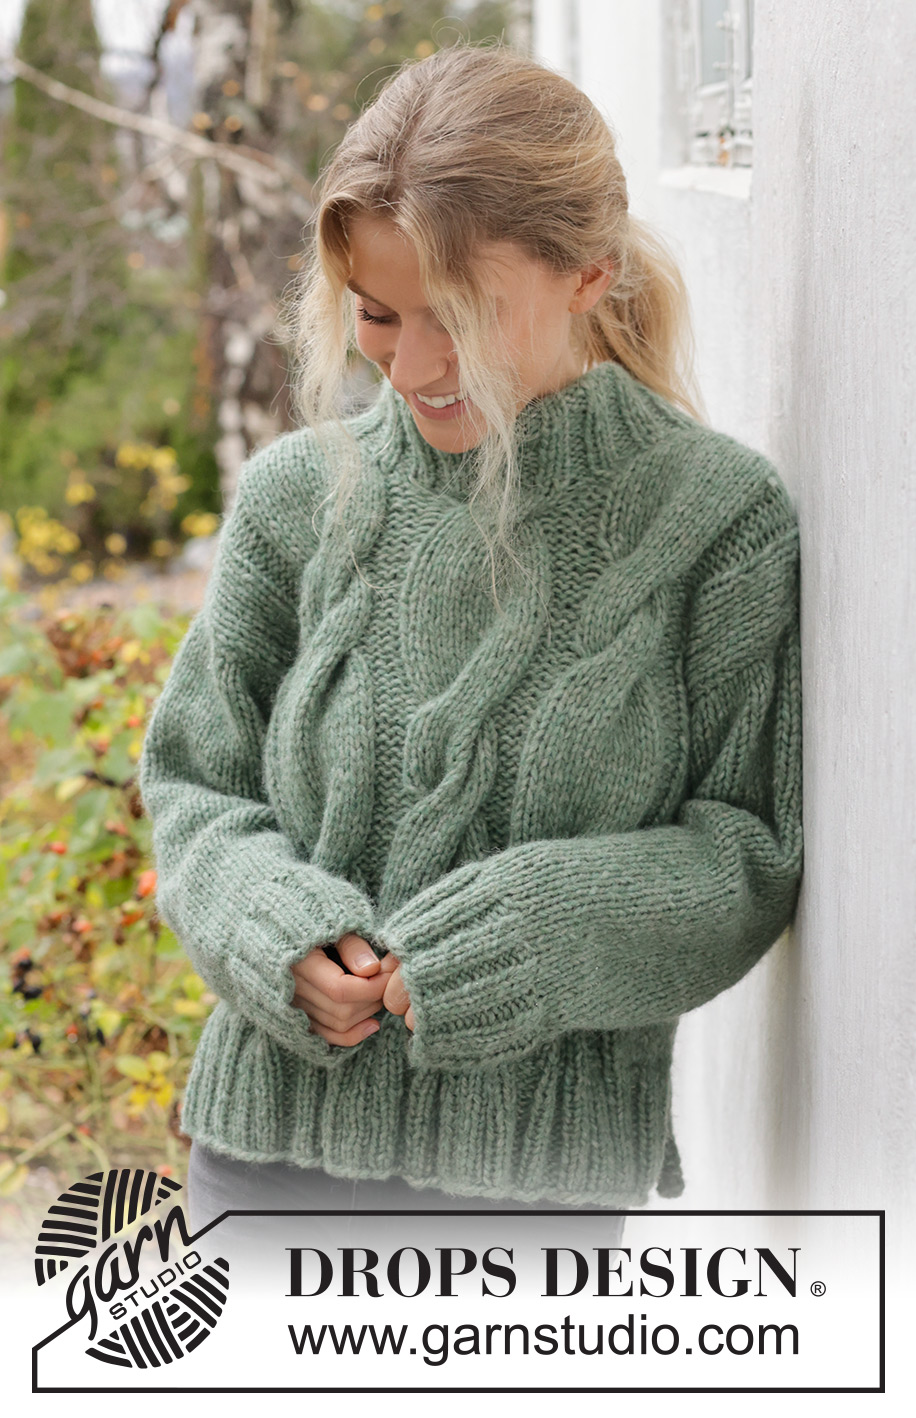
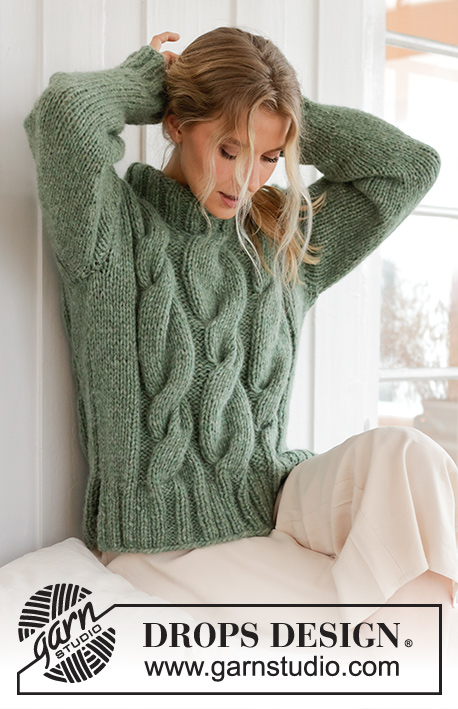
Scent of Sage#scentofsagesweater |
||||||||||
 |
 |
|||||||||
Jersey de punto en 1 hilo DROPS Wish o 2 hilos DROPS Air. La pieza está tejida con torsadas y cuello doble. Tallas S – XXXL.
DROPS 226-62 |
||||||||||
|
EXPLICACIONES PARA REALIZAR EL PATRÓN: ------------------------------------------------ SURCO/PUNTO MUSGO (tejido de ida y vuelta): Tejer todas las hileras de derecho. 1 surco = tejer 2 hileras de derecho. PATRÓN: Ver diagramas A.1 a A.3. Los diagramas muestran todas las hileras del patrón por el lado derecho. TIP PARA DISMINUIR (escote): Disminuyendo al principio de la hilera (hombro derecho): Tejer 1 punto derecho, deslizar 1 punto como de derecho, tejer 2 puntos juntos de derecho y pasar el punto deslizado por encima de los puntos tejidos juntos. Disminuyendo al final de la hilera (hombro izquierdo): Tejer hasta que resten 4 puntos, tejer 3 puntos juntos de derecho, tejer 1 punto derecho. TIP PARA AUMENTAR (mangas): Tejer hasta que reste 1 punto antes del marcador, 1 lazada, tejer 2 puntos derechos (el marcador está entre estos 2 puntos), 1 lazada. En la vuelta siguiente, tejer las lazadas retorcidas de derecho para evitar que se formen agujeros. Después tejer los nuevos puntos en punto jersey. ------------------------------------------------ COMENZAR LA PIEZA AQUÍ: ------------------------------------------------ JERSEY – RESUMEN DE LA PIEZA: La pieza de la espalda y la pieza del frente se tejen separadamente de ida y vuelta y de abajo hacia arriba, con aguja circular. Las mangas se tejen en redondo con agujas de doble punta/aguja circular corta. Las secciones son cosidas entre sí y el cuello se teje al final. FRENTE: Montar 74-74-82-90-98-98 puntos con aguja circular tamaño 7 mm y 1 hilo DROPS Wish o 2 hilos DROPS Air. Tejer 1 hilera de revés por el lado revés. Después tejer de la manera siguiente por el lado derecho: 1 punto de orillo en PUNTO MUSGO – leer descripción arriba, tejer 2 derechos, * 2 reveses, 2 derechos *, tejer de *a* 2-2-3-4-5-5 veces, tejer A.1 tres veces, después los primeros 4 puntos de A.1, tejer 2 derechos, * 2 reveses, 2 derechos *, tejer de *a* 2-2-3-4-5-5 veces, 1 punto de orillo en punto musgo. Continuar este resorte durante 10 cm. Cambiar a aguja circular tamaño 8 mm y tejer de la manera siguiente por el lado derecho: Tejer punto jersey sobre los primeros 11-11-15-19-23-23 puntos, AL MISMO TIEMPO que se disminuyen 3-1-2-4-4-1 puntos distribuidos equitativamente, 4 reveses, A.2, 4 reveses, A.3, 4 reveses, A.2, 4 reveses, punto jersey sobre los últimos 11-11-15-19-23-23 puntos, AL MISMO TIEMPO que se disminuyen 3-1-2-4-4-1 puntos distribuidos equitativamente = 68-72-78-82-90-96 puntos. Continuar este patrón. ¡RECORDAR MANTENER LA MISMA TENSIÓN DE TEJIDO DE LA MUESTRA! Cuando la pieza mida 37-38-39-40-41-42 cm, rematar 2 puntos al principio de las 2 hileras siguientes para las sisas = 64-68-74-78-86-92 puntos. Continuar el patrón hasta que la pieza mida 50-52-53-55-56-58 cm. En la hilera siguiente, colocar los 20-22-22-24-26-26 puntos centrales en un hilo para el cuello y terminar cada hombro separadamente. Disminuir de la manera siguiente en cada hilera por el lado derecho del lado del escote: 2 puntos 4 veces – leer TIP PARA DISMINUIR = 14-15-18-19-22-25 puntos en el hombro. Tejer punto jersey sobre las torsadas cuando no haya espacio suficiente para la torsada a lo ancho. Tejer hasta que la pieza mida 56-58-60-62-64-66 cm, rematar. Tejer el otro hombro de la misma manera. ESPALDA: Montar 56-60-68-72-80-88 puntos con aguja circular tamaño 7 mm y 1 hilo DROPS Wish o 2 hilos DROPS Air. Tejer 1 hilera de revés por el lado revés. Después tejer de la manera siguiente por el lado derecho: 1 punto de orillo en punto musgo, 2 derechos, * 2 reveses, 2 derechos *, tejer de *a* hasta que reste 1 punto, 1 punto de orillo en punto musgo. Continuar este resorte durante 10 cm. Cambiar a aguja circular tamaño 8 mm. Tejer 1 hilera disminuyendo 6-6-8-8-8-10 puntos distribuidos equitativamente = 50-54-60-64-72-78 puntos. Tejer punto jersey sobre todos los puntos. Cuando la pieza mida 37-38-39-40-41-42 cm, rematar 2 puntos al principio de las 2 hileras siguientes para las sisas = 46-50-56-60-68-74 puntos. Continuar con punto jersey hasta que la pieza mida 54-56-58-60-62-64 cm. En la hilera siguiente, rematar los 16-18-18-20-22-22 puntos centrales para el escote y terminar cada hombro separadamente. Después rematar 1 punto en la hilera siguiente a partir del escote = 14-15-18-19-22-25 puntos en el hombro. Tejer hasta que la pieza mida 56-58-60-62-64-66 cm, rematar. Tejer el otro hombro de la misma manera. MANGAS: Montar 36-40-40-44-44-48 puntos con agujas de doble punta/aguja circular corta tamaño 7 mm y 1 hilo DROPS Wish o 2 hilos DROPS Air. Tejer 1 vuelta de derecho, después tejer en resorte (2 derechos, 2 reveses) en redondo durante 10 cm. Cambiar a agujas de doble punta tamaño 8 mm. Tejer 1 vuelta de derecho disminuyendo 4-6-4-6-4-6 puntos distribuidos equitativamente = 32-34-36-38-40-42 puntos. Insertar un marcador al principio de la vuelta = centro bajo la manga. Tejer punto jersey hasta que la pieza mida 11 cm. Ahora aumentar 1 punto a cada lado del marcador – leer TIP PARA AUMENTAR. Aumentar así a cada 9½-9½-9-9-8½-8 cm un total de 5 veces = 42-44-46-48-50-52 puntos. Rematar cuando la manga mida 52-52-50-49-46-45 cm. Tejer la otra manga de la misma manera. ENSAMBLAJE: Coser las costuras de los hombros. Coser las costuras de los lados en el bucle más externo del punto más externo, hasta el resorte (abertura de 10 cm en la parte de abajo). Coser las mangas. CUELLO DOBLE: Comenzar por el lado derecho en uno de los hombros y levantar 60 a 76 puntos alrededor del escote (incluyendo los puntos en el hilo), con aguja circular corta tamaño 7 mm y 1 hilo DROPS Wish o 2 hilos DROPS Air. El número de puntos debe ser múltiplo de 4. Tejer en resorte (2 derechos, 2 reveses) en redondo durante 16 cm. Rematar. Doblar el cuello en dos hacia el lado de adentro y coser. Para evitar que el cuello quede apretado y se enrolle hacia fuera, es importante que la costura sea elástica. |
||||||||||
Explicaciones del diagrama |
||||||||||
|
||||||||||
 |
||||||||||
 |
||||||||||
¿Terminaste este patrón?Entonces, etiqueta tus fotos con #dropspattern #scentofsagesweater o envíalas a la galería #dropsfan. ¿Necesitas ayuda con este patrón?Encontrarás 34 videos tutoriales, un espacio para comentarios/preguntas y más visitando la página del patrón en garnstudio.com © 1982-2026 DROPS Design A/S. Todos los derechos reservados. Este documento, incluyendo todas sus sub-secciones, está protegido por los derechos de autor (copyright). Lee más acerca de lo que puedes hacer con nuestros patrones en la parte de abajo de cada patrón de nuestro sitio. |
||||||||||


Con más de 40 años en el diseño de modelos de punto y de ganchillo, DROPS Design ofrece una de las más vastas colecciones de patrones gratuitos en el internet - traducidos en 17 idiomas. Al día de hoy, contamos con 324 catálogos y 12290 patrones - de los cuales 11685 están traducidos en español.
Nosotros trabajamos con mucho esmero para brindarte lo mejor que las labores de punto y ganchillo tienen para ofrecer,inspiración y consejos, así como hilos de magnífica calidad a precios increíbles! Te gustaría usar nuestros patrones para otro fin además del uso personal? Puedes leer acerca de lo que estás permitida a hacer en el texto de Copyright en la parte de abajo de todos nuestros patrones. Felices labores!
Escribe un comentario sobre DROPS 226-62
¡Nos encantaría saber qué piensas acerca de este patrón!
Si quieres escribir una pregunta referente al patrón, por favor asegúrate de elegir la categoría correcta en el formulario debajo, para acelerar el proceso de respuesta. Los campos obligatorios están marcados con un *.