
Categorías populares
¿Buscas un hilo?


Comentarios / Preguntas (96)
![]() Karin escribió:
Karin escribió:
Das ist so verwirrend die Zunahme 😂 kann man die Zunahme Runde für Runde erklären. Ab welcher Masche man zunehmen muss. Danke!
13.08.2024 - 13:00
![]() Karin escribió:
Karin escribió:
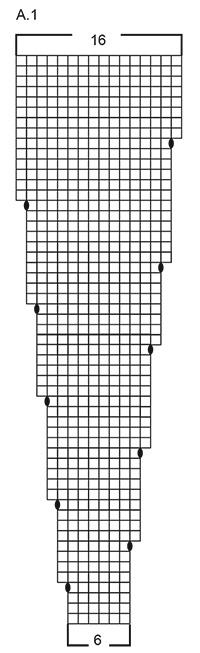
Verstehe die Zunahmen nicht, 17 Rapporte a 6 Maschen bei der Passe. Wie muss ich zunehmen?
05.08.2024 - 21:05DROPS Design respondió:
Liebe Karin, man wird in jedem Rapport zunehmen - siehe 2. Symbol: es wird insgesamt 10 Maschen in jedem A.1 zugenommen, so sind es 16 M wenn A.1 fertig ist, dh 16 Maschen x 17 Rapporte = 272 Maschen. Viel Spaß beim Stricken!
06.08.2024 - 09:33
![]() Paola Bravo escribió:
Paola Bravo escribió:
Hola....buenas tardes me pude ayudar, estoy haciendo este patrón y la parte del cuerpo el tejido quedó inclinado , que hice mal me ayuda porfa🥹
10.07.2024 - 03:59DROPS Design respondió:
Hola Paola, puedes concretar tu pregunta? ¿ A qué te refieres con inclinado? Algunas variaciones en la forma del tejido puede ser por la tensión, comprueba que la tensión del tejido sea correcta.
15.07.2024 - 00:32
![]() Sintia escribió:
Sintia escribió:
Hello, I plan to knit this pattern with one strand of kids-silk and one strand of Karisma . I will swatch but from the yarn group description I am hoping these will work for the pattern? I am also curious how much positive ease is in the sweater/jumper? Thank you!
30.06.2024 - 16:25DROPS Design respondió:
Dear Sintia, please see the relevant measurements of the sweater on the schematic drawing at the bottom of the pattern. We suggest that you take a piece of similar style that fits the intended wearer, and compare the measurements. Happy Knitting!
30.06.2024 - 16:45
![]() Paola Bravo escribió:
Paola Bravo escribió:
Hola!!! Porfavor me puedes ayudar con esta parte, no la entiendo... Trabajar A.1 sobre todos los puntos (= 16-17-19-20-21-23 repeticiones de 6 puntos). ?
26.06.2024 - 18:59DROPS Design respondió:
Hola Paola, A.1 es el diagrama, que puedes encontrar debajo, y son 6 pts en la primera fila. Como repites los 6 pts de A.1 sobre todos los pts, según tu talla, tendrás que repetir estos pts más o menos veces. Por ejemplo, para la talla más pequeña los repetirás 16 veces.
07.07.2024 - 23:32
![]() Glenna escribió:
Glenna escribió:
Jeg strikker i str. M og skal tage ud efter ribkant. Jeg har 84 masker og skal tage ud til 102, dvs. 18 masker. 84:18=4,66. Hvordan skal jeg fordele udtagningerne?
09.05.2024 - 13:52DROPS Design respondió:
Hei Glenna. Da kan du strikke 5 masker, øk, strikke 5 masker, øk, strikke 4 masker øk. Gjenta dette omgangen ut. mvh DROPS Design
13.05.2024 - 11:40
![]() Alka SCHMIDT-KORTEN escribió:
Alka SCHMIDT-KORTEN escribió:
Guten Tag, Mit welcher Nadelstärke muss ich die Maschenprobe stricken? Danke für eine Antwort. Grüße Alka
06.03.2024 - 16:13DROPS Design respondió:
Liebe Frau Schmidt-Korten, Maschenprobe wird mit den grösseren Nadeln ( Nr 5) gestrickt. Viel Spaß beim stricken!
06.03.2024 - 16:30
![]() Sarah Kistner escribió:
Sarah Kistner escribió:
I have knit several swatches to make sure I have the correct gauge, but am still knitting too tightly. I have to go to at least 5.5-6 mm needles to get 17 stitches in 10 cm, but then the swatch pattern is very light/airy (won't make for a warm sweater). If i hold together three strands of Alpaca, on 5.5 mm needles, and end with the correct gauge size (10 x 10 for 17 stitches and the correct rows), would it work to get the correct measurements on the final sweater?
24.02.2024 - 22:39DROPS Design respondió:
Dear Mrs Kistner, if you. like the texture you get with this tension and 3 strands, and if your tension is right in both width and height then it will probably work but just remember that this will also affect the amount of yarn required as we just work with 2 strands here, not with 3. Happy knitting!
26.02.2024 - 08:45
![]() Maria João Ramos escribió:
Maria João Ramos escribió:
Bonjour Je essaye de faire votre Lucky Wish sweater et je veux regarder vos explications sur les videos que vous disponibilisez mais ils non pas de son. Je n’arrive pas à entendre aucun son , sur aucun video. Pouvez-vous m’aider ? Merci
11.02.2024 - 19:46DROPS Design respondió:
Bonjour, Nos videos n'ont pas de son pour que ce soie plus facile à toutes les tricoteuses du monde entier de voir nos vídeos. Bons tricots!
12.02.2024 - 09:03
![]() Heidi Bødker escribió:
Heidi Bødker escribió:
Hvordan skal diagrammet forståes når der står 21 rapporter af 6 masker? Skal jeg lave den første udtagning på 24 maske?
27.12.2023 - 20:42DROPS Design respondió:
Hej Heidi, du starter nederst i diagrammet. På 4.omgang (ifølge diagrammet) laver du 1 omslag efter hver 6.maske og det gør du hele vejen rundt. På 8. omgang laver du 1 omslag strikker 7 masker, 1 omslag 7 masker osv :)
02.01.2024 - 12:14
|
|||||||
Lucky Wish#luckywishsweater |
|||||||
 |
 |
||||||
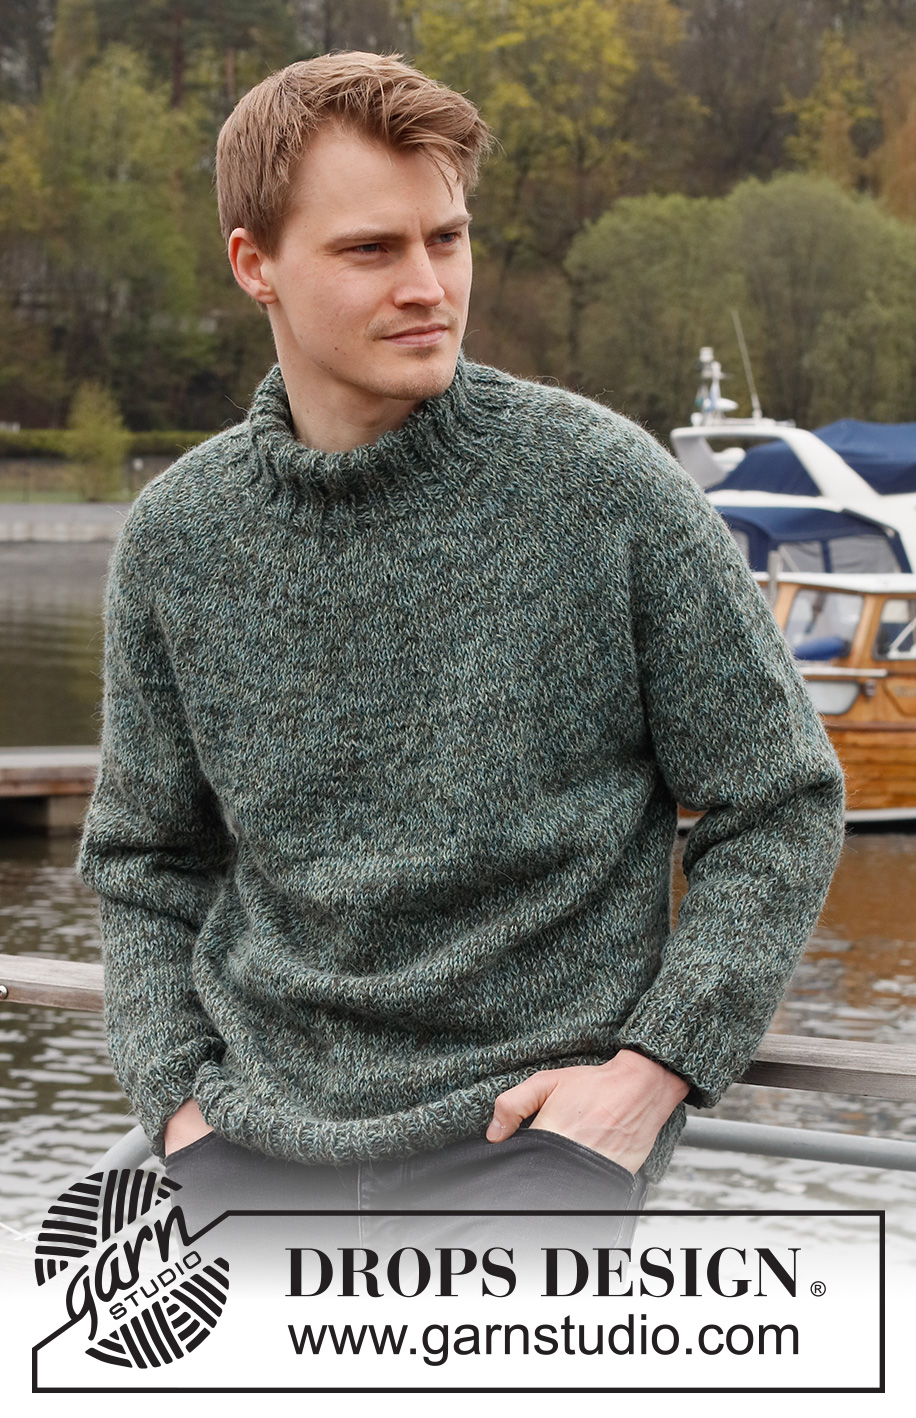
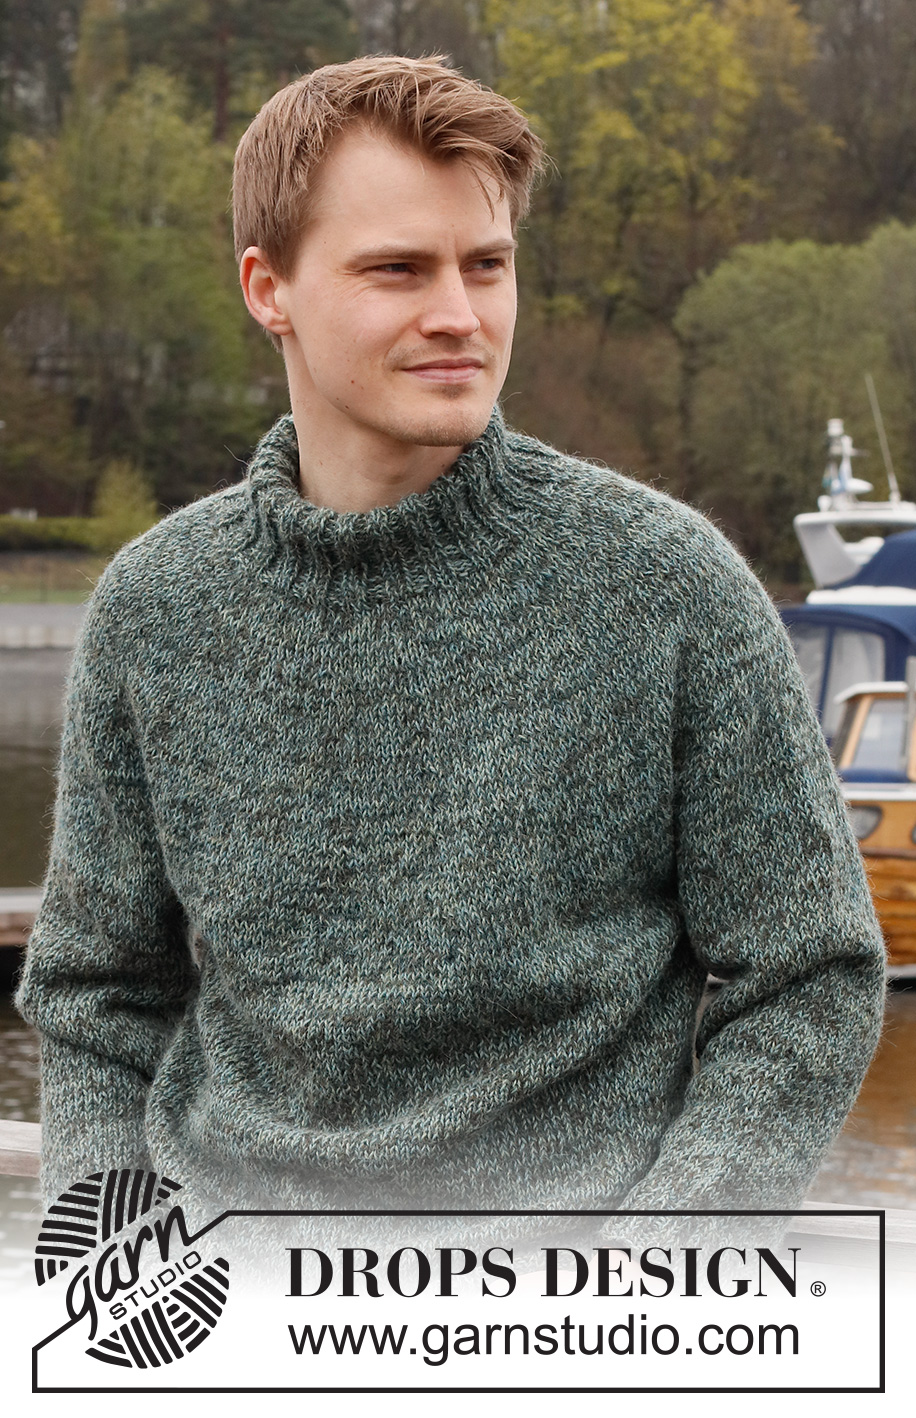
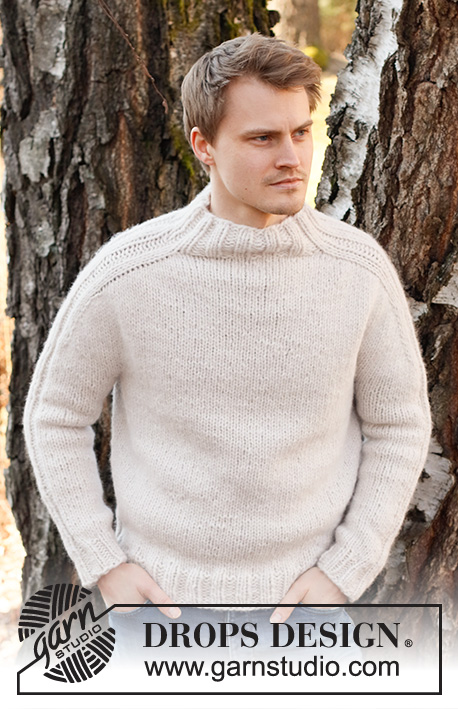
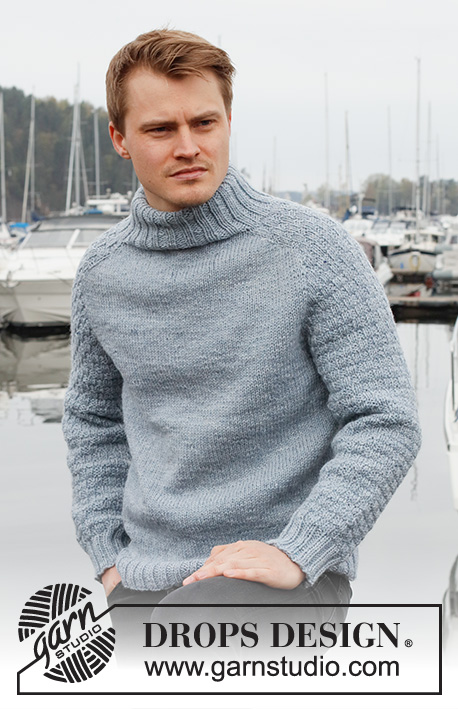
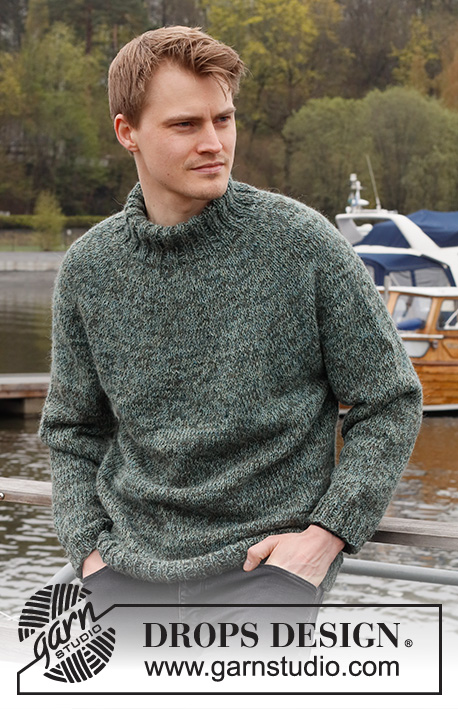
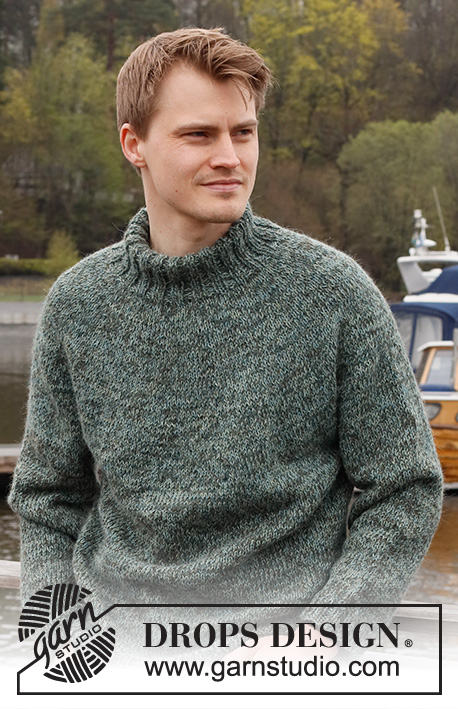
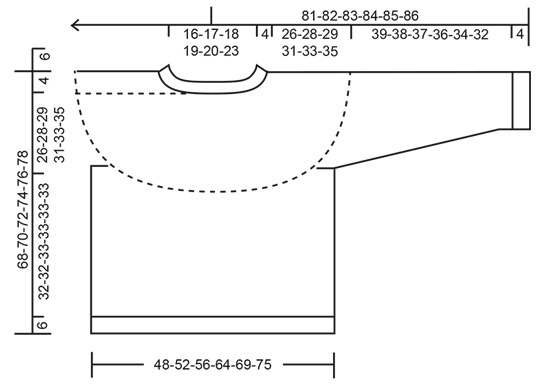
Jersey de punto para hombre en 2 hilos DROPS Alpaca. La prenda está realizada de arriba abajo con el cuello doble y el canesú redondo. Tallas: S-XXXL
DROPS 224-21 |
|||||||
|
EXPLICACIONES PARA REALIZAR LA LABOR: ------------------------------------------------------- TIP PARA LOS AUMENTOS (repartidos): Para calcular cómo aumentar puntos repartidos, contar el número total de puntos en la aguja (p.e. 80 puntos) y dividir entre el número de aumentos a trabajar (p.e. 16) = 5. En este ejemplo, aumentar haciendo 1 hebra después de cada 5º punto. En la siguiente vuelta trabajar las hebras de derecho retorcido para evitar que se formen agujeros. PATRÓN: Ver diagrama A.1. Todo el patrón se trabaja en punto jersey. TIP PARA LAS DISMINUCIONES (para las mangas): Disminuir 1 punto a ambos lados del marcapuntos como sigue: Trabajar hasta que queden 3 puntos antes del marcapuntos, 2 puntos juntos de derecho, 2 derechos (el marcapuntos se encuentra entre estos 2 puntos), deslizar 1 punto como de derecho, 1 derecho y pasar el punto deslizado sobre el punto trabajado (2 puntos disminuidos). TIP PARA EL REMATE: Para evitar que el borde de remate quede tenso se puede cerrar con una aguja más grande. Si el borde sigue tenso, hacer 1 hebra después de aprox. cada 4º punto y al mismo tiempo cerrar; las hebras se cierran como puntos normales. ------------------------------------------------------- COMENZAR LA LABOR AQUÍ: ------------------------------------------------------- JERSEY - RESUMEN DE LA LABOR: El cuello y el canesú se trabajan en redondo con una aguja circular, desde el centro de la espalda y de arriba abajo. El canesú se divide para el cuerpo y las mangas y el cuerpo se continua en redondo con una aguja circular. Las mangas se trabajan con agujas de doble punta, de arriba abajo. CUELLO DOBLE: Montar 100-105-110-115-120-130 puntos con una aguja circular corta de 4 mm y 1 hilo de cada color de DROPS Alpaca (= 2 hilos). Trabajar 1 vuelta de derecho. Trabajar el elástico (2 derecho, 3 reveses) 4 cm. Ahora disminuir 1 punto en todas las secciones de revés trabajando 2 puntos juntos de revés = 80-84-88-92-96-104 puntos. Continuar con el nuevo elástico hasta que el cuello mida 12 cm. Cambiar a una aguja circular de 5 mm. CANESÚ: Insertar 1 marcapuntos al inicio de la vuelta en el centro de la espalda; el canesú se mide desde este marcapuntos! Trabajar 1 vuelta de derecho y al mismo tiempo aumentar 16-18-26-28-30-34 puntos repartidos – leer TIP PARA LOS AUMENTOS = 96-102-114-120-126-138 puntos. Trabajar A.1 sobre todos los puntos (= 16-17-19-20-21-23 repeticiones de 6 puntos). RECORDAR MANTENER LA TENSIÓN DEL TEJIDO! Cuando se haya completado A.1 en vertical hay 256-272-304-320-336-368 puntos en redondo. Trabajar 1 vuelta de derecho y al mismo tiempo aumentar 0-0-0-4-8-0 puntos repartidos = 256-272-304-324-344-368 puntos. Continuar trabajando hasta que el canesú mida 26-28-29-31-33-35 cm desde el marcapuntos. El canesú se divide ahora para el cuerpo y las mangas como sigue: Trabajar 38-40-44-49-53-58 derechos (= mitad de la espalda), colocar los siguientes 52-56-64-64-66-68 puntos en 1 gancho auxiliar para la manga, montar 6-8-8-10-12-12 puntos (= en el lado bajo la manga), 76-80-88-98-106-116 derechos (= delantero), colocar los siguientes 52-56-64-64-66-68 puntos en 1 gancho auxiliar para la manga, montar 6-8-8-10-12-12 puntos (= en el lado bajo la manga), 38-40-44-49-53-58 derechos (= mitad de la espalda). El cuerpo y las mangas se terminan por separado. LA LABOR SE MIDE AHORA DESDE AQUÍ! CUERPO: Ahora hay 164-176-192-216-236-256 puntos en la vuelta. Continuar con punto jersey en redondo 32-32-33-33-33-33 cm (o hasta el largo deseado; quedan aprox. 6 cm). Cambiar a una aguja circular de 4 mm y trabajar el elástico (2 derechos, 2 reveses) 6 cm. Cerrar flojo con derecho sobre derecho y revés sobre revés - leer TIP PARA EL REMATE. El jersey mide aprox. 68-70-72-74-76-78 cm desde el hombro hacia abajo. MANGAS: Colocar los 52-56-64-64-66-68 puntos desde el gancho auxiliar a un lado de la labor con agujas de doble punta/ una aguja circular corta de 5 mm y recoger 1 punto en cada uno de los 6-8-8-10-12-12 puntos montados bajo la manga = 58-64-72-74-78-80 puntos. Insertar un marcapuntos en el medio de los 6-8-8-10-12-12 puntos bajo la manga. Permitir al marcapuntos seguir la labor hacia delante; se usará al disminuir bajo la manga. Comenzar en el marcapuntos y trabajar en punto jersey en redondo 3 cm. Ahora disminuir 2 puntos bajo la manga – leer TIP PARA LAS DISMINUCIONES. Disminuir de esta manera cada 6-4-3-2½-2½-2½ cm un total de 6-8-11-11-12-12 veces = 46-48-50-52-54-56 puntos. Continuar sin más aumentos hasta que la manga mida 39-38-37-36-34-32 cm desde la división (quedan aprox. 4 cm; probarse el jersey y trabajar hasta el largo deseado). Las medidas son más cortas en las tallas más grandes debido a la mayor anchura del escote y mayor largo del canesú. Trabajar 1 vuelta de derecho y al mismo tiempo aumentar 2-4-2-4-2-4 puntos repartidos = 48-52-52-56-56-60 puntos. Cambiar a agujas de doble punta de 4 mm y trabajar el elástico (2 derechos, 2 reveses) 4 cm. Cerrar con derecho sobre derecho y revés sobre revés - recordar TIP PARA EL REMATE! La manga mide aprox. 43-42-41-40-38-36 cm. Trabajar la otra manga de la misma manera. TERMINACIÓN: Doblar el cuello por la mitad hacia dentro y coser. Para evitar que el cuello quede tenso y se enrolle hacia fuera, es importante que la costura quede elástica. |
|||||||
Explicaciones del diagrama |
|||||||
|
|||||||
 |
|||||||
 |
|||||||
¿Terminaste este patrón?Entonces, etiqueta tus fotos con #dropspattern #luckywishsweater o envíalas a la galería #dropsfan. ¿Necesitas ayuda con este patrón?Encontrarás 27 videos tutoriales, un espacio para comentarios/preguntas y más visitando la página del patrón en garnstudio.com © 1982-2026 DROPS Design A/S. Todos los derechos reservados. Este documento, incluyendo todas sus sub-secciones, está protegido por los derechos de autor (copyright). Lee más acerca de lo que puedes hacer con nuestros patrones en la parte de abajo de cada patrón de nuestro sitio. |
|||||||


Con más de 40 años en el diseño de modelos de punto y de ganchillo, DROPS Design ofrece una de las más vastas colecciones de patrones gratuitos en el internet - traducidos en 17 idiomas. Al día de hoy, contamos con 324 catálogos y 12290 patrones - de los cuales 11675 están traducidos en español.
Nosotros trabajamos con mucho esmero para brindarte lo mejor que las labores de punto y ganchillo tienen para ofrecer,inspiración y consejos, así como hilos de magnífica calidad a precios increíbles! Te gustaría usar nuestros patrones para otro fin además del uso personal? Puedes leer acerca de lo que estás permitida a hacer en el texto de Copyright en la parte de abajo de todos nuestros patrones. Felices labores!
Escribe un comentario sobre DROPS 224-21
¡Nos encantaría saber qué piensas acerca de este patrón!
Si quieres escribir una pregunta referente al patrón, por favor asegúrate de elegir la categoría correcta en el formulario debajo, para acelerar el proceso de respuesta. Los campos obligatorios están marcados con un *.