
Categorías populares
¿Buscas un hilo?


Comentarios / Preguntas (126)
![]() Caroline escribió:
Caroline escribió:
Hej! I sista rapporten på A2 står det att omslaget ska stickas brödet på nästa varv så det inte blir hål. Men ska det inte blå hål? Tycker det ser ut som det på fotot.
25.07.2021 - 10:07DROPS Design respondió:
Hej Caroline, det vill bli ett litet hål. Vill du har det större så går det bra att inte sticka det vridet :)
06.08.2021 - 14:28
![]() Pirkko Karjalainen escribió:
Pirkko Karjalainen escribió:
En saa näkyviin mallineuleen piirroksia. Norjankielisessä ohjeessa ne näkyvät, mutta kääntäminen olisi työlästä. Mikä neuvoksi?
07.07.2021 - 09:01DROPS Design respondió:
Nyt piirrokset avautuvat taas.
09.07.2021 - 14:16
![]() Susanne Bang Hansen escribió:
Susanne Bang Hansen escribió:
Strikker str xl. Efter mønstret har jeg 351 masker( som jeg skal have), når jeg så deler i forstyk, ærmer og ryg, så har jeg 13 masker for meget????
03.07.2021 - 23:52DROPS Design respondió:
Hei Susanne. Litt usikker på hvor det blir feil hos deg, men du skal strikke 50 masker rett (= ½ bakstykket), sett de neste 76 maskene på en tråd til erme, legg opp 12 nye masker på pinnen (= i siden under ermet), strikk 99 masker rett (= forstykke), sett de neste 76 maskene på en tråd til erme, legg opp 12 nye masker på pinnen (= i siden under ermet), strikk de siste 50 masker rett (= ½ bakstykket). Om man ser bort fra de 24 ny maskene stemmer maskeantallet. 50+76+99+76+50= 351 masker. Kankje du har blandet noen størrelser? mvh DROPS design
05.07.2021 - 14:54
![]() Astrid escribió:
Astrid escribió:
Det står ingen plass i mønstret at kastene skal strikkes vridd,dette bør stå hvis det erslik det skal være
03.07.2021 - 15:31
![]() Bodil escribió:
Bodil escribió:
Så hvis jeg forstår det riktig da, skal omgang 6 strikkes bare rettmasker.
29.06.2021 - 10:56DROPS Design respondió:
Hej Bodil. Ja det stämmer. Mvh DROPS Design
29.06.2021 - 11:15
![]() Bodil escribió:
Bodil escribió:
Hei. Jeg har kommet til omgang 6 hvor den mørke trekant-symbolet er. Er det over 2 omganger, eller er det på omgang 7? Skjønner ikke helt dette.
29.06.2021 - 07:07DROPS Design respondió:
Hej Bodil. Det er på omgang 7. Mvh DROPS Design
29.06.2021 - 08:01
![]() Lene escribió:
Lene escribió:
A2, etter siste stjerne(som skal være 7m) viser diagrammet 3m på linjene over. Hvordan? Jeg sitter med altfor mye masker!!! Ser ut som dette er et problem som gjentar seg, er det noen som ser på dette?
27.06.2021 - 11:37DROPS Design respondió:
Hei Lene, Stjerne symbol betyr at du skal strikke 7-7-7-9-9-9 masker i samme masken, som gir deg de økte maskene på linjen over (se symbolforklaring over diagrammene). Håper dette hjelper og god fornøyelse!
28.06.2021 - 09:07
![]() Bodil escribió:
Bodil escribió:
Jeg lurer på om kastene skal strikkes vridd vrang eller vridd rett?
27.06.2021 - 01:22DROPS Design respondió:
Hei Bodil, Hvis du har en åpen rute i linje over kastet skal det strikkes vridd rett, hvis det er en rute med kors, skal det strikkes vridd vrang. God fornøyelse!
28.06.2021 - 09:10
![]() Ida Eline Sørensen escribió:
Ida Eline Sørensen escribió:
Hei. Jeg forstår ikke hvordan jeg skal lese diagram A2. Skal en og en av rapportene strikkes? Hvordan henger de sammen? Skal det være noen masker med kun rett, strikkes ett og ett diagram eller flere samtidig? Dette var en forvirrende oppskrift. Takk for svar på forhånd. Strikker forresten str.s.
17.06.2021 - 21:48DROPS Design respondió:
Hei Ida Eline, Du strikker A.2 i ett, så første omgang: 3 vrang, 1 rett, 3 vrang og 1 rett. Gjenta dette på omgangen. Når du er på omgang 3, skal du strikke 3 masker i stjernemasken (som forklart rett over diagrammene) slik at du kan strikke alle maskene i omgang 4. Håper dette hjelper og god fornøyelse!
18.06.2021 - 07:17
![]() Roswitha Zu Dritten escribió:
Roswitha Zu Dritten escribió:
Die letzte Frage habe ich mir selbst bewntworten können. Hab zu schnell aufgegeben. Jetzt läuft es. Aber trotzdem herzlichen Dank für die schnelle Hilfe. Habt einen schönen Freitag
11.06.2021 - 15:22
|
|||||||||||||||||||||||||
Swing by Spring Top#swingbyspringtop |
|||||||||||||||||||||||||
 |
 |
||||||||||||||||||||||||
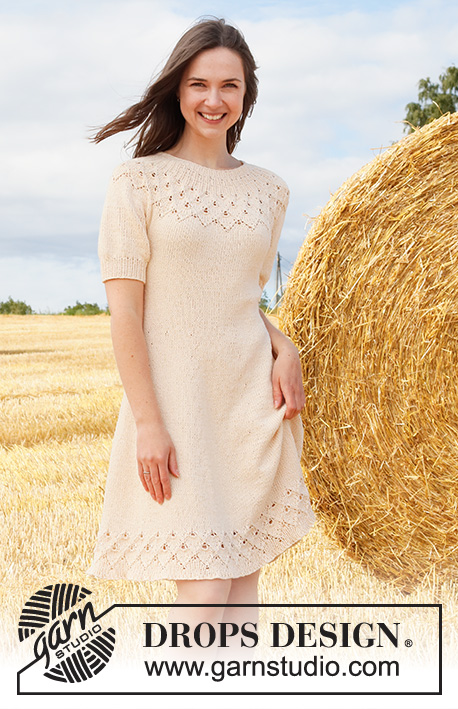
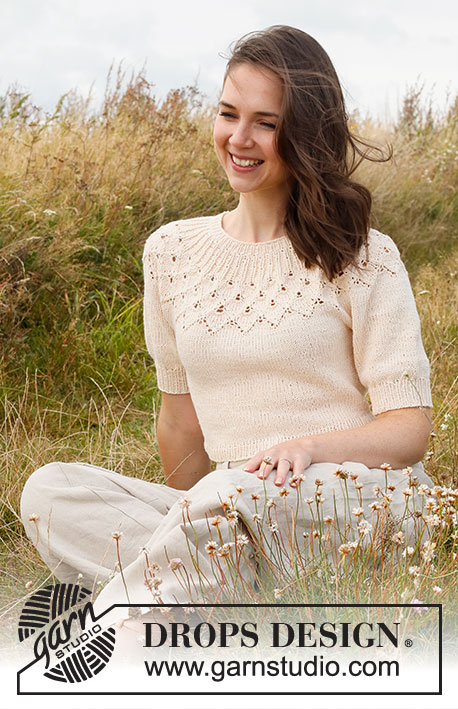
Jersey a punto en DROPS Belle. La labor está realizada de arriba abajo con el canesú redondo, el patrón de calados y mangas cortas en forma puff. Talla: S - XXXL
DROPS 222-32 |
|||||||||||||||||||||||||
|
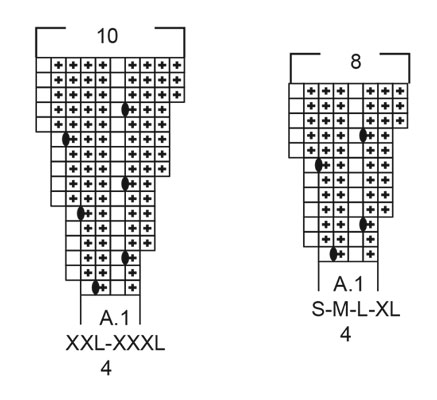
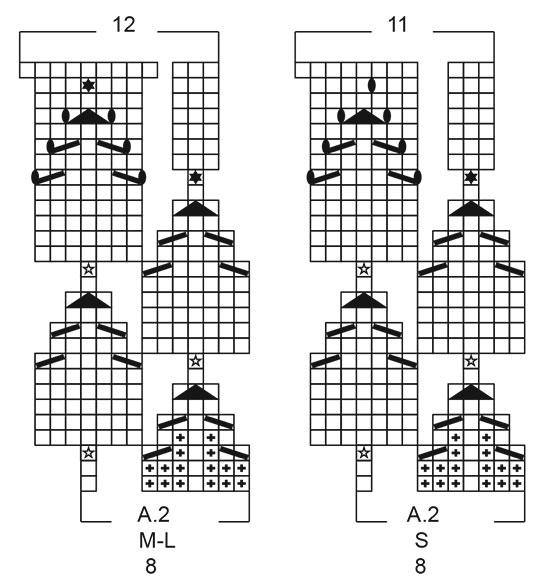
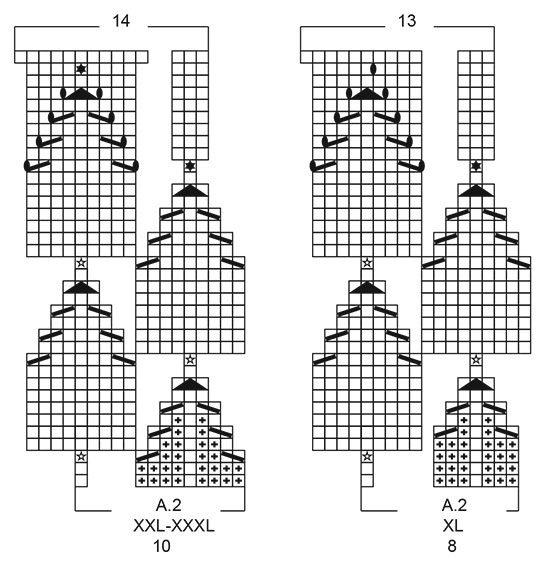
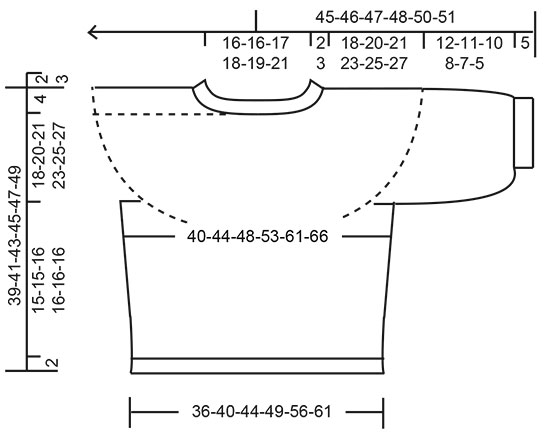
EXPLICACIONES PARA REALIZAR LA LABOR: ------------------------------------------------------- PATRÓN: Ver los diagramas A.1 y A.2. Elegir el diagrama para la talla correspondiente. TIP PARA LAS DISMINUCIONES (aplicar a los lados del cuerpo): Disminuir 1 punto a cada lado del marcapuntos como sigue: Trabajar hasta que queden 3 puntos antes del marcapuntos y trabajar 2 puntos juntos de derecho, 2 derechos (el marcapuntos está entre estos 2 puntos), deslizar 1 puntos como de derecho, 1 derecho, pasar el punto deslizado sobre el punto trabajado. TIP PARA EL REMATE: Para evitar que el borde de remate quede tenso se puede cerrar con una aguja de mayor tamaño. Si el borde sigue tenso, hacer 1 hebra después de aprox. cada 4º punto, y al mismo tiempo cerrar (las hebras se cierran como puntos normales). ------------------------------------------------------- COMENZAR LA LABOR AQUÍ: ------------------------------------------------------- JERSEY - RESUMEN DE LA LABOR: La cenefa del escote y el canesú se trabajan en redondo desde el centro de la espalda, de arriba abajo. Dividir el canesú para el cuerpo y las mangas. El cuerpo se trabaja en redondo con una aguja circular, de arriba abajo. Las mangas se trabajan en redondo con agujas de doble punta/una aguja circular corta, de arriba abajo. CENEFA DEL ESCOTE: Montar 100-100-104-108-112-120 puntos con una aguja circular de 3 mm con Belle. Trabajar 1 vuelta de derecho. Después trabajar el elástico = 1 derecho/1 revés. Cuando el elástico mida 2-2-3-3-3-3 cm, cambiar a una aguja circular de 4 mm. Insertar 1 marcapuntos al inicio de la vuelta en el centro de la espalda, medir el canesú desde el marcapuntos! CANESÚ: Trabajar A.1 en redondo (= 25-25-26-27-28-30 repeticiones de 4 puntos). Después de completar A.1, hay 200-200-208-216-280-300 puntos en la aguja. La labor mide ahora 4-4-4-4-6-6 cm desde el marcapuntos. Ahora trabajar A.2 en redondo (= 25-25-26-27-28-30 repeticiones de 8-8-8-8-10-10 puntos). RECORDAR MANTENER LA TENSIÓN DEL TEJIDO! Después de completar A.2, hay 275-300-312-351-392-420 puntos en la aguja. La labor mide aprox. 14-14-14-17-19-19 cm desde el marcapuntos (es decir, 16-16-17-20-22-22 cm desde el borde de montaje). Trabajar en punto jersey hasta que la labor mida 18-20-21-23-25-27 cm desde el marcapuntos. Ahora dividir la labor para el cuerpo y las mangas. Trabajar la siguiente vuelta como sigue: 38-42-44-50-58-63 derechos (= ½ espalda), colocar los siguientes 62-66-68-76-80-84 puntos en un gancho auxiliar para la manga, montar 8-8-12-12-12-12 puntos nuevos en la aguja (= en el lado bajo la manga), 75-84-88-99-116-126 derechos (= delantero), colocar los siguientes 62-66-68-76-80-84 puntos en un gancho auxiliar para la manga, montar 8-8-12-12-12-12 puntos nuevos en la aguja (= en el lado bajo la manga), trabajar de derecho los últimos 38-42-44-50-58-63 puntos (= ½ espalda). Finalizar el cuerpo y las mangas por separado. AHORA MEDIR LA LABOR DESDE AQUÍ! CUERPO: = 167-184-200-223-256-276 puntos. Insertar 1 marcapuntos en el centro de los 8-8-12-12-12-12 puntos nuevos bajo cada manga (= en el lado del cuerpo). Ahora hay 83-92-100-111-128-138 puntos para el delantero y 84-92-100-112-128-138 puntos para la espalda. Permitir a los marcapuntos seguir la labor hacia delante; se usarán al disminuir en los lados. Trabajar en punto jersey en redondo. Cuando la labor mida 3 cm desde la división, disminuir 1 punto a cada lado de cada marcapuntos - leer TIP PARA LAS DISMINUCIONES (= 4 puntos disminuidos). Disminuir de esta manera cada 2 cm un total de 4-4-4-4-5-5 veces = 151-168-184-207-236-256 puntos. Trabajar en punto jersey en redondo hasta que la labor mida 15-15-16-16-16-16 cm desde la división - o hasta la medida deseada (quedan aprox. 2 cm hasta el largo final). Trabajar 1 vuelta de derecho y al mismo tiempo aumentar 23-26-28-31-36-38 puntos repartidos = 174-194-212-238-272-294 puntos. Cambiar a una aguja circular de 3 mm. Trabajar el elástico (1 derecho/1 revés) en redondo 2 cm. Cerrar con derecho sobre derecho y revés sobre revés - leer TIP PARA EL REMATE. El jersey mide aprox. 39-41-43-45-47-49 cm desde el hombro hacia abajo. MANGAS: Deslizar los 62-66-68-76-80-84 puntos desde el gancho auxiliar a un lado de la labor con agujas de doble punta/ una aguja circular corta de 4 mm, y recoger 1 punto en cada uno de los 8-8-12-12-12-12 puntos nuevos montados en el lado bajo la manga = 70-74-80-88-92-96 puntos. Trabajar en punto jersey en redondo hasta que la manga mida 12-11-10-8-7-5 cm desde la división (quedan aprox. 5 cm hasta el largo final, probarse el jersey y trabajar hasta la medida deseada). Trabajar 1 vuelta de derecho, al mismo tiempo disminuir 16-16-14-14-14-14 puntos repartidos = 54-58-66-74-78-82 puntos Cambiar a agujas de doble punta de 3 mm. Trabajar el elástico en redondo = 1 derecho/1 revés 5 cm. Cerrar con derecho sobre derecho y revés sobre revés - recordar TIP PARA EL REMATE! La manga mide aprox. 17-16-15-13-12-10 cm desde la división. Trabajar la otra manga de la misma manera. |
|||||||||||||||||||||||||
Explicaciones del diagrama |
|||||||||||||||||||||||||
|
|||||||||||||||||||||||||
 |
|||||||||||||||||||||||||
 |
|||||||||||||||||||||||||
 |
|||||||||||||||||||||||||
 |
|||||||||||||||||||||||||
¿Terminaste este patrón?Entonces, etiqueta tus fotos con #dropspattern #swingbyspringtop o envíalas a la galería #dropsfan. ¿Necesitas ayuda con este patrón?Encontrarás 31 videos tutoriales, un espacio para comentarios/preguntas y más visitando la página del patrón en garnstudio.com © 1982-2026 DROPS Design A/S. Todos los derechos reservados. Este documento, incluyendo todas sus sub-secciones, está protegido por los derechos de autor (copyright). Lee más acerca de lo que puedes hacer con nuestros patrones en la parte de abajo de cada patrón de nuestro sitio. |
|||||||||||||||||||||||||


Con más de 40 años en el diseño de modelos de punto y de ganchillo, DROPS Design ofrece una de las más vastas colecciones de patrones gratuitos en el internet - traducidos en 17 idiomas. Al día de hoy, contamos con 324 catálogos y 12290 patrones - de los cuales 11685 están traducidos en español.
Nosotros trabajamos con mucho esmero para brindarte lo mejor que las labores de punto y ganchillo tienen para ofrecer,inspiración y consejos, así como hilos de magnífica calidad a precios increíbles! Te gustaría usar nuestros patrones para otro fin además del uso personal? Puedes leer acerca de lo que estás permitida a hacer en el texto de Copyright en la parte de abajo de todos nuestros patrones. Felices labores!
Escribe un comentario sobre DROPS 222-32
¡Nos encantaría saber qué piensas acerca de este patrón!
Si quieres escribir una pregunta referente al patrón, por favor asegúrate de elegir la categoría correcta en el formulario debajo, para acelerar el proceso de respuesta. Los campos obligatorios están marcados con un *.