
Categorías populares
¿Buscas un hilo?


Comentarios / Preguntas (53)
![]() Michaela escribió:
Michaela escribió:
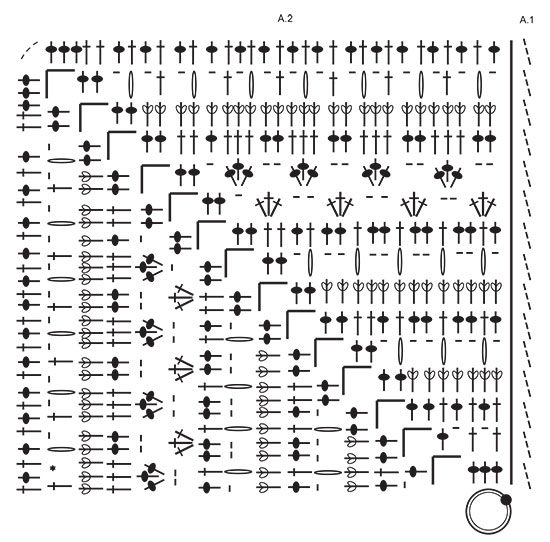
Tut mir leid, vielleicht war die Frage vorher unklar. Wenn man im Diagramm A2 z.B. die 4. und 5. Reihe von unten ansieht, dann sind in der 4. Reihe 9 Stäbchen dargestellt. In der 5. Reihe sollen dann jeweils 4 Stäbchen zusammengehäkelt werden, und dass insgesamt dreimal. Das geht sich aber nicht aus - dazu bräuchte ich in der 4. Reihe 12 Stäbchen und nicht 9. Daher meine Frage, ob man hier nicht immer 3 Stäbchen zusammenhäkelt anstatt 4? Vielen Dank!
27.05.2024 - 10:18DROPS Design respondió:
Liebe Michaela, die 4 Stäbchen zusammen sind als nur 1 Stäbchen gezählt und werden so gehäket (Anfang der 5. Reihe: 1 Lm, 1 M überpsringen, 4 Stb zs in das nächste Stb, 2 Lm, 2 M überspringen, 4 Stb zs in das nächste Stb, 2 Lm, 2 M überspringen, 4 Stb zs in das nächste Stb, 1 Lm, 1 Stäbchen überspringen (= 1+1+2+1+2+1+1= 9 Maschen), dann 2 Stäbchen in nächsten Luftmaschenbogen, usw... Viel Spaß beim Häkeln!
27.05.2024 - 12:59
![]() Michaela escribió:
Michaela escribió:
In der Anleitung steht bei einem Symbol: "4 STÄBCHEN ZU 1 STÄBCHEN ZUSAMMENHÄKELN." Wenn man aber das Diagramm A2 ansieht und dort die Maschen zählt, sieht es eher so aus, als würden nur 3 Stäbchen zusammengehäkelt? Habe ich etwas übersehen? Vielen Dank!
26.05.2024 - 13:37DROPS Design respondió:
Liebe Michaela, hier wird man 4 Stäbchen zusammen häkeln, so zählt jedes als 1 Stäbchen (wie für 1 Noppe z.B.). Viel Spaß beim Häkeln!
27.05.2024 - 08:46
![]() Gunvor escribió:
Gunvor escribió:
Jag blir galen på varv 4! Hur jag än gör får jag 2 stolpar över vid hörnet. Om jag tolkat diagramet rätt, är det sammanlagt 11 relief stolpar i varvet innan. Hoppar över 2m, en stolpgrupp i nästa, hoppas över 2m, en stolpgrupp i nästa. Hoppas över 2m 1 stolpgrupp i nästa, hoppa över 1m. Då är jag framme vid hörnet och har 2 st kvar. Det funkar ju inte? Tänker jag fel? Mönstret är jättevackert, men diagrammet är svårt att följa. Hade föredragit en beskrivning i text.
24.05.2024 - 08:56DROPS Design respondió:
Hej Gunvor, du starter med at hoppe over 1m, 1 stolpgrupp i nästa, hoppa över 2, 1 stolpgrupp i nästa, hoppa över 2, 1 stolpgrupp i nästa, hoppa över 1, 2 stolpar i lm-bågen, 5lm, 2 stolpar i samma lm-båge, hoppa över 1 osv :)
24.05.2024 - 10:25
![]() Hennie Verhees escribió:
Hennie Verhees escribió:
Bij dit patroon voel ik mij misleid, jullie geven 1200 gram aan en ik heb nld 4 gebruikt de afmeting is hetzelfde ,maar ik houd ruim 4 bollen garen over. Hoe kan dit? 1 bol dat snap ik , maar niet 4 volle bollen . ook lijkt dit patroon op een luchtige omslagdoek , terwijl het een best zware deken is. Graag hier uw antwoord op . Met vriendelijke groet , Hennie Verhees
02.04.2024 - 11:06
![]() Kathleen A Dougherty escribió:
Kathleen A Dougherty escribió:
This is a beautiful blanket. I am going to start it. Thank You for the pattern.
05.02.2024 - 21:23
![]() Mattea escribió:
Mattea escribió:
Buongiorno, volevo una precisazione. Nella riga 6 devo lavorare una maglia alta sul gruppo di 4 maglie sottostante ma non so dove devo inserire l'uncinetto. C'è per caso un video esplicativo? grazie
23.12.2023 - 10:17DROPS Design respondió:
Buongiorno Mattea, deve lavorare la maglia alta attorno al gruppo di maglie sotto. Provi a vedere se questo video può esserle di aiuto. Buon lavoro!
30.12.2023 - 10:51
![]() Agnieszka escribió:
Agnieszka escribió:
Not clear for me second row. I start wt chain 3, wich counts as first DC. Then directly I make second DC. Shouldn't I start with chain 4, which counts as first DC plus chain 1 space? Otherwise I have two DCs, without chain space in the begining of the row.
23.11.2023 - 10:25DROPS Design respondió:
Dear Agnieszka, in this pattern, the 3 chains to start rounds are not replacing the first dc, this means A.1 is worked extra: you first work A.1 then repeat A.2 a total of 4 times in the round. Happy crocheting!
23.11.2023 - 15:36
![]() Connie Sahagun escribió:
Connie Sahagun escribió:
I already did all the squares but I started too crochet the sides together with the single stich but what I I don’t understand what to do in the corners.
27.07.2023 - 21:11DROPS Design respondió:
Dear Mrs Sahagun, for the edge you will crochet 3 double crochets (US-crochet terminology) in each corner (and. 1 double crochet in each stitch along the sides of each square + 1 double crochet in the transition between 2 squares). Happy crocheting!
28.07.2023 - 07:39
![]() Gabi escribió:
Gabi escribió:
Guten Tag Werden nur vordere Reliefstäbchen gehäkelt oder abwechselnd vordere und hintere ? Herzlichen Dank
10.07.2023 - 06:43DROPS Design respondió:
Liebe Gabi, Diagram wird in Runde gehäkelt, so die Reliefstäbchen werden immer so gehäkelt. Viel Spaß beim häkeln!
28.07.2023 - 09:08
![]() Linda Mcsweeney escribió:
Linda Mcsweeney escribió:
The graph is confusing for the last round. How many stitches should you have on one side? The graph does not line up with the stiches below on the left side. Thanks.
12.06.2023 - 19:57DROPS Design respondió:
Dear Mrs Mcsweeney, on the last round you will have 32 dc (US-English) on the last half side on the square (A.2) and 3 chains in the corner, then 29 dc on the first half part on next side, this means you should have 32+29= 61 dc along each side of the square. Happy crocheting!
13.06.2023 - 08:14
|
||||||||||||||||||||||||||||
Day By The Sea#daybytheseablanket |
||||||||||||||||||||||||||||
 |
 |
|||||||||||||||||||||||||||
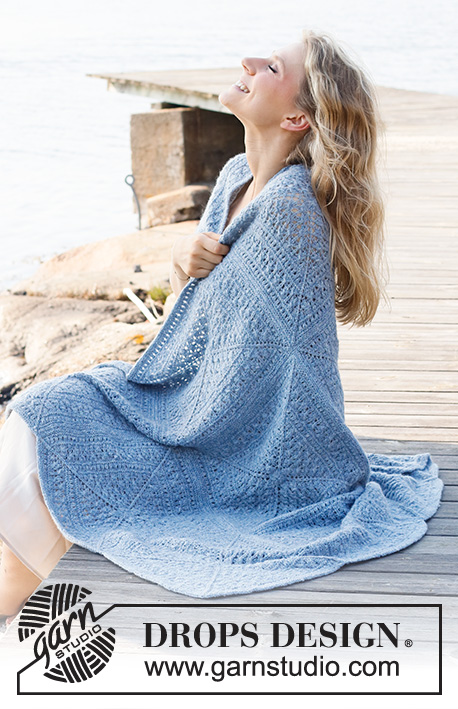
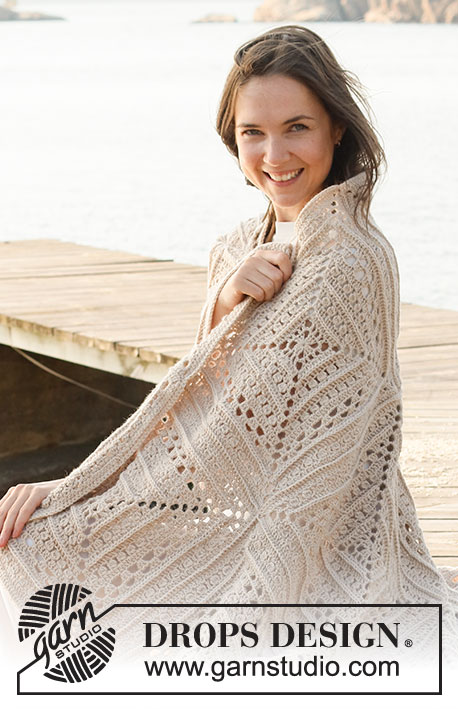
Manta a ganchillo en DROPS Lima.
DROPS 221-2 |
||||||||||||||||||||||||||||
|
EXPLICACIONES PARA REALIZAR EL PATRÓN: ------------------------------------------------ PATRÓN: Ver diagramas A.1 y A.2. El diagrama A.1 muestra cómo comienzan y terminan las vueltas. PUNTO DE CADENA: Si se trabaja en la punta de la aguja de ganchillo, el punto de cadena quedará demasiado apretado. 1 punto de cadena debe ser tan largo como el ancho de 1 punto alto. ------------------------------------------------ COMENZAR LA PIEZA AQUÍ: ------------------------------------------------ MANTA – RESUMEN DE LA PIEZA: La manta consiste de 12 cuadrados que son elaborados de acuerdo a los diagramas. Los cuadrados son unidos entre sí y, para terminar, se trabaja una orilla alrededor de la manta. CUADRADO: Usar aguja de ganchillo tamaño 4 mm y Lima. Leer PUNTO DE CADENA en las explicaciones arriba. Trabajar el diagrama A.2 un total de 4 veces alrededor del anillo de puntos de cadena – A.1 muestra cómo comienza y termina la vuelta. ¡RECORDAR MANTENER LA MISMA TENSIÓN DE LA MUESTRA! Trabajar un total de 12 cuadrados. ENSAMBLAJE: Colocar los cuadrados con 3 a lo ancho y 4 a lo largo. Asegurarse que todos los cuadrados tengan el lado derecho hacia arriba. Usar Lima y unir los cuadrados entre sí, primero a lo ancho y después a lo largo. Colocar 2 cuadrados juntos, lado revés contra lado revés, y trabajar a través de ambas capas por el lado derecho de la manera siguiente: Fijar el hilo con 1 punto bajo alrededor de los arcos de cadena en la esquina, * trabajar 1 punto bajo en cada punto hasta la esquina siguiente (= 3 puntos de cadena), trabajar 1 punto bajo alrededor de la esquina, 2 puntos de cadena y 1 punto bajo alrededor de la esquina siguiente (= 3 puntos de cadena). Trabajar de *a* hasta haber unido todos los cuadrados entre sí, pero en el último cuadrado terminar con 1 punto bajo en la última esquina (= 3 puntos de cadena). Repetir a lo largo de las otras bandas a lo ancho. Unir las bandas entre sí longitudinalmente de la misma manera. ORILLA: Usar Lima y aguja de ganchillo tamaño 4 mm. Comenzar fijando el hilo con 1 punto bajísimo en la primera esquina, después trabajar de la manera siguiente: Trabajar 3 puntos de cadena y 2 puntos altos alrededor de la primera esquina. * Trabajar 1 punto alto en cada punto hasta las esquinas entre los cuadrados, trabajar 1 punto alto alrededor de cada esquina *, trabajar de *a* hasta la última esquina en este lado de la manta. Alrededor de la esquina 2 trabajar 3 puntos altos, trabajar de *a* hasta la última esquina en este lado de la manta. Alrededor de la esquina 3 trabajar 3 puntos altos, trabajar de *a* hasta la última esquina en este lado de la manta. Alrededor de la esquina 4 trabajar 3 puntos altos, trabajar de *a* hasta la primera esquina y terminar con 1 punto bajísimo en el 3er punto de cadena al principio de la vuelta. Cortar y asegurar el hilo. |
||||||||||||||||||||||||||||
Explicaciones del diagrama |
||||||||||||||||||||||||||||
|
||||||||||||||||||||||||||||
 |
||||||||||||||||||||||||||||
¿Terminaste este patrón?Entonces, etiqueta tus fotos con #dropspattern #daybytheseablanket o envíalas a la galería #dropsfan. ¿Necesitas ayuda con este patrón?Encontrarás 9 videos tutoriales, un espacio para comentarios/preguntas y más visitando la página del patrón en garnstudio.com © 1982-2026 DROPS Design A/S. Todos los derechos reservados. Este documento, incluyendo todas sus sub-secciones, está protegido por los derechos de autor (copyright). Lee más acerca de lo que puedes hacer con nuestros patrones en la parte de abajo de cada patrón de nuestro sitio. |
||||||||||||||||||||||||||||


Con más de 40 años en el diseño de modelos de punto y de ganchillo, DROPS Design ofrece una de las más vastas colecciones de patrones gratuitos en el internet - traducidos en 17 idiomas. Al día de hoy, contamos con 325 catálogos y 12298 patrones - de los cuales 11702 están traducidos en español.
Nosotros trabajamos con mucho esmero para brindarte lo mejor que las labores de punto y ganchillo tienen para ofrecer,inspiración y consejos, así como hilos de magnífica calidad a precios increíbles! Te gustaría usar nuestros patrones para otro fin además del uso personal? Puedes leer acerca de lo que estás permitida a hacer en el texto de Copyright en la parte de abajo de todos nuestros patrones. Felices labores!
Escribe un comentario sobre DROPS 221-2
¡Nos encantaría saber qué piensas acerca de este patrón!
Si quieres escribir una pregunta referente al patrón, por favor asegúrate de elegir la categoría correcta en el formulario debajo, para acelerar el proceso de respuesta. Los campos obligatorios están marcados con un *.