
Popular categories
Looking for a yarn?


Comments / Questions (94)
![]() Curcio Mirella wrote:
Curcio Mirella wrote:
Buongiorno ,non riesco a trovare Urban Forest nella pagina di Aiuto e consigli , come mai ? grazie
07.03.2021 - 06:11DROPS Design answered:
Buongiorno Mirella, nella sezione "Consigli e Aiuti" non ci sono i tutorial per i modelli, se ha bisogno di aiuto può spiegarci il suo problema utilizzando i form sotto il modello, come ha fatto ora. Buon lavoro!
07.03.2021 - 14:54
![]() Edith wrote:
Edith wrote:
Bonjour, je voudrais tricoter ce modèle mais j'hésite. Le pli de devant est tout à fait disgracieux et je ne sais pas comment y remédier. Est ce que quelqu'un à trouvé une solution pour améliorer ce modèle ? Merci de vos réponses !!!
01.03.2021 - 07:32DROPS Design answered:
Bonjour Edith, dans ce type de modèles tricotés de haut en bas, le devant pourra rendre différemment en fonction de la morphologie de chacun (largeur et angle des épaules). Bon tricot!
01.03.2021 - 10:09
![]() Bente La Cour wrote:
Bente La Cour wrote:
Strikkeprøven til Urban forest, der er anbefalede pinde ikke angivet. Skal jeg så teste med pind 4, som ribben strikkes med, eller pind 5, som resten strikkes i?
22.02.2021 - 09:54DROPS Design answered:
Hej Bente, du skal få 17 masker i bredden i glatstrik og vi bruger pinde nr 5 til det glatstrikkede, så prøv med den først :)
23.02.2021 - 14:20
![]() Charlotte Harboe wrote:
Charlotte Harboe wrote:
Hej Er det bare mig, eller er der en fejl i opskriften efter der er blevet delt til ærmer og forstykke/bagstykke. I skriver der skal være 70 masker på både for og bagstykke, så skal man slå 2 x 12 masker op under ærmerne. Det kan da aldrig give 164 masker, men må give 184 masker.
17.02.2021 - 08:55DROPS Design answered:
Hej Charlotte 70+70+12+12 =164 :)
18.02.2021 - 08:47
![]() Monika wrote:
Monika wrote:
Dzień dobry,jakim sposobem należy dodawać oczka na karczek,poprzez narzut czy z oczka poniżej?
17.02.2021 - 05:47DROPS Design answered:
Witaj Moniko, należy dodawać oczka z nitki poprzecznej między 2 oczkami poprzedniego okrążenia, patrz część DODAWANIE OCZEK. Pozdrawiamy!
17.02.2021 - 09:35
![]() Peters wrote:
Peters wrote:
Jeg har det samme problem som to andre spørger til (på fransk): der dannes en stor og grim fold under hagen, meget større end den, der kan ses på fotoet af modellen. Hen over ryggen sidder trøjen nogenlunde. Jeg håber, den giver sig lidt i brug, ellers må jeg prøve at blokke den ud, som I foreslår. Jeg tænker, der må være et problem med opskriften?
16.02.2021 - 18:27
![]() Didier Auger wrote:
Didier Auger wrote:
Bonjour, apparemment il y a un problème sur ce modèle. Il y a un commentaire français qui dit comme moi. Je n'ai pas traduit les autres. J'ai fait comme les explications. Mais il se forme devant, sous le menton après le col, un gros pli disgracieux. C'est trop tard pour moi je suis loin sous les manches. Si je le refais comme comme j'en avais l'intention, il faut modifier. C'est dommage de ne pas le corriger. Cordialement Didier
12.02.2021 - 15:22DROPS Design answered:
Bonjour Monsieur Auger, désolé pour la réponse tardive, votre question a malheureusement été oubliée; lorsque l'on tricote ce type de pull avec des épaules/manches marteau, il va effectivement y avoir un excès de matière au niveau de l'encolure, plus ou moins importante en fonction de l'axe des épaules. Vous trouverez ici d'autres modèles avec ce type de manches, mais tricotés de bas en haut, avec une encolure devant marquée par rapport à celle du dos. Bon tricot!
26.04.2021 - 14:13
![]() Christina wrote:
Christina wrote:
Mönster 2 219-16. Jag har stickat Axel-ok mm. Jag har rundstickat hela fram- och bakstycket. När arbetet mäter 29 cm från delningen så skall det ÖKAS 18m jämnt fördelat innan resår. Det är väl fel. Jag skall väl MINSKA 18 m i medium? Jag har minskat i två omgångar 18 m totalt. Om jag följer mönstret så får jag en slapp resår.
02.02.2021 - 09:24DROPS Design answered:
Hej Christina. Resår är mer elastiskt än slätstickning och drar därför ihop sig mer. Genom att öka maskor före resåren undviker man att det blir en markant skillnad på bredden på resåren jämfört med resten av fram- och bakstycket. Mvh DROPS Design
02.02.2021 - 10:21
![]() Gudrun wrote:
Gudrun wrote:
Guten Tag, wie kann ich die Anleitung für ein anderes Garn umrechnen? Ich möchte den Pullover mit Merino extrafein arbeiten. Danke für Ihre Hilfe.
29.01.2021 - 11:20DROPS Design answered:
Liebe Gudrun, Merino Extra Fine gehört zu der Garngruppe B und ist dann keine Alternative zum Alaska, aber Big Merino gehört zur Garngruppe C und könnte eine Alternative sein - oder auch 2 Fäden Baby Merino. Benutzen Sie den Garnumrechner um die neue Garnmenge kalkulieren zu lassen. Viel Spaß beim stricken!
29.01.2021 - 14:23
![]() Gitta wrote:
Gitta wrote:
Warum werden vor dem Abschluss Bündchen soviel Maschen zugenommen ? Maschen vor dem Bündchen abnehmen wäre normal.
28.01.2021 - 19:42DROPS Design answered:
Liebe Gitta, hier will man nicht, daß das Bündchen den ganzen Pullover zusammenzieht, sondern daß die Bündchen etwas "gerade" werden, da man mehr Maschen mit dünneren Nadeln und Rippenmuster als mit dickeren Nadeln und gltt rechts, muss man zunehmen. Viel Spaß beim stricken!
29.01.2021 - 07:59
|
|||||||||||||
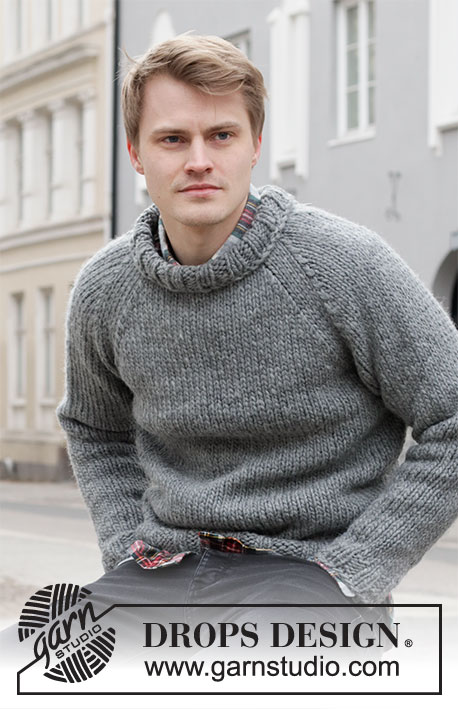
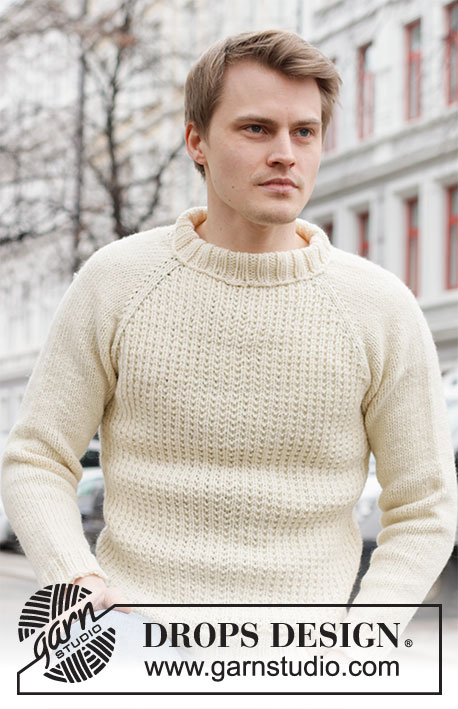
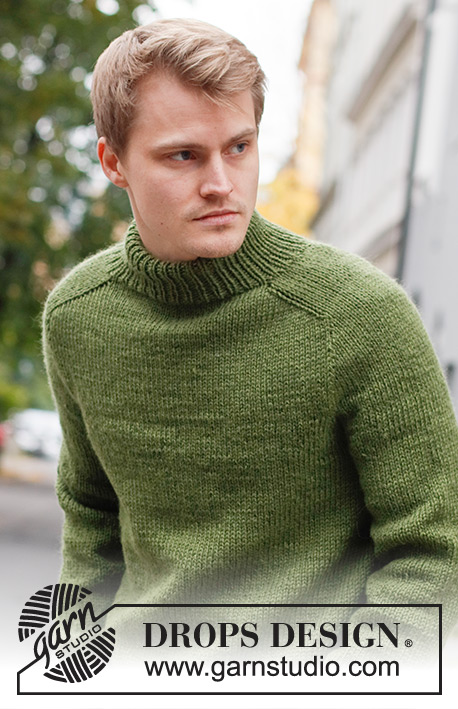
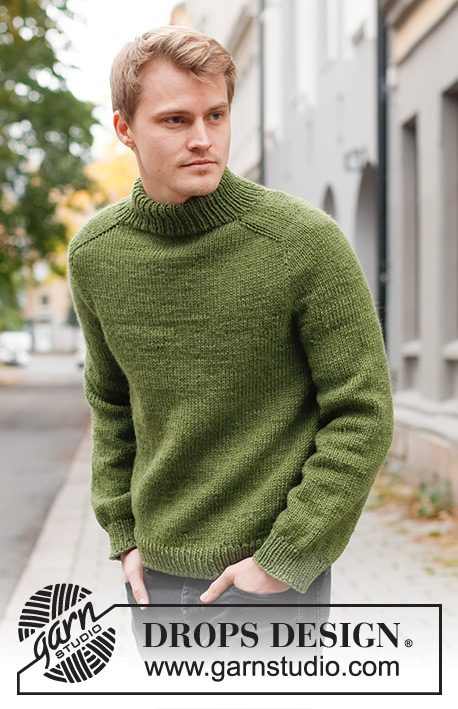
Urban Forest#urbanforestsweater |
|||||||||||||
 |
 |
||||||||||||
Knitted jumper for men in DROPS Alaska. The piece is worked top down, with double neck and saddle shoulders. Sizes S - XXXL.
DROPS 219-16 |
|||||||||||||
|
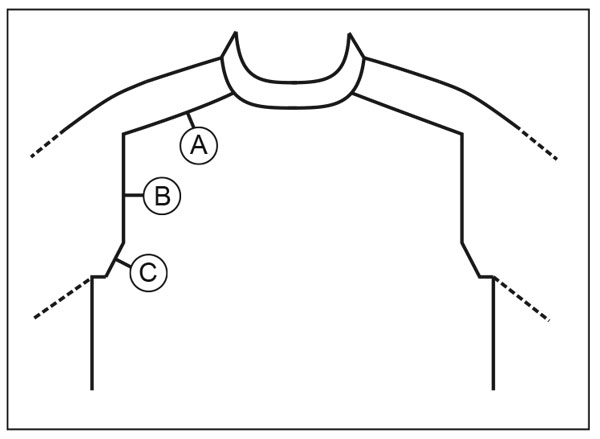
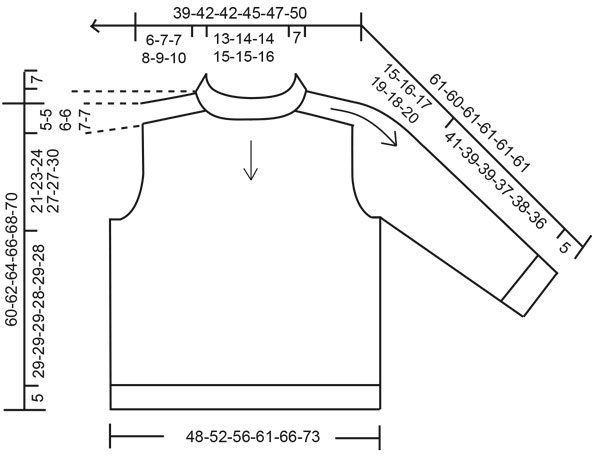
------------------------------------------------------- EXPLANATIONS FOR THE PATTERN: ------------------------------------------------------- INCREASE/DECREASE TIP (evenly spaced): To work out how to increase/decrease evenly, count the total number of stitches on needle (e.g. 78 stitches), and divide by the number of increases/decreases to be made (e.g. 22) = 3.5. In this example, increase by making 1 yarn over after alternately each 3rd and 4th stitch. On the next round work the yarn overs twisted to avoid holes. When decreasing, knit together alternately each 2nd and 3rd stitch and each 3rd and 4th stitch. INCREASE TIP: BEFORE MARKER: The new stitch twists to the right. Use the left needle to pick up the strand between 2 stitches from the previous round; pick up the back strand and knit in the front loop. AFTER MARKER: The new stitch twists to the left. Use the left needle to pick up the strand between 2 stitches from the previous round; pick up the front strand and knit in the back loop. DECREASE TIP (for sleeves): Decrease 1 stitch on either side of the marker thread as follows: Work until there are 3 stitches left before the marker thread, knit 2 together, knit 2 (marker thread sits between these 2 stitches), slip 1 stitch as if to knit, knit 1 and pass the slipped stitch over the knitted stitch. CASTING-OFF TIP: To avoid the cast-off edge being tight you can cast off with a larger size needle. If the edge is still tight, make 1 yarn over after approx. each 4th stitch at the same time as casting off; the yarn overs are cast off as normal stitches. ------------------------------------------------------- START THE PIECE HERE: ------------------------------------------------------- JUMPER – SHORT OVERVIEW OF THE PIECE: The neck and yoke are worked in the round with circular needle, top down from mid back. The yoke is divided for body and sleeves and the body continued in the round with circular needle. The sleeves are worked in the round with short circular needle/double pointed needles, top down. NECK: Cast on 78-82-88-92-98-102 stitches with circular needle size 4 mm and Alaska. Knit 1 round, then work rib (knit 1, purl 1) in the round for 14½ cm. Knit 1 round where you increase 22-22-32-32-34-38 stitches evenly spaced – read INCREASE/DECREASE TIP = 100-104-120-124-132-140 stitches. Change to circular needle size 5 mm. YOKE: Insert a marker at the beginning of the round (= mid-back) – THE PIECE IS MEASURED FROM HERE! In addition, insert 4 new markers as described below – without working the stitches and inserting the markers between 2 stitches. Marker 1: Start mid-back, count 17-18-20-21-21-23 stitches (= ½ back piece), insert marker before the next stitch. Marker 2: Count 16-16-20-20-24-24 stitches from marker 1 (= shoulder), insert marker before the next stitch. Marker 3: Count 34-36-40-42-42-46 stitches from marker 2 (= front piece), insert marker before the next stitch. Marker 4: Count 16-16-20-20-24-24 stitches from marker 3 (= shoulder), insert marker before the next stitch. There are 17-18-20-21-21-23 stitches left on the back piece after marker 4. Allow the markers to follow your work onwards; they are used when increasing for the shoulders. INCREASES FOR SADDLE SHOULDERS: Work stocking stitch in the round. AT THE SAME TIME, on the first round, increase 4 stitches for the shoulders as follows: Increase BEFORE markers 1 and 3 and increase AFTER markers 2 and 4 – read INCREASE TIP. Here you are only increasing on the front and back pieces and the number of shoulder stitches remains the same. Increase like this every round a total of 14-16-16-18-20-22 times = 156-168-184-196-212-228 stitches. REMEMBER THE KNITTING TENSION! After the last increase the piece measures approx. 6-7-7-8-9-10 cm from the marker on the neck. Now increase for the sleeves as follows. INCREASES FOR SLEEVES: Work stocking stitch in the round. AT THE SAME TIME, on the next round, increase 4 stitches for the sleeves as follows: Increase AFTER markers 1 and 3 and increase BEFORE markers 2 and 4 – remember INCREASE TIP. Here you are only increasing on the shoulders and the number of stitches on the front and back pieces remains the same. Increase like this every 2nd round a total of 11-13-13-15-12-12 times = 200-220-236-256-260-276 stitches. The piece should now measure 16-19-19-22-20-21 cm from the marker on the neck. In size S continue working until the piece measures 17 cm. If the length is shorter than the above in sizes M, L, XL, XXL and XXXL, continue to the correct length without further increases. Now increase for the yoke as described below. INCREASES FOR YOKE: Move the 4 markers so each marker sits in the outermost sleeve stitches on each side. There are 36-40-44-48-46-46 stitches between the marker-stitches on each sleeve. On the next round, increase 8 stitches for the yoke by increasing on both sides of all 4 marker-stitches – remember INCREASE TIP. Here you increase on the front and back pieces and on the sleeves; the increased stitches are worked in stocking stitch. Increase like this every 2nd round a total of 4-4-6-6-8-10 times = 232-252-284-304-324-356 stitches. When all the increases are finished, the piece should measure 21-23-24-27-27-30 cm. If the length is shorter than this, continue working to the correct length without further increases. Now divide the yoke for the body and sleeves on the next round as follows: Work the first 35-38-42-45-49-55 stitches (= ½ back piece), place the next 46-50-58-62-64-68 stitches on a thread for the sleeve, cast on 12-12-12-14-14-14 new stitches on the needle (= in side under sleeve), work the next 70-76-84-90-98-110 stitches (= front piece), place the next 46-50-58-62-64-68 stitches on a thread for the sleeve, cast on 12-12-12-14-14-14 new stitches on the needle (= in side under sleeve) and work the last 35-38-42-45-49-55 stitches (= ½ back piece). Body and sleeves are finished separately. THE PIECE IS NOW MEASURED FROM HERE. BODY: = 164-176-192-208-224-248 stitches. Work stocking stitch in the round. When the piece measures 29-29-29-28-29-28 cm from the division, increase 16-18-20-20-22-26 stitches evenly spaced = 180-194-212-228-246-274 stitches. Change to circular needle size 4 mm and work rib (knit 1, purl 1) for 5 cm. Cast off with knit over knit and purl over purl – read CASTING-OFF TIP. The jumper measures approx. 60-62-64-66-68-70 cm from the shoulder down. SLEEVE: Place the 46-50-58-62-64-68 stitches from the thread on the one side of the piece on double pointed needles/short circular needle size 5 mm and knit up 1 stitch in each of the 12-12-12-14-14-14 stitches cast on under the sleeve = 58-62-70-76-78-82 stitches. Insert a marker in the middle of the new stitches under the sleeve. Work stocking stitch in the round. When the sleeve measures 4 cm from the division, decrease 1 stitch on each side of the marker – read DECREASE TIP. Decrease like this every 11-6-3½-3-3-2½ cm a total of 4-6-9-11-11-13 times = 50-50-52-54-56-56 stitches. Continue working until the sleeve measures 41-39-39-37-38-36 cm from the division. Knit 1 round where you decrease 10-8-8-8-10-8 stitches evenly spaced = 40-42-44-46-46-48 stitches. Change to double pointed needles size 4 mm and work rib (knit 1, purl 1) for 5 cm. Cast off with knit over knit and purl over purl – remember CASTING-OFF TIP. Work the other sleeve in the same way. ASSEMBLY: Fold the neck double to the wrong side and sew down. To avoid the neck being tight and rolling outwards, it is important the seam is elastic. |
|||||||||||||
Diagram explanations |
|||||||||||||
|
|||||||||||||
 |
|||||||||||||
 |
|||||||||||||
Have you finished this pattern?Tag your pictures with #dropspattern #urbanforestsweater or submit them to the #dropsfan gallery. Do you need help with this pattern?You'll find 28 tutorial videos, a Comments/Questions area and more by visiting the pattern on garnstudio.com. © 1982-2026 DROPS Design A/S. We reserve all rights. This document, including all its sub-sections, has copyrights. Read more about what you can do with our patterns at the bottom of each pattern on our site. |
|||||||||||||


With over 40 years in knitting and crochet design, DROPS Design offers one of the most extensive collections of free patterns on the internet - translated to 17 languages. As of today we count 325 catalogues and 12298 patterns translated into English (UK/cm).
We work hard to bring you the best knitting and crochet have to offer, inspiration and advice as well as great quality yarns at incredible prices! Would you like to use our patterns for other than personal use? You can read what you are allowed to do in the Copyright text at the bottom of all our patterns. Happy crafting!
Post a comment to pattern DROPS 219-16
We would love to hear what you have to say about this pattern!
If you want to leave a question, please make sure you select the correct category in the form below, to speed up the answering process. Required fields are marked *.