
Popular categories
Looking for a yarn?


Comments / Questions (36)
![]() Stephanie wrote:
Stephanie wrote:
This is extremely complicated to understand
19.02.2022 - 11:53
![]() Christine wrote:
Christine wrote:
Bonjour, Pourrais-je faire cet ouvrage avec la Drops Mélody du groupe D ? Merci par avance. Cordialement
02.02.2022 - 04:20DROPS Design answered:
Bonjour Christine, tout à fait, pensez toutefois à bien vérifier votre tension et à adapter la taille des aiguilles si besoin. Retrouvez d'autres infos sur les alternatives ici. Bon tricot!
02.02.2022 - 08:17
![]() Hilary Wass wrote:
Hilary Wass wrote:
I am confused about continuing the yoke after the first set of increases. The next row is basically straight, but for row 3, are the stitch counts eg. k12=sleeve, the same. Should there be more stitches (the increases) on the sleeve or the body? Thanks in advance...Hilary
15.01.2022 - 05:53DROPS Design answered:
Dear Hilary, after the increase row, you have marked the raglan stitches. The second row is straight and you work the yarn overs twisted to avoid holes. The third row has increases again on each side of the stitch with the marker stitch. The 4th row is worked straight. You repeat this process a certain number of times depending on the size you are working. Happy knitting!
17.01.2022 - 00:46
![]() Daniela Karlsson wrote:
Daniela Karlsson wrote:
Hej Kan man byta ut garnen till två trådar Alpaca?
18.08.2021 - 15:07DROPS Design answered:
Ifall du vill sticka med 2 trådar alpaca är det viktigt att du kontrollerar stickfastheten noga först.
25.08.2021 - 17:09
![]() Stefania wrote:
Stefania wrote:
Can I use drops extra fine merino and kids silk for this pattern
22.07.2021 - 11:35DROPS Design answered:
Dear Stefania, since Merino Extra Fine and Sky both belong to yarn group B, you can use Merino Extra Fine instead, just use the yarn converter to get the new yarn amount (and work with Kid-silk together as in the pattern). Read more about alternatives here. Happy knitting!
22.07.2021 - 13:25
![]() Giovanna wrote:
Giovanna wrote:
Why are all the models knit with circular needles? There are also people who knit with regular straight needles!
08.07.2021 - 00:32DROPS Design answered:
Dear Giovanna, some models are better knitted on the round, easier, they can be tried on while working on the piece and there is hardly any sewing up at the end, some people prefer them for this. However we do have a number of patterns for straight needles, also some of the others can be modified to use straight needles, THIS LESSON can help with that. Happy Stitching!
08.07.2021 - 02:21
![]() Chantal Boulais wrote:
Chantal Boulais wrote:
Bonjour! J'aimerais savoir s'il existe un turoriel sur Youtube pour faire ce chandail : je le trouve trop beau et j'aimerais tenter de le réaliser!!!
23.05.2021 - 23:49DROPS Design answered:
Bonjour Mme Boulais, il n'existe pas de vidéo qui montre comment réaliser ce modèle du début à la fin, mais vous trouverez, à la fin des explications, une liste de vidéos et de leçons qui expliquent les différentes techniques utilisées dans ce modèle. Regardez et lisez-les attentivement, et posez votre question ici si besoin. Pour toute assistance complémentaire individuelle, votre magasin pourra vous aider, même par mail ou téléphone. Bon tricot!
25.05.2021 - 08:06
![]() Rosario wrote:
Rosario wrote:
Hola Jeanette, estoy haciendo el gorro Herringbone 215-4, y además soy novata, entonces me gustaría que me ayudaras. No entiendo bien cada cuántas vueltas tengo que repetir el cruce del ocho. Me lo podrías explicar. Gracias
26.02.2021 - 11:49DROPS Design answered:
Hola Rosario, según el diagrama, el primer cruce de la trenza se hace en la 1ª fila y después cada 10ª fila.
28.02.2021 - 18:30
![]() Barbara wrote:
Barbara wrote:
Buongiorno, credo ci sia un errore nelle diminuzioni del berretto: avendo iniziato con 108 maglie se si effettuano le diminuzioni come descritto (3 maglie, e 4 maglie effettuando lo schema A2 e 5 maglie diminuite sul rimanente del ferro) il totale delle maglie rimaste è 96 e non 90. Mi potete dire se è corretto avere 96 maglie o se devo diminuire di altre 6 maglie? Se devo diminuire altre 6 maglie dove effettuo le diminuzioni? Grazie mille
21.12.2020 - 02:12DROPS Design answered:
Buongiorno Barbara, abbiamo inoltrato la sua richiesta al settore design: se ci saranno delle correzioni verranno apportate direttamente al modello nei prossimi giorni. Buon lavoro!
21.12.2020 - 09:02
![]() Joanne Bergeron wrote:
Joanne Bergeron wrote:
J’aimerais comprendre la quantilé de laine pour le bonnet (tuque), je comprend que c’est à 2 fils mais pour chacune des laine il y a deux fois la quantité d’écrits. Ex: 50- 50g . Est ce que ça veux dire 2 balles ? Merci pour votre réponse
08.12.2020 - 21:27DROPS Design answered:
Bonjour Mme Bergeron, ce modèle est décliné en 2 tailles, vous avez donc les indications pour les 2 tailles: il vous faudra 1 pelote DROPS Sky + 1 pelote DROPS Kid-Silk pour réaliser le bonnet dans chacune des 2 tailles. Bon tricot!
09.12.2020 - 07:07
|
||||||||||||||||||||||||||||||||||||||||
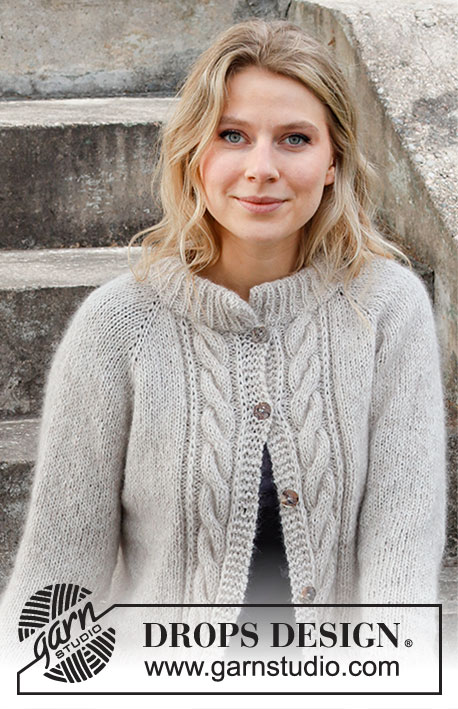
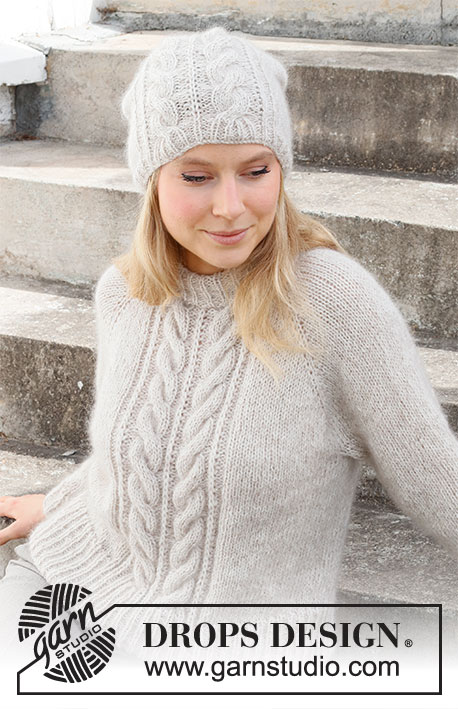
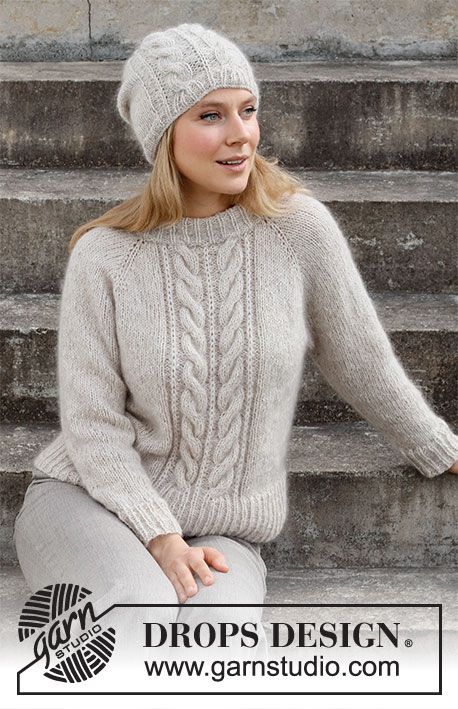
Herringbone Hill#herringbonehillset |
||||||||||||||||||||||||||||||||||||||||
 |
 |
|||||||||||||||||||||||||||||||||||||||
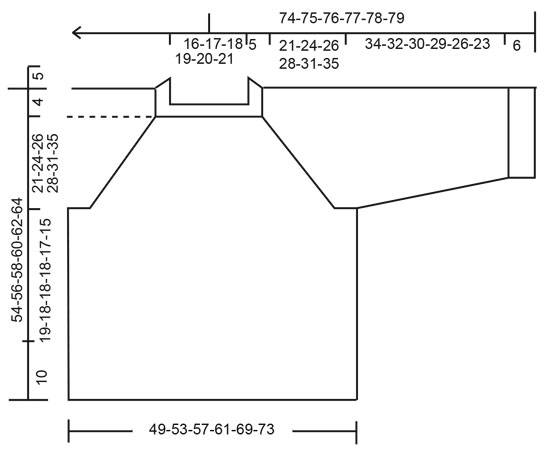
Knitted jumper in DROPS Sky and DROPS Kid-Silk. The piece is worked top down, with raglan, cables and Fisherman’s rib stitches. Sizes S - XXXL. Knitted hat in DROPS Sky and DROPS Kid-Silk, with cables and Fisherman’s rib stitches.
DROPS 215-4 |
||||||||||||||||||||||||||||||||||||||||
|
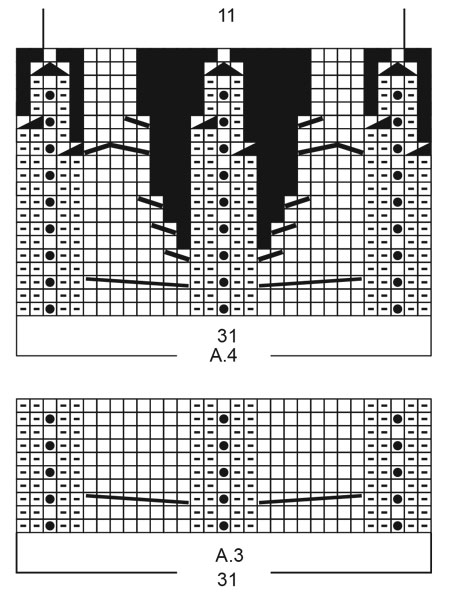
------------------------------------------------------- EXPLANATIONS FOR THE PATTERN: ------------------------------------------------------- PATTERN: See diagrams A.1 to A.4. A.1 applies to the jumper, A.2 to A.4 apply to the hat. INCREASE TIP (evenly spaced): To work out how to increase evenly, count the total number of stitches on the needle (e.g. 73 stitches) and divide by the number of increases to be made (e.g. 26) = 2.8. In this example, increase by making 1 yarn over after alternately each 2nd and 3rd stitch. On the next round knit the yarn overs twisted to avoid holes. RAGLAN: Increase 1 stitch on each side of the raglan-stitch; increase by making 1 yarn over (= 8 stitches increased on the round). On the next round knit the yarn overs twisted to avoid holes. Then work the new stitches in stocking stitch. DECREASE TIP-1 (for sleeves): Decrease 1 stitch on either side of the marker thread as follows: Work until there are 3 stitches left before the marker thread, knit 2 together, knit 2 (marker thread sits between these 2 stitches), slip 1 stitch as if to knit, knit 1 and pass the slipped stitch over the knitted stitch. DECREASE TIP-2 (for hat): Decrease 1 stitch on each side of the marker thread (= 8 stitches decreased on each decrease round + stitches decreases in A.3). Decrease 1 stitch on either side of the marker thread as follows: Work until there are 3 stitches left before the marker thread, knit 2 together, knit 2 (marker thread sits between these 2 stitches), slip 1 stitch as if to knit, knit 1 and pass the slipped stitch over the knitted stitch (= 2 stitches decreased). CASTING-OFF TIP: To avoid the cast-off edge being tight you can cast off with a larger size needle. If the edge is still tight, make 1 yarn over after approx. each 4th stitch at the same time as casting off; the yarn overs are cast off as normal stitches. ------------------------------------------------------- START THE PIECE HERE: ------------------------------------------------------- JUMPER – SHORT OVERVIEW OF THE PIECE: The neck and yoke are worked in the round with circular needle, from mid back and top down. The yoke is divided for body and sleeves and the body is continued in the round with circular needle. The sleeves are worked with double pointed needles, top down. NECK: Cast on 78-81-84-87-90-93 stitches with circular needle size 4 mm and 1 strand Sky and 1 strand Kid-Silk (= 2 strands). Knit 1 round then work rib (knit 1, purl 2) for 10 cm (double neck). When the rib is finished, knit 1 round where you increase 13-14-15-16-17-18 stitches evenly spaced – read INCREASE TIP = 91-95-99-103-107-111 stitches. Change to circular needle size 5.5 mm. Insert 1 marker at the beginning of the round; the yoke is measured from this marker! YOKE: Now work pattern as follows: 14-15-16-17-18-19 stitches in stocking stitch (= half back piece), 1 yarn over, knit 1 (= raglan-stitch), 1 yarn over, knit 12 (= sleeve), 1 yarn over, knit 1 (= raglan-stitch), 1 yarn over, knit 2-3-4-5-6-7, A.1 over the next 31 stitches, knit 2-3-4-5-6-7 (= front piece), 1 yarn over, knit 1 (= raglan-stitch), 1 yarn over, knit 12 (= sleeve) 1 yarn over, knit 1 (= raglan-stitch), 1 yarn over, 14-15-16-17-18-19 stitches in stocking stitch (= half back piece). You have now increased 1 stitch to RAGLAN on each side of all the raglan-stitches in the transitions between the body and sleeves – read description above. Continue this pattern in the round and increase to raglan every 2nd round a total of 18-20-22-23-27-29 times = 235-255-275-287-323-343 stitches. REMEMBER THE KNITTING TENSION! Continue with stocking stitch and pattern without further increases to raglan until the yoke measures 21-24-26-28-31-35 cm from the marker. Now divide the yoke for the body and sleeves on the next round as follows: Work the first 33-36-39-41-46-49 stitches (= half back piece), place the next 48-52-56-58-66-70 stitches on a thread for the sleeve, cast on 6-6-6-8-8-10 new stitches on the needle (= in side under the sleeve), work the next 73-79-85-89-99-105 stitches (= front piece), place the next 48-52-56-58-66-70 stitches on a thread for the sleeve, cast on 6-6-6-8-8-10 new stitches on the needle (= in side under the sleeve), work the last 33-36-39-41-46-49 stitches (= half back piece). Body and sleeves are finished separately. THE PIECE IS NOW MEASURED FROM HERE. BODY: = 151-163-175-187-207-223 stitches. Continue in the round with A.1 and stocking stitch as before until the piece measures 19-18-18-18-17-15 cm from the division – adjust so you finish on row 5 in A.1. Change to circular needle size 4 mm. The next round is worked as follows: Stocking stitch over the first 60-66-72-78-88-96 stitches and increase 14-14-14-14-16-20 stitches evenly over these stitches, A.1b over the next 31 stitches (4 stitches increased = 35 stitches), stocking stitch over the last 60-66-72-78-88-96 stitches and increase 14-14-14-14-16-20 stitches evenly over these stitches. There are 183-195-207-219-243-267 stitches on the needle. Now work rib as follows: Purl 1, * knit 1, purl 2*, repeat from *-* over the next 72-78-84-90-102-114 stitches, knit 1, continue A.1b (= 35 stitches), * knit 1, purl 2 *, repeat from *-* over the next 72-78-84-90-102-114 stitches, knit 1 and purl 1. NOTE! There should now be (knit 1, purl 2) on the whole round. When the rib measures 10 cm, cast off with knit over knit and purl over purl – read CASTING-OFF TIP. The jumper measures approx. 54-56-58-60-62-64 cm from the shoulder down. SLEEVE: Place the 48-52-56-58-66-70 stitches from the thread on the one side of the piece on double pointed needles/short circular needle size 5.5 mm and knit up 1 stitch in each of the new stitches under the sleeve = 54-58-62-66-74-80 stitches. Insert a marker thread in the middle of the new stitches (= 3-3-3-4-4-5 new stitches on each side of the thread). Work stocking stitch in the round. When the sleeve measures 4 cm from the division, decrease 2 stitches under the sleeve – read DECREASE TIP-1. Decrease like this every 3½-3-2½-2-1½-1 cm a total of 9-10-11-12-15-17 times = 36-38-40-42-44-46 stitches. When the sleeve measures 34-32-30-29-26-23 cm (shorter measurements in larger sizes due to wider neck and longer yoke) knit 1 round where you increase 9-7-8-9-7-8 stitches = 45-45-48-51-51-54 stitches. Change to double pointed needles size 4 mm and work rib (= knit 1, purl 2) for 6 cm. Cast off with knit over knit and purl over purl. The sleeve measures approx. 40-38-36-35-32-29 cm from the division. Work the other sleeve in the same way. ASSEMBLY: Fold the neck to the inside and sew down. To avoid the neck being tight and rolling outwards, it is important the seam is elastic. ------------------------------------------------------- HAT – SHORT OVERVIEW OF THE PIECE: The piece is worked in the round with circular needle, bottom up. Change to double pointed needles when necessary. HAT: Cast on 96-102 stitches with circular needle size 3.5 mm and 1 strand Sky and 1 strand Kid-Silk (= 2 strands). Knit 1 round. Insert a marker thread at the beginning of the round, Work rib knit 1, purl 2) in the round for 3½ cm. The next round is worked as follows: Knit 28-31 and decrease 3 stitches evenly over these stitches, work the last row in A.2 over the next 35 stitches (4 stitches decreased = 31 stitches), knit 33-36 and decrease 5 stitches evenly over these stitches = 84-90 stitches. Change to circular needle size 4.5 mm. Now work pattern as follows: Knit 25-28, A.3 over the next 31 stitches (over A.2), and knit 28-31. Continue this pattern. REMEMBER THE KNITTING TENSION! When the hat measures approx. 18-20 cm – finish after a repeat of A.3 in height, insert 4 marker threads as follows (the threads are inserted between 2 stitches and without working the round): The first marker thread after 5-6 stitches, skip 12-13 stitches, insert a thread here, skip 47-49 stitches (= 8-9 knitted stitches, 31 stitches in A.3, 8-9 knitted stitches), insert a thread here, skip 12-13 stitches, insert a thread here, there are 8-9 stitches after the last thread. Work pattern A.4 over A.3 and knit the other stitches. When 6 rounds of A.4 have been worked, start to decrease on each side of the 4 marker threads - read DECREASE TIP-2. Decrease like this every 4th round a total of 4 times. When all the decreases are finished and A.4 has been completed in height, there are 32-38 stitches left. Now knit all stitches together 2 and 2 = 16-19 stitches. Cut the strands, thread the strands through the remaining stitches, tighten and fasten well. The hat measures approx. 26-28 cm from the top down. |
||||||||||||||||||||||||||||||||||||||||
Diagram explanations |
||||||||||||||||||||||||||||||||||||||||
|
||||||||||||||||||||||||||||||||||||||||
 |
||||||||||||||||||||||||||||||||||||||||
 |
||||||||||||||||||||||||||||||||||||||||
 |
||||||||||||||||||||||||||||||||||||||||
Have you finished this pattern?Tag your pictures with #dropspattern #herringbonehillset or submit them to the #dropsfan gallery. Do you need help with this pattern?You'll find 30 tutorial videos, a Comments/Questions area and more by visiting the pattern on garnstudio.com. © 1982-2026 DROPS Design A/S. We reserve all rights. This document, including all its sub-sections, has copyrights. Read more about what you can do with our patterns at the bottom of each pattern on our site. |
||||||||||||||||||||||||||||||||||||||||


With over 40 years in knitting and crochet design, DROPS Design offers one of the most extensive collections of free patterns on the internet - translated to 17 languages. As of today we count 324 catalogues and 12290 patterns translated into English (UK/cm).
We work hard to bring you the best knitting and crochet have to offer, inspiration and advice as well as great quality yarns at incredible prices! Would you like to use our patterns for other than personal use? You can read what you are allowed to do in the Copyright text at the bottom of all our patterns. Happy crafting!
Post a comment to pattern DROPS 215-4
We would love to hear what you have to say about this pattern!
If you want to leave a question, please make sure you select the correct category in the form below, to speed up the answering process. Required fields are marked *.