
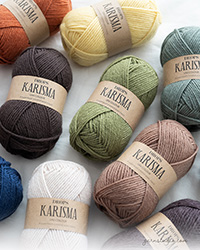
Popular categories
Looking for a yarn?


Comments / Questions (77)
![]() ROSITA PUGLIESE wrote:
ROSITA PUGLIESE wrote:
Buongiorno, lavorando la seconda riga di A.2 mi rendo conto di lavorare e poi avere sul ferro solo 11 maglie per ogni ripetizione. Dove sbaglio? Ho già disfatto tre volte il lavoro, se non risolvo cambio modello...
11.10.2022 - 10:52DROPS Design answered:
Buonasera Rosita, la 2° riga di A.2 è a rovescio, non ci sono aumenti o diminuzioni. Buon lavoro!
13.10.2022 - 22:39
![]() Rosita Pugliese wrote:
Rosita Pugliese wrote:
Chiedo scusa, ho visto ora che c'è un secondo gettato da fare..
10.10.2022 - 10:09
![]() Rosita Pugliese wrote:
Rosita Pugliese wrote:
Buongiorno, alla fine del primo giro ho in totale 235 maglie... eppure mi sembra di aver capito bene gli schemi... dove sbaglio?
10.10.2022 - 10:07
![]() Catherine wrote:
Catherine wrote:
Bonjour, je voudrais juste mentionner une petite erreur dans les explications. Dans la rubrique "Taille XS, L, XL", dernière ligne, il est indiqué "... au-dessus des 21-28-28 mailles suivantes (=3-3-4 motifs), 1 maille lisière au point mousse." En réalité, il s'agit de "(3-4-4 motifs)" et non 3-3-4. Bien cordialement, Catherine
16.07.2022 - 07:57
![]() Anna wrote:
Anna wrote:
Modello Dr ops 213-18 scrivete che alla fine del 1 o ferro sarà diminuita una maglia ogni ripetizione di A.1a ….. cosa sbaglio io ogni diminuzione di A.1a come spiegato dal vostro diagramma ho diminuzione di tre maglie…..
20.03.2022 - 09:20DROPS Design answered:
Buonasera Anna, il 1° ferro di A.1a prevede 3 diminuzioni e 2 aumenti (gettati), per un totale di 1 diminuzione per ogni ripetizione di A.1a. Buon lavoro!
10.08.2022 - 22:54
![]() Kathrin wrote:
Kathrin wrote:
Hallo, ich habe mit der Jacke angefangen und mir ist nicht ganz klar, ob die Zunahme und Abnahme der einen Masche nur EINMAL nötig ist oder in jeder 5. bzw. 15. Reihe des Diagramms: BITTE BEACHTEN: in der 5. Reihe von A.2 1 Masche rechts mehr stricken, bevor die erste Masche des Diagramms gestrickt wird (gilt für das erste Mal, wenn das Diagramm nach den Blenden-Maschen am rechten Vorderteil und nach dem Markierungsfaden an der Seite gestrickt wird).
28.05.2021 - 16:06DROPS Design answered:
Liebe Kathrin, bei der 5. Reihe fangen Sie mit 1 Masche rechts vor A.2, dann stricken Sie A.2 und enden mit nur 5 M in A.3 (= die erste M in A.3 wurde mit der letzten Maschen vorrigen A.2 gestrickt); und am Ende Reihe 15 in A.3 stricken Sie die letzte Masche in A.3 zusammen mit der nächsten Maschen (1 Masche glatt rechts weniger = wurde mit A.3 zusammengestrickt). Viel Spaß beim stricken!
28.05.2021 - 16:18
![]() Inmaculada Santos Hernandez wrote:
Inmaculada Santos Hernandez wrote:
Hola me gustaría hacer este patrón en la talla M,pero al montar los 195 puntos,veo que no coinciden con su patrón,me salen 209,una diferencia de 14 puntos, creo que el error está en los primeros 28,que pide el patrón,pues tendrían que ser 21,si es así,el resto de las indicaciones estarían bien?muchas gracias
10.05.2021 - 12:29DROPS Design answered:
Hola Inmaculada. Gracias por tu aviso. Exactamente ha sido una errata al publicar. Los puntos para la talla M son 21 para el diagrama A.1a
16.05.2021 - 17:54
![]() Irzyk wrote:
Irzyk wrote:
Bonjour le diagramme A1a la jetee doit etre fait combien de fois une fois ou deux et deuxiement A1a on le tricote une seule fois ou A1a et A1b alterne plusieurs fois merci de votre reponse je comprends ne pas pourquoi les diagrammes ne sont pas en entier vous avez des beaux modeles les explications horribles
27.04.2021 - 18:04DROPS Design answered:
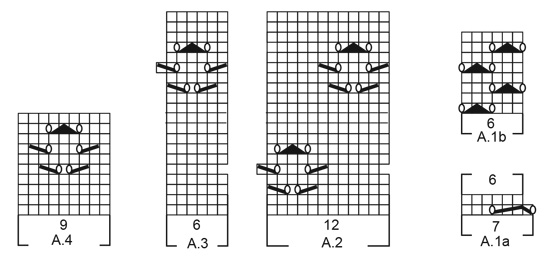
Bonjour Mme Irzyk, A.1a se tricote sur 7 mailles ainsi (= 1 jeté, glisser 1 maille à l'endroit, 3 mailles ensemble à l'endroit, passer la maille glissée par-dessus les mailles tricotées ensemble, 1 jet, 3 mailles endroit) = il reste 6 mailles. Vous répétez A.1a en largeur (3 ou 4 fois en fonction de la taille), quand A.1a est terminé, vous tricotez A.1b (= 6 m) au-dessus de chaque A.1a. Bon tricot!
28.04.2021 - 07:43
![]() Irzyk wrote:
Irzyk wrote:
Bonjour je ne comprends pas vos explications vous pouvez pas faire des diagrammes en entier que des morceaux .Cela fait 5 fois que je recommence et je tombe toujours sur le meme probleme je me retrouve avec des mailles en plus dommage c\'est un tres beau modele
26.04.2021 - 11:16DROPS Design answered:
Bonjour Mme Irzyk, n'hésitez pas à nous indiquer pour quel diagramme vous rencontrez des difficultés de lecture, nous pourrons ainsi vous aider.
26.04.2021 - 12:52
![]() Charlotte Ward Kihle wrote:
Charlotte Ward Kihle wrote:
Hei. En liten kommentar. Jeg har kjøpt garn til jakken free flow som min mor skal strikke. Hun er 86 år og har i alle år strikket og stort sett forstått oppskrifter. Denne gangen sier hun at hun ikke kan starte på den fordi hun ikke klarer å skjønne hva hun skal gjøre. Er det en lettere måte å forklare henne dette mønsteret på? Mvh Charlotte 😊
13.04.2021 - 22:16
|
|||||||||||||||||||
Free Flow#freeflowcardigan |
|||||||||||||||||||
 |
 |
||||||||||||||||||
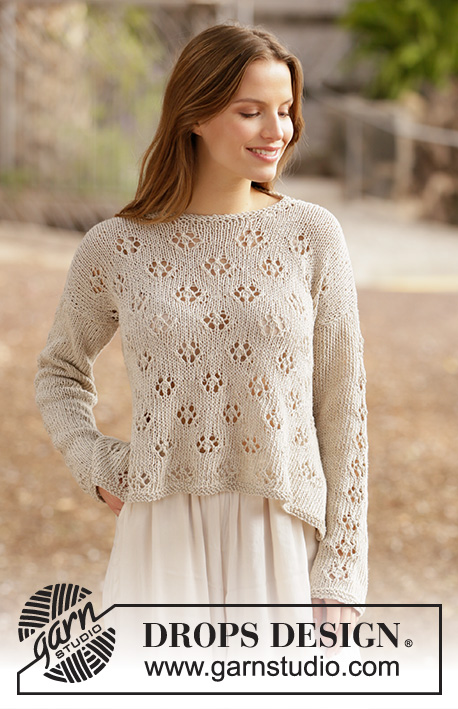
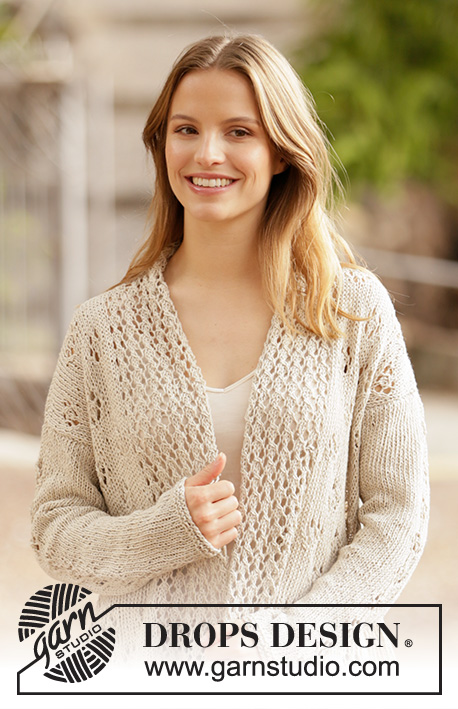
Knitted long jacket with shawl collar in DROPS Bomull-Lin or DROPS Paris. Piece is knitted with lace pattern. Size XS–XXL.
DROPS 213-18 |
|||||||||||||||||||
|
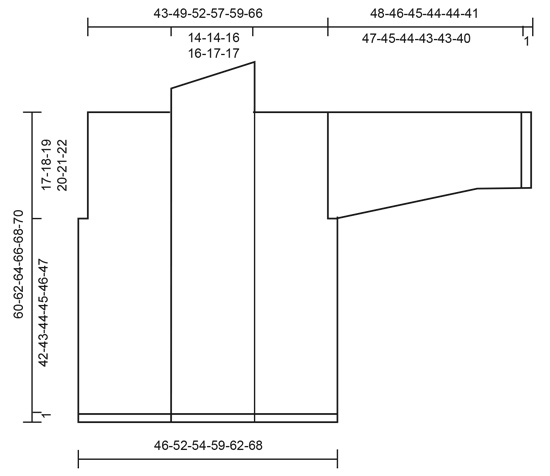
---------------------------------------------------------- EXPLANATION FOR THE PATTERN: ---------------------------------------------------------- GARTER STITCH (worked in the round): 1 ridge vertically = 2 rounds, i.e. knit 1 round and purl 1 round. GARTER STITCH (back and forth): Knit all rows. 1 ridge vertically = knit 2 rows. PATTERN: See diagram A.1 to A.4 (diagram A.4 applies to sleeves). Diagrams show all rows in pattern seen from the right side. INCREASE TIP (applies to sleeves): Work until 2 stitches remain before marker thread, 1 yarn over, knit 4 (marker thread is in the middle of these stitches), 1 yarn over. On next round knit yarn overs twisted to avoid holes. Then work the new stitches in stocking stitch. ---------------------------------------------------------- START THE PIECE HERE: ---------------------------------------------------------- JACKET - SHORT OVERVIEW OF THE PIECE: Work body back and forth on circular needle up to armhole. Then cast off stitches for armholes in each side, and work front pieces and back piece back and forth separately. Work sleeves in the round on double pointed needles/a short circular needle. BODY: Cast on 169-189-195-225-231-251 stitches (including 1 edge stitch in each side towards mid front) on circular needle size 5 mm with Bomull-Lin or Paris. Work 2 ridges in GARTER STITCH - read explanation above. Switch to circular needle size 5.5 mm. Work next row in the different sizes as follows: Size XS, L, XL: Work 1 edge stitch in garter stitch, A.1a over the next 21-28-28 stitches (= 3-4-4 repetitions of 7 stitches), knit 4-3-2, A.2 over the next 12-24-24 stitches (= 1-2-2 repetitions of 12 stitches), A.3 over the next 6-6-6 stitches (= 1 repetition of 6 stitches), knit 4-3-5, insert a marker thread here (= in the side), knit 3-2-4, A.2 over the next 60-84-84 stitches (= 5-7-7 repetitions), A.3 over the next 6-6-6 stitches (= 1 repetition), knit 4-3-5, insert a marker thread here (= in the side), knit 3-2-4, A.2 over the next 12-24-24 stitches (= 1-2-2 repetitions), A.3 over the next 6-6-6 stitches (= 1 repetition of 6 stitches), knit 5-4-3, A.1a over the next 21-28-28 stitches (= 3-4-4 repetitions), 1 edge stitch in garter stitch. Size S, M, XXL: Work 1 edge stitch in garter stitch, A.1a over the next 21-21-28 stitches (= 3-3-4 repetitions of 7 stitches), knit 4-3-2, A.2 over the next 24-24-36 stitches (= 2-2-3 repetitions of 12 stitches), knit 3-5-4, insert a marker thread here (= the side), knit 2-4-3, A.2 over the next 72-72-96 stitches (= 6-6-8 repetitions), A.3 over the next 6-6-6 stitches (= 1 repetition of 6 stitches), knit 3-5-4, insert a marker thread here (= in the side), knit 2-4-3, A.2 over the next 24-24-36 stitches (= 2-2-3 repetitions), knit 5-4-3, A.1a over the next 21-21-28 stitches (= 3-3-4 repetitions), 1 edge stitch in garter stitch. All sizes: When first row has been worked, 1 stitch has been decreased in every repetition A.1a on row (= 6-6-6-8-8-8 stitches decreased in total) = 163-183-189-217-223-243 stitches. Work 1 row from wrong side. Now work A.1b over every repetition A.1a and work pattern as before over the remaining stitches on row. NOTE! On 5th row in A.2 work 1 more knit stitch before the first stitch in diagram (applies first time diagram is worked after band stitches on right front piece and after marker thread in the sides). On 15th row in A.3 work 1 knit stitch less after the last stitch in diagram (applies before marker thread in the sides and before band stitches on left front piece. REMEMBER THE KNITTING TENSION! When piece measures 43-44-45-46-47-48 cm - adjust so that next row is worked from wrong side, cast off 2 stitch in each side, i.e. 1 stitch on each side of marker thread in each side. Then finish front pieces and back piece separately. BACK PIECE: = 71-81-85-93-97-107 stitches. Work first row as follows from right side: 1 edge stitch in garter stitch, knit 2-1-3-1-3-2, work pattern as before over the next 66-78-78-90-90-102 stitches, knit 1-0-2-0-2-1, 1 edge stitch in garter stitch. Continue back and forth like this. When piece measures 55-57-59-61-63-65 cm, do not begin any more lace patterns vertically (this way the neck isn’t cast off in the middle of working a lace pattern).When last lace pattern has been worked, continue with stocking stitch and 1 edge stitch in garter stitch in each side. When piece measures 58-60-62-64-66-68 cm, cast off the middle 21-21-23-23-25-25 stitches for neck, and finish each shoulder separately. On next row from the neck, cast off 1 stitch = 24-29-30-34-35-41 stitches. When piece measures 60-62-64-66-68-70 cm, cast off all stitches. Work the other shoulder the same way. RIGHT FRONT PIECE: = 44-49-50-60-61-66 stitches. Work first row from right side as follows: 1 edge stitch in garter stitch, work A.1b over the next 18-18-18-24-24-24 stitches, knit 4-4-3-3-2-2, work pattern as before over the next 18-24-24-30-30-36 stitches, knit 2-1-3-1-3-2, 1 edge stitch in garter stitch. Continue back and forth like this. When piece measures 60-62-64-66-68-70 cm – adjust so that next row is worked from wrong side, cast off the first 24-29-30-34-35-40 stitches for shoulder, then work over the last 20-20-20-26-26-26 stitches as before. Continue with lace pattern and 1 edge stitch in garter stitch in each side until band measures 7-7-7-7-8-8 cm from shoulder. At the beginning of the next 3-3-3-4-4-4 rows from wrong side, cast off the first 5 stitches = 5-5-5-6-6-6 stitches remain. Loosely cast off the last stitches on next row from wrong side LEFT FRONT PIECE: = 44-49-50-60-61-66 stitches. Work first row from right side as follows: 1 edge stitch in garter stitch, knit 1-0-2-0-2-1, pattern as before over the next 18-24-24-30-30-36 stitches, knit 5-5-4-4-3-3, A.1b over the next 18-18-18-24-24-24 stitches, 1 edge stitch in garter stitch. Continue back and forth like this. When piece measures 60-62-64-66-68-70 cm – adjust so that next row is worked from right side, cast off the first 24-29-30-34-35-40 stitches for shoulder, then work over the last 20-20-20-26-26-26 stitches as before. Continue with lace pattern and 1 edge stitch in garter stitch in each side until band measures 7-7-7-7-8-8 cm from shoulder. At the beginning of the next 3-3-3-4-4-4 rows from right side, cast off the first 5 stitches = 5-5-5-6-6-6 stitches remain. Loosely cast off the last stitches on next row from right side SLEEVES: Cast on 35-35-37-39-41-41 stitches on double pointed needles size 5 mm with Bomull-Lin or Paris. Work 2 ridges. Switch to double pointed needles size 5.5 mm. Insert a marker thread at beginning of round (= mid under sleeve). Work pattern as follows: Knit 13-13-14-15-16-16, A.4 (= 9 stitches) knit 13-13-14-15-16-16. Work pattern in the round as follows. When piece measures 8-8-8-9-9-9 cm, increase 2 stitches under sleeve - read INCREASE TIP! Increase like this approx. every 4-3½-3-2½-2½-2 cm 10-11-12-13-13-15 times in total = 55-57-61-65-67-71 stitches. When sleeve measures 43-41-40-39-39-36 cm, do not begin any more lace patterns vertically (this way the sleeve isn’t cast off in the middle of working a lace pattern). Continue in the round in stocking stitch. When sleeve measures 48-46-45-44-44-41 cm, cast off all stitches. Work the other sleeve the same way. ASSEMBLY: Sew shoulder seams with grafting/kitchener stitches inside cast-off edge. Sew sleeves in body inside 1 edge stitch in garter stitch on body and inside cast-off edge on sleeve. Sew the collar together mid back and sew it to the neck. Fasten off. Bomull-Lin will be more even and look better after it has been washed. When the garment is finished, soak it, stretch it to correct measurements - see chart, and leave it to dry flat. |
|||||||||||||||||||
Diagram explanations |
|||||||||||||||||||
|
|||||||||||||||||||
 |
|||||||||||||||||||
 |
|||||||||||||||||||
Have you finished this pattern?Tag your pictures with #dropspattern #freeflowcardigan or submit them to the #dropsfan gallery. Do you need help with this pattern?You'll find 23 tutorial videos, a Comments/Questions area and more by visiting the pattern on garnstudio.com. © 1982-2026 DROPS Design A/S. We reserve all rights. This document, including all its sub-sections, has copyrights. Read more about what you can do with our patterns at the bottom of each pattern on our site. |
|||||||||||||||||||

With over 40 years in knitting and crochet design, DROPS Design offers one of the most extensive collections of free patterns on the internet - translated to 17 languages. As of today we count 324 catalogues and 12199 patterns translated into English (UK/cm).
We work hard to bring you the best knitting and crochet have to offer, inspiration and advice as well as great quality yarns at incredible prices! Would you like to use our patterns for other than personal use? You can read what you are allowed to do in the Copyright text at the bottom of all our patterns. Happy crafting!
Post a comment to pattern DROPS 213-18
We would love to hear what you have to say about this pattern!
If you want to leave a question, please make sure you select the correct category in the form below, to speed up the answering process. Required fields are marked *.