
Popular categories
Looking for a yarn?


Comments / Questions (16)
![]() Dorina wrote:
Dorina wrote:
Hello. The description says brick red color 19, but the yarn colors show peach 19. Are these two the same? If not, which color is closest to the color in the sample?
29.10.2025 - 11:15DROPS Design answered:
Hi, Dorina, the color name for this shade has been changed, but it has not been updated in this pattern. Happy knitting!
29.10.2025 - 13:19
![]() Dorina wrote:
Dorina wrote:
Hello. A leírás 19 sz. téglavörös színt ír, azonban a fonal színeknél a 19 barack van. Ez a kettő ugyanaz? Ha nem akkor melyik szín áll a legközelebb a mintában lévő színhez?
29.10.2025 - 11:13
![]() Crochetingbeauty wrote:
Crochetingbeauty wrote:
Is there a written pattern somewhere I can use. I’ve tried several times to read the chart but have failed. Please and thankyou.
26.09.2021 - 09:55DROPS Design answered:
Dear Crochetingbeauty, we do not have a written out pattern not only because our patterns are available in several languages, but asle, because we believe that with diagrams, you can see not only the very next step, abut also, the bigger picture, as hoe the rows and stitches relate to each other en-large. However, we do have a lesson on howe to read the diagrams HERE, and you can always ask for help (either over the phone or in person) in the store, where you bought your DROPS yarn from. Happy Stitching!
27.09.2021 - 03:27
![]() Lavender wrote:
Lavender wrote:
What does it mean when it says for the sleeves you have to 'cast on stitches'? I've never heard of that in crocheting only in knitting but is it the same thing? How do I do that?
09.03.2021 - 02:38DROPS Design answered:
Dear Lavender, you will now crochet new stitches as shown in diagram (= A.5a starts at the arrow with 3 chains + 1 double treble in the first stitch on body), work body as before and finish with A.4 (starting with 1 double treble in the last stitch on body + 2 chains + 4 chains to turn with). Happy crocheting!
09.03.2021 - 07:52
![]() Maria B wrote:
Maria B wrote:
Would it be alright if I asked someone to do a tutorial video on making this pattern? Of course, they would, in turn, ask you directly I'm sure
01.09.2020 - 08:34DROPS Design answered:
Hi Maria, did you see this one?: How to crochet puff stitches shaped like hearts
02.09.2020 - 15:40
![]() Nancy's Robasco wrote:
Nancy's Robasco wrote:
Is there any help you can offer to make the pattern tighter so there are not openings to see through ?
10.07.2020 - 14:41DROPS Design answered:
Dear Mrs Robasco, we are unfortunately not able to adapt every pattern to every single request - please contact your store for any individual assistance - or check our our crocheted patterns for sweaters. Happy crocheting!
10.07.2020 - 16:38
![]() Jenny Nilsson wrote:
Jenny Nilsson wrote:
Hej Jag är på vänster axel nu och förstår inte riktigt mönstret. Enligt beskrivningen så ska jag virka 1+12+1 (STL M) när jag är klar med A12 på höjden men då blir det tre puffmaskor över eftersom man ska virka 1+16+ A12 över de bästa tre så totalt 20.
31.03.2020 - 12:04DROPS Design answered:
Hej Jenny, vi forstår ikke rigtigt dit spørgsmål, men du hækler puffm som tidligere og hækler A.12 over de sidste 3 mod halsen, så du tager ind ifølge diagrammet. God fornøjelse!
21.04.2020 - 09:26
![]() Ingrid Aarden wrote:
Ingrid Aarden wrote:
For the beginning chain it is stated that one has to work with 2 strands of Sky for elasticity. But in de US english version it is stated 1 single strand. Is this an errorin the US version?
29.02.2020 - 16:06DROPS Design answered:
Dear Mrs Aarden, it looks like yes, thanks for your feedback, US-pattern will be edited, and cast on the fundation chain with 2 strands Sky (so that it will be more elastic). Happy crocheting!
02.03.2020 - 11:51
![]() Helena wrote:
Helena wrote:
Hallo, ich würde gerne wissen, in welche Masche man das erste Doppelstäbchen von A.4b häkelt? Vielen Dank für eine baldige Antwort. Liebe Grüße
11.11.2019 - 13:01DROPS Design answered:
Liebe Helena, das letzte Doppelstäbchen in A.4b (diese Reihe ist eine Rückreihe und wird links nach rechts gelesen) wird in die erste Puff-Masche am Anfang der vorrigen Reihen gehäkelt. Viel Spaß beim häkeln!
11.11.2019 - 13:11
![]() Corinne wrote:
Corinne wrote:
Bonjour, je ne comprend pas comment faire les augmentations pour les manches A5a. Dois je commencer par 3 mailles en l’air? Sont-elles rattachées au devant déjà crocheté? Quel est le début des 4 lignes du diagramme A5a? Merci pour votre éclaircissement.
23.09.2019 - 17:54DROPS Design answered:
Bonjour Corinne, avant les augmentations des manches, vous avez coupé le fil, vous commencez ensuite A.5a = 3 mailles en l'air, 1 double-bride dans la 1ère maille, crochetez A.2b comme avant et terminez par A.4a = 1 double-bride dans la dernière maille, 2 maille en l'air + 4 mailles en l'air pour tourner. Au rang suivant, crochetez: A.4a (=3 ml, 1 point soufflé, 1 ml), A.2a comme avant et A.5a (= 1 point soufflé dans la 2ème des 3 ml du début du rang précédent, 1 double bride dans la dernière maille en l'air, 2 mailles en l'air (+ les 4 ml du début du rang suivant)). Continuez ensuite ainsi en suivant A.5 et A.4 pour les augmentations de chaque côté. Bon crochet!
24.09.2019 - 10:17
|
||||||||||||||||||||||||||||||||||
In Pieces#inpiecessweater |
||||||||||||||||||||||||||||||||||
 |
 |
|||||||||||||||||||||||||||||||||
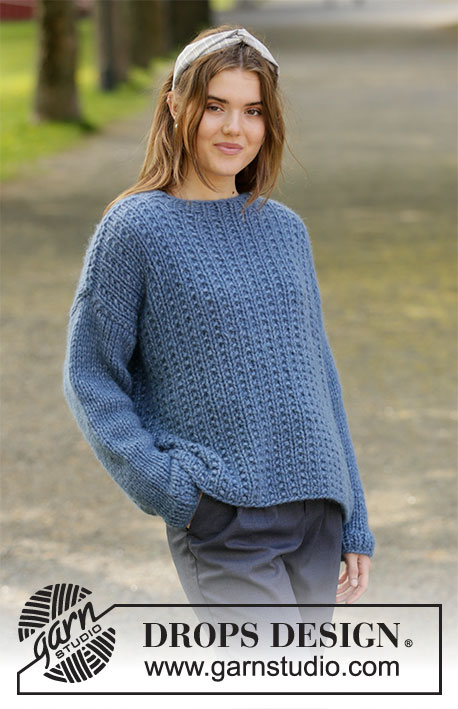
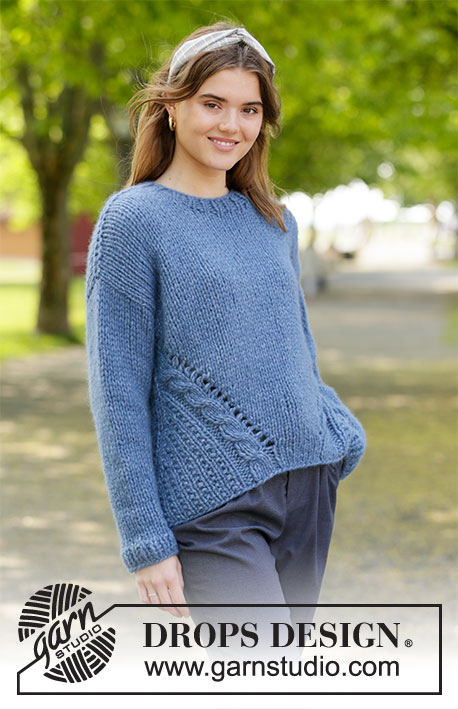
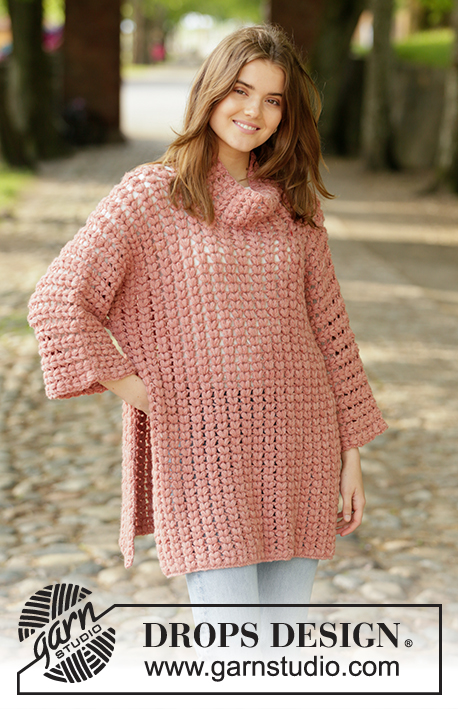
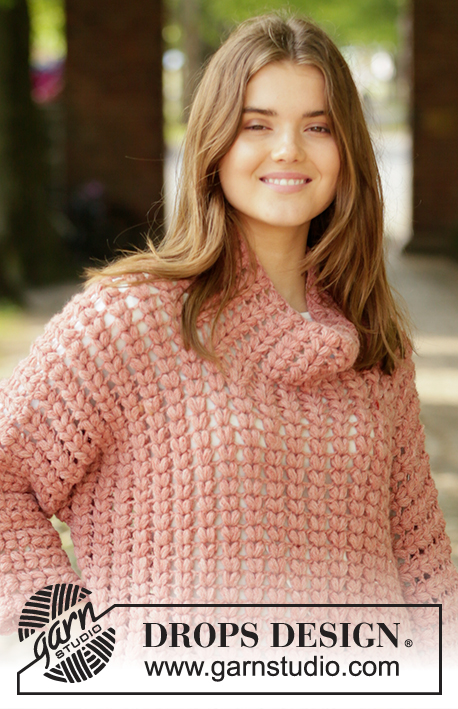
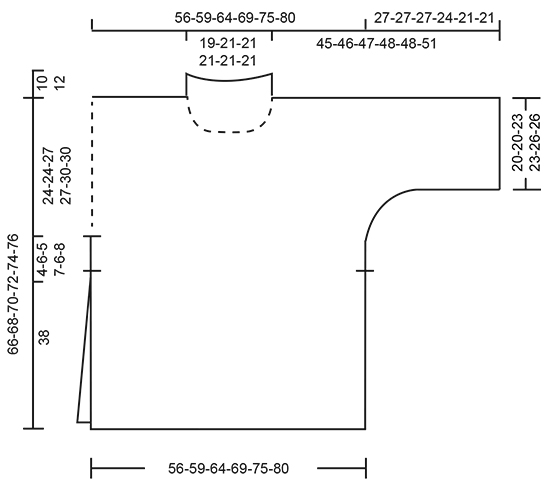
Crocheted poncho-jumper in DROPS Sky. The piece is worked with puff stitches, kimono-sleeves and split in sides. Sizes S - XXXL.
DROPS 205-40 |
||||||||||||||||||||||||||||||||||
|
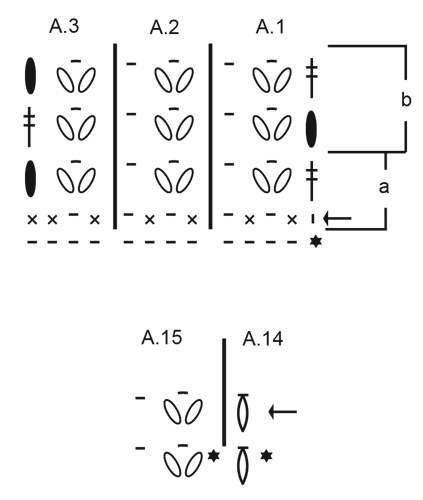
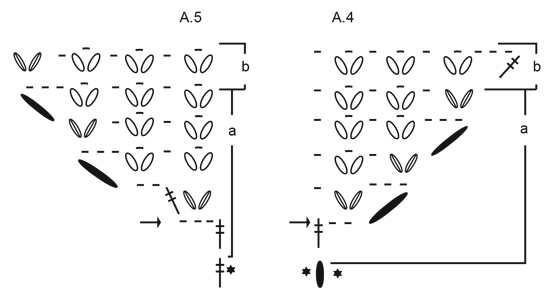
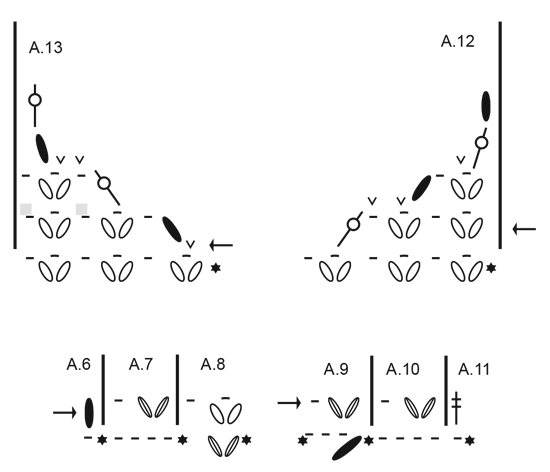
------------------------------------------------------- EXPLANATIONS FOR THE PATTERN: ------------------------------------------------------- CHAIN STITCH: If you work outermost on the hook the chain stitch will often be too tight; 1 chain stitch should be as long as 1 double crochet is wide. PATTERN: See diagrams A.1 to A.15. NOTE: It is important that the strand is pulled to the right length (2 cm) when working puff stitches ------------------------------------------------------- START THE PIECE HERE: ------------------------------------------------------- PONCHO JUMPER – SHORT OVERVIEW OF THE PIECE: Front and back pieces are worked back and forth separately. Stitches are then cast on for the sleeves. The neck is worked in the round. FRONT PIECE: Work 84-88-96-104-112-120 chain stitches – read CHAIN STITCH, with hook size 5 mm and double strand Sky (to make the cast-on edge elastic). Then continue with 1 strand Sky and work as follows: Work A.1a over the first 4 chain stitches, repeat A.2a until there are 4 chain stitches left (= 19-20-22-24-26-28 repeats of 4 chain stitches) and finish with A.3a over the last 4 chain stitches. When A.1a to A.3a have been completed, continue with A.1b to A.3b. Repeat A.1b to A.3b in height. REMEMBER THE CROCHET TENSION! Work until the piece measures approx. 42-44-43-45-44-46 cm. Now cast on stitches for the sleeves on each side; i.e. cut the strand and begin from the wrong side as follows: Work A.5a (= increase for sleeve), repeat A.2b over the puff stitches (= 21-22-24-26-28-30 repeats) and finish with A.4a (= increase for sleeve). When A.4a and A.5a have been completed, cut the strand. Work 25-25-25-21-17-17 loose chain stitches for the sleeve, continue with A.4b, work A.2b as before, work A.5b and finish with 25-25-25-21-17-17 loose chain stitches for the sleeve (shorter sleeves in the larger sizes due to broader shoulders). The next row is worked as follows from the wrong side: Work A.6 over the first chain stitch, A.7 over the next 24-24-24-20-16-16 chain stitches (= 6-6-6-5-4-4 repeats of 4 chain stitches), A.8 over the next puff stitch, repeat A.2b over the next 27-28-30-32-34-36 puff stitches, work A.9 over the next chain-space, A.10 over the next 24-24-24-20-16-16 chain stitches (= 6-6-6-5-4-4 repeats of 4 chain stitches) and finish with A.11 over the last chain stitch. The increases for the sleeves are now finished = 41-42-44-44-44-46 puff stitches on the row. Continue as follows: Work A.1b over the first puff stitch, A.2b over the next 39-40-42-42-42-44 puff stitches and finish with A.3b over the last puff stitch. Continue repeating A.1b to A.3b in height. When the piece measures approx. 61-63-65-66-68-70 cm – adjust so the next row is from the right side, divide the piece and finish the shoulders separately as follows: LEFT SHOULDER: (First row = from the right side): Work A.1b over the first puff stitch, repeat A.2b over the next 16-16-17-17-17-18 puff stitches and finish with A.12 over the last 3 puff stitches. When A.12 has been completed in height work the next row as follows from the right side: A.1b over the first puff stitch, A.2b over the next 12-12-13-13-13-14 puff stitches and finish with A.3b over the last puff stitch. Continue like this until there are a total of 5-5-5-6-6-6 rows on the shoulder. The piece measures approx. 66-68-70-72-74-76 cm. Cut and fasten the strand. RIGHT SHOULDER: (First row = from the right side): Skip the middle 1-2-2-2-2-2 puff stitches (= neck), work A.13 over the next 3 puff stitches, repeat A.2b over the next 16-16-17-17-17-18 puff stitches and finish with A.3b over the last puff stitch. When A.13 has been completed in height work as follows from the right side: A.1b over the first puff stitch, A.2b over the next 12-12-13-13-13-14 puff stitches and finish with A.3b over the last puff stitch. Continue like this until there are a total of 5-5-5-6-6-6 rows on the shoulder. The piece measures approx. 66-68-70-72-74-76 cm. Cut and fasten the strand. BACK PIECE: Work as the front piece until all the increases are finished = 41-42-44-44-44-46 puff stitches. Work A.1b over the first puff stitch, repeat A.2b a total of 39-40-42-42-42-44 times and finish with A.3b over the last puff stitch. Repeat A.1b to A.3b in height. Continue until the piece measures approx. 66-68-70-72-74-76 cm – adjust to match the front piece. Cut and fasten the strand. ASSEMBLY: Sew the shoulder seams. Sew the sleeve and side seams in one go leaving approx. 38 cm at the bottom (= split). NECK: The neck is worked in the round. Start with 1 slip stitch on the right shoulder and work 4 chain stitches, work 1 puff stitch around each of the 7-8-8-8-8-8 puff stitches on the back piece as before, 2 puff stitches around each of the next 1-1-1-2-2-2 rows on the front piece, 1 puff stitch around each of the 7-8-8-8-8-8 puff stitches on the front piece, 2 puff stitches around each of the last 1-1-1-2-2-2 rows on the front piece and finish with 1 slip stitch in the 4th chain stitch at the beginning of the round = 18-20-20-24-24-24 puff stitches. Then work in the round as follows: A.14 (shows how the round starts and ends), work A.15 to end of round. Continue until you have worked 7-7-7-8-8-8 puff stitches in height on the neck. Cut and fasten the strand. |
||||||||||||||||||||||||||||||||||
Diagram explanations |
||||||||||||||||||||||||||||||||||
|
||||||||||||||||||||||||||||||||||
 |
||||||||||||||||||||||||||||||||||
 |
||||||||||||||||||||||||||||||||||
 |
||||||||||||||||||||||||||||||||||
 |
||||||||||||||||||||||||||||||||||
Have you finished this pattern?Tag your pictures with #dropspattern #inpiecessweater or submit them to the #dropsfan gallery. Do you need help with this pattern?You'll find 7 tutorial videos, a Comments/Questions area and more by visiting the pattern on garnstudio.com. © 1982-2026 DROPS Design A/S. We reserve all rights. This document, including all its sub-sections, has copyrights. Read more about what you can do with our patterns at the bottom of each pattern on our site. |
||||||||||||||||||||||||||||||||||


With over 40 years in knitting and crochet design, DROPS Design offers one of the most extensive collections of free patterns on the internet - translated to 17 languages. As of today we count 325 catalogues and 12298 patterns translated into English (UK/cm).
We work hard to bring you the best knitting and crochet have to offer, inspiration and advice as well as great quality yarns at incredible prices! Would you like to use our patterns for other than personal use? You can read what you are allowed to do in the Copyright text at the bottom of all our patterns. Happy crafting!
Post a comment to pattern DROPS 205-40
We would love to hear what you have to say about this pattern!
If you want to leave a question, please make sure you select the correct category in the form below, to speed up the answering process. Required fields are marked *.