
Popular categories
Looking for a yarn?


Comments / Questions (163)
![]() Muriel wrote:
Muriel wrote:
Bonjour ,afin de choisir la bonne taille quelle est l aisance positive pour le tricot mouton ? Merci
02.04.2026 - 13:27DROPS Design answered:
Bonjour Muriel, découvrez ici comment choisir votre taille et l'aisance souhaitée. Bon tricot!
07.04.2026 - 17:02
![]() Diane Poulin wrote:
Diane Poulin wrote:
I would like to knit this sweater if it is not too difficult
22.03.2026 - 02:16DROPS Design answered:
Dear Mrs Poulin, read thoroughly the pattern, look at the related videos / lessons if needed (see tabs nex to tab "Pattern") and should you have any question, please feel free to ask them here so that we can try to help you. Happy knitting!
23.03.2026 - 08:59
![]() Djamila wrote:
Djamila wrote:
Bonjour , J'ai bien reçu le lien pour consulter votre réponse concernant le modèle 194-2 sheep hapens, mais quand je clic dessus je ne vois aucune réponse. Si vous pouviez me renvoyez la réponse à ma question à savoir, si il est possible d'utiliser la laine merino extra fine pour le haut du pull et le reste le tricoter en lima. Je vous remercie par avance de votre réponse. Cordialement.
23.02.2026 - 16:41DROPS Design answered:
Bonjour Djamila, fausse manipe désolée, vous pouvez effectivement tricoter Lima et Merino Extra Fine car elles appartiennent toutes les 2 au même groupe, toutefois, comme elles n'ont pas la même texture, vous aurez un résultat différent. N'hésitez pas à demander conseil à votre magasin, même par mail ou téléphone, si besoin, pour les couleurs. Bon tricot!
24.02.2026 - 09:38
![]() Rita wrote:
Rita wrote:
Hallo, Ich stricke den Pullover in Grösse L. Bei der Maschenaufnahme der Ärmel heisst es: zusätzlich zu den 79 stillgelegten Maschen je 1 Masche der 10 unter dem Arm angeschlagenen Maschen auffassen... das soll dann 89 Maschen ergeben..? Irgend was verstehe ich hier wohl nicht. Danke für die Aufklärung.
12.01.2026 - 09:54DROPS Design answered:
Liebe Rita, ja ganz genau, der Ärmel wird dann über diese 89 Maschen gestrickt, hier zeigen wir, wie man einen Pullover von oben nach unten strickt, ab Bild 9 sehen Sie wie man die Aufteilung strickt; und ab Bild 18, wie man die Ärmel weiter strickt. Viel Spaß beim Stricken!
13.01.2026 - 08:46
![]() Monika wrote:
Monika wrote:
Hallo, es heißt in der Anleitung: "Die Runde beginnt in der hinteren Mitte." Dann soll man 2x A1 und dann1 x A2 stricken. Das hieße aber, dass A2 (das dicke Schaf ;-) ) auf dem Rücken des Pullovers ist?! Ist das richtig? Da der Pullover ja keine Nackenerhöhung hat, ist es ja eigentlich egal wie herum man ihn anzieht...aber ist das so gewollt mit dem dicken Schaf auf der Rückseite? Vielen Dank für das schöne Strickmuster.
06.01.2026 - 22:29DROPS Design answered:
Liebe Monika, das dicke Schaf also A.2 wird sich ca am Ende Rückenteil/Anfang Ärmel befinden. dann wird sich das 2. dicke Schaf ca am Ende Vorderteil. Viel Spaß beim Stricken!
07.01.2026 - 08:26
![]() Annie Hartvig wrote:
Annie Hartvig wrote:
Hvad skal det sorte mellem fårene forestille? Er det lavet sådan for at få tråden med rundt for så kunne man jo ha anvendt back ladder jaquard teknik for et pænere resultat
10.12.2025 - 10:58DROPS Design answered:
Hei Annie. Ja, man kunne ha brukt back ladder jaquard istedenfor det sorte mellom sauene, men i denne oppskriften er det valg å ha noen sorte masker. Disse sorte maskene kan også tenkes at det er halen til sauene. Om man googler illustrasjoner av sauer, kan man se noe tegninger med sort hale (selv om den er hvit). mvh DROPS Design
15.12.2025 - 13:21
![]() Coralie wrote:
Coralie wrote:
How do you know the dimensions of the sizes. I can't seem to see any measurements to know what size I need to make. Thank you
02.12.2025 - 12:35DROPS Design answered:
Dear Coralie, you'll find a chart with all finished measurements taken flat, from side to side at the bottom of the written pattern, below diagrams - measure a similar garment you have and like the size to find out the matching size. Read more here. Happy knitting!
02.12.2025 - 17:20
![]() Sabine wrote:
Sabine wrote:
Je n ais pas compris, pour la taille XL j augmente de 8Mailles seulement? Trabajar 1 vuelta de derecho con gris y aumentar 11-11-15-8-12-1 puntos repartidos en la vuelta = 255-255-285-330-360-375 puntos.
24.11.2025 - 13:41
![]() Fabia Sabine wrote:
Fabia Sabine wrote:
Bonjours, Dite moi si c est correct, augmentation pour la taille xl de 8.c est bizarre que les autre taille plus petite c est plus?? Tricoter 1 tour endroit en gris clair en augmentant 11-11-15-8-12-1 mailles à intervalles réguliers = 255-255-285-330-360-375 mailles. En attente d une reponse, merci Sabine
21.11.2025 - 18:38DROPS Design answered:
Bonjour Sabine, c'est exact, vous allez bien augmenter 8 mailles en taille XL pour avoir un total de 396 mailles (soit plus de mailles que pour les plus petites tailles). Bon tricot!
24.11.2025 - 07:36
![]() Maj-britt wrote:
Maj-britt wrote:
Jeg har strikket den i Lima og købt 600 gram til krop og ærmer. Nu har jeg strikke kroppen og der er 1 nøgle tilbage. Det er jo ikke nok til 2 ærmer. Tænker der må være en fejl i hvor mete men skal bruge.
20.11.2025 - 13:44
|
||||||||||||||||
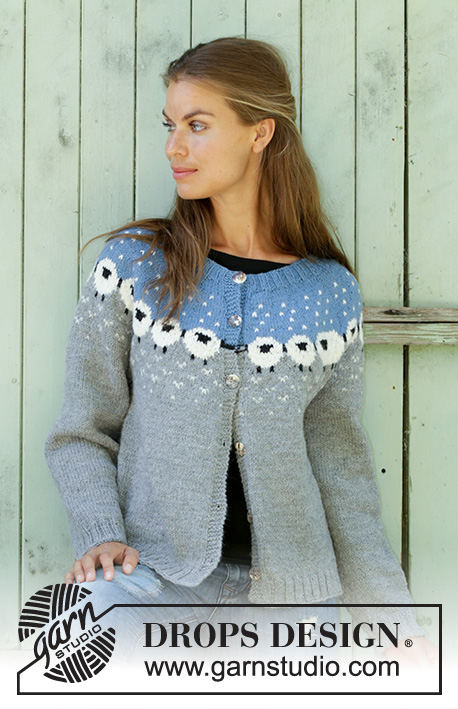
Sheep Happens!#sheephappenssweater |
||||||||||||||||
|
|
||||||||||||||||
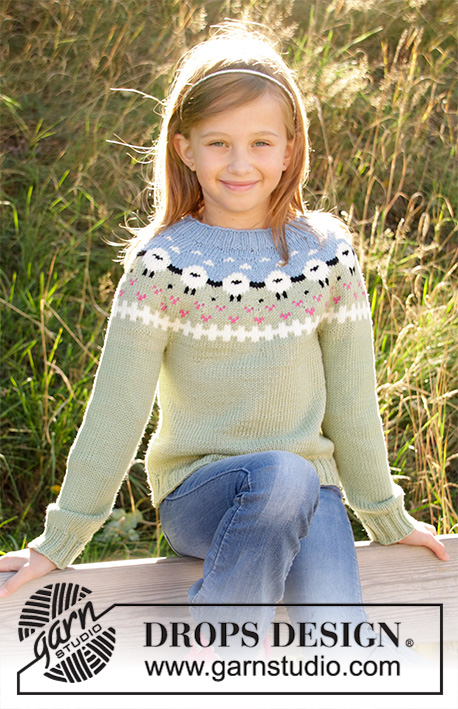
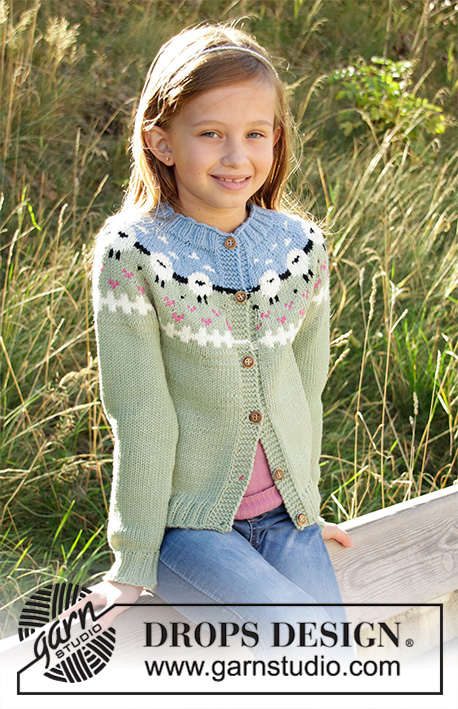
Knitted jumper with round yoke in DROPS Merino Extra Fine or Lima. The piece is worked top down in Nordic pattern with sheep S - XXXL.
DROPS 194-2 |
||||||||||||||||
|
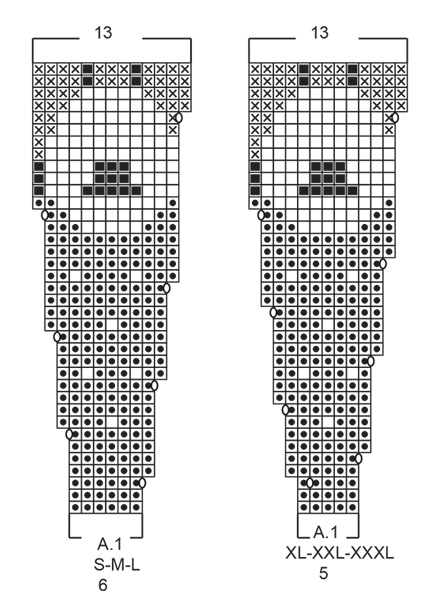
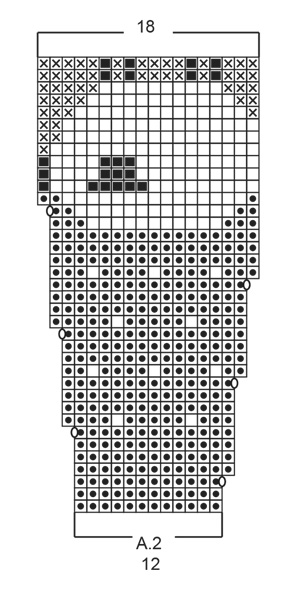
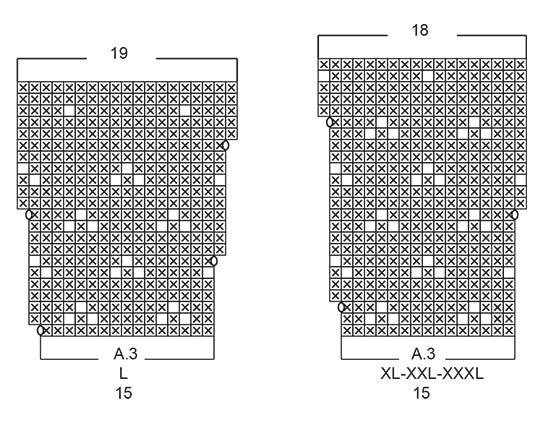
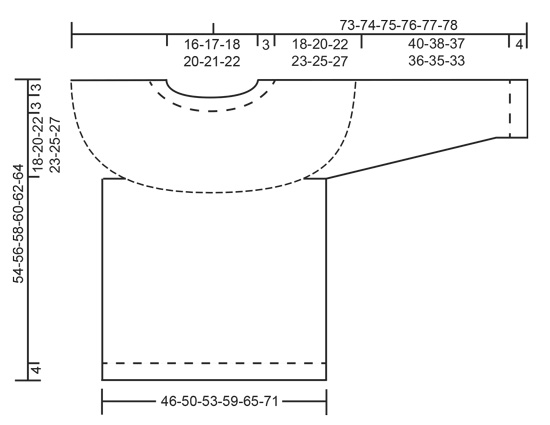
EXPLANATIONS FOR THE PATTERN: ------------------------------------------------------- PATTERN: See diagrams A.1 to A.3. Choose diagram for your size. The diagrams are worked in stocking stitch. As there are long spaces between colour changes, you should twist the strands together approx. every 7th stitch to avoid having long, loose strands at the back. INCREASE TIP (evenly spaced): To work out how to increase evenly, count the total number of stitches on the row (e.g. 90 stitches) and divide these stitches by the number of increases to be made (e.g. 31) = 2.9. In this example, make 1 yarn over after approx. each 3rd stitch. On the next row work the yarn overs twisted to avoid holes. DECREASE TIP (for sleeves): Decrease 1 stitch on each side of the marker thread as follows: Work until there are 3 stitches left before the marker thread, knit 2 together, knit 2 (the marker thread sits in the middle of these 2 stitches), slip 1 stitch as if to knit, knit 1, pass the slipped stitch over the knitted stitch (= 2 stitches decreased). ------------------------------------------------------- START THE PIECE HERE: ------------------------------------------------------- JUMPER - SHORT OVERVIEW OF THE PIECE: The yoke is worked in the round with circular needle, top down. The yoke is divided for body and sleeves and the body is continued in the round. The sleeves are worked in the round with double pointed needles. YOKE: Cast on 92-96-100-104-112-120 stitches with circular needle size 3 mm and light grey blue. Knit 1 round. Then work rib (= knit 2 / purl 2). Work rib for 3 cm. Change to circular needle size 4 mm. Knit 1 round and increase 28-24-32-30-32-34 stitches evenly spaced – read INCREASE TIP = 120-120-132-134-144-154 stitches. Then work pattern as follows (the round starts mid back): Work A.1 (= 6-6-6-5-5-5 stitches) over the first 12-12-12-10-10-10 stitches (= a total of 2 times), A.2 (= 12 stitches), A.1 over the next 42-42-48-50-55-60 stitches (= a total of 7-7-8-10-11-12 times), A.2 over the next 12 stitches, A.1 over the last 42-42-48-50-55-60 stitches (= a total of 7-7-8-10-11-12 times). REMEMBER THE KNITTING TENSION! When A.1 and A.2 have been worked 1 time in height there are 244-244-270-322-348-374 stitches on the needle. The piece measures approx. 16 cm (including the rib). Knit 1 round with light grey and increase 11-11-15-8-12-1 stitches evenly on round = 255-255-285-330-360-375 stitches. Work A.3 (= 15 stitches) over all stitches (= a total of 17-17-19-22-24-25 times in width). When A.3 has been worked 1 time in height there are 306-340-361-396-432-450 stitches on the needle. The piece is now worked with light grey to finished length. Work stocking stitch until the piece measures 21-23-25-26-28-30 cm (including the rib). Then divide the piece for body and sleeves as follows: Work 44-48-50-56-62-67 stitches stocking stitch (= half back piece), place the next 64-72-79-84-90-90 stitches on a thread for sleeve and cast on 8-8-10-10-10-14 new stitches under the sleeve, work 89-99-102-115-127-135 stitches stocking stitch (= front piece), place the next 64-72-79-84-90-90 stitches on a thread for sleeve and cast on 8-8-10-10-10-14 new stitches under the sleeve, finally work 45-49-51-57-63-68 stitches stocking stitch (= half back piece) = 194-212-223-248-272-298 stitches. BODY: Continue working in stocking stitch. When the piece measures 26-26-26-27-27-27 cm from where the body was divided from the sleeves, increase 26-32-33-32-40-42 stitches evenly on next round = 220-244-256-280-312-340 stitches. Change to circular needle size 3 mm and work rib (= knit 2 / purl 2) over all stitches (the yarn overs are worked twisted to avoid holes). Cast off with knit when the rib measures 4 cm (i.e. the piece measures a total of approx. 30-30-30-31-31-31 cm from where the body was divided from the sleeves). The jacket measures a total of 54-56-58-60-62-64 cm, measured from the shoulder. SLEEVE: Place the 64-72-79-84-90-90 stitches from the thread on the one side of the piece on double pointed needles size 4 mm and knit up 1 stitch in each of the 8-8-10-10-10-14 stitches cast on under the sleeve = 72-80-89-94-100-104 stitches. Insert 1 marker thread in the middle of the 8-8-10-10-10-14 stitches (= mid under sleeve). Work stocking stitch in the round with light grey. When the piece measures 1 cm from where the sleeve was divided from the body, decrease 2 stitches mid under sleeve – read DECREASE TIP. Decrease like this every 3-2-1½-1½-1½-1 cm a total of 11-15-18-19-22-23 times = 50-50-53-56-56-58 stitches. When the sleeve measures 40-38-37-36-35-33 cm from where the sleeve was divided from the body, increase 2-2-3-0-4-2 evenly on round = 52-52-56-56-60-60 stitches. Change to double pointed needles size 3 mm. Work rib in the round (= knit 2 / purl 2). Cast off with knit when the piece measures 44-42-41-40-39-37 cm from where the sleeve was divided from the body (approx. 4 cm rib). Work the other sleeve in the same way. |
||||||||||||||||
Diagram explanations |
||||||||||||||||
|
||||||||||||||||
 |
||||||||||||||||
 |
||||||||||||||||
 |
||||||||||||||||
 |
||||||||||||||||
 |
||||||||||||||||
Have you finished this pattern?Tag your pictures with #dropspattern #sheephappenssweater or submit them to the #dropsfan gallery. Do you need help with this pattern?You'll find 25 tutorial videos, a Comments/Questions area and more by visiting the pattern on garnstudio.com. © 1982-2026 DROPS Design A/S. We reserve all rights. This document, including all its sub-sections, has copyrights. Read more about what you can do with our patterns at the bottom of each pattern on our site. |
||||||||||||||||


With over 40 years in knitting and crochet design, DROPS Design offers one of the most extensive collections of free patterns on the internet - translated to 17 languages. As of today we count 325 catalogues and 12298 patterns translated into English (UK/cm).
We work hard to bring you the best knitting and crochet have to offer, inspiration and advice as well as great quality yarns at incredible prices! Would you like to use our patterns for other than personal use? You can read what you are allowed to do in the Copyright text at the bottom of all our patterns. Happy crafting!
Post a comment to pattern DROPS 194-2
We would love to hear what you have to say about this pattern!
If you want to leave a question, please make sure you select the correct category in the form below, to speed up the answering process. Required fields are marked *.